
Billing
Configure invoicing identity, document numbering, billing automation, service lifecycle, reminders, credit, hourly billing and currencies.
What the Billing page is for
The Billing page is where you configure every financial rule on your platform: the legal identity that appears on invoices, how documents are numbered, your tax rates, whether customers are billed with invoices or proformas, the automation that generates renewal invoices and suspends or terminates unpaid services, credit rules, hourly (pay-as-you-go) billing, and the currencies you accept. The settings here directly affect what customers are charged and when their services stop, so review them carefully before you switch automation on.
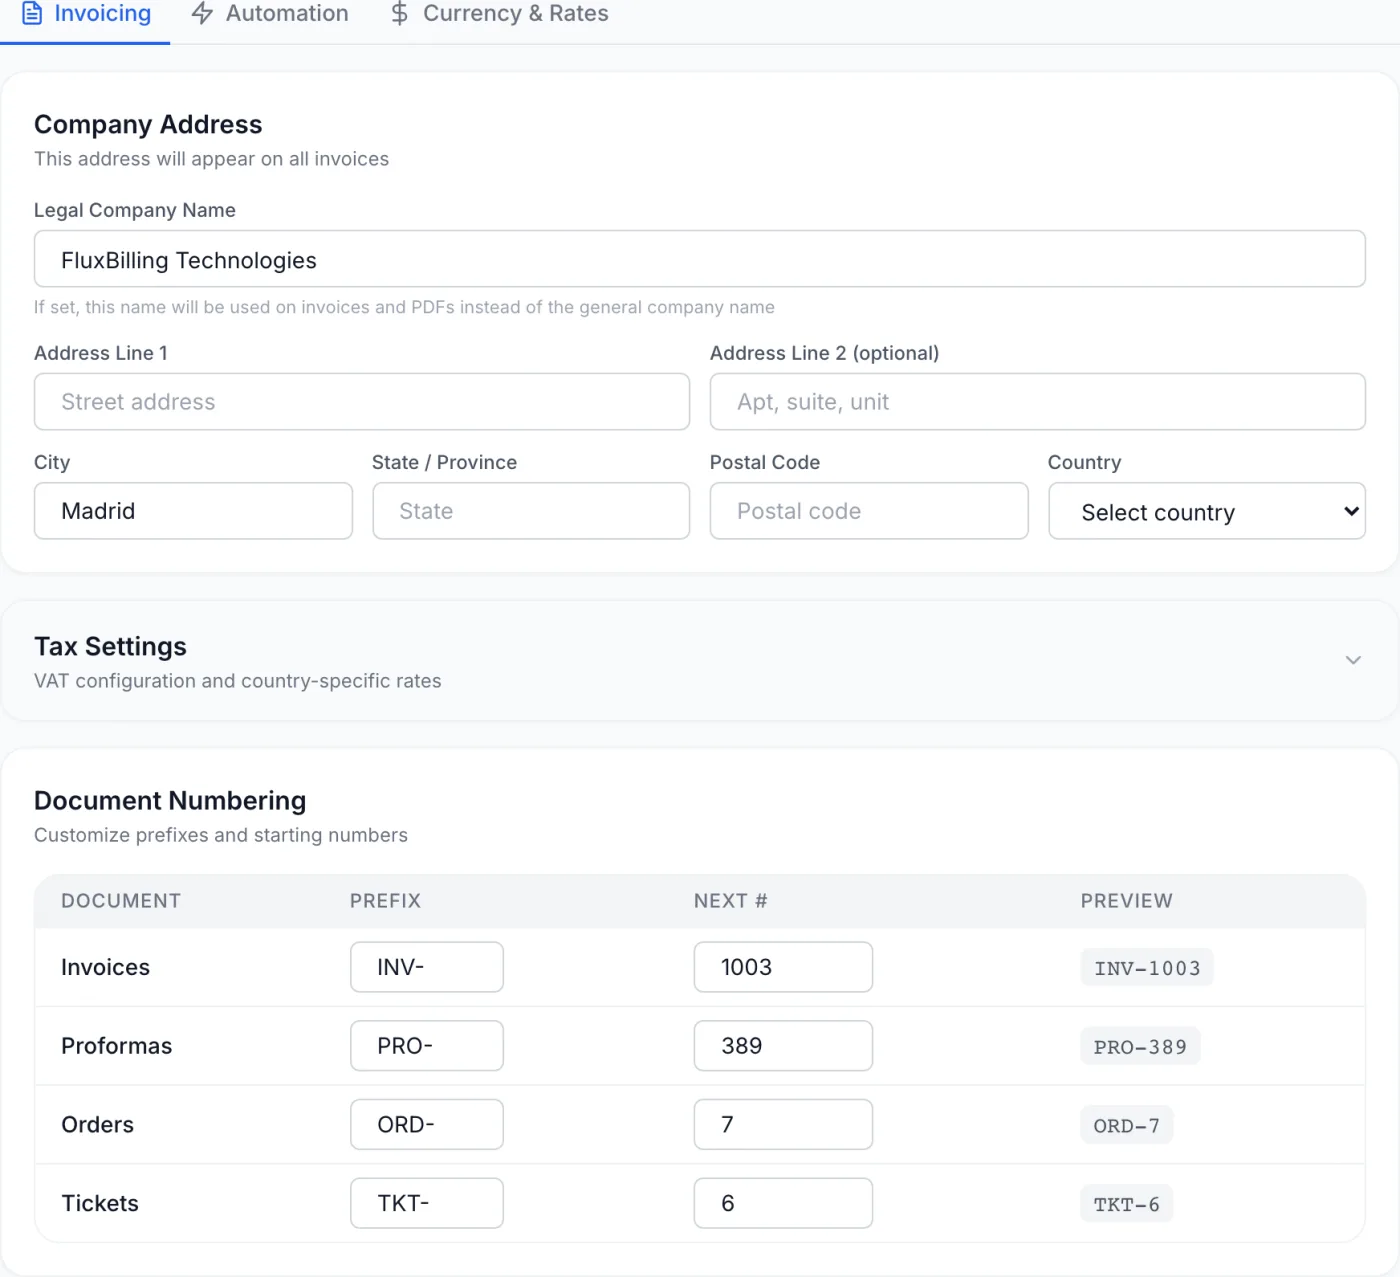
How to reach it
Open the admin panel sidebar and go to Settings. In the settings navigation, under the Financial group, select Billing. The page opens on the Invoicing tab.
The Billing page is split into three tabs shown across the top of the panel:
- Invoicing — company address, tax settings, and document numbering.
- Automation — document type, consolidated invoicing, guest payments, profile locking, service lifecycle, reminders, auto-payment, credit, and hourly billing.
- Currency & Rates — the currencies you accept and how exchange rates are sourced.
One Save button covers everything. A Save button sits at the top-right of the Settings page while you are on Billing. Clicking it stores all three Billing tabs together — you do not need to save each tab separately. The exceptions are the VAT rate table, the currency table, the exchange-rate actions and the Currency Settings sub-tab, which have their own inline buttons and apply as soon as you use them.
Invoicing tab
Company Address
This is the legal identity printed on invoices, proformas, and receipts.
| Field | What it does |
|---|---|
| Legal Company Name | The registered business name. When set, this name is used on invoices and PDFs instead of the general company name from the General settings page. |
| Address Line 1 | Street address. |
| Address Line 2 (optional) | Apartment, suite, or unit. |
| City | City or town. |
| State / Province | Region, state or county. |
| Postal Code | ZIP or postal code. |
| Country | Chosen from a dropdown of countries. |
Note: the country you set here also decides which invoicing rules the platform applies to you — it is what the consolidated-invoicing checks below look at. Set it before you turn that feature on.
Tax Settings
Tax Settings is a collapsible section and it is collapsed when the page loads — click its header to expand it. Inside:
- Enable VAT — a toggle that applies VAT to invoices.
- VAT Number — your company tax registration number, printed on documents (for example
RO12345678). - Accounting series (SAGA) — an optional series used only by the SAGA accounting export, for example
XZONE. Leave it blank to export the invoice number exactly as issued. Your customer-facing numbering is not affected. See Invoice Export. - VAT Rates by Country — a table of per-country rates. Click Add Rate and fill in Country, Country Name and Rate %. The table columns are Country, Code, Rate, Status and Actions. Click a row's status badge to switch it between Active and Inactive; use the pencil to edit the name and rate inline, and the trash icon to delete the row (you are asked to confirm).
Tip: the VAT rate table starts empty. If your invoices are all coming out at 0% VAT, this table is the first place to look.
VAT & Tax explains how the rate for a given document is chosen from this table, what the per-client exemption does, and which lines are taxable.
Document Numbering
This table controls the prefix and next sequence number for each document type. There are four rows — Invoices, Proformas, Orders, and Tickets — with these columns:
| Column | Meaning |
|---|---|
| Prefix | The text in front of the number (for example INV-, PRO-, ORD-, TKT-). |
| Next # | The number that will be assigned to the next document of that type. |
| Preview | A read-only preview combining the prefix and next number, so you can see exactly how the next identifier will look. |
Warning: only raise the Next # value. Lowering it below a number you have already issued produces duplicate document numbers.
Automation tab
This tab drives the unattended billing lifecycle. The sections below appear in the order they do on screen. Remember to click the top Save button when you are done.
Automation
| Toggle | Effect when on |
|---|---|
| Auto Provisioning | Services are provisioned automatically once the order is paid. |
| Auto Suspension | Overdue services are suspended automatically after the suspension grace period. |
| Auto Termination | Suspended services are terminated automatically after the termination grace period. |
| Continuous Invoice Generation | An invoice is generated for each cycle even if the previous one is still unpaid. |
Billing Document Type
Default Document Type decides how billing documents are generated. It sits directly above consolidated invoicing because that feature depends on it.
- Invoice (Direct) — orders and renewals create invoices immediately. The standard workflow for most hosting businesses.
- Proforma First — orders and renewals create a proforma first; when the customer pays, the proforma becomes a final invoice. Suits businesses that need customer approval before billing.
An explanation panel below the dropdown describes whichever workflow you have selected. Switching away from Proforma First also switches consolidated monthly invoicing off in the same edit.
Consolidated Monthly Invoicing
The Consolidated Monthly Invoicing switch changes when the fiscal document is issued, not when money is collected. Normally every payment produces its own invoice. With this on, customers pay on proformas during the month, and at the start of the following month each customer receives one invoice covering everything they settled — far fewer fiscal documents for your accountant to post.
Cash timing does not change. A customer still pays the same day, still gets their service provisioned the same moment, and the proforma is still their receipt until the monthly invoice arrives.
The fields below are the switches; Consolidated Monthly Invoicing is the working guide to living with them — the month day by day, what you may and may not do to a proforma that is still collecting, and how to turn it off safely.
Turning it on
- Set Default Document Type to Proforma First and save. The consolidation toggle is inert until you do — in Invoice mode the payable document is already the fiscal one, so there is nothing to defer. While the document type is anything else, an amber note says so and the switch cannot be moved.
- Turn Consolidated Monthly Invoicing on. Further options appear beneath it.
- Decide what folds onto the monthly document (see the two switches below).
- Set the Issue day.
- Click Save.
What is included
Two switches, both on by default, decide which chargeable events wait for the monthly document:
| Switch | What it does |
|---|---|
| Include credit top-ups | Add-funds payments join the same monthly invoice instead of producing one invoice per top-up. Customers still receive their credit immediately. |
| Include new orders and upgrades | First orders and upgrades join the same monthly invoice instead of producing one invoice per purchase. Provisioning and the upgrade itself still run the moment the proforma is paid. Reseller (wholesale) orders are included. |
Service renewals always fold onto the monthly document while consolidation is on — they have no separate switch. Turn Include new orders and upgrades off if a business customer insists on a fiscal invoice at the moment of purchase; renewals and top-ups will still consolidate.
Issue day
Issue day is the day of the following month on which the closing invoice is issued. It accepts 1 to 10 and defaults to 5. The ceiling is a legal one, not a preference: Romania requires the invoice for a collected advance by the 15th of the following month, and the EU-wide rule for summary invoices tightens to day 10 from July 2030, so 10 is the future-proof maximum. If the close-out is missed on the configured day (for example because the platform was restarting), it runs on the next day instead rather than skipping the month.
Which country's deadline applies is your own place of establishment, not your customer's. A Romanian seller follows Romanian rules for its French and German customers too. A following-month issue day works for Romania, Germany, Italy, Spain (business customers), Poland, Ireland and Belgium. It is not valid if your own company is established in France, where a summary invoice must be issued by the end of the month it covers. The panel prints this caveat next to the field.
Two country notices can appear once the switch is on:
- A red inactive notice, when your company country's invoicing rules cannot be met by any issue day. The feature refuses to run rather than issuing every invoice late, and the rule that blocks it is quoted underneath.
- An amber unverified notice, when your company country has not been checked against this billing model. It is not blocked, but roughly half of the non-EU countries reviewed do not permit a monthly consolidated invoice over prepaid amounts — confirm with your accountant first.
How the monthly document is grouped
One invoice is issued per customer per month — except that documents charging different VAT rates or different currencies stay on separate invoices, because a single document cannot carry two. VAT-free top-ups are listed as non-taxable lines on the same monthly invoice as the customer's other purchases rather than getting a document of their own.
Refunds
Refunds work in both directions. A refunded top-up has its credit reversed whether the refund lands before or after the monthly invoice, and a payment refunded before month end cancels its proforma so returned money is never invoiced.
Preview and manual close-out
Two buttons sit at the bottom of the section:
- Preview this month — groups the same settled proformas the real job would and reports how many invoices would be issued and how many proformas they cover, without writing anything. Use it before your first close-out.
- Close previous month now — runs the close-out immediately and issues the invoices. A confirmation tells you how many invoices were issued and how many proformas they covered.
Warning: a proforma that has been paid but is still waiting for its monthly invoice is the only record of that money. While it is waiting you cannot change its status by hand or delete it — the panel refuses and explains why. To reopen it, delete its payment; to cancel it, refund the payment.
Guest Payments
The Guest Invoice Payment toggle lets customers generate a shareable link for an invoice. Anyone with the link can view the invoice and pay it with any enabled payment gateway, without logging in. An information panel appears when the toggle is on. Credit balance cannot be used in guest checkout.
Client Profile Lock
Choose which profile fields customers may not edit themselves — First Name, Last Name, Company, Phone, Address, City, State / Province, Postal Code, Country and VAT Number. Tick a field to lock it; locked fields turn red. Locked fields become read-only in the client portal and can only be changed by an administrator. Use Lock all or Unlock all to set every field at once.
Service Lifecycle
Three numeric fields define the timeline from due date to termination:
| Setting | Counted from | Purpose |
|---|---|---|
| Suspension Grace (days) | After the due date | Days to wait after an unpaid invoice's due date before suspending the service. Set to 0 to suspend immediately. |
| Termination Grace (days) | After suspension | Days to wait after suspension before terminating permanently. Set to 0 to terminate as soon as the service is suspended. |
| Renewal Invoice (days) | Before the due date | How far ahead the renewal invoice is generated for the customer. |
Tip: below these fields a blue panel shows a worked example for a service due on March 3, recalculated live from your three numbers — when the renewal invoice is generated, when suspension happens, and when termination fires. It is the quickest way to sanity-check your policy before enabling automation.
Invoice Reminders
Three independent reminders — First Reminder, Second Reminder and Third Reminder — each with an enable toggle and a number of days counted from when the invoice was created. The day field stays disabled until its reminder is enabled.
Abandoned Checkout Recovery
Emails a customer once if they start a checkout but never finish paying. It fires faster than invoice reminders, while intent is still warm.
| Field | What it controls |
|---|---|
| Send recovery emails | The main switch. One email per abandoned order. |
| Send after (hrs) | Hours since the order started before the email goes out. |
| Stop after (hrs) | Skip orders older than this. |
| Reached gateway only | Skip orders where the customer never reached the payment step. |
Billing Automation
The settings in this section are the timings; the order in which the nightly pass uses them — raise the renewal document, charge the saved method, chase, suspend, terminate — is set out in Billing Automation.
Auto-Payment for Renewals
When Enable Auto-Payment is on, saved payment methods are charged automatically for renewal invoices. Three fields tune it and are greyed out until the toggle is on:
| Field | Range | Meaning |
|---|---|---|
| Days Before Due | 1–14 | When to attempt the charge, relative to the due date. |
| Max Retries | 0–5 | How many times to retry after a failed charge. |
| Retry Interval (hours) | 1–72 | Wait between retry attempts. |
Two further toggles sit underneath:
- Require saving the payment method — every checkout on a gateway that supports it stores the customer's payment method for future payments. Customers see a notice rather than a choice. Leave it off to let them decide with a tick-box.
- Auto-enroll customers when they save a card — when a customer saves a payment method, automatic payment is switched on for them and that card is used for future invoices. Leave it off to require explicit opt-in.
Payment method health
Below the auto-payment controls, a Payment method health panel lists saved payment methods that are failing, so you spot dying cards before a customer misses a renewal. Each row shows the customer's email, the method's label, the failure reason reported by the gateway, how many consecutive failures it has had, a deactivated marker when the platform has stopped using it, and when it last failed. A refresh icon reloads the list. When nothing is failing it reads No failing saved payment methods.
Automatic Credit Top-up (prepaid / hourly)
Enable automatic credit top-up charges a customer's saved payment method when their credit balance drops below a threshold, bringing it back up to a target. It only applies to customers who are enrolled in automatic payment with an active saved method, and it issues a credit-deposit invoice in their account currency.
- Top up when below — the trigger balance.
- Top up to — the target balance. Must be above the threshold.
- Cooldown (hours) — minimum time between top-ups for the same customer.
Credit Settings
Deposit rules for account credit. Amounts use your base currency symbol. For what the balance is, how it is funded and every way it can be spent, see Credit Balance.
| Setting | What it does | Default |
|---|---|---|
| Min Deposit | Smallest amount a customer can add to their credit balance. | 5.00 |
| Max Deposit | Largest single top-up allowed. | 1000.00 |
| Hourly Min Balance | Minimum credit required to keep hourly services running. | 10.00 |
| Apply VAT to Credit Deposits | Calculates VAT on add-funds invoices based on the customer's country. | — |
Automatic Credit Application
This is the part that decides when a customer's credit balance is spent for them.
| Setting | What it does |
|---|---|
| Auto-Apply Credit to Renewals | Automatically uses the credit balance to pay renewal invoices and proformas. |
| Allow User Override | Lets customers set their own preference in their profile. Only editable while Auto-Apply is on. |
Credit is not swept for one-off purchases. New orders, upgrades and add-on purchases are never paid from the credit balance automatically — the customer has to pick Use Credit Balance at checkout. Hourly billing is the other exception in the opposite direction: it always draws on the balance regardless of this setting. The reasoning is that a customer tops up for the servers they are already running, so their balance should not be silently consumed by whatever open order happens to exist.
An explanation panel under the two toggles restates the outcome of whatever combination you have set, including whether partial credit payments apply and whether customers can change it themselves.
Hourly Billing
Hourly (pay-as-you-go) billing draws down a customer's credit balance for as long as a service runs. Enable Hourly Billing is the main switch for hourly deduction and lifecycle management; the fields below are greyed out until it is on. Hourly Billing explains what these settings do to a live service and how a customer gets one back after it suspends.
| Setting | What it does | Default |
|---|---|---|
| Suspension Grace (hours) | How long a service keeps running after credit runs out before it is suspended. | 1 |
| Termination Grace (hours) | How long a suspended hourly service waits before termination. | 24 |
| Low Credit Warnings | Emails customers when their credit only covers a limited number of hours. When on, a Warning Threshold (hours) field appears. | — |
| Monthly Summary Invoices | Generates a summary invoice on the 1st of each month covering all hourly charges, with credit already applied. | — |
A Game servers sub-section adds two more:
- Bill stopped game servers — keeps charging an hourly game server while the customer has it stopped. With this off, a stopped server is not metered, is never suspended for low credit, and gets no low-credit warning; the world stays on disk.
- Monthly price cap — never charge an hourly service more than its product's monthly price within a calendar month. Once the cap is reached the rest of the month is free and the service cannot be suspended for running out of credit.
These two are the only game controls on this page. Everything else about how the game module behaves — what a customer may do to their server, where mods may come from, and the storefront seeds — is set in Game Settings.
Finally, Generate previous month now lets you run the monthly summary generator by hand. Click Run now.
Tip: the manual generator is safe to re-run. If a summary already exists for that period it tells you nothing was created rather than issuing a second invoice, and if there were no hourly charges it says so.
Currency & Rates tab
This tab has three sub-tabs: Currencies, Exchange Rates, and Settings. It opens on Currencies.
Currencies
A table lists every currency with columns for Code, Name, Format (a worked sample of how an amount will print), Users (how many customers are assigned to it), Status and Actions. The base currency is marked with a star and is always enabled.
- Add Currency — opens a small form for Code, Name and Symbol. All three are required.
- Enabled / Disabled badge — click to switch a currency on or off. A currency cannot be disabled while customers are assigned to it, and the base currency cannot be disabled.
- Star — makes an enabled currency the new base currency.
- Pencil / Trash — rename or delete a currency. Deleting asks for confirmation and the base currency cannot be deleted.
Note: enabling a second currency does not force converted prices on you. On each product's pricing tab you can enter a fixed price sheet per enabled currency — monthly, quarterly, semi-annual, annual and setup fee — so you can sell at a round figure in each currency instead of one that moves with the exchange rate. A currency you leave blank stays converted, and hourly prices are always converted from the base price. See Products.
Exchange Rates
Rates are shown as cards from your base currency to each enabled currency, with the value, when it was last updated, and its source.
- Update Now — fetches fresh rates from your chosen provider and reports how many were refreshed.
- History — opens a window listing recorded rate changes over the last 30 days, with Date, From, To, Rate and Source.
- The pencil on a card sets a manual rate override, badged Manual. The X clears the override and returns to the provider's rate.
Settings (rate provider)
| Setting | Options / purpose |
|---|---|
| Auto-Update Exchange Rates | Fetches rates from the provider on a schedule. The fields below are disabled when it is off. |
| Exchange Rate Provider | ECB (free, EUR base), ExchangeRate-API, Open Exchange Rates, or Fixer.io. |
| Update Interval | Hourly, every 4 hours, every 12 hours, or daily. |
| Rate Margin (%) | A percentage added on top of the market rate. |
| API Key | Shown only for providers that require one. Masked, with an eye button to reveal it. |
Click the inline Save button in this sub-tab to store the provider settings.
Tips and gotchas
- Enable lifecycle and reminder automation only after checking the on-screen example timeline — wrong grace days can suspend or terminate paying customers early.
- Set your base currency before adding others; deposit limits and several thresholds are expressed in the base currency symbol.
- Tax Settings is collapsed when the page loads — remember to expand it to reach the VAT controls and the accounting series.
- Consolidated monthly invoicing only exists on top of proformas. If the switch will not move, check Default Document Type first.
- Run Preview this month before your first close-out so you know exactly how many documents the change will produce.
- Changes on the Invoicing and Automation tabs are only stored when you click the top Save button; the VAT table, the currency table and the exchange-rate actions apply immediately.
Related articles
Invoices · Proforma Details · Billing Automation · VAT & Tax · Consolidated Monthly Invoicing · Credit Balance · Hourly Billing · Invoice Export · Payment Gateways · Products