
Local Agents
Set up Local Agents to relay power, SNMP, PXE boot, OS install, IPMI, and Redfish commands to dedicated servers on private management networks.
What a Local Agent is
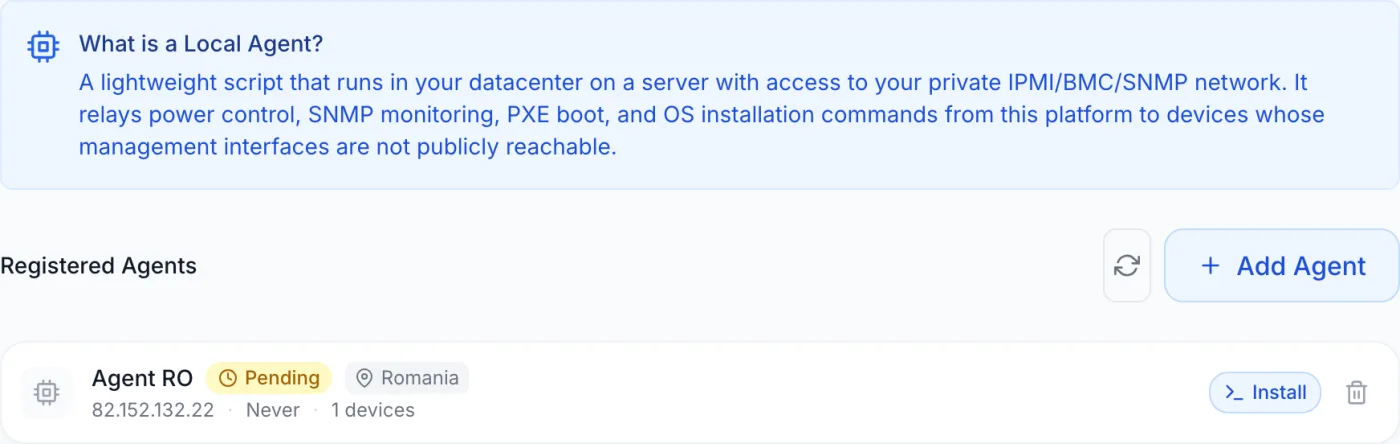
A Local Agent is a lightweight service that runs on a server inside your datacenter and acts as a bridge between FluxBilling and your private management network. It relays automation commands — power control, SNMP monitoring, network boot, operating-system installation, IPMI and Redfish requests — to devices whose management interfaces (BMC/IPMI, switches, PDUs) live on a private network and are not reachable from the public internet. Without an agent in that network, automation cannot talk to the hardware behind it.
How to reach this page
Open Settings from the admin sidebar, then in the settings navigation find the Infrastructure group and click Local Agents. The page opens with a short explanation banner (“What is a Local Agent?”) at the top and a Registered Agents list below it, with a refresh icon and an Add Agent button on the right of the list header.
Note: Local Agents only appears when the Inventory module is enabled for your company. If the Infrastructure group does not show Bare Metal and Local Agents, that module is switched off.
Registering a new agent
Each agent is installed onto a server you already control inside the target network. FluxBilling connects to that server over SSH and installs the agent for you — there is no command to copy and run by hand.
- Click Add Agent. The Register Agent box opens.
- Give the agent a Name — a label you will recognise, such as the site it serves.
- Under Locations, tick one or more locations this agent will serve. At least one is required; only active locations are listed. Devices belonging to those locations become available for the agent to manage.
- Enter the SSH Host — the address of the server inside the network where the agent will be installed. Optionally adjust User (defaults to
root) and Port (defaults to22). - Choose an Authentication method: Password (enter the SSH password) or SSH Key (paste a private key).
- Click Register Agent. The button stays disabled until Name, SSH Host and at least one location are set.
The box also carries a note headed Remote console — zero config: once the agent is online, an Open Console button appears next to any dedicated server it manages, and the agent bridges to that machine's serial-over-LAN console. No DNS entries, public ports or tunnels are needed.
Tip: The host you point the agent at must be able to reach the private management interfaces of your devices — for example a small utility machine on the same network as your BMCs and switches. The installer needs a 64-bit x86 or ARM host.
Add Agent fields
| Field | What it does |
|---|---|
| Name (required) | A label for the agent shown throughout the panel. |
| Locations (required) | One or more locations the agent serves; their devices become assignable to it. |
| SSH Host (required) | Address of the in-network server where the agent will be installed. |
| User | Login user for the SSH connection. Defaults to root. |
| Port | SSH port. Defaults to 22. |
| Authentication | Password or SSH Key. Choosing SSH Key swaps the password box for a field to paste a private key. |
Installing the agent
As soon as the agent record is created, the installation panel opens and the install starts by itself over the SSH connection you supplied, streaming progress back into the panel. You do not have to press anything.
- A progress bar and a step list track the run: connecting to the host, detecting the operating system and processor architecture, installing the management tools it needs, installing its runtime, deploying the agent, writing its configuration, and registering it as a service that restarts on boot. Each finished step is listed with a green check.
- When the agent is installed and reports in, the panel shows Installation complete and confirms that the agent will now relay IPMI, SNMP and provisioning commands for devices at this location. Click Done to close it.
- If a step fails, the failing line turns red and the error is shown underneath.
Open the panel again at any time to re-run it. From the list, agents that are Pending or in an Error state show an Install button on their row; from an agent's detail view, the Reinstall button runs the same flow. When you open it this way the install does not start on its own, and two extra controls are available:
- Test SSH — confirms FluxBilling can reach the host and log in before you commit to an install. On success it reports SSH connected with a short description of the machine; on failure it explains what went wrong. The panel prompts you to test first.
- Hypervisor (KVM/libvirt) — a checkbox that also installs the virtualisation stack on the node. Tick it only for a machine that will host a VPS cluster; the same install without it is the plain bare-metal one. A hypervisor install deliberately skips the IPMI, SNMP, graphical-console and network-boot tooling, so it runs through fewer steps. The rest of that path — what the panel checks before it accepts the machine, and how to register it — is in Adding a Hypervisor Node.
Then click Install to begin.
Agent status
Every agent row carries a colour-coded status badge so you can see at a glance whether it is healthy:
| Status | Meaning |
|---|---|
| Online | The agent is connected and sending regular heartbeats — ready to relay commands. |
| Pending | Registered but not yet connected; waiting for installation to finish or for its first heartbeat. |
| Installing | Installation is in progress. |
| Offline | The agent was online before but has stopped reporting in. |
| Error | Installation or operation failed. The message is shown on the row's detail view so you can act on it. |
Any successful heartbeat from an agent that is pending, installing, offline or in error puts it back to Online by itself.
Alongside the status, each row shows the SSH host, how long ago the last heartbeat arrived, the number of devices the agent manages and — when work is underway — a count of active jobs. A Default badge and a location pill also appear where applicable; an agent serving more than one location shows a count instead of a name.
Working with an agent
Click any agent in the list to open its detail view. A Back to agents link returns you to the list, a Reinstall button re-runs the installer, and a refresh control re-reads the latest state. Any standing error message is shown in full above the tabs.
Info tab
| Field | What it shows |
|---|---|
| Status | Current connection status badge. |
| Location | The location the agent serves. |
| Version | The agent version currently running on the host. |
| Last Heartbeat | How long ago the agent last reported in. |
| Capabilities | The management protocols the agent reported it can use (see below). |
| Installed | The date the agent was installed. |
| Default Agent | A toggle: new devices added at this location are auto-assigned to this agent. |
When an agent connects it reports the protocols it supports. These appear as Capabilities badges:
- IPMI — out-of-band power and sensor control on server BMCs.
- SNMP — polling switches, PDUs and other network gear.
- Redfish — the newer BMC management interface.
- HTTP Server — serving boot and installation files locally.
- SSH — shell access to managed hosts.
- DHCP — address assignment during network boot.
- Serial — serial-over-LAN console bridging.
Devices tab
The Devices tab lists the hardware at the agent's locations and lets you control which devices it handles; the tab label carries the count. Each device shows its name and management address. Use the inline Assign link to make this agent responsible for a device, or Unassign to remove it — a device already handled by this agent is marked Assigned. A device handled by another agent shows that agent's name instead of a link. An Assign all unassigned shortcut appears above the list whenever there is at least one unassigned device.
Note: Each device is managed by exactly one agent. If the location has no hardware yet, the tab says so and points you at adding servers or switches to racks there first.
Jobs tab
The Jobs tab is an activity log of the commands the agent has carried out — provisioning, reinstalls, power actions and power-status reads, rescue and unrescue, health checks, console access, network configuration, IPMI commands, Redfish requests, file serving, DHCP configuration and SNMP walks, gets, sets and polls. Each entry shows the job type, a status badge (Queued, Claimed, In Progress, Completed, Failed, Timeout or Cancelled), the affected device and its management address, a short detail (such as the power action, the requested value or the boot image), how long the job took and when it was created. Failed jobs display their error message. The twenty most recent jobs are shown, newest first.
Installation Log tab
Once install details exist, an Installation Log tab appears listing each completed install step. It is useful for confirming a clean install or reviewing what happened during setup.
Keeping agents up to date
You do not update agents by hand. Every agent checks in regularly, and each check-in tells it which version the platform expects. If the agent is behind, it downloads the new version, replaces itself and restarts — typically within a minute of the platform being updated.
- The only visible sign is the Version row on the Info tab changing on its own, and possibly a brief flip to Offline and back to Online while the service restarts.
- If the agent is in the middle of virtual-machine or game-server work when a new version appears, it finishes that work first and stops taking on new work of that kind until it has updated, so a running machine is never interrupted mid-operation. That work is queued and reported separately — see Jobs.
- Updates are not optional and there is no switch to turn them off — a fix has to reach every agent.
- If the role recorded for an agent here and the role the machine actually runs disagree, updates for that one agent are held and the mismatch is shown as its error message. Reinstall it with the right role and updates resume by themselves.
Use Reinstall only to repair a host, change its role, or bring back an agent that was removed — not to pick up a new version.
Removing an agent
To remove an agent, click the trash icon on its row and confirm. The dialog warns that this also unlinks all associated devices. Removal uninstalls the agent from the host and stops its service. Make sure another agent covers those devices first, or their out-of-band automation will stop working.
Tips and gotchas
- Test SSH before reinstalling. It catches credential and reachability problems before the install starts.
- One agent can be a single point of failure for a site. If power-cycle uptime matters, deploy more than one agent per site so device control survives one host going down.
- Mark a default agent per location. With Default Agent on, any new device added at that location is assigned to this agent automatically.
- Watch the heartbeat. An agent that slips from Online to Offline means its host or network path is down — automation for its devices stalls until it returns.
- Tick the hypervisor option only for VPS hosts. A machine that will run a VPS cluster needs it; a machine that only reaches BMCs and switches does not. Once the machine is up, it is registered and managed from Clusters, and the same machine can carry customers’ game containers as well — see Game Nodes.
Related
Bare Metal, Locations, Inventory, Monitoring, Adding a Hypervisor Node, VPS Hosting Overview, VPS Panel Migration.