
Switch Inventory
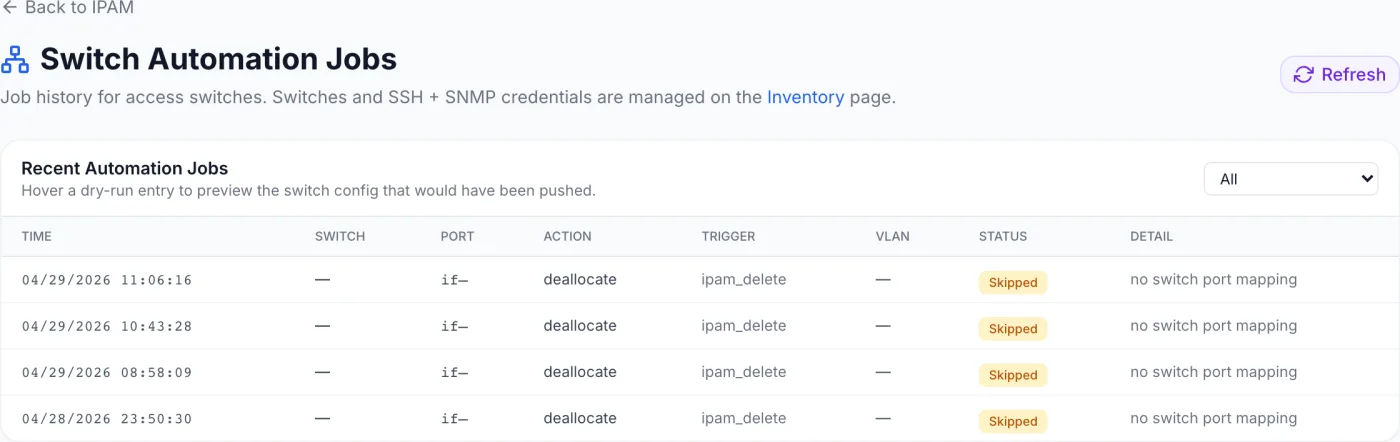
Switch Automation Jobs is the read-only history of access-switch operations, with status badges and a hover preview of the exact config the engine would push.
What the Switch Automation Jobs page is for
The Switch Automation Jobs page is a read-only history of every access-switch operation the platform attempted while allocating, deploying, or releasing IP addresses. It records what was attempted on each switch port — not what is currently configured — so you can confirm that a VLAN or routed-address change actually reached the device, or work out why it did not.
The switches themselves, with their credentials and their port mapping, live on the Inventory page. The subtitle of this page says so: Job history for access switches. Switches and SSH + SNMP credentials are managed on the Inventory page.
How to reach this page
Open IPAM from the sidebar, then click the Switches button in the toolbar at the top right. A Back to IPAM link at the top left of this page returns you to the address manager.
Note: the page is reached through IPAM, so it is available whenever the IPAM module is enabled for your company. If you do not run physical switches, or you have never turned switch automation on, the table simply reads No jobs yet.
Reading the job history
The page shows a single card titled Recent Automation Jobs with the help text Hover a dry-run entry to preview the switch config that would have been pushed. Each row is one operation the platform performed, or chose to skip, against one switch port. The card holds the 100 most recent jobs.
Table columns
| Column | What it shows |
|---|---|
| Time | Date and time the job ran, down to the second. |
| Switch | The name of the access switch the job targeted, or a dash if none was resolved. |
| Port | The port the change applied to — the port name, or an interface index (shown as if<number>) when no name is known. |
| Action | The operation requested, such as setting an access VLAN on a port, enabling or disabling a port, or assigning and removing a routed address on a port. |
| Trigger | What caused the job — for example an address allocation, an address release, or a deploy event. |
| VLAN | The VLAN ID involved, or a dash when the action is not VLAN-related. |
| Status | A coloured badge: OK (green) for success, Failed (red), or Skipped (grey). A dash appears when no status was recorded. |
| Detail | A short reason or error message — for example no switch port mapping. Long text is truncated; hover the cell to read all of it. |
Filtering and refreshing
- Filter by status. Use the dropdown in the top-right of the card. The choices are All (default), Success, Failed, and Skipped / Dry-run. Choosing one reloads the table immediately.
- Investigate a problem. Set the filter to Failed to see only operations that did not apply, then read the Detail column for each.
- Refresh. Click Refresh at the top right of the page to reload the list at any time; the icon spins while it loads.
Previewing the exact switch changes
Rows that carry a planned change are interactive. Hover one and the cursor becomes a help pointer while a dark popover appears, headed Exact transport-level ops the driver would send, listing precisely what would go to the switch. This is the heart of the page: it lets you verify what a change means before you ever enable live pushes.
The popover header also names the driver used for that switch, and the body lists each operation in order with its own label. Depending on the switch, an operation is shown as one of:
- ssh — the literal command-line configuration lines.
- eapi — the command set for switches that accept an API command list.
- snmp — the individual set operations, each with its object identifier, type, and value.
- netconf — the configuration sent as XML.
- skipped or error — a note explaining that no operation was needed, or that the preview could not be produced.
When a switch's driver offers no preview of its own, the page falls back to a normalised, readable configuration summary and labels the entry fallback with the note driver did not provide a transport-level preview, so you always see what the change means.
Note: the preview is informational. Hovering never sends anything to a switch — it replays what the platform planned at the time the job was recorded.
Understanding Skipped jobs
A Skipped status with the detail no switch port mapping is the most common entry, and it is not an error. It means the addressing step completed normally, but the subnet or address involved was not tied to a physical switch port, so there was nothing to push and no switch was touched.
To turn skipped jobs into real changes, the switch has to be reachable and the server has to be cabled to a known port. Both are recorded on the switch's record in Inventory:
- A management IP the platform can reach, and working SNMP settings — version, and either a community string or the version 3 user and protocols.
- A Switch Automation Driver. Leave it on Default (Generic Snmp) or pick the driver that matches your switch's operating system. Some drivers add their own fields, such as an optional privileged-mode password or an optional management-API address that the driver falls back from to the command line.
- An SSH Username and SSH Port for the drivers that configure over the command line, plus the stored password.
- A discovered port list. Use Discover Ports on the switch record to read the ports over SNMP, then use the connect action on a port to record which server or blade is cabled to it. That mapping is what turns a skipped job into a pushed one.
Turning automation on
Whether the platform only logs intended changes or actually pushes them is a company-wide setting, not something you change on this page. Open Settings, stay on the General tab, and scroll to the Features section. Make sure the IPAM feature is on; the addressing mode and the switch-automation controls appear nested beneath it, under a heading reading Allocate on Switch via SNMP. That control offers three modes:
| Mode | Behaviour |
|---|---|
| Off | No switch config pushed. This is the starting value for every company. |
| Dry-run | Log intended changes without touching any device. These are the rows you can hover to preview. |
| On | Push VLAN / L3 config to switch on IPAM + deploy events. Choosing this asks you to confirm, because it changes live switch configuration on every allocation. |
Warning: the confirmation reads Turning this on will push VLAN / L3 config to access switches on every IPAM allocation. Verify switch credentials and port mappings first. Start in Dry-run, confirm on this page that the previewed operations match your network's conventions, and only then switch to On.
Note: the three modes are only selectable while addressing is set to Automatic just above them. In Manual mode they grey out with the label (requires Automatic IPAM mode) and a line reading IPAM is in Manual mode — no switch config is pushed. The selected mode takes effect when Automatic IPAM is enabled.
Practical tips
- Use the hover preview during the Dry-run phase to validate the generated VLAN and routed-address commands before enabling live pushes.
- If a job shows Failed, read its Detail message first — most failures trace back to credentials or reachability on the switch's record in Inventory.
- This is a history view. You cannot edit, retry, or re-run a job from here. Make the corrective change on the address in IPAM or on the switch in Inventory, which produces fresh jobs you can review here.
- Releasing a customer's addressing also generates jobs: the platform removes the VLAN or routed address from the port after the space returns to the pool.