
Placing an Order
Browse service categories, pick a plan and billing cycle, configure options and add-ons, apply a discount code, and pay at checkout.
What ordering does
The order pages let you browse the services your provider offers, pick a plan, configure it (location, operating system, add-ons and more), and pay. You can buy a single service in one go or fill a cart with several items and check out together.
How to reach the order page
There is no permanent Order link in the sidebar (which lists Dashboard, My Services, Billing and Support Tickets). Open the order page from the Order New Service button, which appears in two places:
- On the Dashboard, in the top-right corner (and on the No services yet card if you have none).
- On the My Services page, in the top-right corner.
You can also arrive from a product link your provider publishes on their website or in an email. Those links drop you straight onto the right configuration page with the product already selected.
Once you add an item to your cart, a cart icon with a count badge appears in the top header bar. Select it any time to jump to checkout. The icon is hidden while the cart is empty.
Note: You do not have to be signed in to browse and configure. You only need an account at the last step — see Ordering as a guest below.
What's on the order page
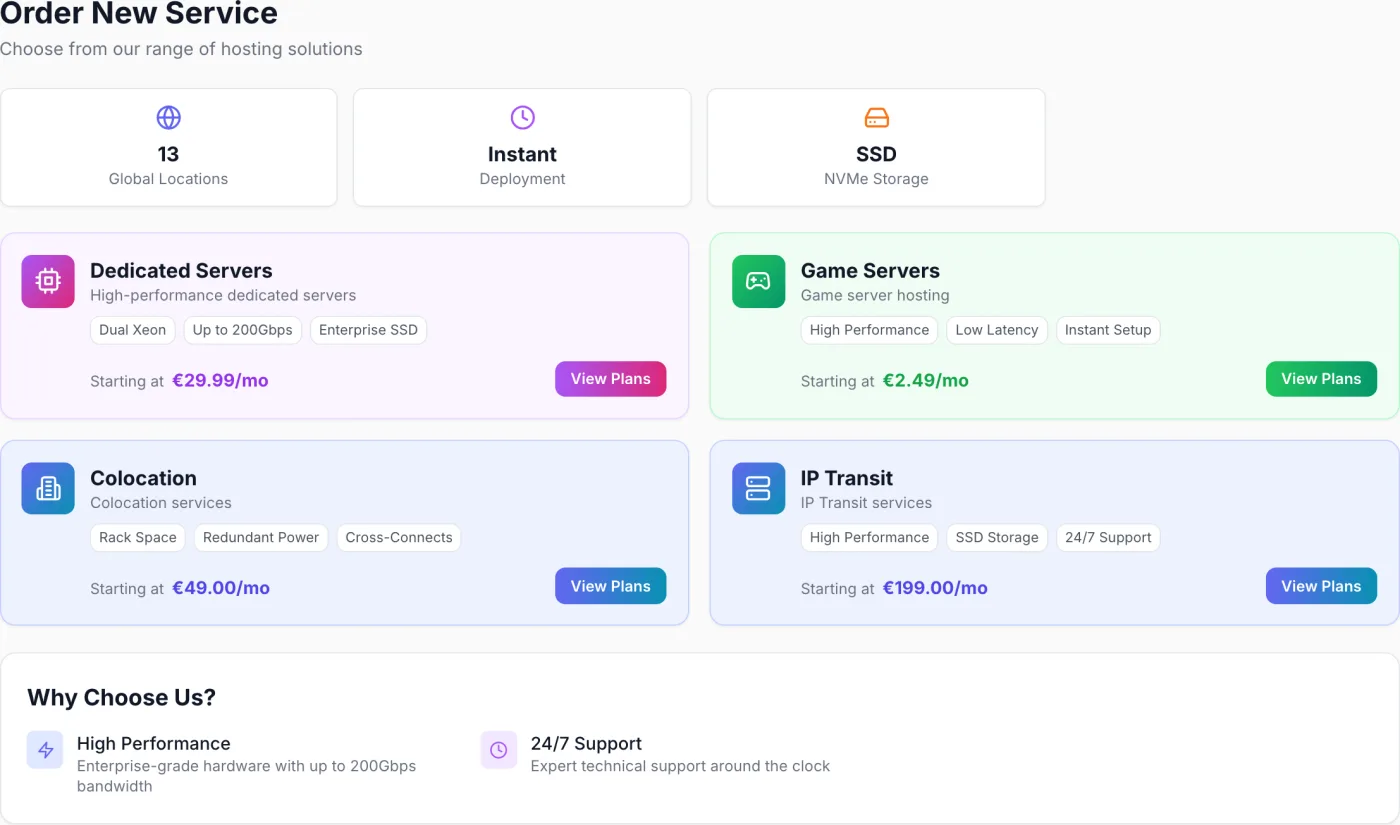
The page is headed Order New Service with a short subtitle your provider can edit. Below it your provider may show a row of quick stat tiles (for example 99.9% Uptime, 24/7 Support, Instant Setup) and, further down, a Why Choose Us? block. Both are optional.
If your provider sells domain names, a wide Domain Names card sits above the category grid with a preview of the extensions offered and a Search button.
The main content is a grid of service category cards. Each card shows:
- An icon and the category name.
- A short description.
- A few feature tags.
- A Starting at price shown per month (for example
€10.00/mo). Where the category also supports hourly billing, both rates appear side by side (for example€0.0139/hr · €10.00/mo). - A View Plans button.
Only categories your provider has enabled appear, so the exact mix (virtual servers, game servers, dedicated servers, colocation and so on) depends on your provider. If nothing is on sale you see No services available.
Choosing a category
View Plans takes you to one of four kinds of page, depending on what you picked:
- Dedicated servers — a filterable list of physical machines, then a configuration page.
- Colocation — a list of rack plans, then a configuration page.
- Everything else — a single configuration page for that category, with the plans, billing cycles and fields the category defines.
- Domain Names — the domain search page (reached from the domain card, not a category card).
Ordering a dedicated server
- The Dedicated Servers list opens. Filter it with the CPU: pills (shown only when more than one processor brand is offered) and the Bandwidth: pills. Cards are sorted cheapest first for the bandwidth you picked, show the price per month, the CPU, RAM and storage, the guaranteed bandwidth, and may carry a POPULAR ribbon.
- Select Configure Server (or click the card) to open Configure Server.
- Pick a Location. The first available location is selected for you.
- Pick an Operating System. This is required — the card is marked * Required and turns red with Please select an Operating System if you skip it. Where the product has a default image it is pre-selected.
- If the server offers disk redundancy choices, a RAID Configuration card appears; pick the layout you want.
- Add anything else you need from Additional Options — extra memory, extra disks, extra bandwidth, additional IP addresses and so on, exactly as your provider has configured them. Each option is either a switch with its price, or a dropdown whose entries read
Label - €25/mo. One-time options show their price without a/mosuffix. - Complete any required fields in the Additional Information card, if the category defines one.
- In the Order Summary, select Checkout to go straight to payment, or Add to Cart to keep browsing.
Dedicated servers are ordered one at a time on a monthly cycle — there is no quantity box or cycle picker on this page. The summary also shows a delivery estimate chip: either a time such as 2h delivery, or Contact sales when no estimate can be given.
Ordering colocation
- The Colocation list shows each plan with its Rack Space in rack units, Power in kW, Bandwidth and Cross-Connects, a feature checklist, the monthly price, and a
+ €250.00 setup feeline where one applies. - Select Configure Plan.
- Pick a Datacenter Location (the first is selected for you).
- Add anything else from Additional Options — extra rack units, extra power, extra bandwidth, extra cross-connects and similar, as configured by your provider.
- Complete any required extra fields, then select Checkout or Add to Cart.
The colocation summary lists the plan specifications, the location, your selected options, the Total per month, and the Setup Fee beneath it.
Ordering from any other category
- Choose a billing cycle. When more than one cycle is enabled, a selector appears at the top (Hourly, Monthly, Quarterly, Semi-Annually, Annually as offered). Prices update instantly and a discount badge may appear on longer cycles.
- Select a plan. The Order Summary on the right updates as soon as you change anything.
- Configure it. Depending on the service you may be asked for a location, an operating system, a hostname, a password, or other plan-specific fields. Sensible defaults are filled in where possible. Some categories run as a short wizard with Back and Next buttons instead of one long page.
- Add optional extras. Where the plan offers add-ons, they are listed with their prices and update the summary total as you select them.
- Fill in any extra information. Some categories include custom fields; required ones must be completed.
- Add to cart or check out from the Order Summary.
If a category has not been given an order form you see Order form not configured with a Back to Services button; contact your provider in that case.
The Order Summary panel
While you configure, the sticky Order Summary on the right shows a live preview: the selected plan and its price, the chosen Location, the Billing cycle, any Savings against paying monthly, any location premium, the Options total, and the Total with its cycle suffix (/hr, /mo, /qtr, /6mo or /yr). A free plan shows Free instead of a price. Before you pick a plan it reads Select a plan to see summary.
If a required field is missing you get a message naming the fields, and the page scrolls to the first one that needs attention.
Registering or transferring a domain
The Domain Names page has one search box (placeholder yourname or yourname.com) and a Search button. Before your first search, the extensions your provider offers are listed as chips with their prices, for example .com €12.99/yr.
Each result row is marked Available, Already registered, or Could not check — try again.
- On an Available row, choose a registration period (1, 2, 3, 5 or 10 years, where the extension is priced annually), check the price, and select Add to Cart. The button becomes In cart once added.
- On an Already registered row, select Transfer In to open a strip where you paste the EPP / authorization code from your current registrar, then select Start Transfer. Transfers are always one year at the annual price and include a year of renewal. Unlock the domain and request its code at your current registrar first; transfers typically complete within 5–7 days.
Domains go into the same cart as everything else, so you can check out a domain and a server together. A Go to Checkout button appears once your cart has something in it.
The checkout page
Checkout is headed Checkout / Complete your order, with the review column on the left and an Order Summary sidebar on the right.
Reviewing your items
- Order Items (N) lists what you are buying. Each collapsed row shows the product name, a quantity chip where relevant, a
Location • Billing Cycleline, a few specification chips, an add-on count, and the price with its cycle underneath. - Select a row (or its chevron) to expand it and see PRODUCT, QUANTITY, LOCATION, BILLING CYCLE, then SPECIFICATIONS, CONFIGURATION and ADD-ONS, followed by a price breakdown (Base Price, Add-ons and the item total, or unit price × quantity).
- The trash icon removes that item.
Discount and voucher codes
When your provider has the discount system switched on, a Discount Code field appears in the summary sidebar. Type your code and select Apply (or press Enter). Codes are capitalised as you type, so case does not matter. A valid code turns into a green box showing the saving, for example 25% off - Saving €12.50, with an X to remove it. An invalid one shows the reason in red under the field.
Tip: Reward vouchers earned through the referral programme are entered in this same field. See Referrals & Rewards.
Order Summary totals
The sidebar lists every item, then any one-time and setup charges, then the running breakdown:
| Line | What it means |
|---|---|
| Item lines | One line per item, with its quantity, at its recurring price. A free item shows Free. |
| Setup Fee | Any one-off setup charge on the products you are buying, shown as its own line so the total here matches the document you receive. |
| Subtotal | Everything above added together, including setup and one-time fees, before discount and tax. |
| Discount | Shown with the code name and a negative amount, only when a valid code is applied. |
| VAT | Calculated from your account details once you are signed in. Shows as a rate and amount, Calculating... while it is worked out, or Exempt where your account qualifies. |
| Credit Applied | Shown only when you turn on Use Credit Balance. |
| Total / To Pay | The amount due. Reads To Pay when credit is being applied, and Free when nothing is owed. |
Because setup and one-time fees sit inside the subtotal, both the discount and the tax are calculated on them too.
Paying for your order
Once you are signed in and the total is above zero, a Payment Method section appears:
- Use Credit Balance. A switch that appears when you hold credit. A green Covers Full Amount badge appears when your balance pays the whole order; otherwise an amber note shows the Remaining amount to pay another way. The line below shows what is available and how much is being applied. + Add more credit opens the top-up window without leaving checkout. With a zero balance you get a + Add credit to your account link instead. See Account Credit.
- Saved payment methods. Methods you have stored appear as selectable rows, with a Default badge on your preferred one. Choosing one charges it directly — no trip to the provider's page.
- Payment method. The list of gateways your provider has enabled, each with its icon and description. The first one is selected for you, and sandbox gateways carry a Test badge. If none are available you see No payment methods available / Please contact support.
- Save this payment method so renewals are paid automatically. A checkbox shown for gateways that support storing a method. Where your provider requires storing it, the checkbox is replaced by a plain notice saying the method will be kept so renewals can be paid automatically.
- Terms. Where your provider publishes legal links, you must tick the box agreeing to the Terms of Service and Privacy Policy before the order button becomes active.
The order button is labelled according to what you chose: Complete Order, Pay €25.00, Pay with Credit, or Complete Free Order. It shows Calculating... while tax and credit settings load and Processing... while the order is placed. After that you are taken to your billing document, redirected to your payment provider, or shown bank-transfer instructions, depending on the method you picked.
Ordering as a guest? You can browse and configure without signing in, but to finish you must log in or create an account. Checkout shows an Account Required card with Login and Register buttons, and the sidebar button reads Login to Complete Order. Your cart is saved, so your selection survives the sign-in step.
Warning: Hourly plans need credit. If your order uses hourly billing, your balance must be at least the minimum your provider requires. If it is not, checkout shows an amber Credit Required for Hourly Billing card giving the minimum and your current balance, with an Add Credit link, and the order button stays disabled until you top up.
After you order
You land on a confirmation page showing:
- Order placed successfully! (or Payment successful on returning from a payment provider).
- An Order Details card with your order number, each item with its location and billing cycle, and the Total. A purely hourly order shows Credit-based instead of a total.
- For dedicated servers, an amber Estimated Delivery chip where an estimate is available.
- Quick links to My Services, Invoices and Support, plus a Go to Dashboard button.
The document you receive
What arrives in your Billing list depends on how your provider bills:
- Invoice — an invoice is raised straight away and is the document you pay.
- Proforma — a proforma is raised instead. It is the document you pay, and it tells you Once paid, it will be converted to a final invoice. Where your provider groups a whole month onto one document, the paid proforma stays in your list and the invoice arrives at the start of the following month.
- An order that costs nothing produces a paid invoice.
- A purely hourly order produces no document up front. Usage is drawn from your credit balance as the service runs and is summarised on a document at the end of the month.
Most services are provisioned automatically once payment is confirmed; you can follow their progress on the My Services page. Where a bank transfer is used for a proforma, you are told the service is activated within 1–2 business days of the payment being received and verified.
Tips and gotchas
- Order from several categories at once. Use Add to Cart on each item, then open the cart from the header to check out everything together.
- Your cart is remembered if you close the browser and come back later, and it survives logging in.
- If a discount code is rejected, check that it has not expired and that it applies to the products in your order.
- Pay a bank transfer with the reference shown. A transfer without it cannot be matched to your document and delays activation.
Related
Invoices & Payments · Account Credit · Managing Your Services · Client Portal Overview