
Email Signature
Set one company-wide HTML and plain-text footer for outgoing emails: enable toggle, Visual/Source/Preview editor, and a copyable sample template.
What the Email Signature page does
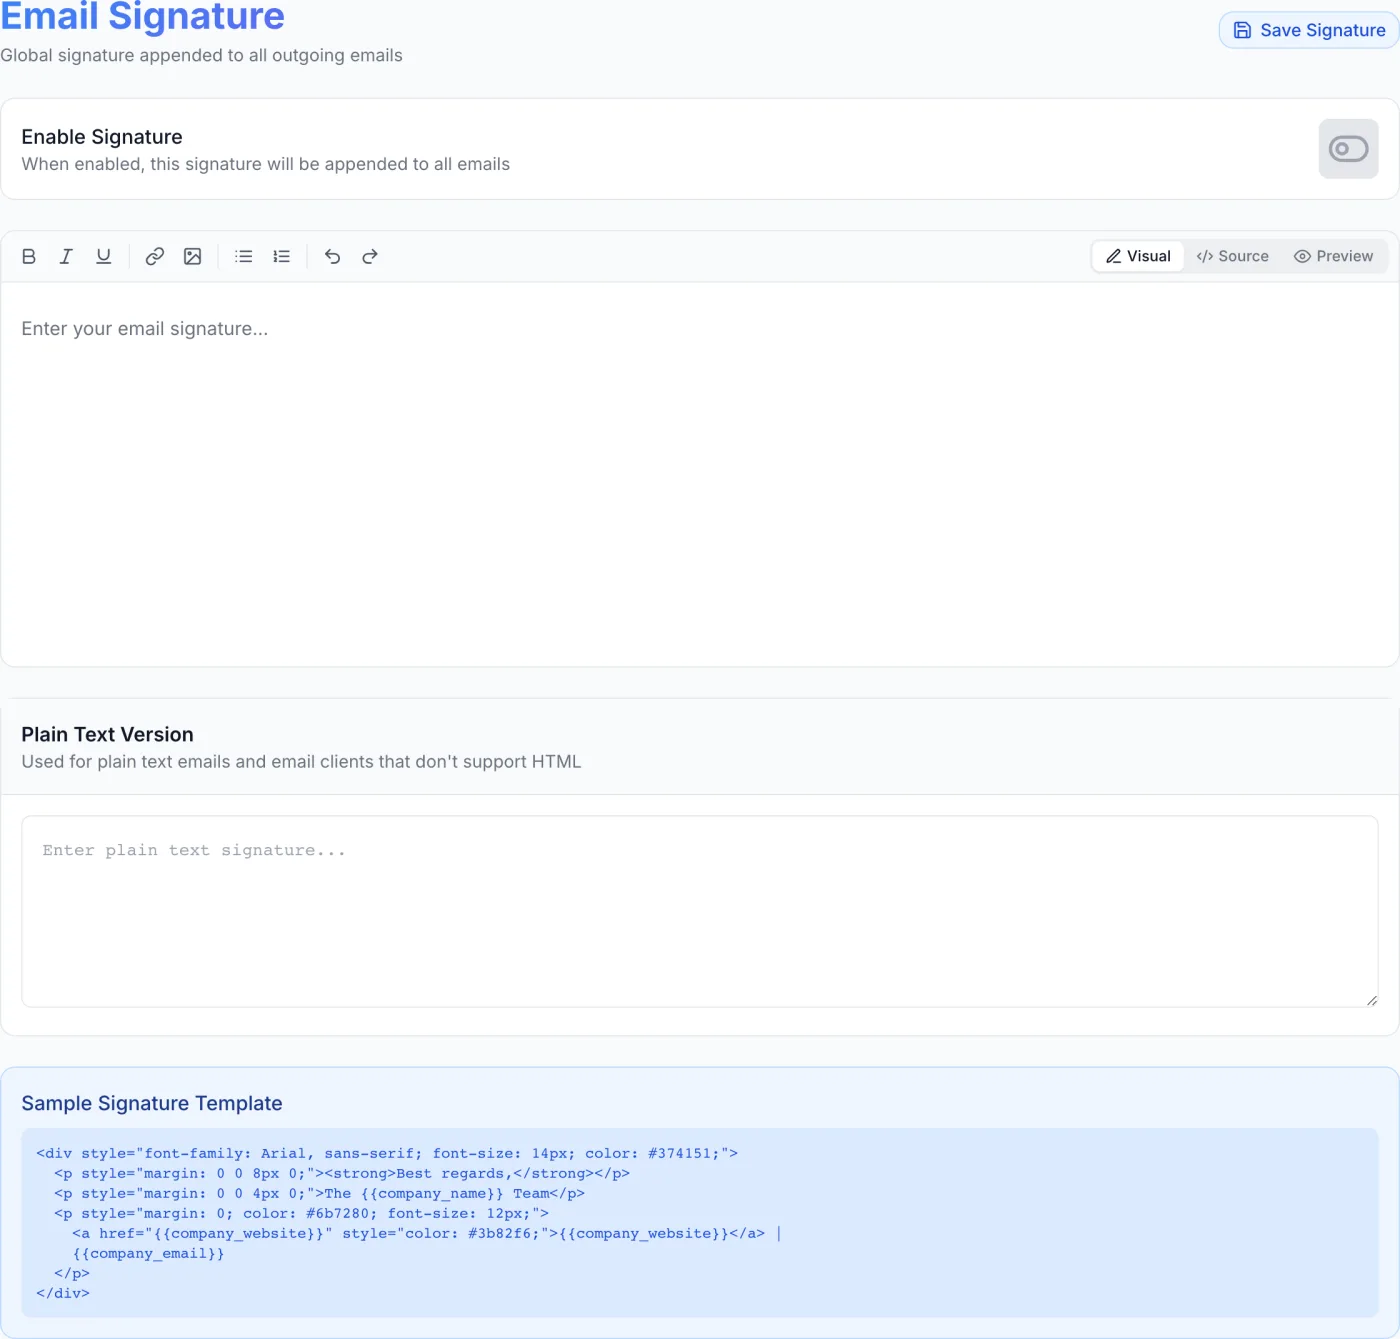
The Email Signature page defines one company-wide footer that is added to the bottom of your outgoing emails. Instead of writing the same closing into every notification template, you set it once here. The page heading reads Email Signature with the subtitle Global signature appended to all outgoing emails.
How to open it
The Email Signature page is not listed in the sidebar and has no tab of its own under Settings. Reach it by adding /emails/signature to your admin panel address — for example https://admin.example.com/emails/signature. You need administrator access to view and edit it.
Tip: Bookmark the page once you have it open. It is a set-and-forget setting, but you will want to find it again the next time your phone number or company details change.
Setting up your signature step by step
- Turn the signature on. Near the top of the page is the Enable Signature card with the note When enabled, this signature will be appended to all emails. Click the toggle on the right so it shows the green, switched-on state. While it is off, your saved content is kept but no footer is added to outgoing mail.
- Write the HTML version. Use the editor in the middle of the page to compose the signature recipients will see. The empty editor shows the prompt Enter your email signature...
- Add a plain-text version. Scroll to the Plain Text Version box and type a text-only equivalent (see the dedicated section below).
- Save. Click Save Signature at the top right. While it saves, the button reads Saving..., and a green Signature saved successfully banner confirms the change. If something goes wrong, a red Failed to save signature banner appears instead.
Note: Saving stores the enable switch, the HTML version and the plain-text version together in a single click. There is no separate save for each box — and flipping the toggle on its own does nothing until you press Save.
Where the signature actually appears
- Automated notification emails — invoices, password resets, order and service messages, ticket notifications and the rest — carry the signature automatically whenever it is switched on.
- Campaigns do not. Each broadcast has its own Append signature tick box in the composer, off by default. Tick it if you want the footer on that campaign. See Email Broadcast.
The HTML signature is added below a thin dividing line at the end of the message; the plain-text signature is added below a --- separator at the end of the plain-text alternative.
Note: This global footer is a different thing from the per-administrator signatures used on ticket replies, which are managed under Admin Signatures. A ticket reply can carry both: the staff member's signature inside the reply text, and this company footer at the very bottom of the notification email.
The editor (Visual, Source, Preview)
The editor has three mode buttons in the top-right of its toolbar. Switch between them at any time without losing your work:
- Visual
- A what-you-see-is-what-you-get editor. Format text using the toolbar without touching any code. This is the mode the editor opens in.
- Source
- A raw HTML view. Switch here to paste in HTML you exported from another tool, or to fine-tune the markup directly. The formatting buttons are greyed out in this mode because you are editing code, not styled text.
- Preview
- A read-only render showing roughly how the signature will look in a recipient's inbox.
In Visual mode the toolbar offers a deliberately small set of formatting controls. Each button shows its name on hover:
| Button | What it does |
|---|---|
| Bold | Makes the selected text bold. |
| Italic | Italicises the selected text. |
| Underline | Underlines the selected text. |
| Link | Asks for a URL and turns the selection into a clickable link. |
| Image | Asks for an image URL and inserts the image inline. |
| Bullet List | Starts an unordered (bulleted) list. |
| Ordered List | Starts a numbered list. |
| Undo / Redo | Step backward or forward through your recent edits. |
Tip: The Image button expects a URL to an image that is already hosted somewhere public — it does not upload a file. Use a stable, permanent web address, such as your logo on your own website, so the image keeps loading in recipients' inboxes over time.
Plain Text Version
Below the editor is the Plain Text Version box, described on the page as Used for plain text emails and email clients that don't support HTML. It is a simple multi-line text field (placeholder Enter plain text signature...) with no formatting. Type a clean, text-only equivalent here — for example your company name, website and contact email on separate lines.
Warning: Fill this in. Some mail clients and corporate filters strip HTML and fall back to the plain-text part of a message. If you leave this box empty, those recipients see no signature at all.
Sample Signature Template
At the bottom of the page, a highlighted Sample Signature Template box shows a ready-made example you can copy as a starting point. It demonstrates a tidy, email-safe layout — a Best regards closing, a company line, and a small website-and-email footer — built with inline styles so it survives most inboxes.
The sample uses {{company_name}}, {{company_website}} and {{company_email}} as stand-ins for your details.
Important: Replace those three placeholders with your real company name, website and email address before you save. The signature is added to messages exactly as you write it — it is not run through the placeholder substitution that Email Templates uses, so anything left in double braces is delivered to the customer literally.
Copy the sample into the editor's Source mode, replace the placeholders and adjust the wording, then switch to Preview to check the result before saving.
Reference: fields and controls
| Control | Location | Purpose |
|---|---|---|
| Enable Signature | Top card, toggle on the right | Turns the global footer on or off without deleting the saved content. |
| Editor | Centre of the page | Composes the HTML signature; offers Visual, Source and Preview modes. |
| Plain Text Version | Below the editor | Text-only fallback for clients that do not render HTML. |
| Save Signature | Top right | Commits the toggle, the HTML version and the plain-text version together. |
| Sample Signature Template | Bottom of the page | A ready-made example you can copy as a starting point. |
Tips and gotchas
- One signature, everywhere. This is a single company-wide footer applied across your outgoing email. There is no per-department or per-template variant.
- Keep it email-safe. Email clients are stricter than web browsers. Favour simple layouts, inline styles, hosted image URLs and modest styling so your signature renders consistently across inboxes.
- Do not repeat the unsubscribe link here. Campaigns add their own unsubscribe footer, so putting one in the signature gives recipients two.
- Preview before you save. The Preview mode is the quickest way to catch a broken link, a missing image, or unwanted spacing.
- Turning it off is not destructive. Switching Enable Signature off simply stops the footer being appended; your saved HTML and plain text remain intact for when you switch it back on.
- Check the result in a real inbox. The signature is attached to the message as it is handed to your mail provider, which is after the copy kept in Email Logs is recorded — so a log entry shows the message body without the footer. To confirm the signature is landing, send yourself something and look at the email that arrives.
Related
Email Templates · Email Logs · Email Broadcast · Admin Signatures · Email