
Orders
Manage the order pipeline: filter by status and payment, search, sort, and confirm, cancel, or delete orders one at a time or in bulk.
What the Orders page is for
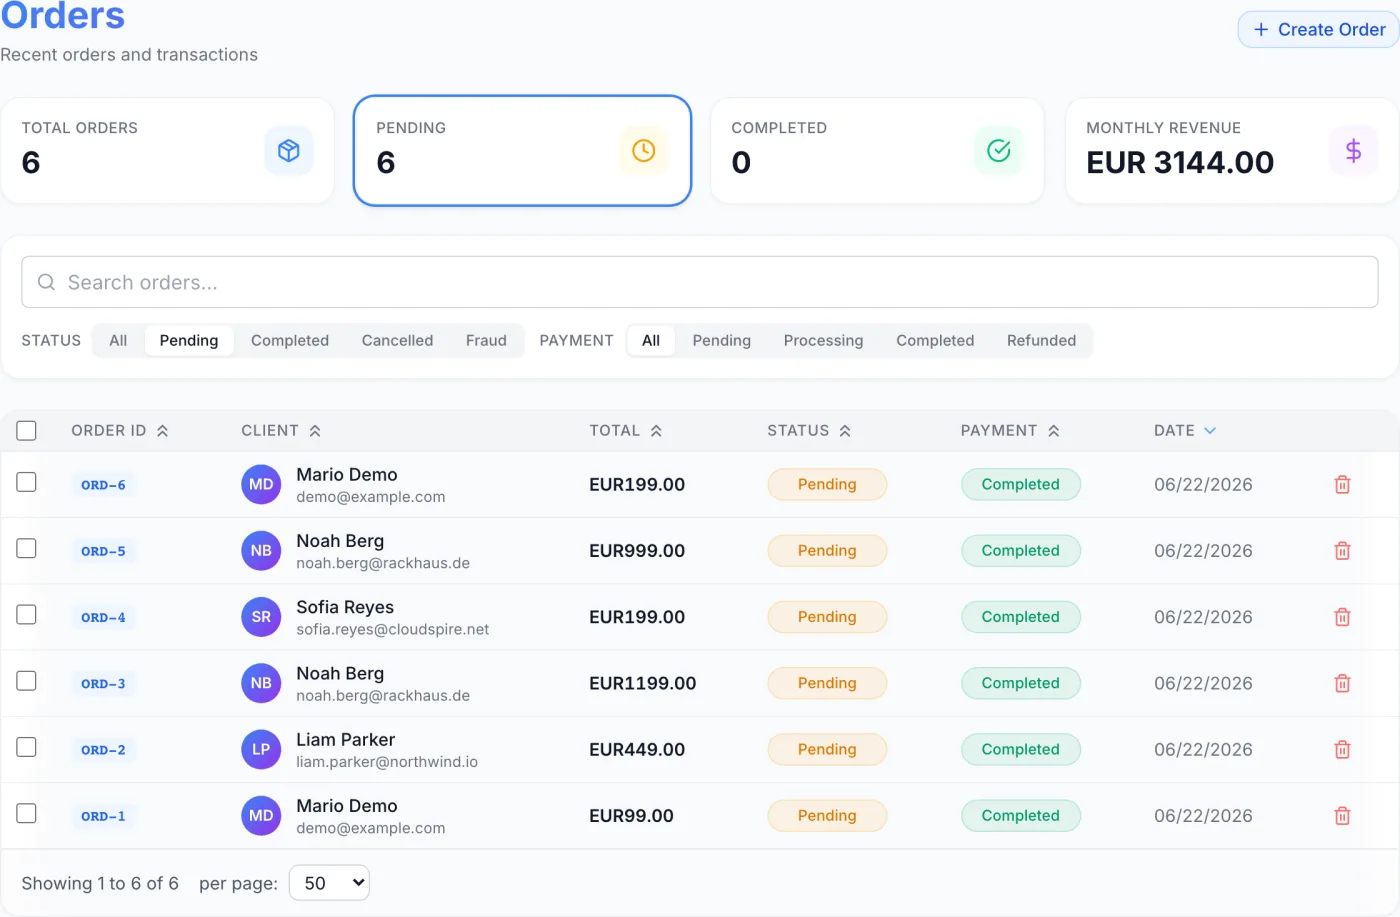
The Orders page is your staff-facing sales pipeline. Every order — whether it comes in from the customer-facing checkout or is placed for a customer through the staff-side New Order form — lands here as a row. The table tracks each order's fulfilment status, its payment state, the client it belongs to and the date it was placed, so your team can confirm, cancel or review orders from one screen.
How to reach it
Open the admin panel and click Orders (the shopping-cart icon) in the left sidebar. The page header reads Orders with the subtitle Recent orders and transactions. When you first open the page the table is pre-filtered to Pending orders, since those are the ones that usually need staff attention. Use the status tabs described below to switch to another view or to show everything.
Note: The sidebar link only appears for staff whose role includes permission to view orders.
Reading the summary tiles
Across the top sit four tiles. Three of them double as one-click filters for the table beneath them.
| Tile | What it shows | Click action |
|---|---|---|
| Total Orders | The all-time count of orders. | Switches the table to All statuses. |
| Pending | Count of orders whose status is Pending. | Filters the table to Pending only. |
| Completed | Count of orders whose status is Completed. | Filters the table to Completed only. |
| Monthly Revenue | The total of every order created in the current calendar month whose payment is marked Completed. Formatted in your base currency. | Display only — not clickable. |
The tile matching the current filter is highlighted with a ring, so you can always tell which view you are looking at.
Note: Monthly Revenue adds order totals together at face value. If you sell in more than one currency, treat it as an indicator rather than an accounting figure — the Invoices page is the place to reconcile revenue.
Finding orders: search and filters
Below the tiles is a filter bar:
- Search box — type into Search orders… to match by order number, by the client's first name, last name or email address, or by the name of the product on the order. Results refresh a moment after you stop typing.
- Status — a row of tabs labelled All, Pending, Completed, Cancelled and Fraud. Pick one to narrow the table to that lifecycle stage.
- Payment — a second row of tabs labelled All, Pending, Processing, Completed and Refunded. This filters by the money state, independently of the order status.
Note: An order's payment state is only ever Pending, Processing or Completed, so the Refunded payment tab returns an empty table. A refund is recorded against the invoice that was paid, not against the order — see Invoice Details.
Tip: On a narrow screen the two filter rows collapse into dropdown menus (All Statuses and All Payments) and the Client, Payment and Date columns are hidden to save room. The choices are identical.
The order table
Each row represents one order. Click anywhere on a row to open its Order Details page.
| Column | What it shows |
|---|---|
| Selection checkbox | Selects the row for a bulk action. The checkbox in the header selects every row on the current page. |
| Order ID | The order number, shown as a badge. An Upgrade badge appears next to it when the order is a plan change on an existing service rather than a new purchase. |
| Client | The customer's initials, name and email address. The name links to that client's record. |
| Total | The order amount with the currency symbol the order was placed in. Hourly (usage-billed) orders show Credit-based instead of a fixed price, because they draw down account credit rather than charging a set total. |
| Status | A colour-coded badge: Pending, Completed, Cancelled or Fraud. |
| Payment | A colour-coded badge for the money state: Pending, Processing or Completed. |
| Date | When the order was created. |
| Delete | A trash button at the right end of the row. |
Click a sortable column header to sort by that field; click again to reverse the direction. Newest first is the default. The table is paginated at 50 rows per page, and you can change the page size from the controls at the bottom. When nothing matches your filters, the table shows a No orders found empty state.
Creating an order
Click Create Order at the top right of the page. This opens the New Order form, where you pick a customer, add one or more products, configure each line and place the order on the client's behalf.
Confirming, cancelling and deleting orders
One order at a time
- To act on a single order, click its row to open Order Details, where Mark as Completed and Cancel Order live.
- To remove a single order from the list, click the trash button at the right end of its row. A confirmation dialog appears.
- The delete dialog carries a checkbox, unticked by default, offering to also delete and terminate the services this order allocated. Leave it unticked to remove only the order record and keep the services running; tick it to tear the services down as well.
Warning: Deleting an order is permanent and cannot be undone. To keep the record while flagging the order, set its status to Cancelled or Fraud instead.
Several orders at once
Tick one or more row checkboxes and a blue bulk action bar appears above the table, showing how many orders are selected and offering three buttons:
- Confirm Selected — sets the chosen orders to Completed and sends each customer the order-completed email. It does not provision anything on its own.
- Cancel Selected — sets the chosen orders to Cancelled. Services, invoices and proformas already created are left untouched. If an order used a discount code and was never paid, its use of that code is handed back so the code can be redeemed again.
- Delete Selected — permanently deletes the chosen orders. As with the single-row delete, the confirmation offers to also delete and terminate their services.
Each bulk action asks you to confirm first and then reports how many orders (and, for deletions, how many services) were affected.
Understanding status and payment
The two badges on every row track different things, and they move independently.
- Status — the order lifecycle
- Pending → Completed is the normal path. Cancelled stops the order. Fraud is a hard flag: an order marked Fraud should be reviewed by a person before anything is delivered.
- Payment — the money lifecycle
- Pending → Processing → Completed as funds clear. The order's payment state moves to Completed when its invoice or proforma is paid, and that is also what starts provisioning.
Tip: Because the two are separate, use them together when reconciling — for example filter to Status Pending and Payment Completed to find orders that have been paid for but never confirmed.
Related pages
New Order · Order Details · Products · Invoices · Services · Discounts