
General
Configure branding, contact emails, access control, feature toggles, navigation, date format, and the daily automated task schedule.
What the General settings page does
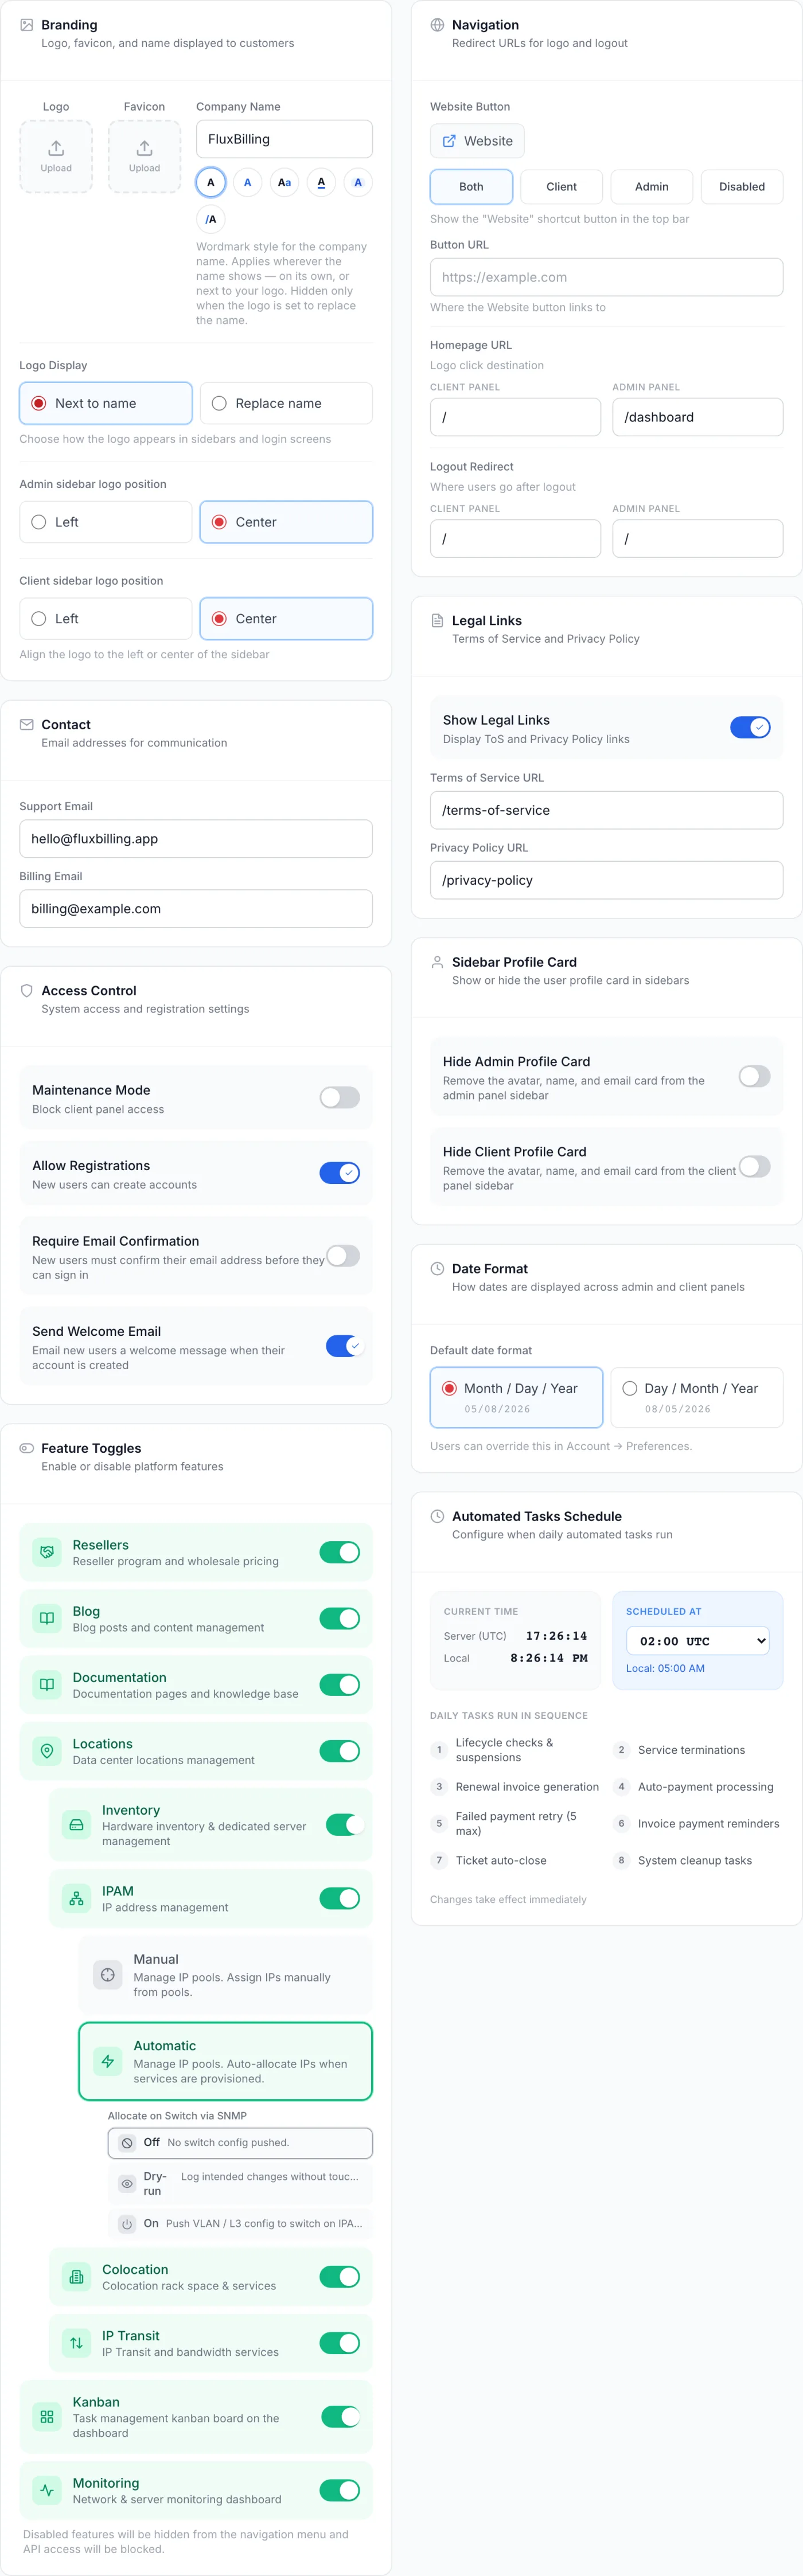
The General tab is your platform’s identity and feature switchboard. It controls the branding customers see on every panel and email, the contact addresses used for outgoing mail, who can sign in and register, which entire modules appear in the navigation, where the built-in navigation links point, how dates are displayed, and the hour at which the daily automated billing tasks run. It is usually the first page you configure after setting up the platform.
How to reach it
In the admin panel, click Settings in the sidebar. The Settings page opens on the General tab. If you do not see Settings at all, your account needs permission to view settings; Super Admins always have it.
The settings menu down the left of the page is grouped into Organization, Communication, Localization, Financial, Promotions, Integrations, Infrastructure, Appearance, Migration Tools, System and Performance. A search box sits at the top of that menu — type a few letters to filter the groups and tabs instead of scrolling. On a narrow screen the menu collapses into a dropdown button showing the tab you are currently on.
Nothing on this tab saves automatically. After changing anything, click Save Settings in the page header. Leaving the tab without saving discards your changes. The IPAM mode and Switch Automation controls are the exception — they save the moment you pick an option.
Branding
The Branding card controls the logo, favicon and company name shown across both the admin and client panels, on the sign-in screens, and in outgoing emails.
- Upload a logo. Click the dashed square under Logo and choose an image. Accepted formats are JPEG, PNG, GIF, WebP and SVG, up to 5 MB. Once a logo is set, hover over it to reveal the change and remove buttons.
- Upload a favicon. Click the dashed square under Favicon. Accepted formats are PNG, ICO and SVG, up to 1 MB. This is the small icon shown in the browser tab. Hover over an existing favicon to change or remove it.
- Enter your company name. Type it in the Company Name field. It appears wherever the logo does not replace it, and in emails.
- Pick a name style. The row of small round swatches below the name field sets the wordmark style used when the name is shown as text: Plain, Accent color, Two-tone, Accent underline, Highlight pill or Leading slash. The style applies wherever the name shows, on its own or next to the logo, and is hidden only when the logo is set to replace the name.
- Choose how the logo displays. Under Logo Display, pick Next to name (logo and company name together) or Replace name (logo alone).
- Set sidebar logo alignment. Two separate controls, Admin sidebar logo position and Client sidebar logo position, align the logo Left or Center in each panel’s sidebar independently. Both start on Center.
Logo, name, name style and alignment are previewed live in the admin sidebar as you change them, so you can judge the result before saving. The preview disappears if you leave the page without saving.
Contact
The Contact card holds the two email addresses your platform uses for customer communication. The mail server itself and the message templates are configured separately on the Email tab.
| Field | What it does |
|---|---|
| Support Email | Your general support address, shown to customers and used as a reply target. |
| Billing Email | The address associated with invoices and billing correspondence. |
Access Control
This card governs who can get into the platform and what happens when new people sign up. Each item is an on/off switch.
| Toggle | What it does | Default |
|---|---|---|
| Maintenance Mode | Blocks client panel access. When enabled, a Maintenance Message box appears where you can write the notice customers see; leave it blank to use the default wording. | Off |
| Allow Registrations | Controls whether new visitors can create their own accounts. Turn it off to make the platform invite-only. | On |
| Require Email Confirmation | New users must confirm their email address before they can sign in. | Off |
| Send Welcome Email | New users are emailed a welcome message when their account is created. | On |
Note: Maintenance Mode blocks the client panel only — you and your staff can still reach the admin panel to keep working.
Feature Toggles
Each switch here turns an entire module on or off. A disabled feature is hidden from the navigation menu and its pages become unavailable, so you can keep the interface focused on only what you offer. Click anywhere on a row to flip its switch, then click Save Settings. Modules & Feature Toggles goes through what each module covers, which ones depend on Locations, and what happens to your data when one is switched off.
| Feature | What it enables | Requires |
|---|---|---|
| Resellers | Reseller program and wholesale pricing. | — |
| Blog | Blog posts and content management. | — |
| Locations | Data center location management. This is the parent feature for the five indented features below. | — |
| Inventory | Hardware inventory and dedicated server management. | Locations |
| IPAM | IP address management. | Locations |
| Colocation | Colocation rack space and services. | Locations |
| IP Transit | IP transit and bandwidth services. | Locations |
| VPS | Virtual server hosting and its management pages. | Locations |
| Kanban | A task-management kanban board on the dashboard. | — |
| Customer API | API keys your customers create in the client panel to manage their own services. | — |
| Monitoring | Network and server monitoring dashboard. This row appears only when monitoring is part of your licence. | — |
The five Locations-dependent features are shown indented. If you switch Locations off, they grey out, lock, and display “Requires Locations to be enabled” — and any of them that were on are switched off with it.
IPAM mode and Switch Automation
When IPAM is enabled, two extra controls appear beneath it. Unlike the rest of this tab, they save the moment you choose an option:
| Control | Options |
|---|---|
| IPAM mode | Manual — manage IP pools and assign addresses by hand. Automatic — manage pools and allocate addresses automatically when services are provisioned. |
| Allocate on Switch via SNMP | Off — no switch configuration is pushed. Dry-run — the intended changes are logged without touching any device. On — VLAN and L3 configuration is pushed to the switch on allocation and deploy events. Choosing On asks you to confirm first. |
You can set the switch automation mode while IPAM is in Manual mode, but nothing is pushed to hardware in that mode; a note under the control says the choice takes effect once Automatic IPAM is enabled.
Tip: Use Dry-run to validate switch automation safely before going live — it records exactly what would happen without changing any hardware. Verify your switch credentials and port mappings before switching it to On. See IPAM for the pools themselves.
Navigation
The Navigation card sets where the built-in links point. A small live preview of the Website button sits above the choices and dims when the button is disabled.
| Setting | What it controls |
|---|---|
| Website Button | Where the “Website” shortcut button appears in the top bar: Both, Client, Admin or Disabled. |
| Button URL | The destination that button links to. |
| Homepage URL | Where clicking the logo takes the user. Set separately for the Client Panel and the Admin Panel. |
| Logout Redirect | Where users land after signing out. Set separately for the Client Panel and the Admin Panel. |
Legal Links
Turn on Show Legal Links to display Terms of Service and Privacy Policy links. It is on by default. When enabled, two fields appear for the Terms of Service URL and the Privacy Policy URL; both start pointing at your own hosted terms and privacy pages.
Sidebar Profile Card
Two independent toggles, Hide Admin Profile Card and Hide Client Profile Card, remove the avatar, name and email card from the bottom of each panel’s sidebar.
Date Format
Choose how dates are displayed across both panels: Month / Day / Year (for example 05/08/2026) or Day / Month / Year (08/05/2026). A sample date is shown beside each option, and Month / Day / Year is the starting value. Individual users can override this for themselves under Account → Preferences.
Automated Tasks Schedule
This card sets the single hour each day when the platform runs its automated billing chain. The left panel shows the current Server (UTC) and Local time, updating live; the right panel is the schedule picker.
- Open the Scheduled At dropdown and pick an hour from
00:00 UTCto23:00 UTC. The default is02:00 UTC. Your equivalent local time is shown just below the picker. - Click Save Settings. The note on the card confirms that changes take effect immediately. If the new schedule cannot be applied straight away, the confirmation message says so and the change is picked up at the next restart.
At the chosen hour the tasks run one after another in this order:
- Lifecycle checks & suspensions
- Service terminations
- Renewal invoice generation
- Auto-payment processing
- Failed payment retry (5 max)
- Invoice payment reminders
- Ticket auto-close
- System cleanup tasks
Tip: Because all eight tasks run as one chain at the configured hour, pick a quiet, low-traffic time of day. The hour is set in UTC — use the local-time hint beneath the picker to confirm it lands where you expect.
Tips and gotchas
- Save after every change. Only the IPAM mode and Switch Automation controls save on their own; everything else waits for Save Settings.
- One save covers the whole tab. A single save writes every card on this page at once. If a value is rejected, the red message names the reason so you can correct it and save again.
- Feature changes update the navigation. Turning a feature off removes its menu entry; if you were sitting on a settings tab that belongs to the feature you just disabled, the page returns you to General.
- Branding propagates everywhere. The logo, favicon and name flow to the sign-in pages, both panels and emails, so check how they look in context after saving.
Related articles
For the full tour of the settings area see Settings, and for the module switches on this page see Modules & Feature Toggles. For the daily task chain the schedule card drives, see Billing Automation. For email delivery and templates, support departments, billing options, appearance and speed, see Email, Departments, Billing, Themes and Performance.