
Email Templates
Customise the subject and HTML body of every automated email your platform sends, with an HTML Content editor, a live Preview toggle, category filters, and variable chips.
What Email Templates does
Email Templates is the catalogue of automated emails your platform sends — the email-verification message, the password-reset link, invoice and payment notices, service welcome letters, order and ticket updates. Each template controls the subject line and the message body for one specific event, so you can match every outgoing message to your own branding, tone and wording.
How to reach it
Open the admin panel, go to Settings and open the Email section. It is divided into three sub-tabs — Provider, Templates and Logs. Click Templates to open the catalogue. You need settings access to see the Settings area at all.
The layout
The Templates sub-tab is a single panel that switches between two views:
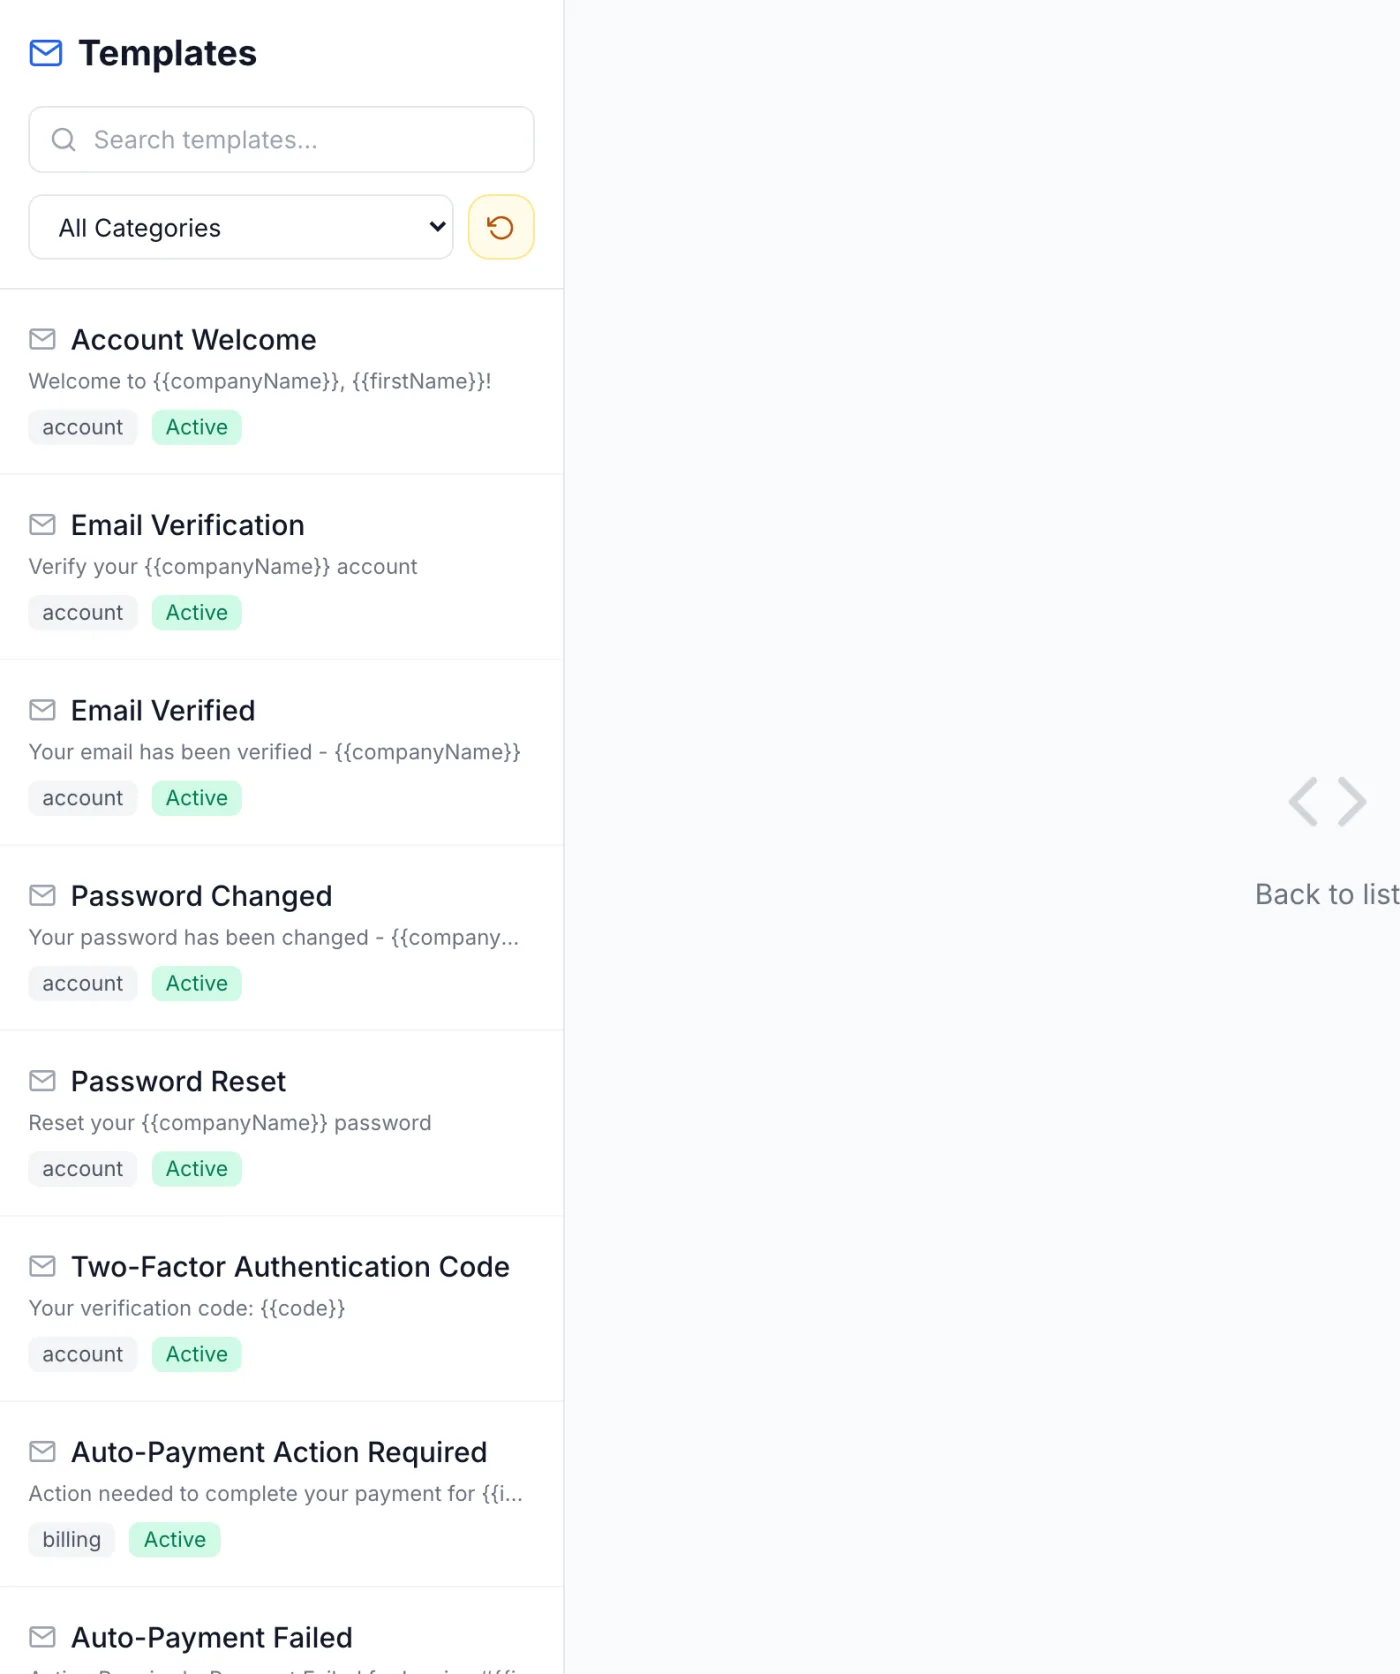
- List view. At the top is a Search templates... box, a category dropdown, and a Reset All button with a circular-arrow icon. Below that, every template appears as a row showing its name, a one-line preview of its subject, its category tag, and an Active or Inactive pill. The list scrolls inside its own panel. When nothing matches your search it reads No templates found.
- Editor view. Clicking a row replaces the list with the editor. A Back to list control (the X at the top-left) returns you to the catalogue.
Editing a template — step by step
- Find the template. Type part of its name into the Search templates... box, or pick a category from the dropdown to shorten the list. The search matches the template name only, not the subject line.
- Click the template row. The view switches to the editor.
- Edit the name (optional). The Template Name field is a label for you, not something recipients see.
- Edit the subject line. The Subject Line field is the email subject. Its placeholder reads
Email subject (supports {{variables}})— you can drop placeholders into it, for example an invoice number. - Edit the body. The HTML Content box is a code editor where you write the email's HTML directly, with line numbers and word wrap. To check your work, click the eye icon in the editor header to toggle a rendered Preview pane that opens beside the code; its header shows the subject line as it currently reads. Click the eye again to hide it.
- Click Save. The button stays greyed out until you actually change the name, subject, body or active state. A green Template saved banner confirms the change; a red Failed to save template banner appears if it did not go through.
The HTML Content box is what gets sent
This is the point that most often causes confusion, so it is worth stating plainly:
Important: When a template has HTML content, the HTML version is what recipients receive. The HTML Content box in the editor is that version. There is no second body field to edit in the panel — what you type here is also stored as the plain-text alternative for mail clients that cannot display HTML. If you have changed a template and the message that arrives still looks the same, the cause is almost never the field you edited: check that you pressed Save, and that the template is Active.
Two things are added to the message automatically after your content is rendered, so do not duplicate them in the template:
- A brand header. Your company logo and name are placed at the top of the message, following the logo-display choice in your branding settings. This is skipped if your template is a complete HTML document of its own, or if it already shows the logo.
- Your email signature, if it is switched on — appended below a dividing line. Set it once in Email Signature rather than copying a footer into every template.
Template variables
Variables are placeholders wrapped in {{double braces}} that are replaced with real values when the email is sent. With a template open, an Available Variables panel appears below the editor with the hint (click to insert) — a row of clickable chips, each showing a variable such as {{firstName}}. Hover a chip to see a short description of what it inserts.
Clicking a chip appends that placeholder to the end of the HTML Content; move it where you want it, or type the placeholder by hand. The set of chips changes with the template's category, because a billing template has data a support template does not.
Available in every template
| Variable | Becomes |
|---|---|
{{companyName}} | Your company name from settings. |
{{companyEmail}} | Your company email address from settings. |
{{billingEmail}} | Your billing email address from settings. |
{{supportEmail}} | Your support email address from settings. |
{{firstName}} | The recipient's first name. |
{{lastName}} | The recipient's last name. |
{{email}} | The recipient's email address. |
{{unsubscribeUrl}} | A per-recipient unsubscribe link. This one is filled in for broadcasts only — it has no value in a transactional template. |
Added by category
| Category | Extra variables |
|---|---|
| Account | {{verificationUrl}} (email verification link), {{resetUrl}} (password reset link), {{expiresIn}} (how long the link stays valid). |
| Billing | {{invoiceNumber}}, {{amount}}, {{dueDate}}, {{invoiceUrl}}, {{paymentMethod}}, {{items}} (the line items — see below), and, when the invoice covers a single service, {{hostname}}, {{ipAddress}} and {{location}}. |
| Service | {{serviceName}}, {{ipAddress}}, {{hostname}}, {{location}}, {{username}}, {{password}}, {{serviceUrl}}. |
| Order | {{orderNumber}}, {{productName}}, {{amount}}, {{orderUrl}}. |
| Support | {{ticketNumber}}, {{subject}}, {{ticketUrl}}, plus {{{replyPreview}}} (the reply as HTML) and {{{replyPreviewText}}} (the reply as plain text). |
| Reseller | {{resellerCompany}}, {{discountRate}}, {{apiRateLimit}}, {{portalUrl}}. |
| General, Monitoring | No extra variables — these templates use the common list above. |
Warning: The Service category includes
{{username}}and{{password}}. A template that uses them sends real login credentials in plain text. Keep those templates to the services that genuinely need them, and do not add the placeholders to templates that go to a wider audience.
Writing more than a plain placeholder
- Raw HTML. Ordinary
{{ }}placeholders escape their value, which is what keeps a customer's name from breaking your layout. Use three braces —{{{replyPreview}}}— where the value is meant to be HTML. - Repeating over invoice lines.
{{items}}is a list, not a single value. Loop over it with{{#each items}} ... {{/each}}and read{{description}},{{quantity}},{{unit_price}},{{total}}and{{details}}inside the loop. - Formatting helpers.
{{formatDate dueDate}},{{formatDateTime dueDate}},{{formatCurrency amount}},{{uppercase firstName}},{{lowercase email}}and{{truncate subject 60}}are available. - Conditions.
{{#ifEquals a b}} ... {{else}} ... {{/ifEquals}}and{{#ifNotEquals a b}} ... {{/ifNotEquals}}let you vary the wording.
Tip: Keep placeholder names exactly as the chips show them. A misspelled placeholder is not replaced — it is sent to the customer literally, braces and all.
Categories
The category dropdown narrows the list to one group of events. It lists All Categories plus the categories actually present in your catalogue, so you may see fewer than the full set if a module is switched off.
| Category | Covers messages around… |
|---|---|
| Account | Sign-up, verification, passwords and two-factor codes. |
| Billing | Invoices, proformas, payments, auto-payment, credit top-ups and hourly billing. |
| Service | Service lifecycle: activation, suspension, renewal, termination and provisioning outcomes. |
| Order | Order placement and processing updates. |
| Support | Ticket notifications. |
| General | Team invitations and team membership changes. |
| Monitoring | Infrastructure alert notifications. |
| Reseller | Reseller application outcomes. |
The templates you will find
These are the events that ship with the platform. Any of them can be reworded, and any of them can be silenced by setting it to Inactive.
| Category | Templates |
|---|---|
| Account | Email Verification · Account Welcome · Password Reset · Email Verified · Password Changed · Two-Factor Authentication Code |
| Billing | Invoice Created · Proforma Invoice Created · Payment Received · Invoice Overdue · Invoice Reminder · Auto-Payment Success · Auto-Payment Failed · Auto-Payment Action Required · Payment Method Disabled · Checkout Recovery · Auto Top-up Successful · Auto Top-up Failed · Hourly Billing – Low Credit Warning · Hourly Billing – Service Suspended · Hourly Billing – Service Restored · IP Transit Overage Invoice |
| Service | Service Activated / Welcome Letter · IP Transit Service Activated · Colocation Service Activated · Service Suspended · Service Unsuspended · Service Terminated · Service Renewal Reminder · Service Provisioning Complete · Service Provisioning Failed |
| Order | Order Created · Order Processing · Order Completed |
| Support | Ticket Created · Ticket Reply · Ticket Closed |
| General | Team Invitation · Team Member Joined · Team Member Removed |
| Monitoring | Monitoring Alert · Monitoring Alert Resolved |
| Reseller | Reseller Application Approved |
Templates that depend on a module
Some templates are hidden when the module they belong to is switched off for your company, so your list may be shorter than the table above:
- Monitoring Alert and Monitoring Alert Resolved appear only when the Monitoring module is enabled and available on your plan.
- IP Transit Service Activated and IP Transit Overage Invoice appear only when the IP Transit module is enabled.
- Colocation Service Activated appears only when the Colocation module is enabled.
- Service Provisioning Complete and Service Provisioning Failed appear only when the Inventory module is enabled, since they cover bare-metal installs.
- Reseller Application Approved appears only when the Reseller module is enabled.
Active vs. Inactive templates
Each template carries an Active or Inactive pill, shown in the list and as a button in the editor header. An Active template is sent normally. Click the pill in the editor to flip it, then click Save — the change only takes effect once saved, and leaving the editor without saving discards it. Setting a template to Inactive silences that specific email: the underlying event still happens, but no message goes out. This is the clean way to suppress a notification you do not want without losing your customised content.
Resetting to defaults
If you have over-edited a template and want the original wording back, there are two reset controls, both shown with a circular-arrow icon. Read the confirmation before you agree — it tells you which one you clicked.
- Reset to default — the icon button in the editor header, next to Save. It restores only the template you have open. The confirmation names it: Reset "…" to its default content? Your customizations will be lost.
- Reset All — the button beside the category dropdown in the list view. It restores every template in one action, and its confirmation reads Reset ALL email templates to their defaults? All customizations will be lost.
Warning: Resetting cannot be undone — the name, subject and body of the affected templates are replaced with the originals. Whether each template is Active or Inactive is left as you had it. If you only want to compare against the default, copy your current content out first.
Reference: editor controls
| Control | What it does |
|---|---|
| Search templates... | Filters the list by template name. |
| Category dropdown | Limits the list to one category, or All Categories. |
| Reset All | Restores every template to its default content. |
| Back to list | The X at the top-left of the editor; returns to the list view. Unsaved edits are discarded. |
| Template Name | Label for the template, not shown to recipients. |
| Subject Line | The email subject line; supports {{variables}}. |
| HTML Content | The code editor holding the message body — the version recipients receive. |
| Preview (eye icon) | Toggles a rendered preview pane beside the code, with the subject line above it. |
| Available Variables | Clickable chips below the editor that append a placeholder; the set depends on the template's category. |
| Active / Inactive | Marks whether the email is sent; takes effect after Save. |
| Reset to default | Restores just the open template. |
| Save | Commits the name, subject, body and active state. Greyed out until something changes. |
Tips and gotchas
- Always click Save before leaving the editor — going back to the list discards unsaved edits.
- The Preview pane does not send anything; it only renders the layout. To confirm a message actually reached someone, check Email Logs.
- The preview shows your placeholders as literal
{{braces}}, since there is no customer to fill them in with. Judge layout here and check real substitution on the next message the event produces. - If emails are not being delivered at all, the cause is usually the sending configuration rather than a template — check the Provider sub-tab covered in Email.
- Email clients are stricter than browsers. Favour tables and inline styles over modern layout techniques, and keep images on stable public addresses.
Related
Email · Email Signature · Email Logs · Email Broadcast · Settings