
IP Ban
Block IP addresses from both panels: a main enforcement switch, automatic banning after failed logins, and a searchable list of banned addresses.
What IP Ban does
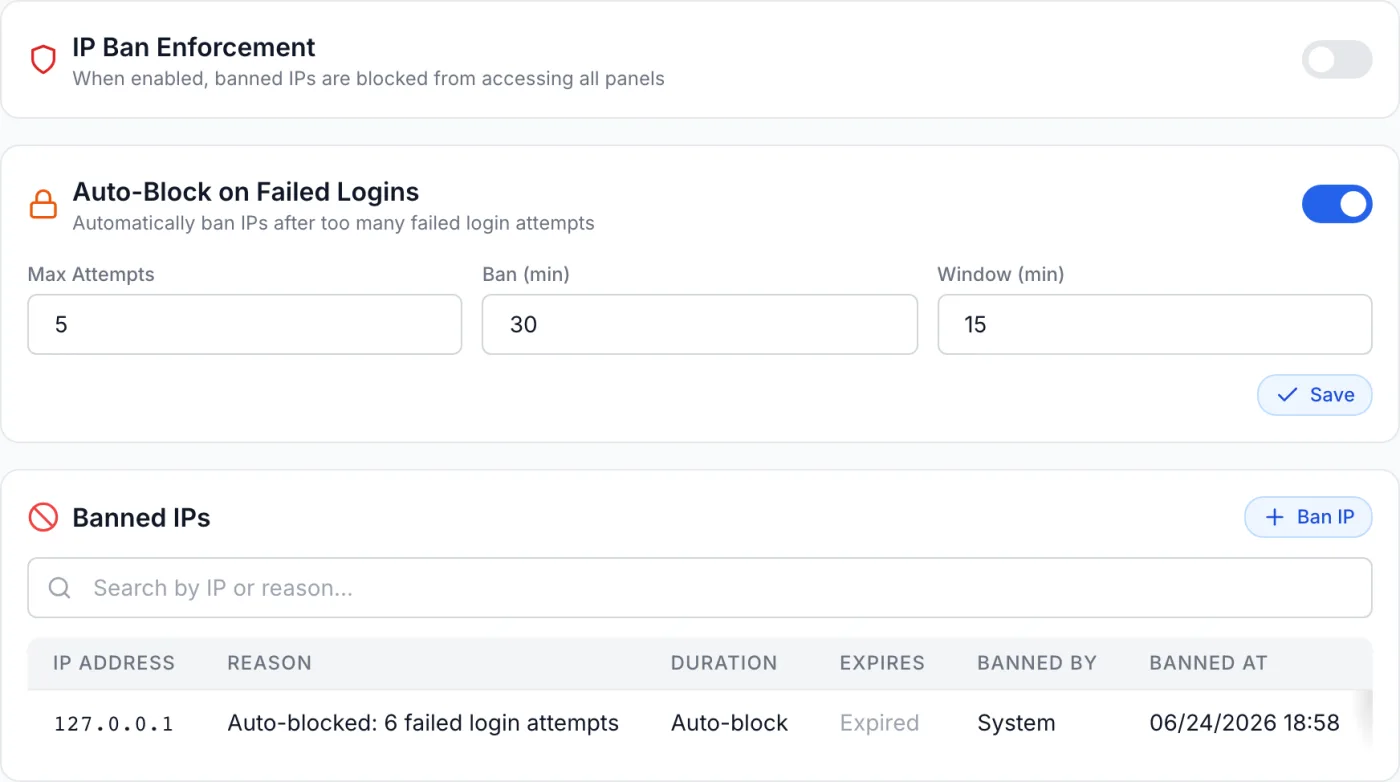
The IP Ban page lets you block individual IP addresses from reaching either panel, and automatically block addresses that fail to log in too many times. Where reCAPTCHA stops abusive traffic at the login form, IP Ban stops it before a request ever reaches a sign-in page. The page has three cards stacked top to bottom: an enforcement switch, automatic blocking on failed logins, and a searchable list of banned addresses.
How to reach it
Open Settings from the admin sidebar, then under the System group choose IP Ban. It sits between Security and License.
The enforcement switch
At the top of the page, the IP Ban Enforcement card carries a single on/off switch, described as “When enabled, banned IPs are blocked from accessing all panels.” It is on by default. When it is off, bans are retained but not applied, so traffic flows normally even for addresses that appear in the list.
Note: this switch saves the moment you flip it — there is no separate Save step. A confirmation banner appears at the top of the page reading IP ban enforcement enabled or IP ban enforcement disabled.
Auto-Block on Failed Logins
The second card automatically bans an address after too many failed sign-in attempts in a short period — the standard defence against password-guessing and credential-stuffing bots. It has its own on/off switch in the card header plus three number fields. After changing any of the numbers, click Save in the card to apply them; a confirmation banner reads Auto-block settings saved.
| Field | What it controls | Range | Default |
|---|---|---|---|
| Auto-block switch (card header) | Turns automatic banning on or off. When off, failed logins are still recorded but never trigger a ban. | On / Off | On |
| Max Attempts | How many failed logins an address may make before it is automatically banned. | 1–20 | 5 |
| Ban (min) | How long an automatic ban lasts, in minutes. After this time the ban expires on its own. | 1 and up | 30 |
| Window (min) | The rolling window, in minutes, over which failed attempts are counted toward Max Attempts. Older attempts no longer count. | 1 and up | 15 |
Tip: the three fields work together. With Max Attempts 5 and Window 15, an address is banned only if it fails five times within any fifteen-minute span; one stray typo every hour never trips it. Keep Ban (min) short enough that a genuine customer who fat-fingers their password is not locked out for the rest of the day.
The Banned IPs list
The bottom card, Banned IPs, lists every address currently banned — both the ones you added by hand and the ones the auto-block rule created. The search box filters by IP address or reason and narrows the list as you type. When there is more than one page, arrows at the bottom move between pages and show your position as page / total. If nothing matches, the card reads No banned IPs.
| Column | Meaning |
|---|---|
| IP Address | The blocked address. |
| Reason | The note recorded when the ban was created (a dash if none was given). |
| Duration | The ban length chosen at creation — 6 Days, 1 Month, Permanent, or Auto-block for bans created automatically. |
| Expires | Time left before the ban lifts, shown as 2d 6h left or 4h 12m left; Permanent for bans with no end; Expired once the time has passed. |
| Banned By | The staff member who created the ban, or System for bans the auto-block rule added. |
| Banned At | The date and time the ban was created. |
| Actions | Two icon buttons per row: an eye icon to view login attempts, and a trash icon to remove the ban. |
Manually banning an address
- Click the Ban IP button at the top-right of the Banned IPs card.
- In the Ban IP Address dialog, type the address into the IP Address field (for example
192.168.1.1). - Choose a Duration: 6 Days (the default), 1 Month, or Permanent.
- Optionally type a Reason so you remember later why the address was blocked. The field can be left blank.
- Click Ban IP. The entry appears in the list immediately and a confirmation banner names the address.
Note: manual bans use coarse durations because they are usually aimed at known bad actors, whereas auto-block bans are measured in minutes for short-lived brute-force bursts. A Permanent ban never expires on its own — it stays until you remove it.
Removing a ban
Find the address in the list (use the search box if needed) and click the trash icon in its Actions column. The address is unbanned right away and the row disappears. This works for both manual and automatic bans.
Reviewing login attempts
To understand why an address was flagged before deciding whether to keep or lift the ban, click the eye icon in its row. A Login Attempts dialog opens, headed with the address, listing the sign-in attempts seen from it:
| Column | Meaning |
|---|---|
| Time | When the attempt was made. |
| The email address entered during the attempt (a dash if none was captured). | |
| Panel | Which panel the attempt targeted — admin or client. |
| Status | Success with a green check, or Failed with a red cross. |
Longer histories are paginated; use the arrows at the bottom of the dialog to page through them. If there is nothing recorded, it reads No login attempts found.
Tip: this view is the fastest way to tell a fumbling customer apart from an attack. A handful of failures all using the same real email is probably someone who forgot their password; dozens of failures cycling through many different emails is almost certainly a bot — leave that one banned.
Tips and notes
- The enforcement switch and the auto-block switch are independent. You can keep a manual blocklist active while leaving automatic banning off, or the other way round.
- Changes to the auto-block number fields only take effect after you press Save in that card. The two on/off switches take effect the instant you flip them.
- If a legitimate customer reports being locked out, search their address and remove the ban — or review their login attempts first to confirm it was a false positive.
- Auto-block bans appear with System as the creator and Auto-block as the duration, so you can always tell them from bans your staff added.
- If your platform sits behind a CDN or load balancer, configure trusted proxies first. Otherwise every visitor appears to share the proxy's address and a single ban can block everyone. See Security.