
Bare Metal
Manage bare-metal provisioning in FluxBilling: run the service, curate OS images, and build cloud-init / Unattend.xml deployment templates.
What the Bare Metal page is for
The Bare Metal settings page is where you run and monitor the bare-metal provisioning service, review the catalog of operating-system images customers can install, and build the deployment recipes that configure each physical machine on first boot.
How to reach it
Open Settings from the admin sidebar, then select Bare Metal under the Infrastructure group. The page opens on the Overview sub-tab. Three sub-tabs run across the top:
- Overview — provisioning service status and the hostname-suffix setting.
- OS Images — the catalog of deployable operating-system images.
- Templates — the deployment recipes applied at first boot.
Note: Bare Metal only appears when the Inventory module is enabled for your company. If the Infrastructure group does not show it, that module is switched off.
Overview sub-tab
The Overview sub-tab tells you whether the provisioning service is running and lets you control it. A header line reads Bare metal server provisioning — automatically configured; a Refresh button re-reads the live status at any time.
Service status and controls
A status card at the top reports one of three states:
- Automation Ready — Ready for bare metal provisioning.
- Setup in Progress… — the service is configuring itself; no action needed, wait for it.
- Services Stopped — the service is not running; Click Start to resume services.
The buttons that appear depend on the state:
- When stopped, a Start button brings the service up.
- When running, you get a Restart button and a Stop button.
- While setup is in progress, no buttons are offered.
Below the status card, a Service Status grid shows each internal component as a coloured circle — a green check for running, a grey cross for stopped, a yellow warning for anything else — with the component name and its state beneath it.
Node statistics
Once the service is running, a Nodes panel summarises your enrolled machines with counters for Total, Active and Available. An Error counter only appears when one or more nodes are in an error state.
Note: Servers sync with the provisioning service automatically when you create, update or delete them in Inventory — there is no manual sync button.
Server Hostname Suffix
The Server Hostname Suffix is a domain appended to each bare-metal server's short name at deploy time to form its fully-qualified hostname. The field shows a fixed server-name. prefix on the left; you type the domain on the right.
- Type the domain into the suffix box, for example
example.com. - A live example appears below the field, such as Example: XR-BL31S1.example.com.
- Click Save. The button briefly changes to Saved to confirm.
Leave the field blank to use the server's short name only. Save stays disabled until you change the value.
IPA Images
When the service reports them, an IPA Images panel shows two cards — Kernel and Ramdisk — each marked Downloaded or Not available. These are the boot helpers the service uses to inspect and image a machine; both should read Downloaded before you provision.
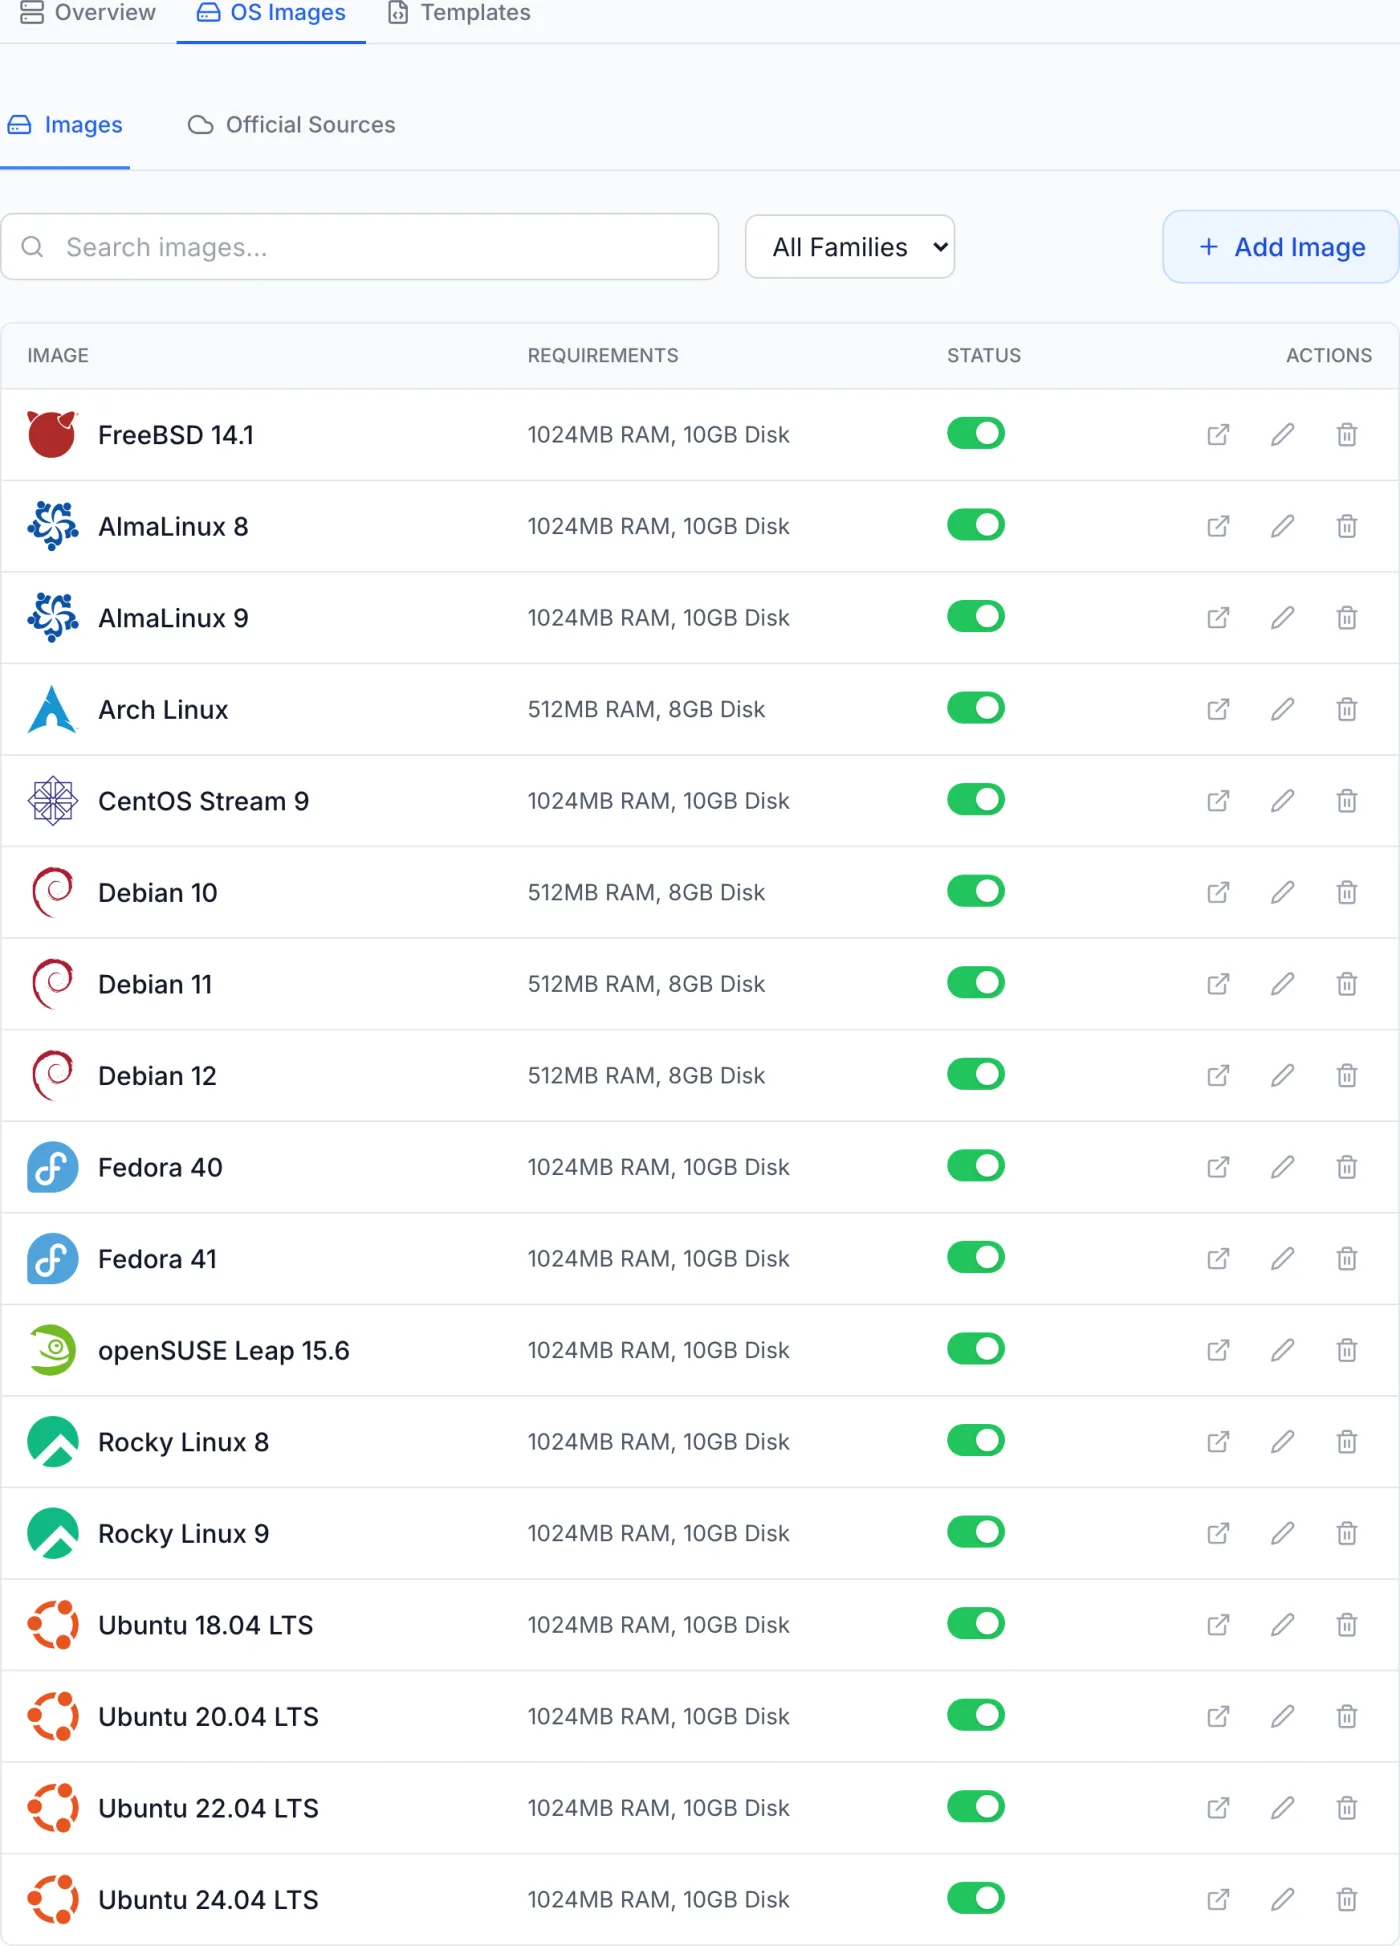
OS Images sub-tab
The OS Images sub-tab is the library of operating systems customers can choose when they order or reinstall a bare-metal server. The catalog itself is published centrally and kept in step for you, so on your own panel this is a review screen rather than an authoring one: the images arrive already filled in, and rows that came from the published catalog carry a Platform catalogue badge with a padlock and are read-only here.
A search box filters by name, short identifier or distribution, and an All Families dropdown narrows the list to Linux, Windows, FreeBSD or Other. The table has these columns:
| Field | What it does |
|---|---|
| Image | The image logo and display name, plus the Platform catalogue badge on published rows. |
| Requirements | Minimum RAM and disk, for example 2048MB RAM, 20GB Disk. |
| Status | A toggle — green when the image is active and offered, grey when hidden. Disabled on published rows. |
| VPS | Only shown when the VPS module is enabled. A clickable badge saying what the VPS catalog does with this image (see below). |
| Actions | An open-link icon that opens the image's source address in a new tab, plus edit and delete icons that are disabled on published rows. |
If the list is empty, the page says the catalog is published by the platform operator — give the sync a moment rather than expecting to type images in by hand.
The VPS badge
Your VPS answer for an image is yours, not the published catalog's, so this badge is editable even on a published row. Click it to open the VPS availability box, which carries an Available for VPS VMs switch and a VPS source URL field — the direct address of the cloud image a virtual machine's disk is seeded from, required while the image is offered for VPS. The badge reads:
- On — customers can order a VPS on this image.
- Off — not offered for VPS. Bare metal can still deploy it.
- No image — offered for VPS but there is no usable cloud image to build from, so orders for it fail. Add the source address.
- Hidden — offered for VPS but the image's own Status toggle is off, so no customer can see it.
A small padlock next to the badge means the row is pinned: it keeps your answer and a catalog update will not change it.
An image switched on here is only half of it — a customer can order a VPS on it once you also have a hypervisor registered and a plan that offers the image. See Adding a Hypervisor Node and VPS Plans.
The same screen is covered in more depth in OS Images.
Templates sub-tab
Deployment templates are the first-boot recipes that configure a server after the operating system is written — creating users, installing packages, setting the hostname, applying network configuration and running post-install scripts. The Templates sub-tab lists them as cards.
Browsing and filtering
Category filter chips run across the top — an All Templates chip plus a chip for each category that contains templates (Basic Server, Web Server, Database, Docker, Kubernetes, Security, Windows or Custom), each with a count. A New Template button sits at the right-hand end of that row, and a search box below filters by name. Cards marked with a System badge are built in; an Inactive badge marks disabled templates.
Creating or editing a template
Click New Template, or the edit pencil on a card. The editor offers:
| Field | What it does |
|---|---|
| Name / Slug | Identify the template; a Generate button builds the slug from the name. Both are required. |
| Category | Groups the template under one of the filter chips. |
| Description | Short summary shown on the card. |
| Template Type | Cloud-init (Linux), Unattend.xml (Windows), Network Config, Post-install Script or Combined Template. |
| Content tabs | Four editors — Cloud-init (user data, YAML), Unattend.xml (Windows), Network (network configuration) and Post-install (a shell or PowerShell script). |
| Validate | Checks the current content and answers Syntax is valid or shows the error. It checks the Unattend.xml content for a Windows template and the cloud-init content otherwise. |
| Preview | Offered on a saved template only. Renders the recipe with sample values so you can see the final output. |
| Compatibility | Checkboxes for the OS families the template supports: Linux, FreeBSD, Windows. |
| Active | Checkbox controlling whether the template is available. |
Note: System templates are locked: name, slug, category, type, content and compatibility are read-only, and the card offers no delete icon, so a built-in recipe cannot be broken by accident. The editor marks them System template (limited editing). You can still switch a system template's Active checkbox. To customise one, create a new template instead.
Templates use simple placeholders for substitution: {{variable}} for a value, {{#each array}} for loops (such as SSH keys) and {{#if condition}} for conditionals. Click Save Template when done; it stays disabled until Name and Slug are filled in.
Tips and gotchas
- Match an image's minimum RAM, disk and CPU against your hardware tier before assigning it to a product, or provisioning can fail when the machine is allocated.
- Hide an image you are not ready to offer with the Status toggle rather than deleting it — toggling is reversible.
- Operating-system images and deployment templates are managed here under Bare Metal, not under Inventory.
- Always run Validate before saving a hand-written recipe, and use Preview on the saved template to confirm the rendered result.
- The provisioning service talks to hardware through the agent that serves each site, so check Local Agents first when a deploy never starts.
Related
Inventory, OS Images, Deployment Templates, Local Agents, Bare Metal Setup Wizard, Products.