
Clients
Browse and manage every customer account: summary tiles, search, status filters, an admins-only view, sortable columns, manual account creation, and bulk delete.
What the Clients page is for
The Clients page is the central directory of every customer account in your billing system. It is where staff search for a person or company, segment accounts by status, review high-level numbers, and open an individual customer to do the real work — handling support, investigating billing, or running outreach. Each row is a link into that customer's full Client Details page.
How to reach it
Open the Clients entry in the admin sidebar. The page loads the customer list immediately, sorted newest-first. Staff members need the client-view permission to see the entry at all.
Reading the page at a glance
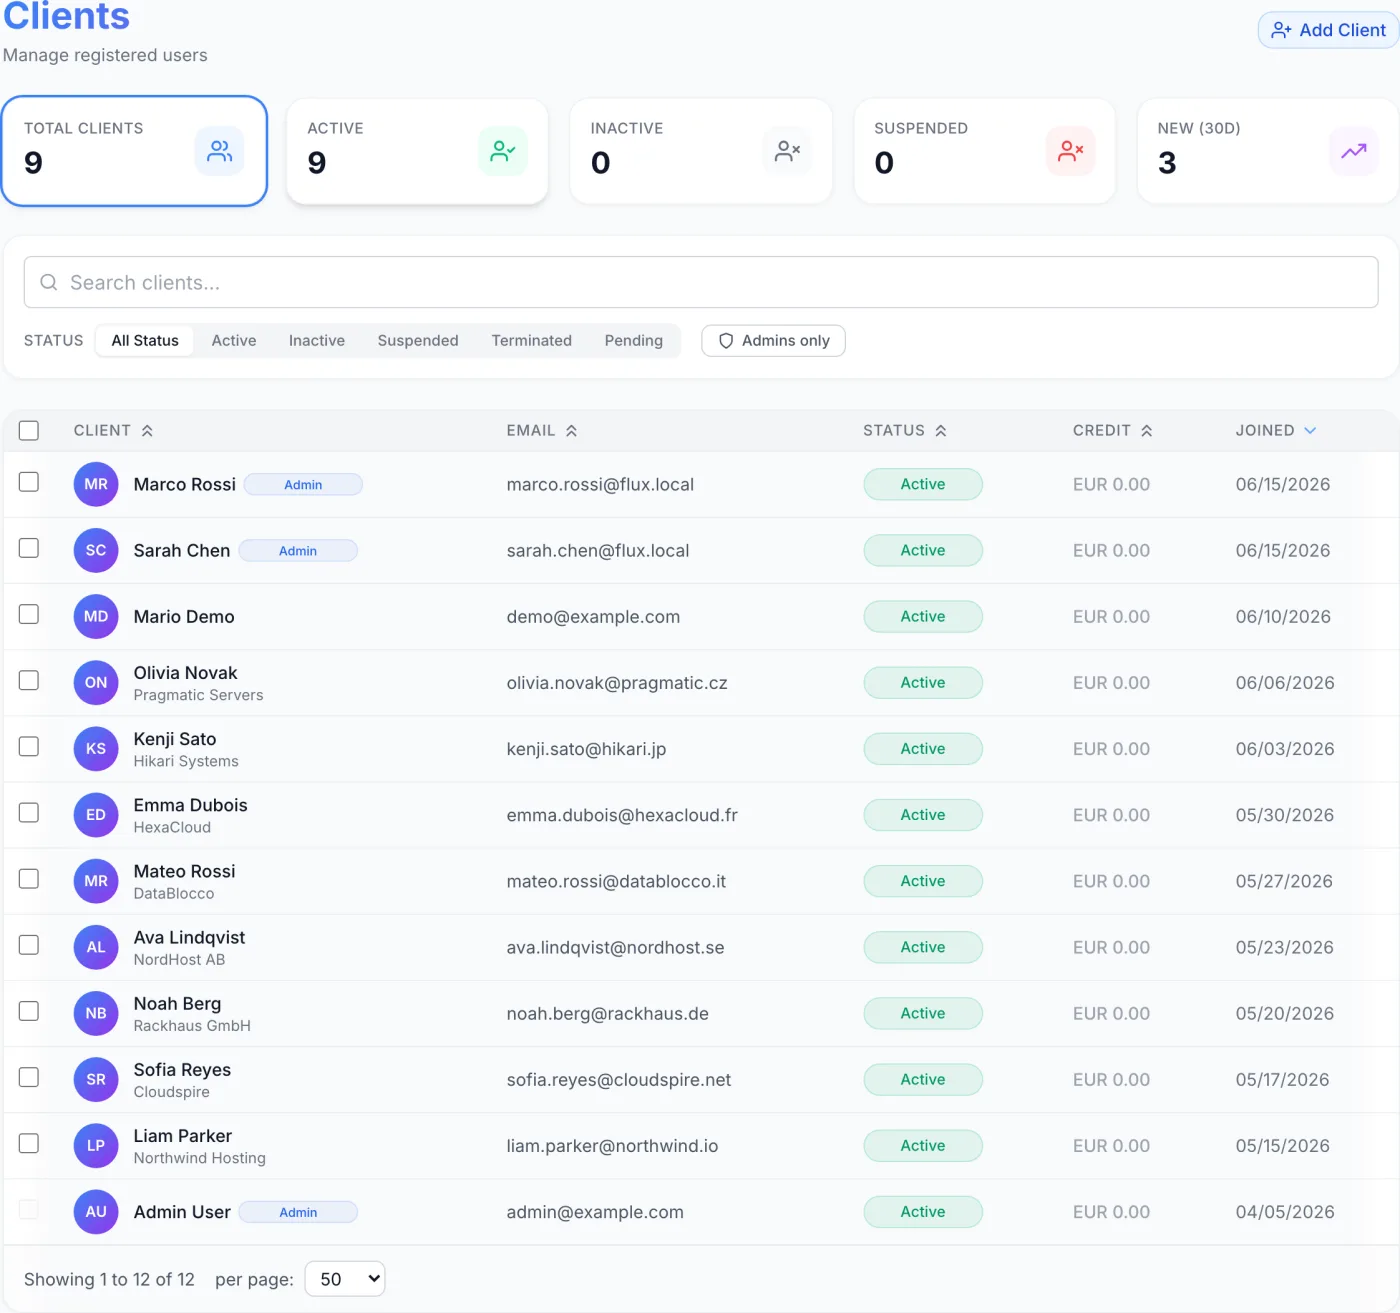
Five summary tiles run across the top of the page. Each shows a live count, and most double as a one-click filter for the table beneath them.
| Tile | What it counts | Click behaviour |
|---|---|---|
| Total Clients | Every customer account on record, excluding erased ones. | Clears the status filter (shows all). |
| Active | Customer accounts in good standing. | Filters the table to Active. |
| Inactive | Customer accounts marked inactive. | Filters the table to Inactive. |
| Suspended | Customer accounts currently suspended. | Filters the table to Suspended. |
| New (30d) | Customer accounts created in the last 30 days. | Display only — not a filter. |
Note: The tiles count customer accounts only. Staff and admin accounts appear in the table (and can be isolated with the Admins only button) but are not included in these five numbers. Erased accounts are left out of Total Clients and New (30d).
The tile you have filtered by is outlined with a highlight ring, so you always know which segment the table is showing. Clicking Total Clients returns you to the full list.
Finding a customer
Use the controls in the filter card directly below the tiles.
- Search. Type into the search box (labelled Search clients…). The list narrows as you type — it waits a moment after your last keystroke before refreshing — and matches on email, first name, last name, and the two names together in either order.
- Filter by status. On a wide screen the status options appear as a row of tabs: All Status, Active, Inactive, Suspended, Terminated, Pending, and Erased. On a narrow screen the same options collapse into a dropdown. Picking one limits the table to that status.
- Show staff only. Toggle the Admins only button (marked with a shield icon) to narrow the list to accounts that hold an admin role — useful for managing staff accounts separately from regular customers. Toggle it off to return to everyone.
Search and the status filter work together. If you have a status selected and search returns nothing, widen the status back to All Status before assuming the customer does not exist. Note that choosing a status or toggling Admins only clears the current search term.
Note: Erased accounts are hidden from the list, the counts and the search unless you pick the Erased tab explicitly. That tab is how you reach the retention record behind a closed account — for example when an authority asks you to identify who held a service. See Client Details.
Note: Team members who were invited into someone else's account are not listed here. They appear on the account owner's Users tab instead, so one company shows up as one row.
The customer table
Each row represents one account. The columns are:
| Column | Shows |
|---|---|
| Client | The customer's avatar (or their initials if none is set), full name, and company name underneath. An Admin badge appears next to the name for staff accounts. |
| The account's email address. | |
| Status | A coloured badge reflecting the account's current state: Active, Inactive, Pending, Suspended, Terminated or Erased. |
| Credit | The customer's current account balance. A positive amount — shown in green — is credit on file that can be applied to future billing. See Credit Balance. |
| Joined | The date the account was created. |
The Client, Email, Status, Credit, and Joined headers are all sortable — click a header to sort ascending or descending. The default order is Joined, newest first, so recent signups sit at the top. On smaller screens the Email, Credit, and Joined columns are hidden to keep the layout readable.
To open a customer, click anywhere on the row. This takes you to the Client Details page, where you manage that account's services, invoices, tickets, notes, and more.
If no accounts match the current search and filters, the table shows a No clients found empty state. The footer shows the current range and total (for example, “Showing 1 to 50 of 240”) with a Per page selector offering 25, 50, 100, 200 or All; 50 rows per page is the default.
Adding a client manually
Most accounts are created automatically when a customer signs up or places an order. To create one by hand — for example, when onboarding an existing customer — click the Add Client button at the top right. A dialog opens with the fields grouped under three headings:
| Section | Fields |
|---|---|
| Personal Information | First Name and Last Name (both required), Phone, Company, and VAT Number. |
| Address | Street Address, City, State / Province, Postal Code, and a Country picker. |
| Account Credentials | Email (required) and Password (required, at least 8 characters). |
Steps to add an account:
- Fill in the first and last name, then the email address.
- Set a password. You can click Generate to drop in a strong random password (which is then revealed automatically), and use the eye icon to show or hide it.
- Add any optional contact, company, tax, and address details.
- Optionally tick Send welcome email to email the new customer a welcome message.
- Click Create Client. The account appears in the list immediately. Use Cancel or the close icon to discard.
The required fields are first name, last name, email, and a password of at least eight characters. If the email is already in use, the form reports an error rather than creating a duplicate. Decide up front whether to send the welcome email — manually created accounts do not notify the customer unless you tick that box.
Tip: The address fields are optional, but if you fill one in it must look like a real address: the street line has to include a street number, the city and state have to be spelled out, and the postal code has to match the format of the selected country. Placeholder text is rejected, because these values are printed on invoices.
Closing accounts in bulk
Each row carries a checkbox, and the header checkbox selects every eligible account on the current page. Selecting one or more rows reveals a blue action bar showing how many are selected.
- Tick the accounts you want to close (or use the header checkbox to take the whole page).
- When the whole visible page is selected and more accounts match the filter, a prompt offers to select all matching records across every page. A Clear selection link undoes it.
- Click Delete Selected in the action bar and confirm. Large selections are processed in batches, and the button shows the batch progress as it works.
The confirmation spells out what will happen: the selected accounts are closed, their services are terminated and their personal data erased; billing records that the law requires you to keep are retained and removed automatically once the retention period ends; accounts with no billing history at all are deleted outright. This is the same decision the Delete button on a single customer makes — see Closing a Client Account for exactly what is destroyed, what is kept, for how long, and what to settle before you press it.
Warning: This cannot be undone. The primary owner account is protected — its checkbox is greyed out and cannot be selected — and accounts that are already erased are excluded from “select all matching”. Always double-check the count in the confirmation dialog before proceeding.
Erased accounts
An account that has been closed on an erasure request keeps a row in the system with the status Erased, but it holds no personal details: the name reads as a placeholder, the email address has been released, and it can neither sign in nor be charged. Select the Erased status tab to list them, then open one to see the retention record — what is still held, on what legal basis, and the dates on which each part is deleted automatically. Closing a Client Account explains how to read that record and how to find an erased account when an authority asks.
Related pages
Client Details · Closing a Client Account · Resellers · Referrals · Team Members