
Locations
Manage the geographic directory of your infrastructure: add locations, read capacity bars, toggle active state, reorder, bulk delete, and browse loose-item inventory.
What the Locations page is for
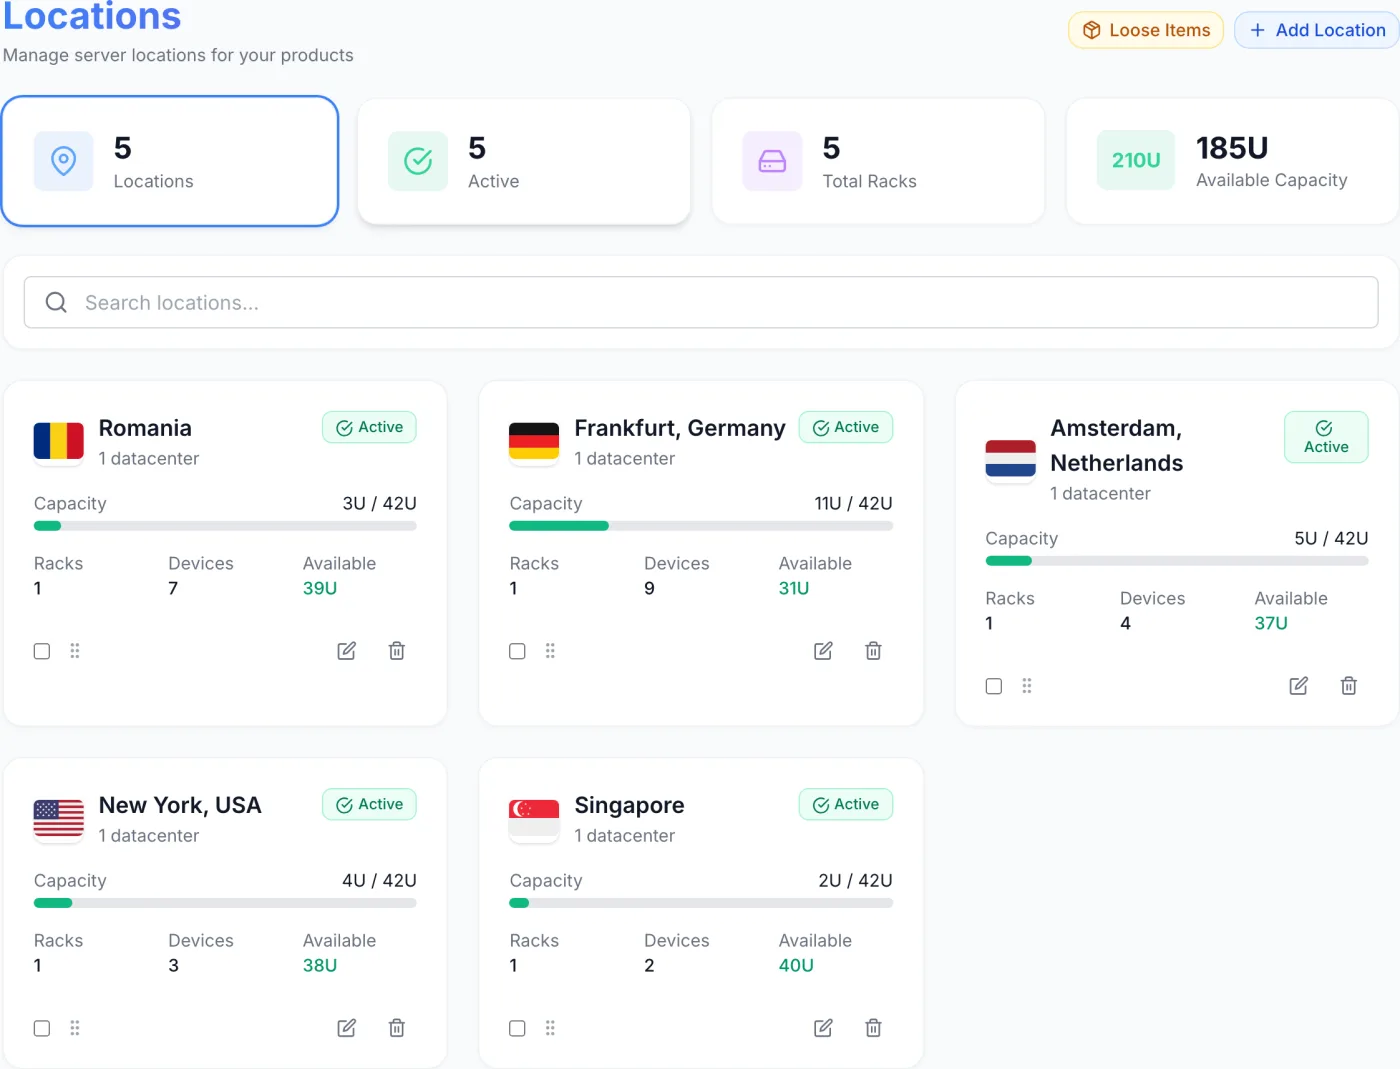
The Locations page is the geographic directory of your infrastructure. Each card is one country or region where you operate hardware, and the page subtitle sums it up: Manage server locations for your products. Opening a card drills into that location's datacenters, and from there into racks and the devices mounted in them. A location is also the unit customers choose from when they order a product that is tied to a place.
How to reach it
In the admin sidebar, click Locations (the map-pin icon). The page opens directly on the location grid.
Note: The Locations entry only appears when the Locations module is enabled for your company and your staff role carries the permission to view locations. Location Details, Datacenter Details and the rack editor all live behind the same module.
The four-part hierarchy
Everything on these pages is one chain, and each level is a separate page:
- Location — a country or region. This page.
- Datacenter — a building inside that location. See Location Details.
- Rack — a cabinet inside that building. See Datacenter Details.
- Device — a server, chassis, switch or PDU mounted at a specific rack unit. See Rack Management.
The device records themselves live on the Inventory page, which appears separately and only when the Inventory module is enabled. Locations and Inventory are two different modules: you can run one without the other, though hardware is only useful once it sits in a rack that belongs to a location.
Reading the page
The summary tiles
Four tiles sit across the top and aggregate every location, datacenter and rack you manage:
| Tile | What it shows | Clickable? |
|---|---|---|
| Locations | Total number of locations you have created. | Yes — clears the status filter and shows all locations. Any text in the search box stays applied. |
| Active | How many locations are currently switched on. | Yes — filters the grid down to active locations only. |
| Total Racks | The combined rack count across every datacenter under every location. | No — display only. |
| Available Capacity | Free rack units (U) still open across all racks, with the total U shown in the badge beside it. | No — display only. |
Tip: The two clickable tiles act as a toggle pair. The selected tile is highlighted with a coloured ring. Click Locations again at any time to return to the unfiltered list.
The location cards
Each card is one location and surfaces its operational health at a glance:
- Flag and name — the country flag (drawn from the country code) and the location's display name.
- Datacenter count — how many datacenters live under this location, shown under the name.
- Active / Inactive pill — the status badge in the top-right corner. Click it directly to switch the location on or off without opening any form.
- Capacity bar — used U out of total U, with a colour cue: green below 70% used, yellow from 70% to 89%, red at 90% and above. The bar only appears once the location has racks that report a total U.
- Racks / Devices / Available — three counters along the bottom showing the rack count, the device count, and the free rack units remaining at this location.
Beneath those, each card has a selection checkbox, a drag handle (the grip icon), an edit pencil, and a delete trash icon.
What a location row actually controls
A location is not just a label. Three things key off it:
- Where a product can be ordered. On a product, the Delivery section carries an Available Locations picker — a row of location chips. Only active locations appear in that picker. The chips you switch on become the location choices your customer sees on the order form for that product. See Products.
- Price by location. For products delivered by a plugin or by the virtual-server module, a per-location price table sits directly beneath the same picker, so one product can cost more in one country than another. See VPS Plans.
- Which hardware can fulfil the order. When a customer picks a location on a dedicated-server order, only Available devices whose rack sits under that location are considered. A location with no free matching hardware reads as out of stock for that product.
The chain matters here: a device belongs to a rack, a rack to a datacenter, and a datacenter to a location. A device that is not racked has no location, so it can never be picked for an order.
Location works the same way for the virtual-server and game modules: a hypervisor node is filed at a location, and that is what a plan targets and what a customer chooses on the order form. See Groups & Migration Pools and Game Nodes.
Common tasks
Add a location
- Click Add Location in the top-right of the page.
- In the New Location dialog, type the Name (for example,
Netherlands). This field is required. - Enter the two-letter Country Code (such as
NLorUS). The flag fills in automatically from this code, and the preview card at the top of the dialog updates as you type. - Change the Flag field only if you want something other than the flag the country code produced.
- Click Create Location.
Note: Adding a location does not provision any hardware. It only creates the geographic entry. You still need to open the location and add datacenters, then racks and devices inside them, before there is any real capacity to fill.
Edit a location
- Click the pencil icon on the card.
- Change the Name, Country Code or Flag as needed.
- Click Save Changes.
The active/inactive state is not part of this form — toggle it with the status pill on the card instead.
Turn a location on or off
Click the Active or Inactive pill on any card. Marking a location inactive removes it from the location picker in the product editor, so it can no longer be added to a product, while every datacenter, rack and device underneath is kept intact. It is also the fallback when a location cannot be deleted (see below).
Warning: Deactivating a location does not retroactively strip it from products that already list it. If you want a region to stop being orderable straight away, remove its chip from the Available Locations picker on each product that offers it.
Open a location's details
Click anywhere on the body of a card (the flag, name or stats) to open Location Details. There you see the datacenters at that location and can add, edit or remove them, then drill further into racks and devices.
Reorder locations
Grab the drag handle (grip icon) on a card and drag it to a new position. The new order is saved automatically and controls the sequence the cards appear in on this page.
Note: Drag-to-reorder only works on the full, unfiltered list. If you have typed in the search box or selected the Active tile, dragging does nothing — clear the search and click the Locations tile first.
Delete a location
- Click the trash icon on a card.
- A Delete Location? dialog appears and lists what will be permanently removed: datacenters, racks, client boxes and loose items. If nothing hangs off the location, it says so instead.
- Click Delete Location to confirm, or Cancel to back out.
Two things are worth knowing before you confirm:
- A location that any product offers cannot be deleted. The attempt is refused with a message telling you to deactivate it instead. Remove the location from every product's Available Locations picker first if you really need it gone.
- Devices are not deleted. The racks, client boxes and loose items under the location are removed, but each server, chassis, switch and PDU keeps its inventory record — it is simply taken out of its rack and left with no rack or U position. You will find it again in Inventory, and in the Unassigned Devices panel of any rack editor.
Bulk delete
- Tick the checkbox on each location you want to remove.
- A red Delete button appears in the page header showing the number selected.
- Click it, review the combined list of datacenters, racks and devices affected, and confirm.
Locations that are in use by a product are skipped, and the result message tells you how many were deleted and how many failed.
Search
Use the search box above the grid to filter cards by location name. Searching also temporarily disables drag-to-reorder.
The Loose Items inventory
Click the amber Loose Items button in the page header to open a searchable list of spare parts and accessories stored across all your racks and client boxes — drives, network cards, cables, power supplies and more. This is the place to answer "do we have a spare PSU anywhere?" without walking the floor.
The list opens empty and waits for you to pick a filter (Select a location or apply filters to search). Use any combination of the controls below:
| Filter | Options |
|---|---|
| Location | All Locations, or a single location. |
| Item type | All Types, SSD, HDD, NIC, SFP/Transceiver, Cable, PSU, RAM, Fan, Riser, Rail, Caddy, or Other. |
| Condition | All Conditions, New, Used, Refurbished, or Faulty. |
| Search | Free-text match on name, serial or model. |
Each result row shows the item name, a quantity badge when more than one is held, the manufacturer and model where recorded, a badge marking whether it sits in a Rack or a Client Box, the path to where it lives (location › datacenter › rack or box), the linked customer for box items, the serial number when known, and a colour-coded condition badge.
Note: A count line at the top of the results tells you how many items matched. If a filter combination returns nothing, the list shows No items found rather than an error — widen the filters to broaden the search. This window is read-only; to add, edit, move or delete an item, open the rack or the client box that holds it.
Tips and gotchas
- The Available figure on a card, and the Available Capacity tile, are the numbers to watch when deciding where to deploy new hardware — both are summed across every rack in every datacenter at that location.
- A location with no racks yet shows no capacity bar. Add a datacenter and racks to give it capacity.
- Marking a location inactive is the safe way to stop offering a region on new products without touching any of its underlying infrastructure.
- Read the delete preview before confirming a single or bulk delete. Racks, client boxes and loose items do not come back.
Related articles
Location Details · Datacenter Details · Rack Management · Inventory · IPAM · Products · VPS Hosting Overview · Game Hosting Overview