
Getting Support
Open a support ticket, pick a department and priority, attach files, link a service, track replies, and close a resolved request in the client portal.
What support tickets are for
Support tickets are how you reach your provider's team whenever you have a question or a problem. From Support Tickets in the client portal you can open a request, follow its progress, reply to every update, attach files, and close it once your issue is resolved — with the whole conversation kept on record.
How to reach the Tickets page
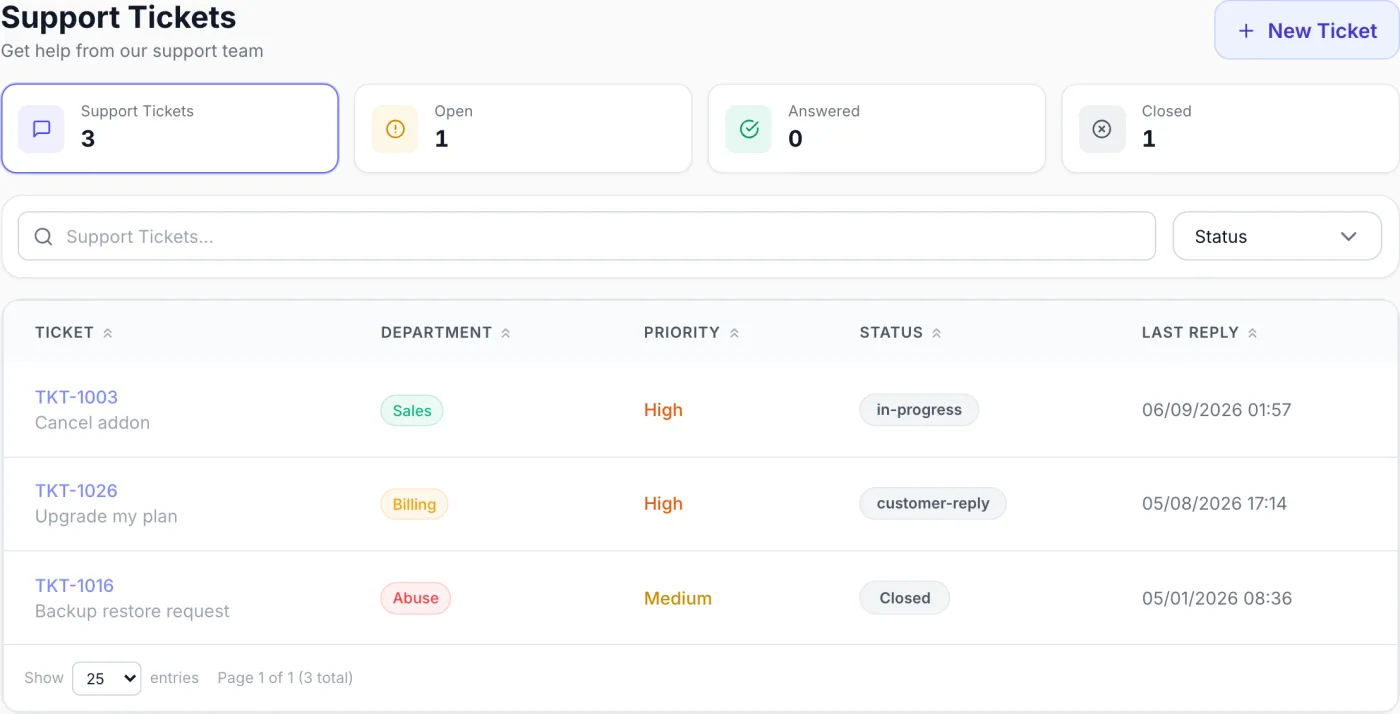
Choose Support Tickets from the sidebar. The page is headed Support Tickets with the subtitle Get help from our support team, and opens on the list of all your requests. Four summary cards sit across the top — Support Tickets (the total), Open, Answered and Closed. Select a card to filter the list to that status, and select it again to clear the filter.
Opening a new ticket
Select New Ticket (top-right of the Tickets page) to open Create New Ticket, then work through the form top to bottom.
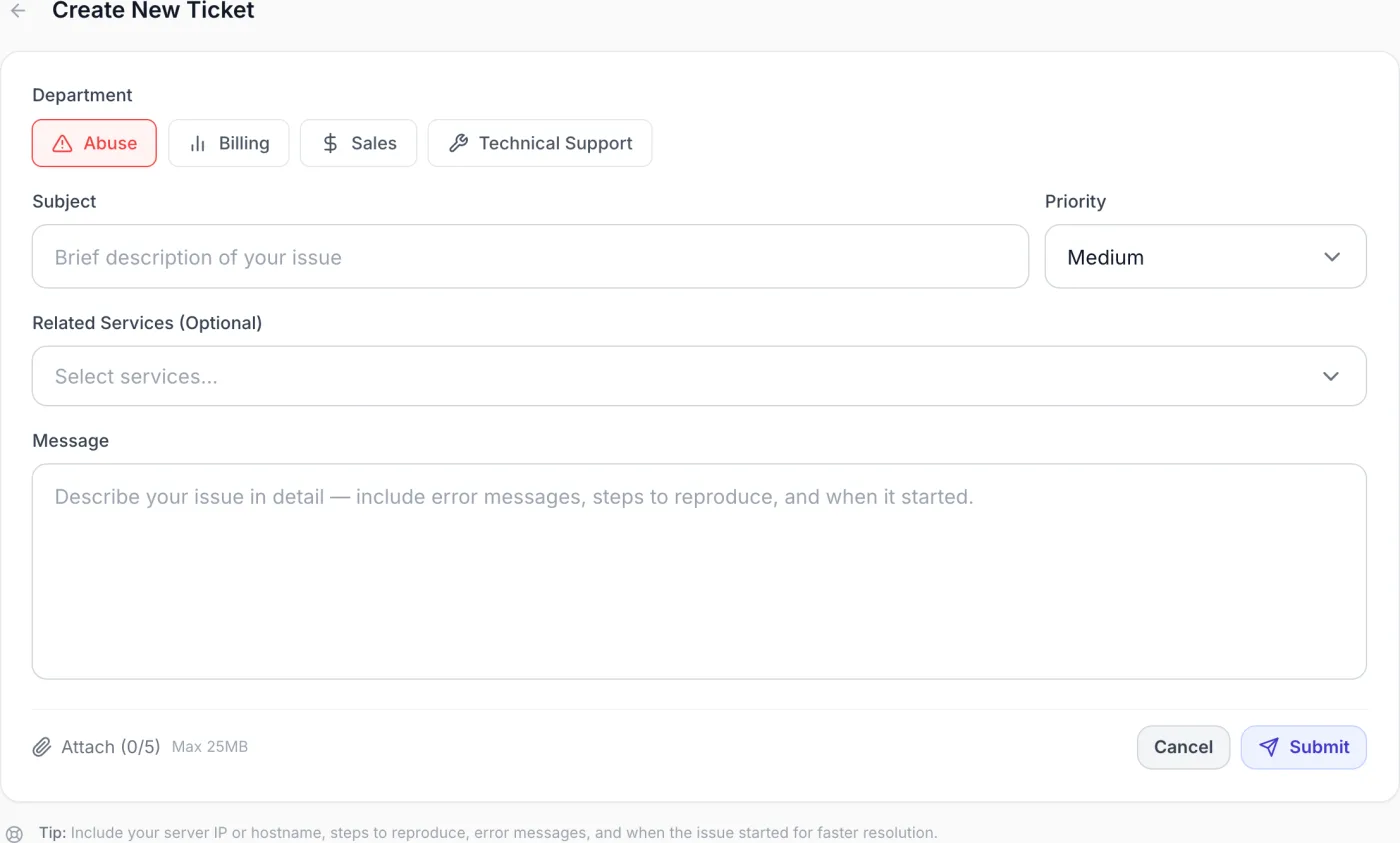
- Choose a department. The departments appear as a row of labelled buttons at the top of the form. Select the one that best fits your request. The first department is chosen for you, so you only need to act if a different team suits it better.
- Enter a subject. Type a short summary in Subject (placeholder Brief description of your issue). It is required and must be at least 5 characters.
- Set the priority. Pick how urgent it is from the Priority dropdown next to the subject. It defaults to Medium.
- Link any related services. Related Services (Optional) lets you attach one or more of your services so the team has the context immediately. The selector only appears when your account has services to choose from.
- Write your message. Describe the issue in Message. It is required and must be at least 20 characters — the placeholder asks for error messages, steps to reproduce, and when it started.
- Attach files. Optional; use the paperclip button below the message — see the next section for limits.
- Submit. Select Submit to send the ticket, or Cancel to return to the list without saving. On success you are taken back to your ticket list with a confirmation.
A tip line under the form reminds you to include your server IP or hostname, steps to reproduce, error messages, and when the issue started, for a faster resolution.
Field reference
| Field | Required | What it does |
|---|---|---|
| Department | Yes (preselected) | Routes your ticket to the right team. Departments are set by your provider, so the options vary (for example Billing, Technical Support or Sales). |
| Subject | Yes | A short headline for your request. Minimum 5 characters. |
| Priority | Yes (defaults to Medium) | Signals urgency. Choices are Low, Medium, High and Urgent. |
| Related Services | No | Links one or more of your services so the team sees their details without asking. Only shown when you have services. |
| Message | Yes | The full description of your issue. Minimum 20 characters. |
| Attachments | No | Up to 5 files, 25 MB each. Added with the paperclip button, which shows a running count. |
What the priority levels mean
- Low
- General questions, no urgency.
- Medium
- The default — issues affecting your work but not critical.
- High
- Service degradation or otherwise urgent issues.
- Urgent
- A complete service outage.
Attaching files
Both on the new-ticket form and when replying, select the paperclip button below the message box to choose files. Each file appears as a small chip with its name and size; remove one with the × on its chip. The button reads Attach (1/5) and stops accepting files once you reach the limit.
- Allowed file types — PDF, Word documents (
.doc,.docx), plain text (.txt), images (PNG, JPEG, GIF, WebP, HEIC/HEIF) and spreadsheets (CSV, XLS, XLSX). - Maximum size — 25 MB per file.
- Maximum count — up to 5 files per message.
Note: Executable files and archives —
.exe,.bat,.cmd,.msi,.zip,.rar,.7z,.tar,.gz— cannot be attached, and any file over 25 MB is rejected with a message naming it. If you need to share a large or blocked file, describe its contents in the message and the team will tell you how to send it.
Finding a ticket in the list
Each row shows the ticket number and subject, the Department (as a coloured chip), the Priority, the Status badge and the Last Reply time. Tickets that started as a live chat carry a Chat badge next to the number. Use the search box to find a ticket by its number or subject, and the status dropdown — Status, Open, Answered, Closed — or the summary cards to narrow the list. Select any sortable column heading to reorder. On narrow screens the Department and Last Reply columns are hidden.
Reading and replying to a ticket
Select a row to open the full conversation. Messages are shown newest first. Replies from the support team are marked with a Staff badge and a coloured left edge so they stand out; your own messages carry a You tag, replaced by your profile photo if you have set one. Each message shows the author, a timestamp, an (edited) note if it was changed, and any attachments — select an attachment to download it.
- At the top of the conversation, type your response in the Reply to Ticket box.
- Optionally attach files with the paperclip button (same limits as above).
- Select Submit. Your reply appears in the thread immediately and the ticket goes back to the team.
A speaker button in the header mutes or unmutes the chime that plays when a new staff message arrives. If your provider has enabled reply ratings, a small star control appears under each staff reply so you can rate how helpful it was; your rating is shown back to you once saved.
A ticket that began as a live chat behaves the same way, except that when the chat has been ended you see This chat has ended. and the reply box is removed.
Ticket statuses
| Status | What it means |
|---|---|
| Open | Your ticket has been received and is waiting for the support team. |
| Customer Reply | You replied most recently, so the ticket is back with the team. |
| In Progress | Someone is actively working on it. |
| Answered | The support team has replied; open the ticket to read their response. |
| Closed | Resolved and read-only. You can still read the whole history, and a link to open a fresh ticket is shown. |
Note: The Open summary card also counts tickets that are waiting on the team after your latest reply, so its number can be higher than the count of tickets whose badge literally reads Open.
Closing a ticket yourself
If your issue is resolved you can close the ticket without waiting. Open it and select Close in the header. The status changes to Closed straight away, the reply box is replaced by This ticket has been closed, and an Open a new ticket link is offered in case the problem returns. The full conversation stays visible.
Tracking a ticket without signing in
If a ticket was raised without an account — through a contact form or a live chat, for example — you can still follow it. Add /tickets/track to your provider's portal address to open Track Your Ticket.
- Enter your Ticket Number (for example
TKT-00001) and the Email Address you used when the ticket was submitted. - Select Find Ticket. If the details do not match you see Ticket not found. Please check your details.
- The conversation opens with the ticket's status shown as Open, Answered, Awaiting Response or Closed. It refreshes on its own while you have it open.
- Unless the ticket is closed, type into the Reply box and select Send Reply. A closed ticket shows This ticket is closed. instead.
- Back returns to the lookup form.
Tip: If you do have an account, sign in instead — the full ticket list, attachments and file uploads are only available there.
Tips
- The more detail in your opening message, the faster the team can help — include exact error text, what you were doing, and when it started.
- Link the affected service with Related Services so the team sees its details without asking.
- Pick the department that matches your request (Billing for invoice questions, for example) so it reaches the right people first time.
- Reserve High and Urgent for genuine degradation or outages so the team can triage effectively.
Related
Managing Your Services, Invoices & Payments, Client Portal Overview.