
Invoices
Use the Invoices & Proformas ledger to search, filter by status, date and amount, create documents manually, and bulk-delete from one admin page.
What the Invoices & Proformas page is for
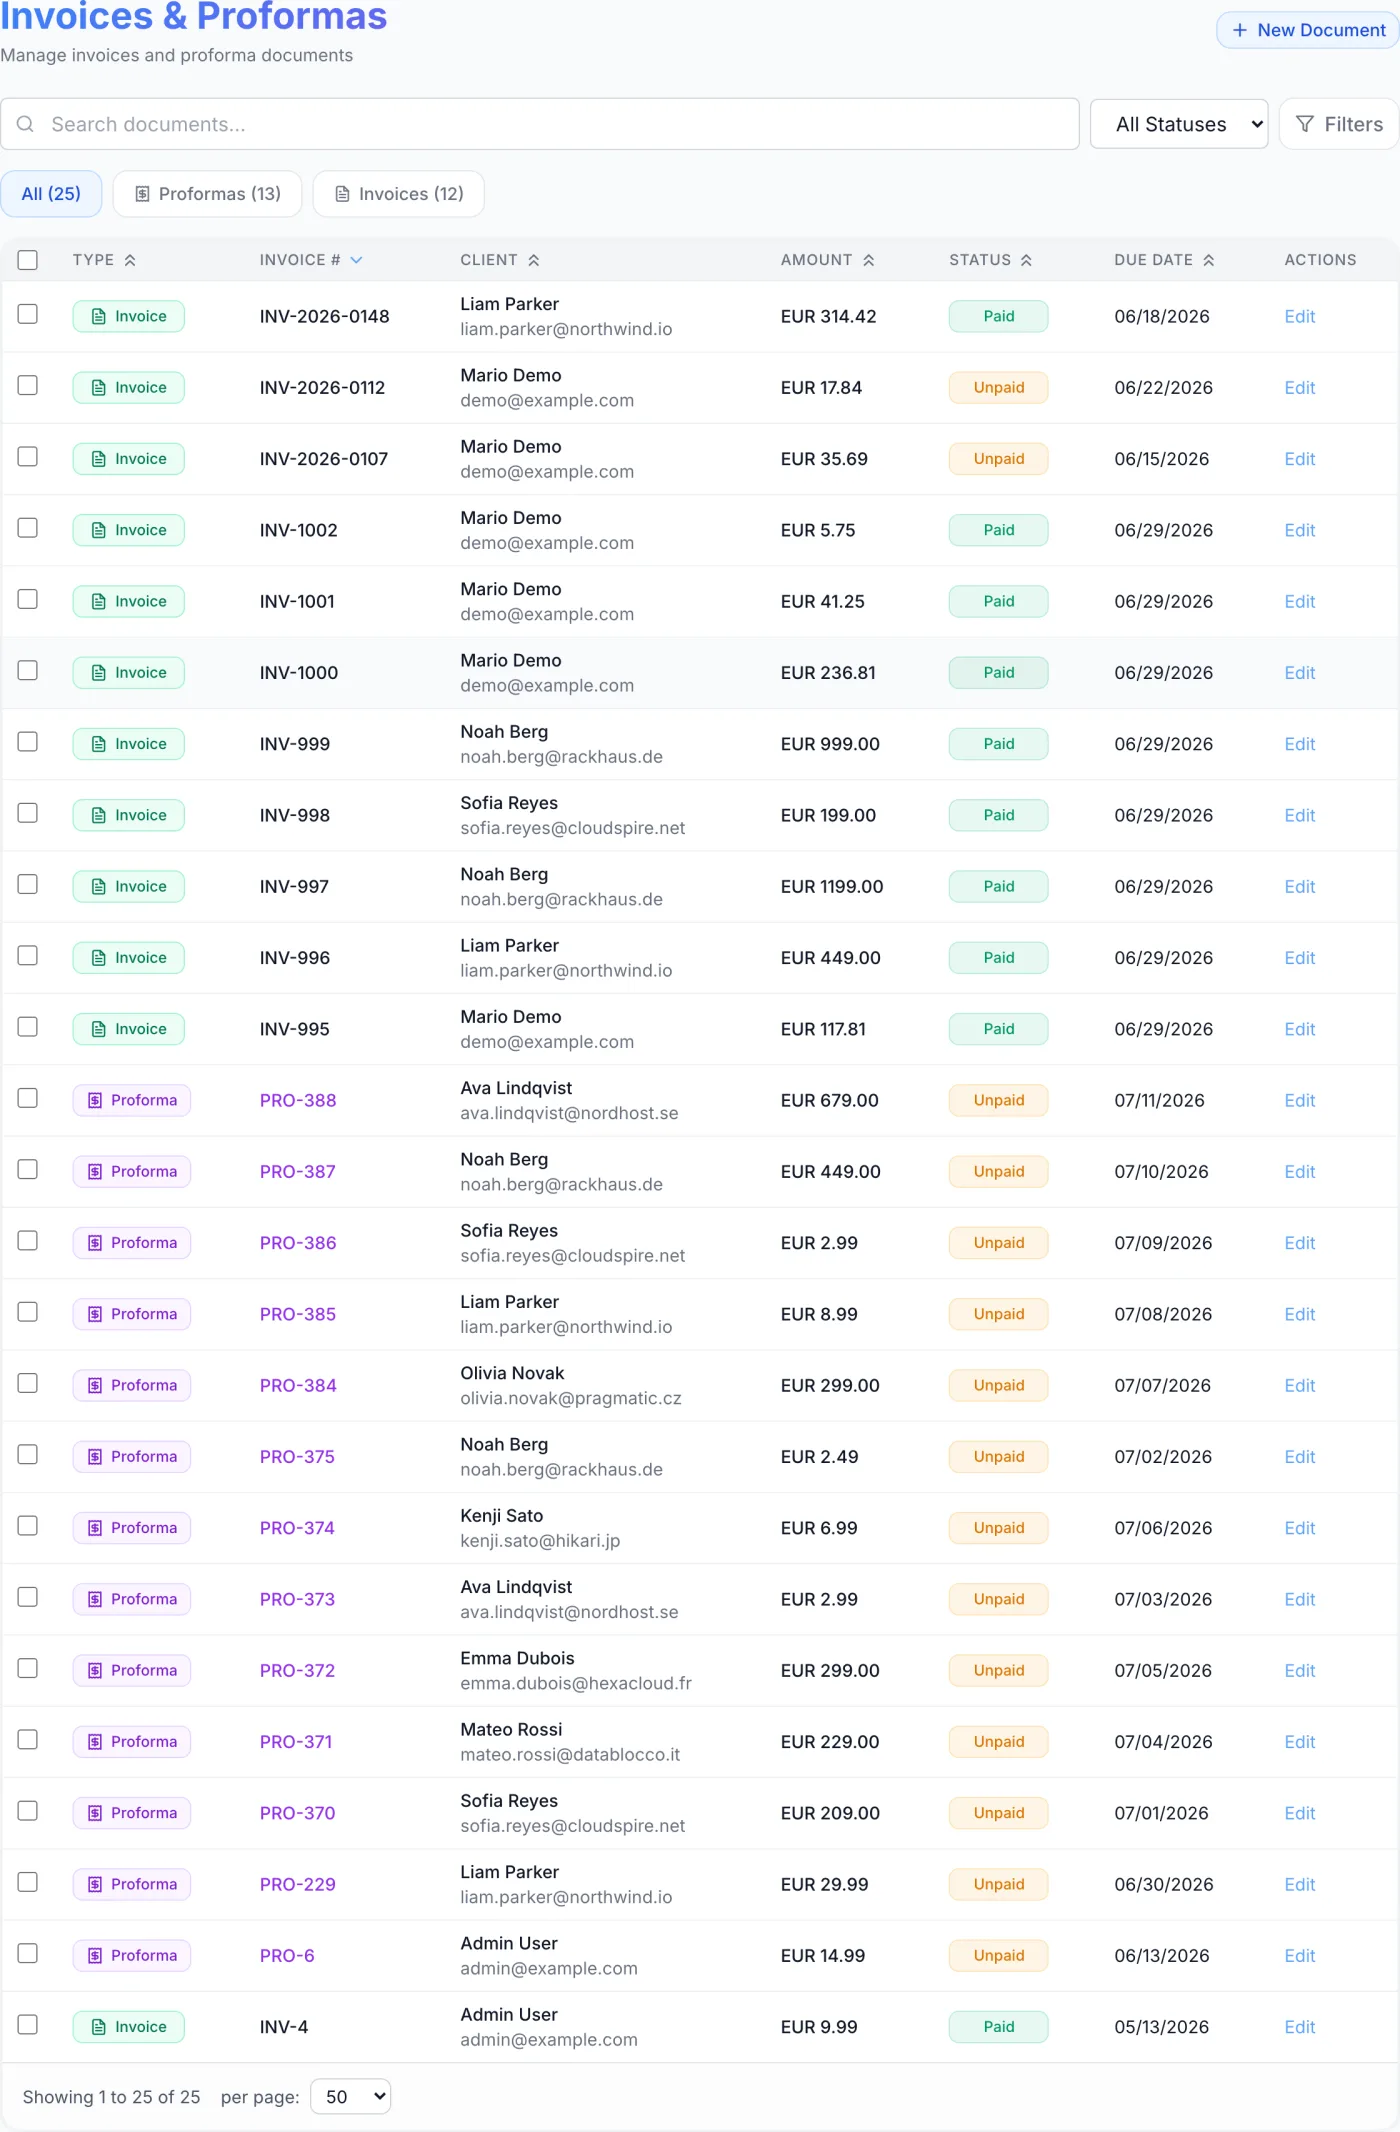
Invoices & Proformas is your billing ledger. It lists every invoice and every proforma your company has issued, with tabs to switch between the two document types and tools for search, filtering, and bulk cleanup. Almost everything on this page is created automatically by orders, renewals, upgrades and credit top-ups, so this is mainly where you review and open documents rather than create them.
How to reach it
Open the admin panel and click Invoices in the main sidebar. The page header reads Invoices & Proformas with the subtitle “Manage invoices and proforma documents.”
Invoice or proforma?
Your company issues one of two things when money becomes payable, and you choose which on the Billing settings page under Billing Document Type:
- Invoice — the payable document is also the tax document. It is issued unpaid and marked paid when the money arrives.
- Proforma — a request for payment that is not a tax document. When it is paid in full it is normally converted into an invoice, which carries its own number.
Both kinds live in this one list. See Proforma Details for the full proforma lifecycle.
Understanding the layout
Below the header there is a search box and filter row, then the type tabs, then the document table.
Search
The search box (placeholder Search documents…) matches the document number, the client’s name and email, the service name, the transaction reference, the due and created dates as they are displayed, and the amount. Results narrow as you type; click the × inside the box to clear it.
Status filter
The dropdown to the right of the search box filters by one status at a time. The choices are All Statuses, Paid, Unpaid, Overdue and Cancelled.
Note: a document that passes its due date keeps the status Unpaid — the platform does not restamp it. To find late documents, filter on Unpaid and sort by Due Date ascending. Overdue reminder emails are sent on their own schedule regardless of the status shown here.
Advanced filters
Click Filters to expand a panel with four fields. A blue badge on the button counts the filters currently applied, and a Clear filters link appears next to it.
| Field | What it does |
|---|---|
| Date From | Only show documents created on or after this date. |
| Date To | Only show documents created on or before this date, including the whole of that day. |
| Min Amount | Hide documents whose total is below this value. |
| Max Amount | Hide documents whose total is above this value. Leave blank for no upper limit. |
The badge counts the date range, the amount range and the status dropdown. Clear filters resets all of those and the search box in one click.
Type tabs
Three tabs sit above the table, each with a live count:
- All — every document, for example
All (12). - Proformas — proformas only.
- Invoices — invoices only.
The counts are the totals your company holds; they do not change when you type in the search box or apply the advanced filters.
Table columns
| Column | What it shows |
|---|---|
| Type | A green Invoice badge or a purple Proforma badge. |
| Invoice # | The document number, for example INV-4 or PRO-6. Proforma numbers are shown in purple. |
| Client | The client’s name, linking to their record, with their email beneath. |
| Amount | The document total in the document’s own currency. |
| Status | A coloured status badge (see below). |
| Due Date | The date payment is due. |
| Actions | An Edit link. Clicking anywhere on the row opens the document. |
Every column header is sortable — click once for ascending, again for descending. The list opens sorted by document number, highest first. On narrow screens the Type, Client and Due Date columns are hidden so the table stays readable.
Document statuses
The badge shows the state the document is actually in. Invoices and proformas do not use exactly the same set.
| Status | Appears on | Meaning |
|---|---|---|
| Unpaid | Both | Issued and not yet settled. |
| Pending | Both | A payment has been started and is waiting on the gateway to confirm. |
| Paid | Both | Settled in full. |
| On Hold | Both | A renewal document parked while an upgrade for the same service is in progress. It is released or cancelled when the upgrade finishes. |
| Cancelled | Both | Voided and no longer collectible. |
| Converted | Both | A proforma that has become an invoice, or an invoice that was turned back into a proforma. The document it points at carries the money. |
| Refunded | Invoices | Money was returned to the client. |
| Collections | Invoices | Carried over from another billing system on import. Documents in this state can still be paid. |
| Expired | Proformas | Set by hand when you decide a proforma has lapsed. Nothing sets it for you. |
Consolidated monthly invoicing
If your company issues proformas, you can switch on Consolidated Monthly Invoicing on the Billing settings page. Clients then pay proformas as usual, and instead of one invoice per payment they receive one invoice per month covering everything they settled in it. Those invoices appear here like any other, carry a Monthly Invoice badge on the document page, and are already marked Paid when they are issued.
Proformas settled this way stay in the list at Paid until the month is closed out, then move to Converted and point at the monthly invoice. See Proforma Details for what you may and may not do to one of those while it is waiting, and Consolidated Monthly Invoicing for exactly what folds onto the month’s document, the close-out day, and what the client receives.
Creating a document by hand
Click New Document at the top right. Whether the dialog creates an invoice or a proforma is decided by your Billing Document Type setting — the dialog title and its confirm button say which one you are about to produce, and there is no choice inside the dialog.
- Choose the client. Type at least two characters of a name or email into the box (placeholder Search by name or email…) and pick a result. The chosen client appears in a card; click the × beside it to pick someone else.
- Set the due date. Due Date defaults to today.
- Add line items. Each row takes a description, a quantity and a unit price, and shows the row total. Add Item adds another row; the trash icon removes one, and at least one row must remain. A running Subtotal is shown underneath.
- Add notes (optional). Notes appear on the finished document.
- Create. The new document appears in the list.
Note: the dialog states “VAT will be calculated automatically”. Enter prices without tax — any VAT that applies to that client is added on top when the document is created, at the rate VAT & Tax explains how the platform chooses. There is no currency selector here; the document uses the client’s configured currency.
Opening a document
Click any row, or its Edit link, to open it. Invoices open Invoice Details and proformas open Proforma Details, where you can review the lines, record payments, refund, and change the document.
Deleting documents in bulk
- Tick the checkbox at the start of one or more rows, or use the header checkbox to select everything on the current page.
- A blue bar appears showing how many documents are selected.
- Click Delete Selected and confirm. Invoices and proformas in the same selection are removed together.
Warning: deleting a document also deletes the payment records attached to it. No money is returned to the client, no refund is sent to the gateway, and account credit that was spent on the document is not given back. For a document that should no longer be collected but must stay on the record, set it to Cancelled instead. Deletion is meant for test or mistaken documents.
Practical tips
- Stack the filters. The tab, the status dropdown, the advanced filters and the search box all apply together — the Invoices tab plus Unpaid plus a Min Amount plus a recent Date From surfaces large outstanding invoices quickly.
- Most documents are automatic. Orders, renewals, upgrades, add-on purchases and credit top-ups all raise their own documents, so New Document is for genuine one-offs. The nightly pass that raises renewal documents and chases them is described in Billing Automation.
- Numbering is configurable. Number prefixes and the next number for each document type are set on the Billing settings page, in the Document Numbering section. Proforma and invoice numbering run independently.
- Exporting for accounting. To hand a period to your accountant, use Invoice Export rather than copying rows out of this table. For the figures behind the ledger — revenue, recurring revenue, and how long money has been outstanding — use Reports.
Related articles
Invoice Details · Proforma Details · Billing Settings · Billing Automation · Consolidated Monthly Invoicing · VAT & Tax · Invoice Export · Reports · Orders · Services