
Newsletter Subscribers
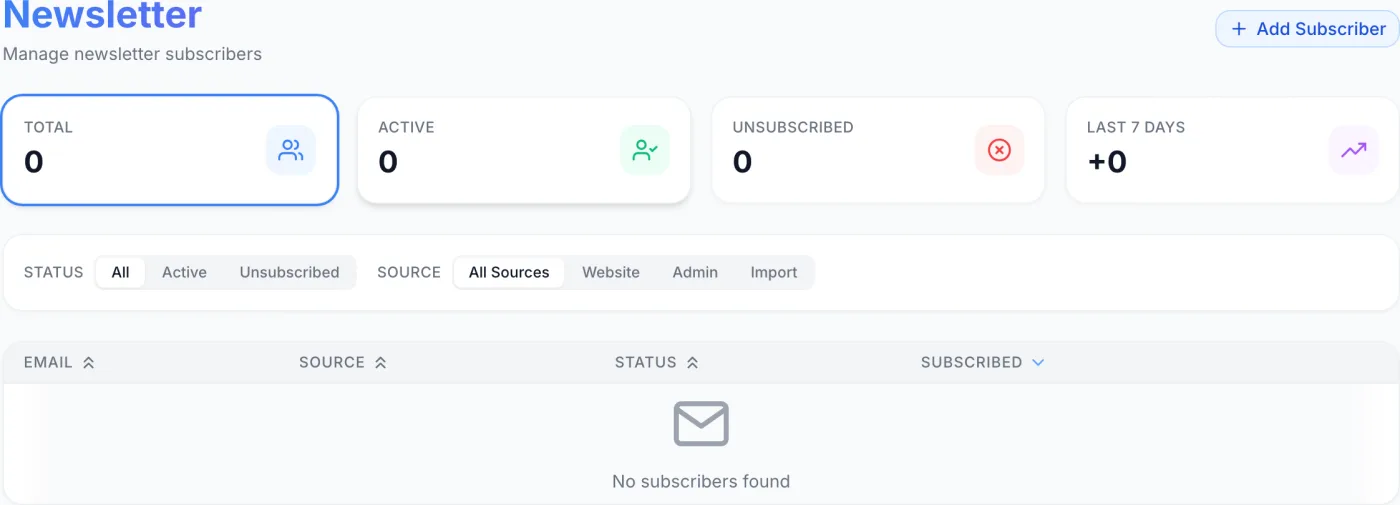
Manage your opt-in newsletter list: review Total, Active, and Unsubscribed tiles, filter by status and source, add subscribers, and unsubscribe or delete them.
What the Newsletter page is for
The Newsletter page is your opt-in mailing list. It holds the email addresses of people who have agreed to receive marketing and announcement emails from you, whether or not they are paying customers. This is the audience an Email Broadcast reaches when you pick the Newsletter target group, which makes it the right home for prospects, blog readers and other contacts who have signed up but not yet placed an order.
Note: This list is separate from your customer accounts. A customer who unsubscribes from your campaigns is recorded against their own account and does not appear here, and adding someone here does not create a customer account for them.
How to open it
In the admin panel sidebar, click Newsletter (the envelope icon), directly below Campaigns at the bottom of the menu. You need settings access for the item to appear. The page header reads Newsletter with the subtitle Manage newsletter subscribers.
How people join the list
There are two routes onto the list, and they are the two you will see in the Source column:
- They subscribe themselves through the newsletter sign-up form on your public website. Their address is tidied to lower case, their sign-up address is recorded, and the record is tagged Website. Somebody who is already on the list and active is told they are already signed up; somebody who had unsubscribed before is simply re-subscribed, and their Subscribed date is set to the moment they came back. To keep automated sign-ups from flooding the list, the form accepts at most ten attempts an hour from the same address.
- You add them by hand from this page, which tags the record Admin.
The Source filter also offers Import, which is the label carried by records brought in from an existing list. There is no import or export control on this page — addresses arrive through the sign-up form or through Add Subscriber, and the list is read on screen rather than downloaded.
How people leave the list
- They unsubscribe themselves. Every campaign carries a personal unsubscribe link, either the one you placed in the body or the footer that is added automatically. Clicking it opens a short confirmation page reading You have been unsubscribed, naming the address that will no longer receive marketing email. Mail clients that show their own one-click Unsubscribe button do the same thing without opening a page. Their row stays on the list, marked Unsubscribed.
- You unsubscribe them with the row action described below — for example when someone asks to be taken off by replying to a message.
- You delete them, which removes the record entirely.
- A data-erasure request removes them. Erasing a customer account also removes any newsletter record held under the same address.
Reading the summary tiles
Four tiles sit across the top of the page:
- Total — every subscriber record on the list, active or not.
- Active — addresses currently subscribed, which are the ones a Newsletter campaign reaches.
- Unsubscribed — addresses that have opted out but are still kept on record.
- Last 7 days — new sign-ups in the past week, shown as a
+Nfigure.
Tip: Total, Active and Unsubscribed are clickable shortcuts — click one to filter the table to that status and the tile gains a blue ring. Last 7 days is informational and does not filter. Because reactivating an address resets its Subscribed date, a reactivation counts towards the Last 7 days figure just like a fresh sign-up.
Filtering the list
Below the tiles, a filter bar narrows what the table shows. On desktop the filters appear as labelled button groups; on smaller screens they collapse into dropdown menus.
- Status — All, Active, or Unsubscribed.
- Source — All Sources, Website, Admin, or Import.
The two work together, so you can show only active subscribers who joined through your website. Changing either one returns you to the first page of results. There is no search box on this page; to find one address, sort or filter down to it, or raise the page size.
The subscriber table
The table lists one row per subscriber. Every column header can be clicked to sort, and results are ordered by Subscribed, newest first, until you change it.
| Column | What it shows |
|---|---|
| The subscriber's email address. | |
| Source | A pill reading Website, Admin or Import. |
| Status | A green Active badge for current subscribers, or a red Unsubscribed badge for those who have opted out. |
| Subscribed | The date and time the address joined the list, or last rejoined it. |
| (Actions) | The unlabelled last column holds the per-row action icons described below. |
At the bottom, a per-page selector offers 25, 50, 100, 200 or All, alongside the range and total and the page buttons. The page opens on 50. If nothing matches your filters, the table shows No subscribers found.
Note: The first name captured at sign-up is stored and used to fill in
{{firstName}}in a campaign, but it is not shown as a column here.
Adding a subscriber manually
Use this when you want to add a single address yourself — for example after someone asks to join during a support conversation.
- Click Add Subscriber in the top-right corner of the page.
- In the dialog, enter the Email address. The field is required and is marked with an asterisk.
- Optionally enter a First Name. Its placeholder reads Optional.
- Click Add Subscriber to save — it reads Adding... while it works — or Cancel to close without adding.
The new entry is recorded with a Source of Admin and appears as Active. A green Subscriber added successfully banner confirms it; the banner has an X to dismiss it. If the address is already on the list you get This email is already subscribed instead, and nothing is changed.
Warning: Only add people who have genuinely agreed to receive your emails. Manually adding addresses that never opted in harms your sending reputation and may breach anti-spam rules.
Managing an existing subscriber
Each row ends with small icon buttons in the last column. Which appear depends on the subscriber's current status.
| Icon | When it appears | What it does |
|---|---|---|
| Orange person-minus | On an Active row | Marks the address unsubscribed. The record stays on the list but is excluded from future newsletter campaigns. Takes effect immediately, with no confirmation prompt. |
| Green person-plus | On an Unsubscribed row | Resubscribes the address so it once again receives newsletter campaigns, and sets its Subscribed date to now. No confirmation prompt. |
| Red trash | On any row | Permanently deletes the record. A confirmation asks Delete this subscriber permanently? because it cannot be undone. |
After any of these actions the table and the summary tiles refresh, and a banner confirms the result.
Warning: Only resubscribe someone who has asked to come back. Reversing an opt-out on your own initiative is exactly what anti-spam rules exist to prevent.
Tips and notes
Tip: Unsubscribed is not the same as deleted. Marking an address unsubscribed keeps it on record, so you have proof of the opt-out and can restore it if the person asks. Deleting wipes the record — and with it the evidence, and the guard against the same address being re-added later. Prefer unsubscribing unless you specifically need the address gone.
- Unsubscribed addresses are automatically left out of any campaign that targets the Newsletter group, so you never need to scrub the list before sending.
- Use the Last 7 days tile to gauge whether your sign-up form is bringing in new contacts.
- Sort the Subscribed column to find your newest or oldest sign-ups, or sort Source to group entries by how they joined.
- People here may never have placed an order, which is exactly why the Newsletter audience is useful for marketing to prospects — and why a campaign written for that group should not assume the reader is already a customer.
- To check that a newsletter campaign actually went out, look at Email Logs.