
Managing Your Services
View every active service, check status, copy connection details, power on or off, add options, upgrade your plan, or cancel — all from the Services area.
What the Services area is for
My Services is your central view of everything you have with us. From one list you can check the status of any service, then open it to see connection details, use whatever controls that service type supports, buy options, upgrade your plan, or request a cancellation — without contacting support.
How to reach it
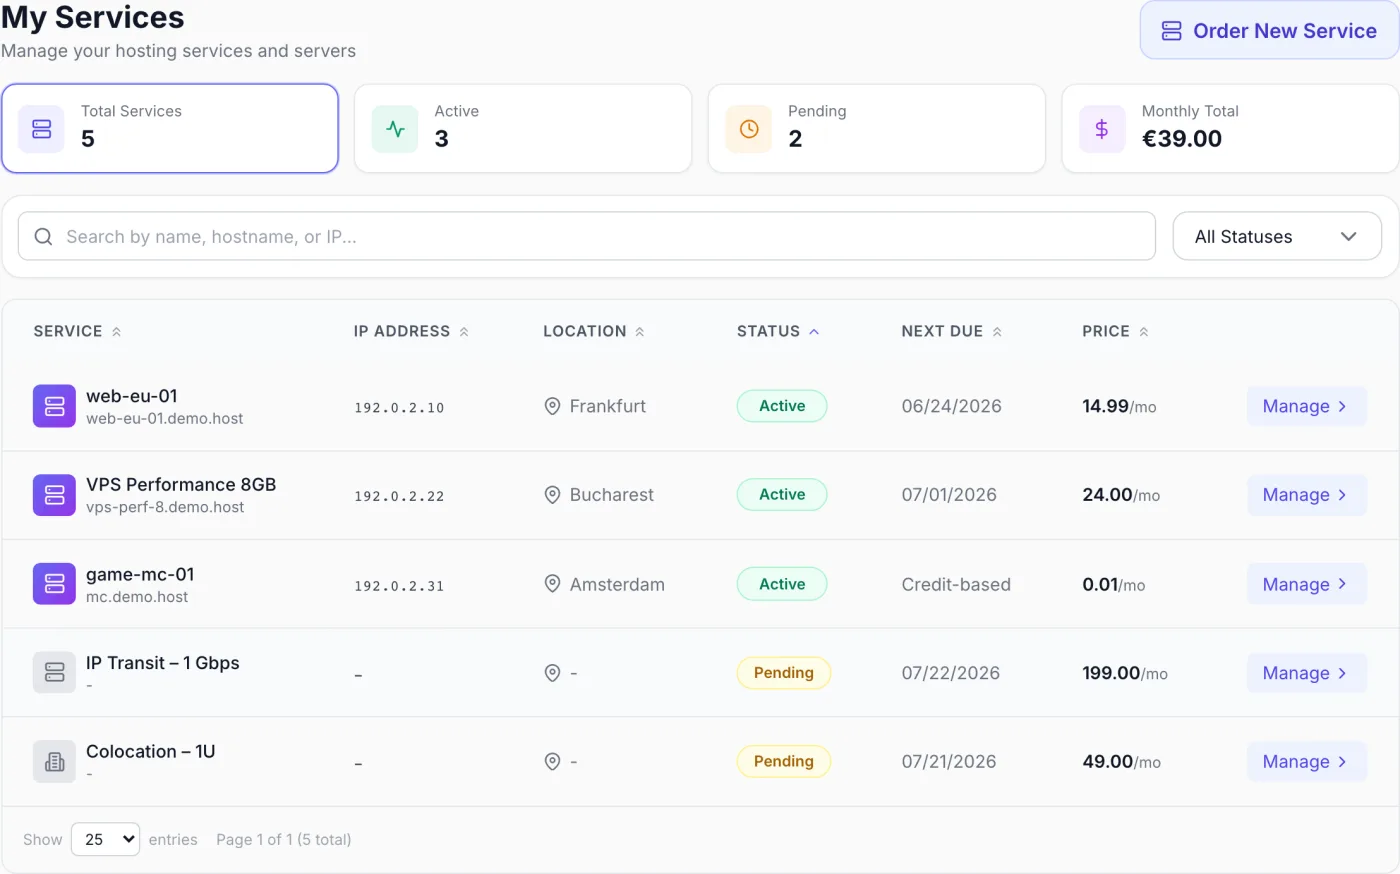
Choose My Services from the sidebar. The page is headed My Services with the subtitle Manage your hosting services and servers. To open a single service, select the Manage button at the end of its row — that button is the way in; selecting elsewhere in the row does nothing.
The Services list at a glance
- Summary tiles — four cards show Total Services, Active, Pending and Monthly Total. Selecting Total, Active or Pending filters the table to that status; selecting the same tile again clears the filter. Monthly Total also filters to Active.
- Search box — placeholder Search by name, hostname, or IP...; it narrows the page you are looking at.
- Status filter — All Statuses, Active, Suspended or Pending.
- Services table — columns Service (name, with the hostname beneath it), IP Address, Location, Status, Next Due and Price, plus the Manage button. Select a column heading to sort.
- Order New Service — the button in the top-right opens the order catalogue. See Placing an Order.
- Paging — the footer lets you show 25, 50 or 100 entries and move between pages.
Note: On narrow screens the IP Address, Location and Next Due columns are hidden to keep the table readable — open the service to see those values in full.
If nothing matches, the table shows No services found with Try adjusting your filters, and an Order Your First Service button. If the list itself fails to load you get Couldn't load your services with the reassurance that your services are not affected, and a Try again button.
Service statuses
The status badge tells you the current state of each service:
- Active
- Running normally; the management actions your service type supports are available.
- Pending / Pending Payment
- The order is being processed, or is waiting for payment. For dedicated servers the row may instead show an amber Preparing badge with an estimated delivery date or time, or Processing while that estimate is worked out.
- Installing / Processing
- The service is being built or an operation is in flight.
- Provisioning Failed
- Setup did not complete. Open a support ticket.
- Suspended
- Usually an unpaid invoice or, on hourly services, an empty credit balance. All management actions are disabled until it is resolved.
- Stopped / Offline
- The service exists and is billed but is not currently running.
- Cancelled / Terminated / Expired
- The service has ended.
Tip: If a service shows as Suspended, check your open documents — settling an overdue one usually brings the service back automatically. See Invoices & Payments.
The service detail page
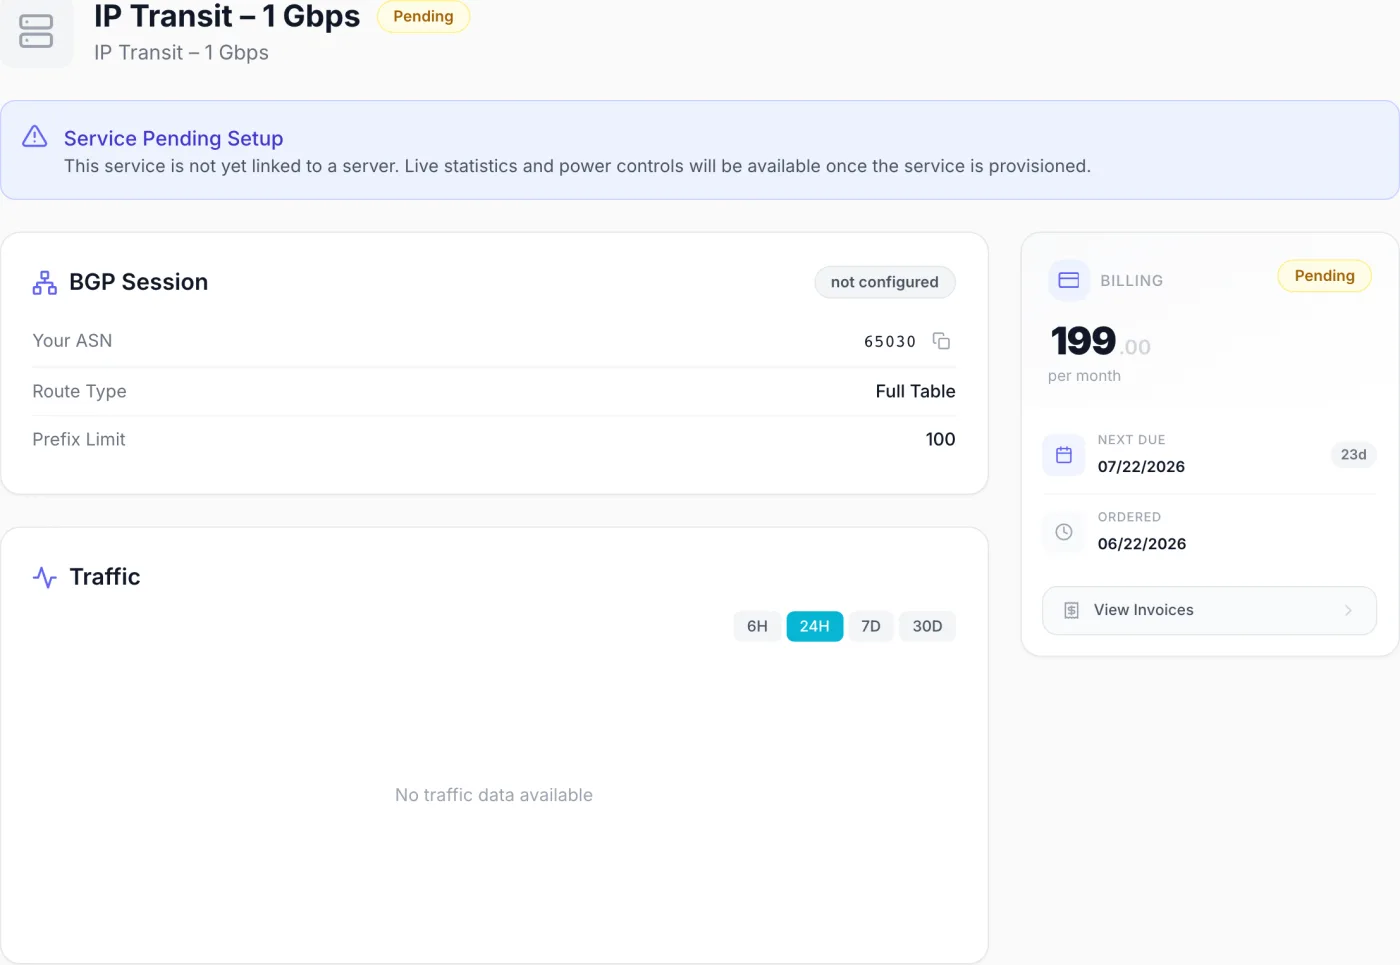
Select Manage to open a service. The panels you get depend entirely on the type of service, but the frame is always the same: a header, the main content on the left, and a billing sidebar on the right (which moves below the content on smaller screens).
Header
An icon, the service name with its live status badge, and the hostname beneath. To the right sit the controls that apply to your service type — power buttons where the type has them — and, while the service is active with no cancellation pending, a red Cancel Service button.
Billing sidebar
- The price, written out as per month, per quarter, per 6 months, per year and so on.
- NEXT DUE with the date and a days-remaining chip. For hourly services this row is labelled BILLING and reads Credit-based, with no chip.
- ORDERED with the order date.
- View Invoices, which opens your billing history.
- A Cancel Service link while the service is active, replaced by a green Keep Service button once a cancellation is scheduled.
- Inline warnings when the service is suspended, terminated, or has a cancellation scheduled.
Tip: The days-remaining chip changes colour as the date approaches — amber within seven days, red within three — so you can arrange payment in time.
Banners you may see
- Service Suspended (red) — explains that power controls, reinstallation and management are disabled, with the reason where one was given.
- Cancellation Scheduled (yellow) — the end date and your reason, with a Revoke Cancellation button.
- Service Pending Setup (blue) — the service is not yet linked to a server. Live statistics and power controls appear once provisioning finishes.
- Server Preparation in Progress (amber, pending dedicated servers) — an Allocated chip once hardware is assigned, an expected or estimated delivery, and sometimes a list of preparation steps.
- Limited management (blue, some virtual servers) — power controls work as usual, but console access, reinstall, password reset and snapshots are handled by the support team for that server; open a ticket and they will do it for you.
Terminated services
A terminated service opens on a reduced page: the Terminated badge, a note that no further actions can be performed with the termination date, and an Order Details card listing the Product, Service ID, Billing Cycle, Order Date and, where recorded, the termination date and reason. The billing sidebar is still there; no management controls are.
What each service type can do
Controls differ sharply by type, and your provider can switch individual ones off. If a control described below is not on your page, that service does not offer it — open a support ticket instead.
Virtual servers (VPS)
- Server Information — IP Address, Port, Hostname, Operating System and Location, each with a copy button that flips to a green tick for a couple of seconds. Where several addresses are assigned, a full IP Addresses list follows, showing each address with its prefix, a PRIMARY chip, whether it is IPv4 or IPv6, and its gateway.
- Power — Restart and Stop while running, Power On while stopped, plus Refresh to re-read the live state.
- Resource Usage — CPU Usage, RAM Usage, Disk Usage and Bandwidth Usage with bars and a detail line, and Traffic this month in and out where available. Shortly after delivery you may see Collecting usage data instead; the first points appear within a few minutes.
- Console Access — Open Console gives you a browser-based console that works even when networking or SSH is down. The window can be dragged and maximised, has a Ctrl+Alt+Del button, and offers Reconnect if the session drops.
- Quick Actions — Reinstall OS and Reset Root Password, where your provider offers them.
- Snapshots — where your provider offers them, save the current state of the disk so you can roll back later. Not all providers enable this.
Virtual servers do not have rescue mode, file backups, a firewall editor, reverse-DNS editing, or per-service SSH key management (SSH keys live in your profile).
Dedicated servers
- Server Information — IP Address, Port, Hostname, Operating System, Username, Location, Product and Billing Cycle, plus an Additional IP Addresses list where more than one is assigned. An Additional Details card shows any order fields you filled in.
- Power — a compact widget in the header with a state dot and Restart / Stop, or Power On when the machine is off.
- Quick Actions — Reinstall OS, Rescue Mode (where the server supports it) and Open KVM for a browser console.
- Network Configuration — your subnets with their gateways, and each IP address with its type and an editable rDNS row. Select the pencil to set a reverse-DNS name (for example
host.example.com) and save it. - Network Interfaces, Storage (one row per disk) and Location (datacentre and rack) cards.
- Hardware Health — where reported for your server: Total Power, Temperatures, Fans and Power Supplies.
- Bandwidth — a traffic graph with P95, Max and Avg figures, range buttons for 6H, 24H, 7D and 30D, inbound and outbound series, and month-to-date totals.
Dedicated servers do not have snapshots or a root-password reset — a reinstall uses the SSH keys on your account instead.
Game servers
- Server status — two separate badges: the Server status (what the panel is doing with your server) and the Game status (whether the game itself is up). When the container is running but the game is down you get a plain-English explanation rather than a contradiction.
- Power — Start, Stop, Restart and Force stop, limited to the actions your provider allows. While the service is suspended no power buttons are shown.
- Connect — the connect address to give your players (click to copy), the note that it stays the same for the life of the service, and a list of Allocated ports naming each one (Game, Server query, Remote console, Voice chat, File transfer) with its protocol.
- File access — the SFTP address, username, port and a ready-made connection string, with a Reset password button. A new file-access password is shown once only, so copy it before closing.
- Your plan — memory, processor allowance, disk, player slots, plan name, included backups and hosting location.
- Upgrade this server — add memory, player slots, storage, a dedicated address or backups. Charged pro-rata for the rest of your billing period, then renewed with the server.
- Server settings — the variables your game exposes, with sensitive values masked.
- Tabs — Console (live output and a command box), Files (browse, edit, upload, archive and download), Backups (create, restore, lock and delete within your stored-count and space limits), Schedules (timed restarts, commands and backups) and Mods. A tab your provider has locked stays visible and tells you why.
Game servers have no OS reinstall, root-password reset, rescue mode, snapshots, IP or reverse-DNS management, traffic graph or graphical console, and game servers cannot be billed hourly. Backups are restored in place — there is no download; use file access for that. Game Servers describes each of these screens in more detail, including what your provider sees on their side.
Colocation
A Colocation Details card shows your Location, Rack Position, Power, Bandwidth and Cross-Connects Included, followed by tables of your Cross-Connects (port, provider, circuit ID, media, speed, status), BGP Sessions (allocated and announced subnets, peer addresses) and VLANs. A Service Specifications grid totals your power, bandwidth, cross-connects, rack units and BGP sessions, showing what the plan includes and what your options have added. Before the space is provisioned you see a note that rack assignment and details will appear once it is ready.
Colocation has no power controls, console, reinstall, backups or statistics — options, upgrades and cancellation only.
IP transit
A Service Specifications grid shows Bandwidth, Committed Rate, Burst Rate, BGP Sessions and Included Transfer. An Assigned IPs card lists your addresses. A BGP Session card shows your ASN, our ASN, the peer addresses, route type, prefix limit, IRR AS-SET and announced prefixes, all copyable, with an Edit BGP Details control for your ASN, AS-SET, announced prefixes (one per line) and route type. A Traffic card shows utilisation against your committed rate, and a Port Details card repeats the port speed, rates, location and address.
Other service types
Some services are managed by a module your provider has installed, and their page is whatever that module provides — tabs or sections with information cards, statistics, actions, tables, credential panels or a console launcher. Services with no management module at all (a plain domain registration, for example) show only their billing information, any options and upgrades, and the cancellation controls. There are no domain nameserver, transfer-code or DNS editing tools in the portal; ask support for changes to a registered domain.
Common tasks
Copy your IP address or hostname
- Open the service and find the Server Information card.
- Select the copy icon next to the field you need.
- A green tick replaces the icon for a couple of seconds to confirm the value is on your clipboard.
Power a service on, off or restart
Power controls sit in the header (or, on game servers, in the Power card). They are hidden while a service is suspended and while it is still being set up, and your provider can withhold individual actions. Colocation, IP transit and services with no management module have no power controls at all.
Reinstall the operating system
Reinstalling erases everything on the server. Back up anything important first — it cannot be undone.
- Virtual servers: open Quick Actions → Reinstall OS. Pick an operating system (your plan's default is preselected), set a New Root Password of at least 8 characters, then type
REINSTALLin the confirmation field to enable the red Reinstall button. The card then tracks progress and tells you when it completes, or offers Try Again if it does not. - Dedicated servers: open Quick Actions → Reinstall OS, choose an operating system from the dropdown, and select Reinstall. There is no password field — the server is rebuilt with the SSH keys on your account, so add a key in your profile first if you have none.
Use rescue mode
Where your dedicated server supports it, Rescue Mode appears under Quick Actions.
- Select Rescue Mode, then Start Rescue Mode. The server reboots into a minimal recovery environment; your main operating system stays intact on disk.
- The window shows a temporary Rescue Password. Use the reveal and copy buttons to save it, then connect over SSH.
- When you are finished, select Exit Rescue Mode to reboot back into your normal system.
Add a service option
The Service Options card lists the options already on your service, each with its variant, quantity, whether it is a One-time purchase or billed on a cycle, and its status. The card appears only once you have at least one option.
- Select Add Option to open Available Options. Options you already hold are filtered out.
- Each option shows its name and description with the price on the button itself — for example €25.00/month, or €25.00 One-time. Where both are offered you get both buttons.
- Select the price you want. An invoice or proforma is raised for the purchase.
- Open that document from Billing and pay it. The option becomes active once the payment is confirmed and is then listed under Service Options.
Recurring options are added on a monthly cycle. The button is hidden while a service is suspended.
Upgrade your plan
When higher plans or paid add-ons exist for an active service, an Upgrade Plan card appears in the sidebar with the strapline Scale with prorated pricing. Upgrades & Downgrades explains where the prorated figure comes from and when the change takes effect.
- Select the card to open Upgrade Your Plan. It lists PLAN UPGRADES (each with its new price and the monthly difference) and ADD-ONS with switches or quantity boxes. A strip shows the prorated cost now and the change to your recurring price.
- For a plan change select Review Upgrade; for add-ons alone select Purchase Add-ons.
- Confirm Upgrade shows your current and new plan side by side and the price breakdown, in this order: a green Credit for N unused days on the plan you are leaving, the New plan (N days) charge, any Upgrade fee, any VAT, and Total due today. An OPTION CHANGES panel lists options kept, repriced or removed, and a note gives your new recurring price from the next cycle.
- Select Confirm & Pay. You are taken to the invoice or proforma raised for the upgrade; pay it to complete the change. Add-on purchases raise their own document, which you pay from Billing.
Note: If an upgrade is already waiting for payment, an amber Pending banner appears at the top of the window with a Cancel Pending button so you can back out before paying.
Request a cancellation
- Select Cancel Service in the header, or the cancel link in the billing sidebar, while the service is active.
- Choose when to cancel:
- At end of billing period — the service stays active until the date shown, then ends.
- Terminate immediately — the service is terminated now and all data is permanently deleted. This cannot be undone.
- Enter a Reason. At least two words are required, or you are asked to provide a reason with at least two words.
- Confirm with Schedule Cancellation (or Confirm Cancellation) or, for an immediate stop, the red Terminate Now.
A yellow banner then confirms the scheduled cancellation with its end date and your reason.
Note: Hourly-billed services cannot be scheduled to end at a billing date — the only option offered is immediate termination.
Revoke a scheduled cancellation
While a cancellation is scheduled, a Revoke Cancellation button appears on the banner and a green Keep Service button in the billing sidebar. Either one keeps the service running.
Hourly, credit-based services
- The list shows Credit-based in the Next Due column, and the sidebar row is labelled BILLING rather than NEXT DUE.
- Usage is deducted from your credit balance as the service runs, and prices are shown to four decimal places.
- If your balance runs out the service is suspended after a short grace period, and a service left suspended is eventually terminated. Keep the balance topped up — see Account Credit, which also covers automatic top-up.
- Cancelling an hourly service means terminating it immediately; the usage already accrued is settled from your balance and appears on your monthly summary.