
Ticket Details
Work a single support ticket: reply, leave internal notes, attach files, set status, priority, department and assignee, link services, and close.
What the Ticket Details page is for
Ticket Details is the single-ticket conversation view. It shows the whole thread for one support ticket — every customer message, every staff reply and every staff-only note, newest first — alongside the controls you use to reply, change status, reassign, attach files, leave private notes and close the ticket. It is where almost all day-to-day support work happens.
You reach it from Support Tickets: open Tickets in the sidebar, then click any ticket row. You can also land here from a customer's profile in Client Details, in which case the back arrow returns you to that customer.
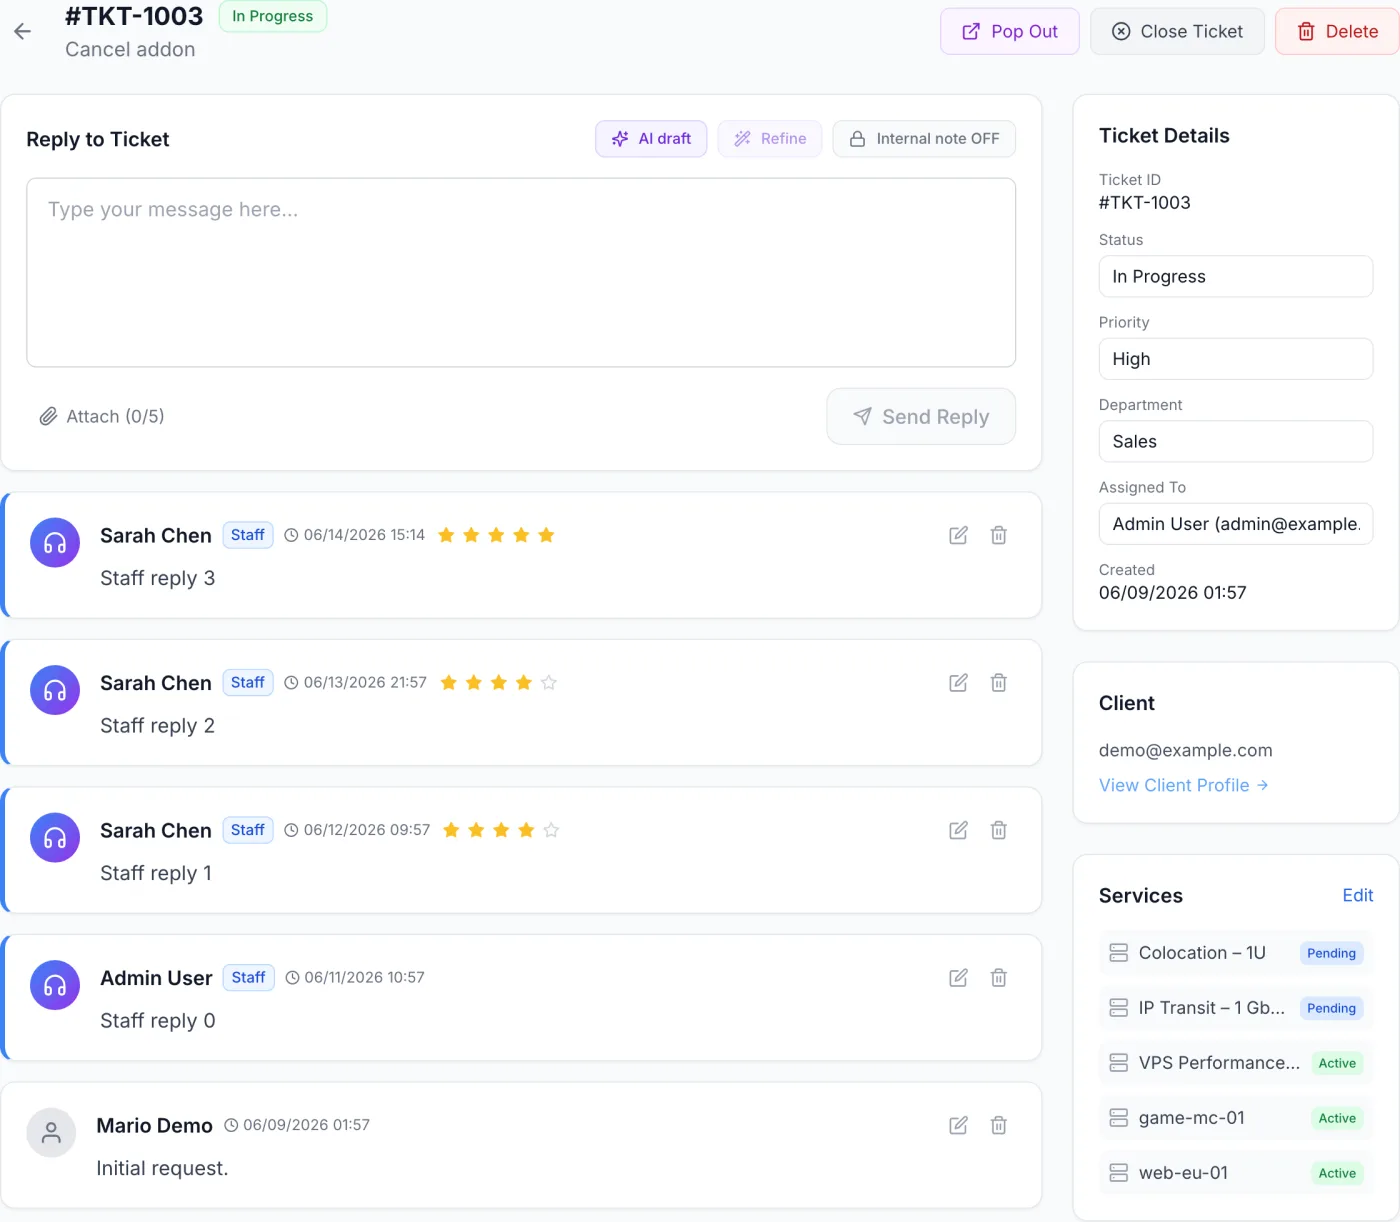
Page layout at a glance
- Header — back arrow, ticket number (for example
#TKT-1042), the current status badge, and the subject line underneath. Click the subject to edit it in place. The buttons on the right are the sound toggle, Pop Out, Close Ticket and Delete. - Presence banner — an amber strip appears when another staff member is also viewing this ticket, showing the initial of each viewer. If one of them starts typing a reply, an "is typing" note is added so two agents do not answer at once.
- Reply box — a plain-text composer pinned above the thread, with buttons for AI drafting, the internal-note switch, the signature preview and file attachments.
- Conversation thread — every message, newest first, each with the author's name and avatar, badges, timestamp, and an edited marker where applicable.
- Sidebar (desktop) — the Ticket Details card (Ticket ID, Status, Priority, Department, Assigned To, Created), the Client card, a collapsible Activity Log, and the Services card. On phones these controls move to a compact strip above the thread.
Sending a reply
- Type your response in the reply box at the top of the thread.
- Optionally attach files — see Attaching files below.
- Optionally click Show Signature to see your signature previewed under the message.
- Click Send Reply.
The reply is added to the thread immediately and the customer is notified in their client area and by e-mail. Sending a public reply moves the ticket to Answered automatically — you do not need to change the status by hand. Your draft is saved as you type, per ticket, so if you navigate away and come back the half-written reply is still there.
Your signature
The signature attached to your replies is your own, set on the Signature tab of your Account page (Ticket Signature, with an Enable Signature switch). Every staff member maintains their own; there is no shared one.
Note: Show Signature / Hide Signature only controls the preview inside the composer. While your signature is enabled on your Account page it is appended to every public reply you send, whether or not the preview is showing. To send a reply without it, switch the signature off in your Account first. The button appears only once you have a signature saved and enabled, and never in internal-note mode.
AI draft and Refine
Two assistant buttons sit in the composer header, beside the Reply to Ticket heading:
- AI draft — reads the conversation so far and writes a suggested reply into the editor for you to review and edit.
- Refine — takes what you have already typed and improves its grammar, tone and clarity. It stays disabled until the box contains text.
Both buttons only ever fill the editor; nothing reaches the customer until you click Send Reply. While a request is running the button reads Thinking.... Both need an AI provider configured under Settings > AI, where you can also record standing Ticket AI Instructions (house style, things never to promise) that every draft and refinement follows — see AI Settings. Without a provider configured, the buttons report that no provider is available and nothing is inserted.
Internal notes
Internal notes are real and available on every ticket. Click the padlock button in the composer header — it reads Internal note OFF normally and Internal note ON once switched — to put the composer into private mode. The card turns amber, the heading changes to Internal note, and a reminder appears: Visible to staff only. Client will not see this message or receive a notification. The send button becomes Send Internal Note.
An internal note:
- is visible only to staff, in the admin panel — it never appears in the client area, in the guest ticket tracker or in any e-mail;
- does not change the ticket status, so a note does not make a ticket look answered;
- carries no signature, and does not raise a customer notification;
- appears in the thread with an amber left border and an Internal padlock badge.
Use internal notes to leave context for colleagues — "waiting on the data centre", "refund approved by finance". Click the padlock again to return to a normal public reply.
Attaching files
- Click the paperclip button at the bottom-left of the composer; it is labelled Attach (0/5) and counts up as you add files.
- Select one or more files. Chosen files appear as chips above the send button, each showing its name and size; click the × on a chip to remove one before sending.
- Send the reply as normal — the files are attached to that message.
Limits and accepted types:
- Up to 5 files per message, each up to 25 MB. A file that is too large, or of a blocked type, is rejected with a message and the rest are still attached.
- The file picker offers PDFs, Word documents, Excel spreadsheets, plain text, CSV and common images (PNG, JPG, GIF, WebP, HEIC/HEIF).
- Archives, disk images, installers and scripts are refused for safety — for example
.zip,.rar,.7z,.tar,.gz,.exe,.bat,.cmd,.msi,.iso.
Attachments are stored with the ticket, not in your mail system, and appear as download buttons inside the message they belong to, showing the file name and size. Click one to save the file. Images may be re-encoded on upload to keep them small, so a saved image can come back in a different image format than the one you sent.
Note: Attachments are kept for the retention period set in Settings > Tickets — up to 30 days, or forever if the period is set to 0. When files expire they are removed from old messages; the messages themselves are always kept. Save anything you need to keep before it ages out.
Editing the ticket
Edit the subject
Click the subject text under the ticket number; a pencil icon appears when you hover it. It becomes an editable field — type the new subject and press Enter, or click the tick, to save; press Escape or click the cross to cancel.
Change status, priority, department or assignee
Use the dropdowns in the sidebar. Each one saves the moment you change it and confirms with Ticket updated — there is no separate Save button.
| Control | Options | What it does |
|---|---|---|
| Status | Open, Answered, Customer Reply, In Progress, Closed | Sets where the ticket sits in your workflow. Sending a public reply sets Answered for you; a new customer message sets Customer Reply. Setting a closed ticket back to any other value reopens it. |
| Priority | Low, Medium, High, Urgent | Flags how quickly the ticket needs attention; used for the colour pill, sorting and filtering in the queue. |
| Department | Your configured departments | Routes the ticket to a team. Staff who are not super administrators see only the departments they belong to, and moving a ticket into a department you are not in removes it from your own view. |
| Assigned To | Unassigned, or any active staff member (shown with their e-mail) | Hands the ticket to a specific person. Choose Unassigned to put it back in the shared queue. Assigning does not change the status or e-mail anybody. |
The same card also shows two read-only values: the Ticket ID (its number) and the Created date and time.
Edit or delete a message
Each message in the thread has a pencil (edit) and a bin (delete) icon in its top-right corner, on customer messages as well as your own. Editing opens the text in place — change it and click Save, or Cancel to discard. An edited message then carries a small (edited) label. Deleting asks for confirmation and removes the message permanently.
Warning: Edits and deletions apply to the copy the customer sees in their client area too, so the conversation they read changes. The e-mail they already received does not change.
Reading the thread
Messages are listed newest first. Each shows the sender's avatar, name, timestamp and badges:
| Badge / marker | Meaning |
|---|---|
| Staff badge, blue left border | A public reply sent by one of your team. |
| Internal padlock badge, amber left border | A staff-only note the customer cannot see. |
| Guest badge, "G" avatar | A message from someone writing without a signed-in account — a public form, live chat or inbound e-mail. |
| (edited) label | The message was changed after it was first posted. |
| Star rating | The customer's rating of that staff reply, when reply ratings are switched on in Settings > Tickets and the customer has rated it. |
A customer name in the thread links straight to that customer's profile. The speaker icon in the header mutes or unmutes the chime that plays when a new message arrives; the choice is remembered in your browser and shared with the pop-out window.
Client, activity and services sidebar
- Client — the customer's e-mail address with a View Client Profile link to their full profile. For a ticket raised without an account the card shows the guest's name and e-mail with a Guest badge and no profile link.
- Activity Log — a collapsed box; click it to open the history of this ticket, showing who replied, left a note, changed the status or priority, reassigned it or merged tickets into it, with paging through older entries. The same events also appear in the platform-wide Activity Log.
- Services — lists all of the customer's services. Ones attached to this ticket are highlighted and tagged Linked; each shows a small status pill. Click any service to open it.
To change which services are attached, click Edit on the Services card. The Edit Linked Services dialog lists the customer's services with checkboxes — tick the relevant ones and click Save Changes. Linking a service makes it easy to jump to the affected service while handling the ticket.
Note: The Services card and the client-profile link do not appear on guest tickets, because a guest has no account or services to link.
Closing, deleting and popping out
- Close Ticket
- Asks for confirmation, then moves the ticket to Closed and e-mails the customer the "ticket closed" notice. Once closed, the reply box is replaced by a This ticket has been closed notice and the Close button disappears. Set the Status dropdown to any other value to reopen the ticket and reply again.
- Delete
- Permanently removes the ticket and all of its messages after a confirmation. This cannot be undone — most of the time you want Close, not Delete.
- Pop Out
- Opens the ticket in a small floating window you can drag, resize and minimise, so you can keep replying while you move around the admin panel — useful for checking a customer's invoices or services without losing the conversation. The pop-out shows the thread and a simple reply box (no attachments, no signature preview and no internal-note switch), lets you edit or delete messages, and offers Open full view to come back here. It closes if you reload the page.
E-mail replies and threading
Every public reply you send is e-mailed to the customer, with a link back to the conversation — to their client area if they have an account, or to the Track Your Ticket page if they do not. Internal notes are never e-mailed.
If the ticket's department has a mailbox connected in Departments, your reply also carries that mailbox as its reply-to address and is threaded onto the existing conversation. The customer can then answer the e-mail directly and their answer lands back on this ticket as a customer reply — even on a ticket that has been closed, which reopens it. Without a department mailbox, replies still reach the customer, but they have to answer from the client area rather than by e-mail.
Live chat tickets
Tickets that started as a live chat carry a Chat badge in the header, plus an Online or Offline pill showing whether the visitor is still connected. You reply exactly as on any other ticket, but chat replies are delivered in the chat window only — no reply e-mail is sent. Once the visitor disconnects or ends the chat the conversation becomes read-only, the reply box is replaced by a banner explaining that the chat has ended, and the Online/Offline pill disappears.
Tips and gotchas
Prevent auto-close while you work. When auto-close is enabled in Settings > Tickets, only tickets sitting in Answered are swept up after the configured number of quiet days. Set a ticket you are still working through to In Progress and it stays out of the sweep.
Check the composer colour before you send. A normal reply reaches the customer; an amber composer with the padlock lit does not. Glance at the header — it reads Reply to Ticket or Internal note — before sending anything sensitive, and before sending anything the customer must actually receive.
Avoid double answers. If the amber presence banner shows a colleague is also viewing the ticket, coordinate before replying so the customer does not get two conflicting responses.
Department access is enforced. If a ticket is moved to a department you do not belong to, you can no longer open it, reply to it or delete it. A super administrator can always reach it.
Related articles
Support Tickets · New Ticket · Account · Settings > Tickets · Departments · Client Details