
Reseller Program
Set up FluxBilling's wholesale reseller programme: enable it, build sales tiers, set approval rules, choose a payment mode, and link upstream catalogues.
What the Reseller Program page is for
The Reseller Program page is the central switch and policy panel for your wholesale reseller programme. From one place you decide who can apply to become a reseller, what tier and discount they sit on, how their orders are paid, how their API and webhook integrations behave, and whether you also resell another operator's catalogue through an upstream connection.
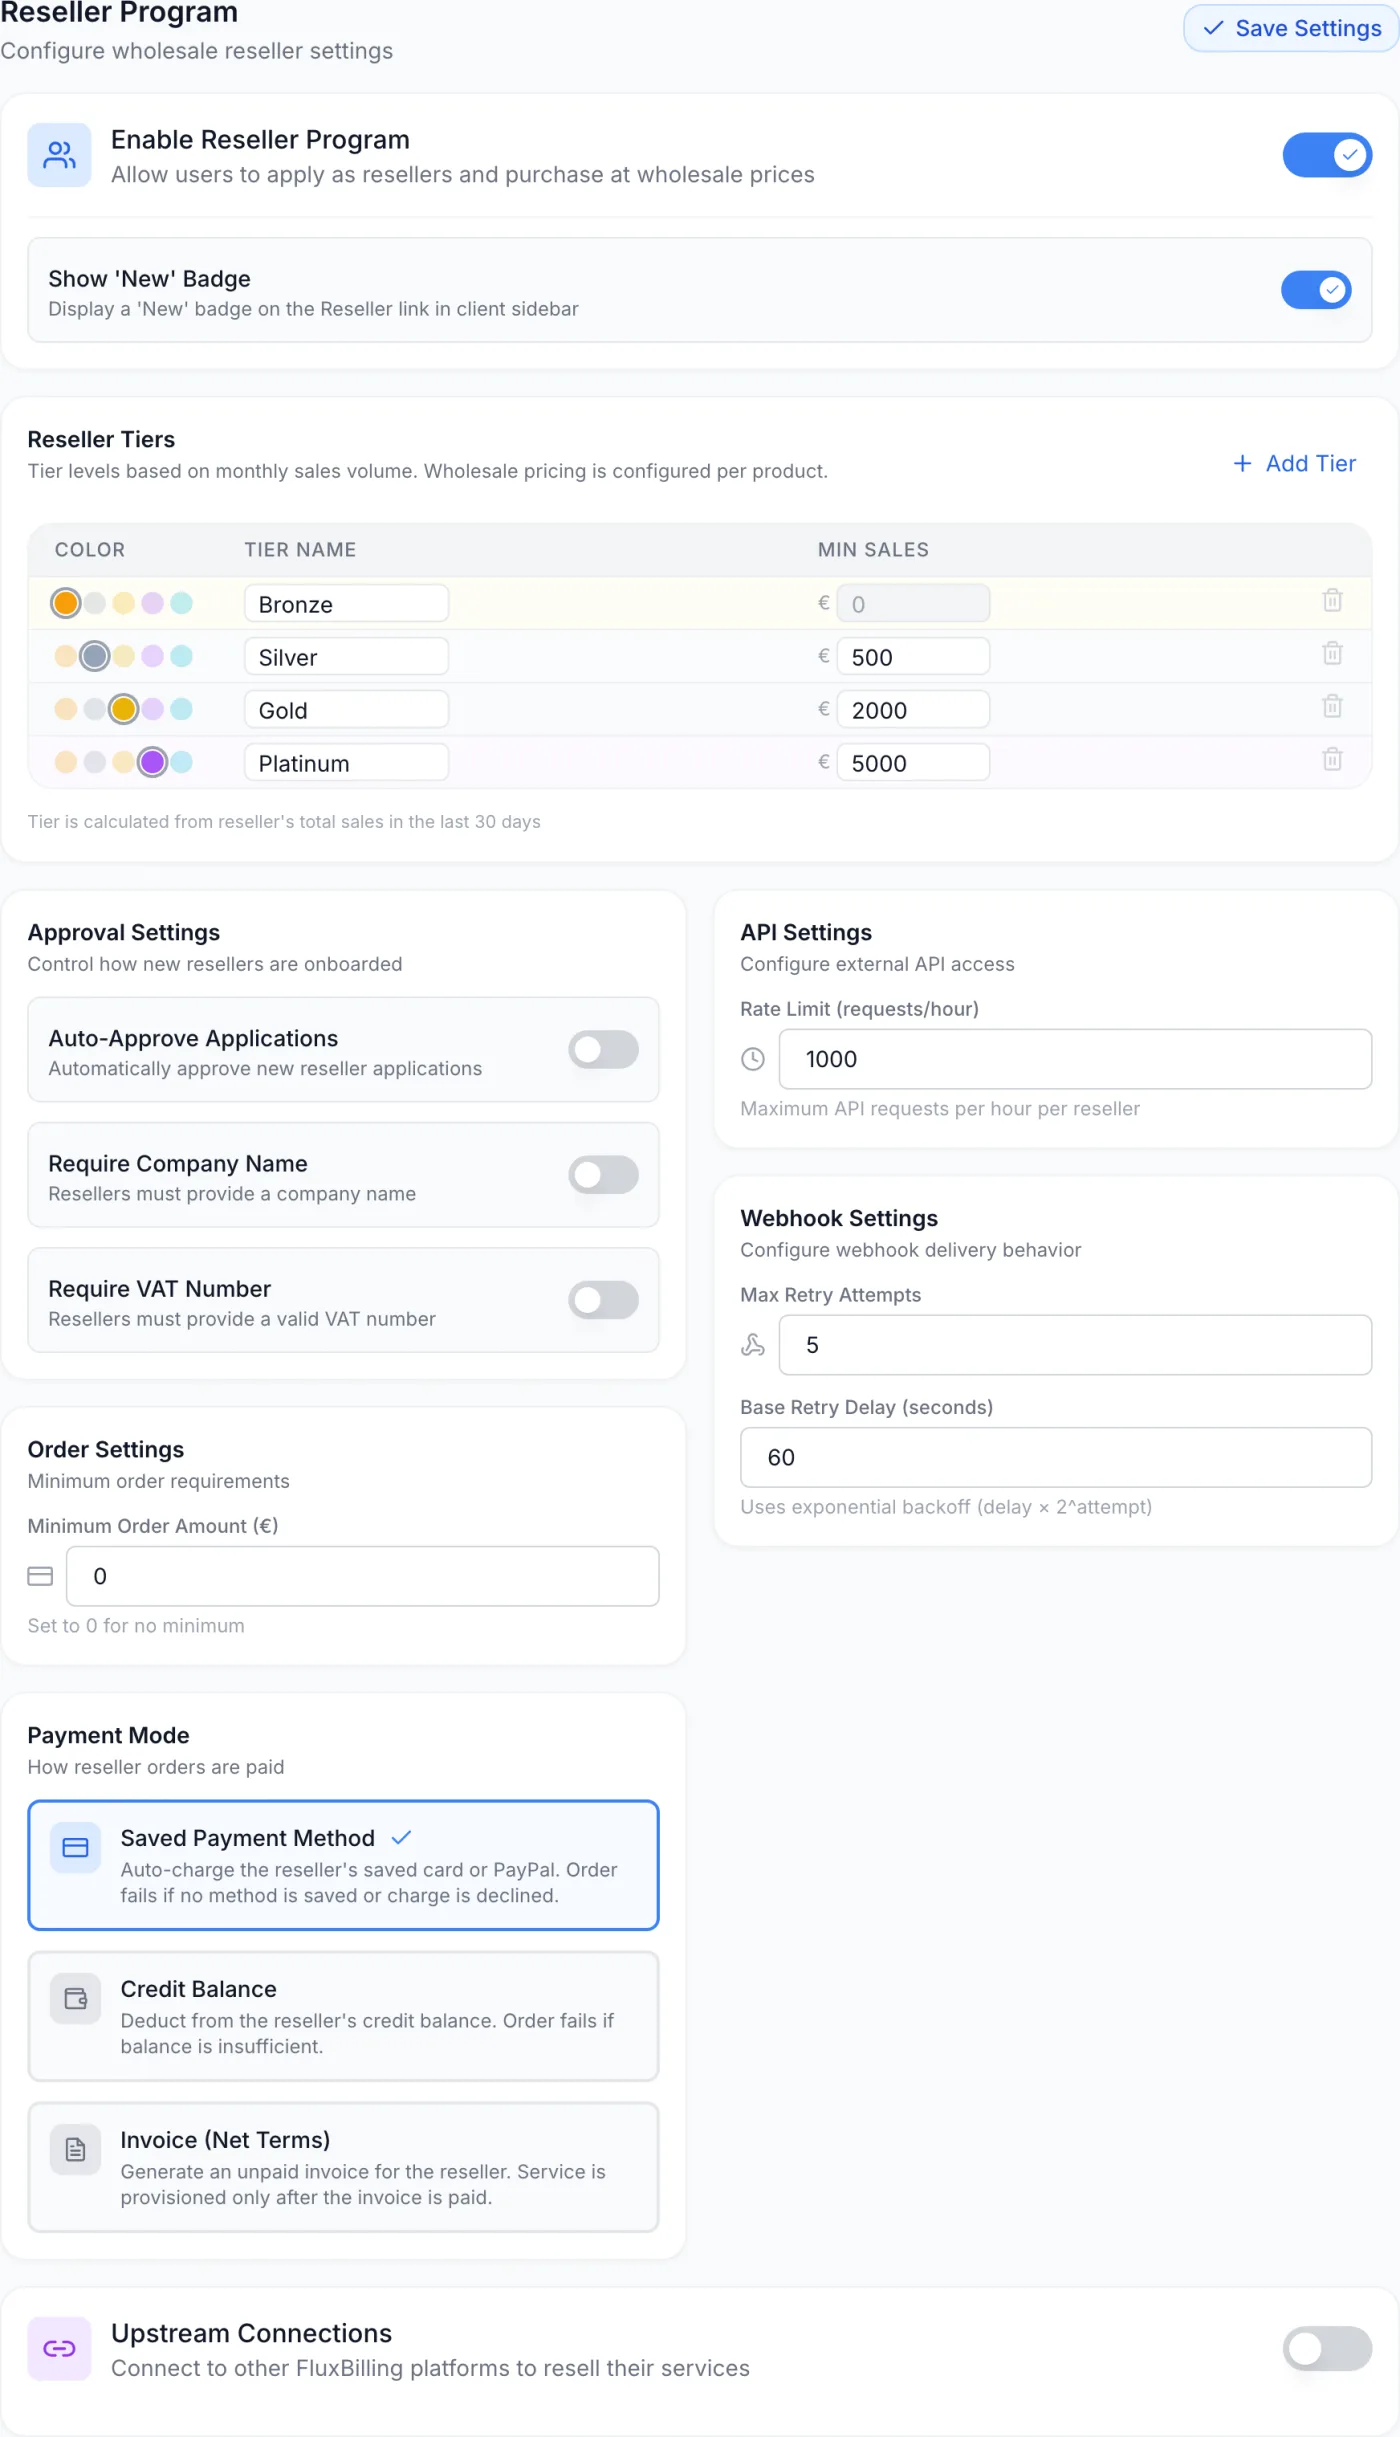
How to reach this page
In the admin panel, open Settings, then under the Financial group choose Reseller Program. The entry only appears when the resellers module is enabled for your platform. Wholesale prices themselves are not set here — you set them per product (see Products) and per reseller.
Turning the programme on
At the top of the page is Enable Reseller Program, described as “Allow users to apply as resellers and purchase at wholesale prices.”
- Flip the toggle on. The partner-documentation card and the policy sections (tiers, approval, orders, payment, API, webhooks) appear beneath it.
- While it is off, an amber notice reads: “The reseller program is currently disabled. Enable it to allow reseller applications and wholesale orders.” The Reseller link does not appear in client sidebars and reseller features are inaccessible.
- With the programme on, a Show ‘New’ Badge toggle appears. Leave it on to display a “New” badge next to the Reseller link in the client sidebar.
- Click Save Settings (top right) to store everything on the page.
Note: saving is a single action for the whole page — tier rows, toggles, payment mode and the numeric fields are stored together. The upstream connection list is the exception: connections save immediately as you add, edit or delete them.
Partner documentation
With the programme on, a Partner documentation card sits directly under the main toggle. It gives you three links, each with a Copy link button, that your platform serves itself without a key:
- A rendered guide and API reference as a web page.
- The same content as Markdown, for a partner's own tooling.
- An OpenAPI 3.0 route contract.
Hand these to a partner together with their API key and signing secret, which they find in their own portal under Reseller → API Settings. Because the links are served by your platform, they always describe the live contract. Reseller API is the same ground in this documentation, if you want to read it before you hand a partner anything.
The card also lists the four steps to get a partner trading:
- Products partners may buy must carry the Resellable toggle (on by default, on a product's General tab). Set the tier price book below, and per-partner overrides on each reseller's Products tab.
- Approve the application on the Resellers page, or turn auto-approval on. The partner is emailed and their signing secret is created.
- Ask the partner to set their webhook address and mint a key with the scopes they need before their first order — or do it for them on the reseller's API tab. What the partner then sees on their side is described in The Reseller Area.
- For package changes between two products, add an upgrade path between them (on a product's Upgrade Paths tab).
Reseller Tiers
The Reseller Tiers table defines a ladder of levels based on monthly sales volume, each with its own wholesale discount. The columns are:
| Column | What it does |
|---|---|
| Color | A row of coloured dots. Click one to label the tier; it is purely visual. |
| Name | An editable text field for the tier's name, for example Bronze, Silver, Gold. |
| Min Sales | The minimum monthly sales figure a reseller must reach to enter this tier, shown with your platform currency symbol. |
| Discount % | The wholesale discount that tier earns, 0 to 100 in steps of 0.5. |
Click Add Tier to append a band above the highest existing one, and the trash icon at the end of a row to remove it (you cannot remove the last remaining tier). Rows are always displayed sorted by their minimum-sales value.
Note: a reseller's tier is calculated from their monthly run-rate — the recurring value of every non-terminated service they hold, normalised to a month, plus one-off paid orders in the last 30 days. It is not simply the last 30 days of revenue, so a reseller with a large standing base keeps their tier through a quiet month.
Warning: the first (lowest) tier must start at 0 monthly sales — its Min Sales field is locked. If no tier starts at 0 the page refuses to save and shows “First tier must start at 0 monthly sales”. This guarantees every approved reseller lands in a starting tier.
Approval Settings
How new resellers are onboarded and what identifiers you collect.
| Control | What it does |
|---|---|
| Auto-Approve Applications | Approves new reseller applications automatically. Leave it off to vet each applicant from the Resellers page. |
| Require Company Name | Resellers must provide a company name when applying. |
| Require VAT Number | Resellers must provide a VAT number when applying. The field is checked for presence, not validated against any registry. |
| Default discount for new resellers (%) | Written to each new reseller profile, 0 to 100 in steps of 0.5. A reseller is priced at the better of their tier discount and this rate; change it per reseller on their Profile tab. |
Order Settings
Minimum Order Amount sets the smallest order value a reseller may place, shown in your platform currency. Set it to 0 for no minimum.
Payment Mode
Three selectable cards decide how reseller orders are paid. Click one to select it.
| Mode | How it works |
|---|---|
| Saved Payment Method | Auto-charges the reseller's saved card or PayPal. The order fails if no method is saved or the charge is declined. |
| Credit Balance | Deducts the order from the reseller's credit balance. The order fails if the balance is insufficient. |
| Invoice (Net Terms) | Generates an unpaid invoice for the reseller. The service is provisioned only after the invoice is paid. |
Selecting Invoice (Net Terms) reveals an Invoice Due Days field — the number of days until the reseller invoice falls due. Provisioning still waits for payment.
Note: changing the payment mode affects future reseller orders only. Existing services are not retroactively rebilled.
API Settings
- Rate Limit (requests/hour) — the maximum API requests per hour per reseller, so one busy reseller cannot exhaust another's allowance. Accepts 100 to 10,000.
- Peer connections — allows your active resellers to connect to other FluxBilling platforms and resell their catalogue using API keys.
Webhook Settings
These two fields govern every outbound delivery to every partner. Which events fire, what a payload contains, how a delivery is signed and where to inspect one are covered in Webhooks.
| Field | What it does | Range |
|---|---|---|
| Max Retry Attempts | How many times a failed webhook delivery is retried before it is given up. | 1–10 |
| Base Retry Delay (seconds) | The starting wait between attempts. Retries use exponential backoff — the delay is multiplied by 2 for each further attempt. | 10–3600 |
Upstream Connections
The Upstream Connections card at the bottom of the page is where you become a reseller of another FluxBilling platform: their catalogue syncs into yours, you sell it at your own price, and every order your customers place is forwarded to that supplier automatically. It is shown whether or not your own reseller programme is enabled — buying wholesale and selling wholesale are separate decisions.
Setting one up — what to collect from the supplier, the connection dialog, the webhook address, syncing the catalogue, creating and pricing your local products, and what happens on an order — has its own article: Upstream Connections.
Your customers get the same service page for a resold service that the supplier's own customers get — hardware, network, console, add-ons, the game panel — and add-ons they buy later are forwarded and charged to you at wholesale. See What your customer sees in that article.
Note: the toggle in the card header controls automatic product sync only. Ordering, lifecycle forwarding and webhook processing run whenever a connection exists, regardless of the switch. Connections save immediately as you add, edit or delete them; they are not part of Save Settings.
Recommended setup
For a typical business-to-business programme, turn on Auto-Approve Applications together with Require Company Name and Require VAT Number: you skip manual review while still collecting the identifiers you need for tax compliance. Pair that with a clear tier ladder, a sensible default discount, and per-product wholesale prices, so resellers see a real benefit as their volume grows. Then hand each new partner the three documentation links and walk them through the four steps.
Related
Resellers · Reseller Details · Reseller API · Upstream Connections · Webhooks · The Reseller Area · Products · Settings: Billing