
Connect a mail provider (SMTP, Gmail, Mailgun, Microsoft 365, SendGrid, SparkPost), set your From identity, edit templates, pick triggers, check logs.
What the Email settings page is for
The Email page connects your platform to an outgoing mail provider and lets you control every message it sends — welcome emails, password resets, invoice notices, payment receipts, ticket replies and more. Until a working provider is configured and switched on here, no transactional email leaves the system.
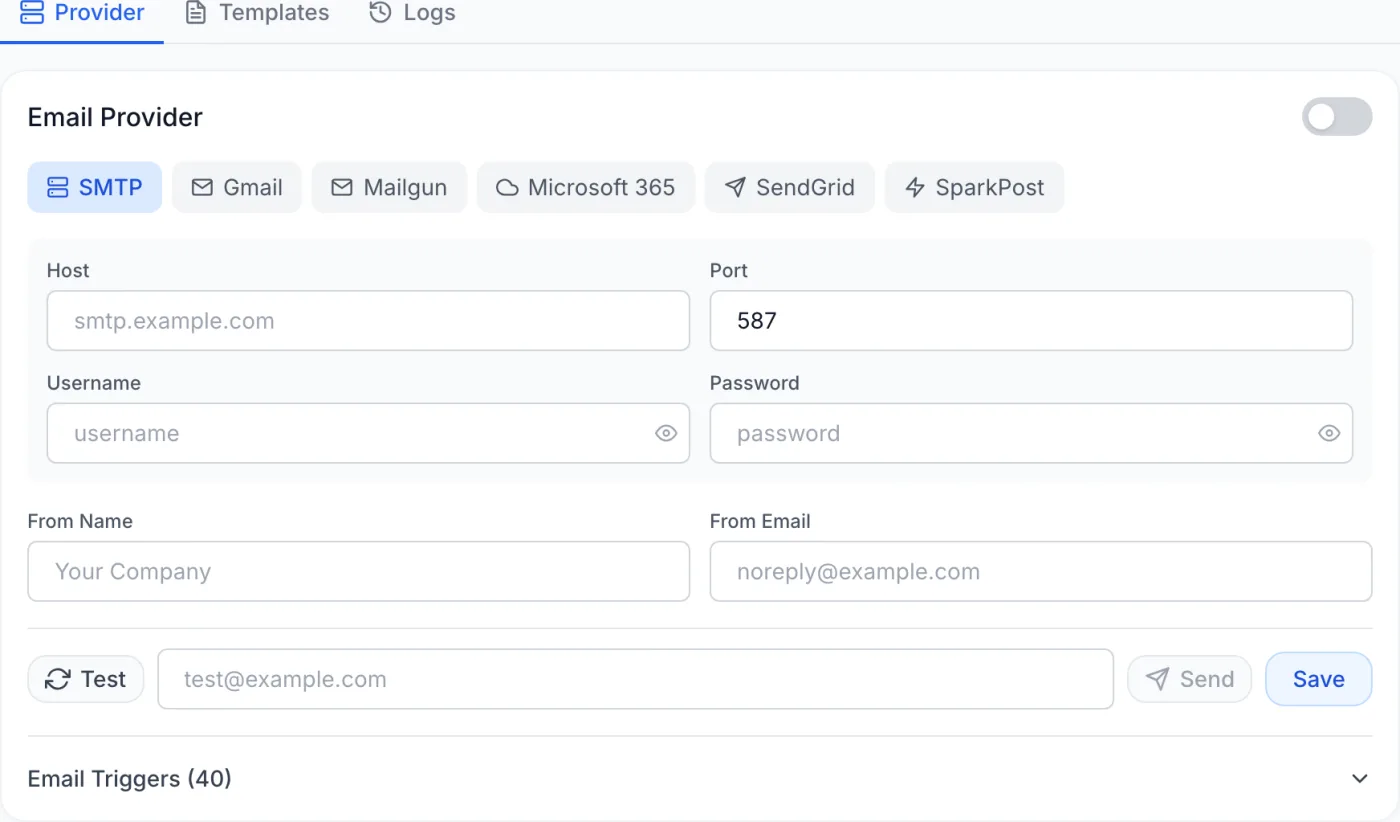
How to reach it
Open the admin panel, go to Settings, then under the Communication group choose Email. The page opens on the Provider sub-tab. Three sub-tabs run across the top:
- Provider — choose a sending service, enter its credentials, set your From identity, switch email on or off, and choose which events send mail.
- Templates — edit the name, subject line and HTML body of each message your platform sends.
- Logs — review recent send attempts and their outcomes.
Configure a sending provider
On the Provider sub-tab, the toggle in the top-right corner of the card, beside the Email Provider heading, turns outgoing email on or off for the whole platform. It is part of the form, so a change to it only takes effect once you click Save.
- Click one of the provider buttons: SMTP, Gmail, Mailgun, Microsoft 365, SendGrid or SparkPost. The credential fields below swap to match your choice.
- Fill in the credentials for that provider (see the field reference below).
- Set the From Name (the display name recipients see, usually your company name) and the From Email (the address messages are sent from).
- Click Test to check the credentials connect. A green confirmation or a red error appears just below the row of buttons.
- Click Save to store the configuration.
- Optionally type an address into the field between the buttons and click Send to deliver a real test message to it.
Note: The three buttons behave differently. Test checks the provider and credentials currently on screen, including edits you have not saved yet, so you can verify a configuration before committing to it. Send first saves what is on screen and then sends a real message through it. Save stores the configuration without sending anything. A failed test means production mail will not go out, so confirm a green result before relying on the provider.
Tip: Secret fields are hidden behind dots, with an eye button on the right to reveal what you have typed. A secret you have already saved comes back masked; leave it untouched to keep the stored value, or type a new value to replace it.
Provider field reference
| Provider | Fields you enter |
|---|---|
| SMTP | Host, Port (starts at 587), Username and Password. Use this for any standard mail server or relay. |
| Gmail | Client ID and Client Secret, then a Connect with Google button that opens Google’s authorisation screen. The button stays disabled until both credentials are filled in. Once authorised, a green banner shows the connected account and the button becomes Reconnect. |
| Mailgun | API Key, Domain (for example mg.yourdomain.com) and Region (US or EU). |
| Microsoft 365 | Microsoft 365 Tenant ID, Client ID, Client Secret and Sender Email. |
| SendGrid | API Key. |
| SparkPost | API Key and Region (US or EU). |
Both the Gmail and the Microsoft 365 provider show an expandable Setup Instructions note above their fields. The Gmail note contains the exact redirect address to register with your Google credentials; the Microsoft note summarises the app registration steps below.
Note: For Gmail, the sending address is the Google account you authorise — it cannot be set to an arbitrary address. For every other provider, your From Email should belong to a domain you have verified with that provider, or messages may be rejected on sender-authentication grounds.
Microsoft 365 setup
The Microsoft 365 provider sends through your own Microsoft 365 organisation using an app registration. Everything is prepared once in the Microsoft administration portal:
- Under App registrations, create a new single-organisation registration. From its Overview page, copy the directory identifier into the Microsoft 365 Tenant ID field and the Application (client) ID into Client ID.
- Open Certificates & secrets, create a New client secret, and copy the secret’s Value straight away — it is hidden once you leave the page. That goes into the Client Secret field. Take care not to copy the secret’s ID by mistake.
- Open API permissions, choose Add a permission, then Microsoft Graph, then Application permissions, add Mail.Send, and click Grant admin consent. Application permissions are essential — Delegated permissions do not work here, because the platform sends without a signed-in user. Mail.Send is the only permission outgoing email needs.
- Set Sender Email to the mailbox the platform should send as. It must be a real mailbox in your organisation — a licensed user mailbox or a shared mailbox — and your From Email should normally be the same address.
Tip: If authentication succeeds but messages never arrive, re-check step 3. The two usual mistakes are adding Mail.Send as a Delegated permission instead of an Application permission, and forgetting to click Grant admin consent. Your Microsoft administrator can optionally restrict the application to that one mailbox with an application access policy. Reading mail in from a Microsoft mailbox — turning customer emails into tickets — is a separate connection set up per department, with its own credentials and a different permission; see Departments.
Choose which events send email
At the bottom of the Provider sub-tab is a collapsed Email Triggers section; the heading shows how many triggers exist. Click it to expand. Triggers are grouped under category headings, and each row is one event that can produce a message.
- Click the toggle at the left of a row to enable or disable email for that event. Green means enabled.
- Use the dropdown at the right to pick which template the event uses. The list offers the templates in the same category as the event, plus any custom templates. Choosing No template falls back to the built-in default for that event.
Note: Changes in this section apply the moment you make them — there is no separate save step, and the page-level Save button does not cover them. Two-factor authentication emails are deliberately not listed here; they are managed alongside two-factor authentication on the Security page.
Edit message templates
Switch to the Templates sub-tab to change the wording and design of each message. You get a searchable list: the search box filters by template name, and the dropdown beside it narrows to one category (or All Categories). Each row shows the template name, its subject line, a category badge and an Active or Inactive badge.
- Click a template to open the editor.
- Edit the Template Name and the Subject Line at the top. The subject accepts variables as well.
- Edit the message in the HTML Content code editor. Click the eye icon in the header to show a live Preview beside the editor, with the subject line above it.
- Insert dynamic values by clicking any chip in the Available Variables panel below the editor — a customer name, an invoice number and so on. Which variables are offered depends on the template’s category.
- Use the Active / Inactive button to control whether this template is in use.
- Click Save. The button stays disabled until you actually change something. Back to list returns to the list, discarding anything unsaved.
Tip: A variable chip is appended to the end of the content rather than inserted where your cursor is. Click the chip, then cut and paste the inserted placeholder into position.
To undo your edits, click the circular reset button in the editor header to restore that one template to its default. From the list view, Reset All restores every template to its shipped defaults at once. Both ask for confirmation first.
Warning: Resetting replaces your custom wording with the default and cannot be undone. Any event left without a customised template uses the built-in default anyway, so you only need to edit the messages you actually want to change.
Review delivery logs
The Logs sub-tab lists the most recent send attempts so you can troubleshoot deliverability. Each entry shows the recipient address, the subject, a timestamp and a coloured status icon — sent, failed, or still waiting to go out.
- Use the search box to find entries by recipient or subject.
- Use the status dropdown to filter by All, Sent, Failed or Pending.
This view shows the latest twenty matching entries. For the full, paged history with more detail, use the dedicated Email Logs page.
Tip: If a customer reports a missing email, search the logs for their address. A Failed status confirms the platform tried but could not deliver — usually a provider credential or From-address problem you can fix back on the Provider sub-tab.
Recommended setup order
- Pick a provider and enter its credentials.
- Set a clear From Name and a From Email on a domain you control.
- Click Test, then Save, then Send a test message to yourself.
- Expand Email Triggers and enable the events you want customers to receive.
- Open Templates and brand the messages that matter most — welcome, invoice, payment receipt.
- Trigger a real message from one of those events, confirm it arrives, and check Logs for a Sent status.
Related
Email Templates, Email Logs, Email Signature, Tickets settings, Security.