
Discount Editor
Build or edit a discount code in the Discounts & Referrals settings dialog: set its value, validity dates, usage limits and product scope.
What the discount editor is for
The discount editor is the dialog where you build or change a single discount code — the coupon string customers type at checkout to take money off an order. Every setting that controls how the code behaves lives in this one window: what it is worth, who may use it, how often, when it is valid and which products it touches.
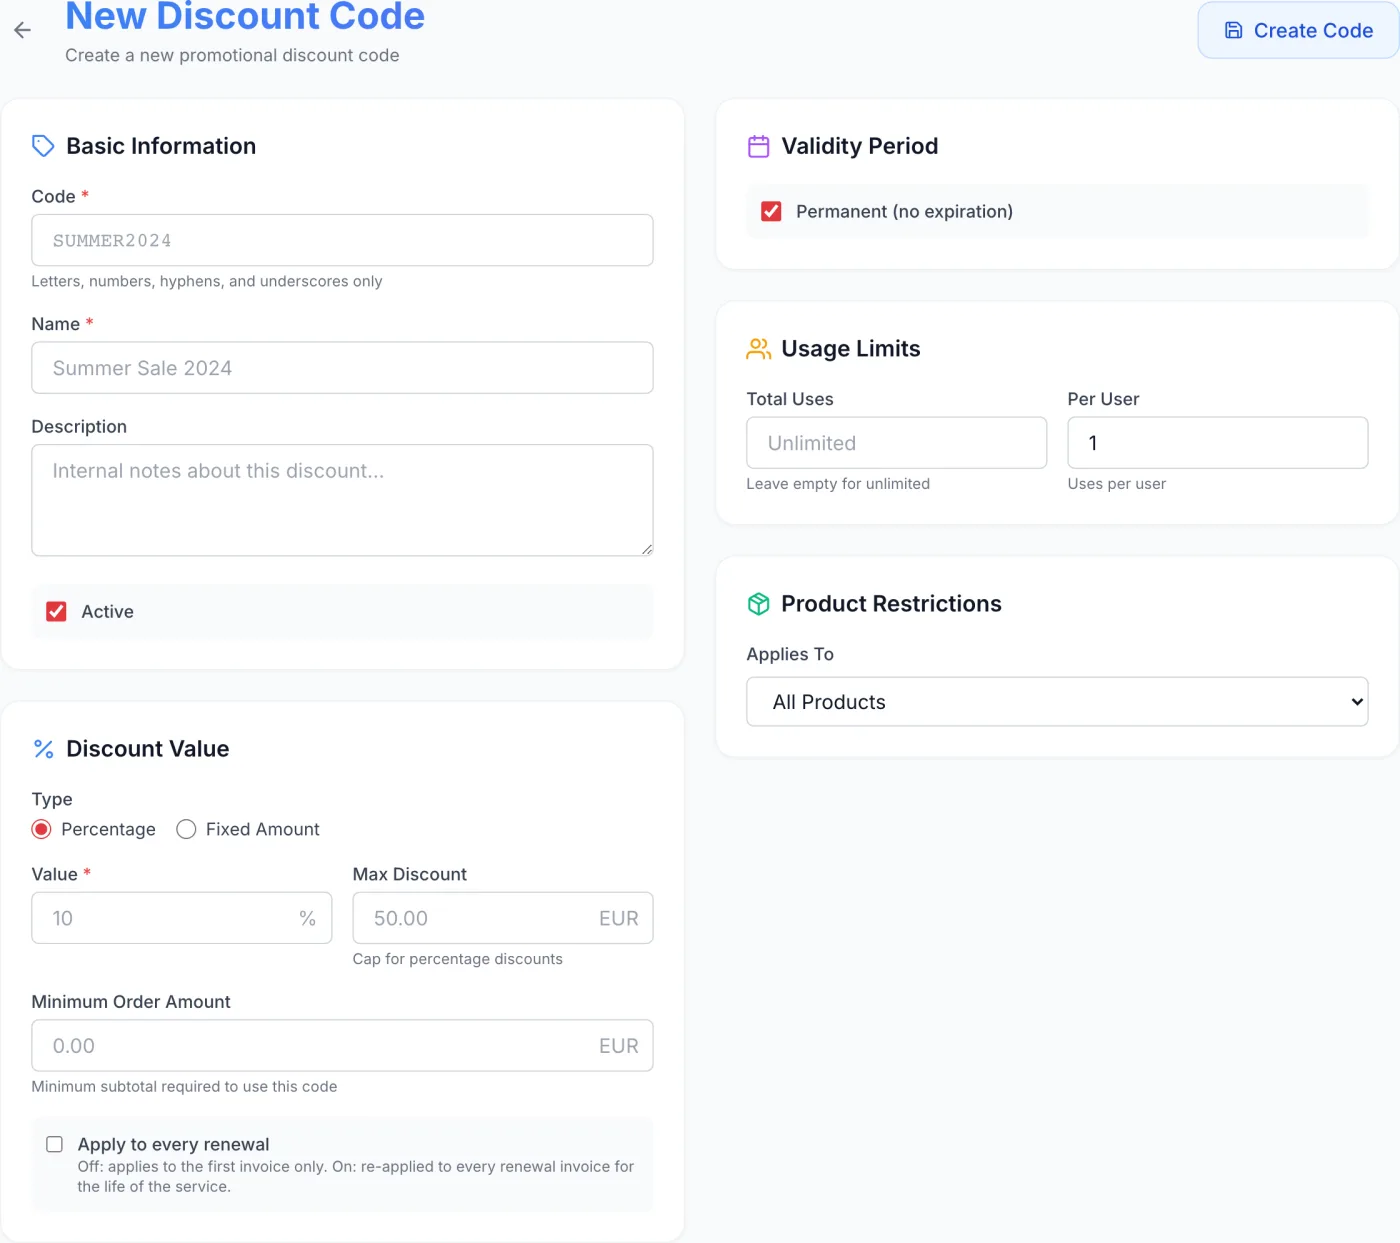
How to reach it
Discount codes are managed from Settings. Open Settings in the admin panel, and under the Promotions group choose the Discounts & Referrals tab. The lower half of that tab is the Discount Codes list. From there you can:
- click New Code at the top right of the Discount Codes card to create a code,
- click Create your first code when the list is still empty, or
- click any row in the list to open that code for editing.
Any of these opens the editor as a centred dialog. Its title reads New Discount Code or Edit Discount Code; when you are editing, the existing code text is shown underneath the title. A close (×) button sits in the top-right corner, and clicking the dimmed background also closes the dialog.
Note: The Enable Discount Codes switch at the top of the same tab controls whether codes can be redeemed at checkout at all. If discounts are not applying for customers, check that switch first. Codes never stack — a checkout accepts one code per order, and there is no setting that changes that.
Creating a discount code, step by step
- On the Discounts & Referrals tab, click New Code.
- In the Code field, type the string customers will enter, for example
SUMMER2024. It is forced to uppercase as you type. - Enter a Name — an internal label such as
Summer Sale 2024that helps your team recognise the code. - Choose the type — Percentage or Fixed Amount — then enter the Discount Value.
- Optionally set the two Usage Limits boxes beside the value, and leave the Active switch on so the code works immediately.
- If you need dates, a spending minimum, a cap, product targeting, renewal behaviour or notes, click Advanced Options to expand them.
- Click Create Code in the dialog footer. The dialog closes and the new code appears in the list.
The Details view
The editor opens on the Details view. Its fields, top to bottom, are:
- Code (required)
- The redemption string customers type at checkout. It is auto-uppercased, must be between 3 and 50 characters, and accepts only letters, numbers, hyphens and underscores. It must be unique — saving a code that already exists is refused. The code cannot be changed once it has been saved: the field is locked when you reopen an existing code.
- Name (required)
- A staff-facing label. Customers never see it; it only helps you identify the code in your list, and it is one of the two fields the list's search box matches on.
- Type
- Two radio buttons: Percentage (a share of the order) or Fixed Amount (a flat sum).
- Discount Value (required)
- The percentage or the flat amount, accepting up to four decimal places so it can be used with sub-cent hourly pricing. The trailing symbol switches between
%and the code's currency symbol depending on the type. It must be greater than zero, and a percentage may not exceed 100. - Usage Limits
- Two small inputs sit beside the value. Total is the maximum number of redemptions across all customers — leave it empty for unlimited. Per user is how many times one customer may redeem the code, and starts at
1on a new code. Both accept whole numbers from 1 upward. - Active
- A switch. When on, the code works; turn it off to disable the code without deleting it. Every other setting and the full usage history are kept.
Advanced Options
Click Advanced Options to expand the rest of the settings. When you reopen a code that already uses any of them — a minimum, a cap, dates, a product restriction or the renewal setting — the section is expanded for you.
| Option | What it does |
|---|---|
| Validity Period | A Permanent (no expiration) checkbox, ticked by default. Untick it to reveal Start Date and End Date pickers; the code then works only within that window. |
| Apply to every renewal | Makes the discount recurring. Its own hint says it: off, the discount applies to the first document only; on, it is re-applied to every renewal document for the life of the service. |
| Minimum Order Amount | The smallest order subtotal the code will accept. Leave it blank for no minimum. Shown in the code's currency. |
| Max Discount | Shown only for percentage codes. Caps the amount actually taken off, so a large percentage on an expensive order cannot run away with your margin. |
| Applies To | A dropdown that scopes the code: All Products (the default), Specific Products or Specific Categories. The last two reveal a scrollable checklist; tick the items the code may discount. If your catalogue is empty the list says so — add items under Products first. |
| Description | Optional internal notes (placeholder Internal notes about this discount…). Customers never see it. |
Validity, usage and product scope explained
Validity Period
While Permanent is ticked the code never expires. With dates set, a code whose start date is in the future shows as Upcoming in the list and checkout tells the customer it is not yet active. A code past its end date shows as Expired.
The End Date is inclusive. A code that ends on 30 September keeps working through the whole of the 30th and stops at the end of that day, so you can set the last day of a campaign as the end date and it behaves the way the customer expects.
Usage Limits
- Total caps redemptions across everyone. It is counted the moment an order is placed with the code, not when the code is checked in the checkout box, and the count and the check happen together — so two customers finishing checkout simultaneously cannot both take the last remaining use. The one who loses the race is told the code has reached its usage limit.
- Per user caps how many times one customer can redeem it, and can only be enforced against a signed-in customer. Leave it at 1 for welcome or first-order codes.
- Turning a code off with the switch in the list and back on again does not reset or clear these limits — nor the end date or the cap. Everything is preserved exactly as you set it.
- An order that was never paid gives its use back when it is cancelled, so the code can be redeemed again. An order that was paid keeps its use, and refunding it later does not return it.
Applies To
Leave it on All Products for a catalogue-wide code, or narrow it to specific products or categories for a targeted promotion. A restricted code is accepted only when the order contains at least one matching item.
Currency
The currency beside the value, the minimum and the cap follows your base currency and is not chosen in this dialog. When a code is used on an order priced in a different currency, those three amounts are converted at your configured exchange rate before the code is checked and applied; a percentage carries over unchanged.
Warning: If no exchange rate exists between the code's currency and the order's currency, the code is refused at checkout with a message naming the order's currency. Check your currency configuration before running a fixed-amount promotion for customers who buy in another currency.
Saving and editing
- Create Code / Update Code — the primary button in the dialog footer commits the code and closes the dialog. A toast confirms it.
- Cancel — the footer button, the × in the corner, or clicking the dimmed background all discard your changes and close the dialog without saving.
- Validation runs before anything is sent. You will be told if the code or name is missing, if the discount value is zero or below, or if a percentage is over 100, and the dialog stays open so you can fix it.
Usage History view
When you reopen an existing code, two tabs appear under the title: Details (everything above) and Usage History. The history tab lists each redemption of that code, showing for every entry the customer's email address and, on the right, the amount that was taken off and the date it was redeemed.
If the code has never been redeemed the tab shows This code hasn't been used yet instead of the list.
Note: Renewals discounted by a recurring code do not appear here, and do not count against the code's limits. Only the original redemption is recorded.
Tips and gotchas
Tip: Codes cannot be renamed. The Code field is read-only after creation. If you need a different redemption string, create a new code and switch the old one off.
Tip: Use Max Discount as a safety net. A 50% code with no cap on a high-value plan can wipe out the margin. Set a ceiling under Advanced Options so the discount stays predictable.
Tip: Switch off rather than delete when in doubt. Turning the Active switch off keeps the code and its usage history; deleting it from the list removes both permanently.
Note: The vouchers the referral program issues appear in the same list and open in this same dialog, but they are bound to the customer who earned them — nobody else can redeem them, whatever you change here. See Referrals.
Related
Discounts · Referrals · Products · Product Categories · Orders