
Account
Manage your personal staff profile: name, billing address, avatar, date format, ticket signature, password, and the active device sessions on your account.
What the Account page is for
The Account page is your personal staff profile. It controls how you sign in, the personal and billing details on your profile, the public links shown against your blog byline, the date format you see throughout the admin panel, the signature appended to your ticket replies, your password, your second sign-in factor, and which devices currently hold an active session. Everything here affects only your own user. Platform-wide configuration lives under Settings.
How to reach it
Click the profile card at the top of the left sidebar — the small panel showing your avatar, name and email. If that card has been hidden platform-wide, open the account menu behind your avatar in the top header and choose Account Settings.
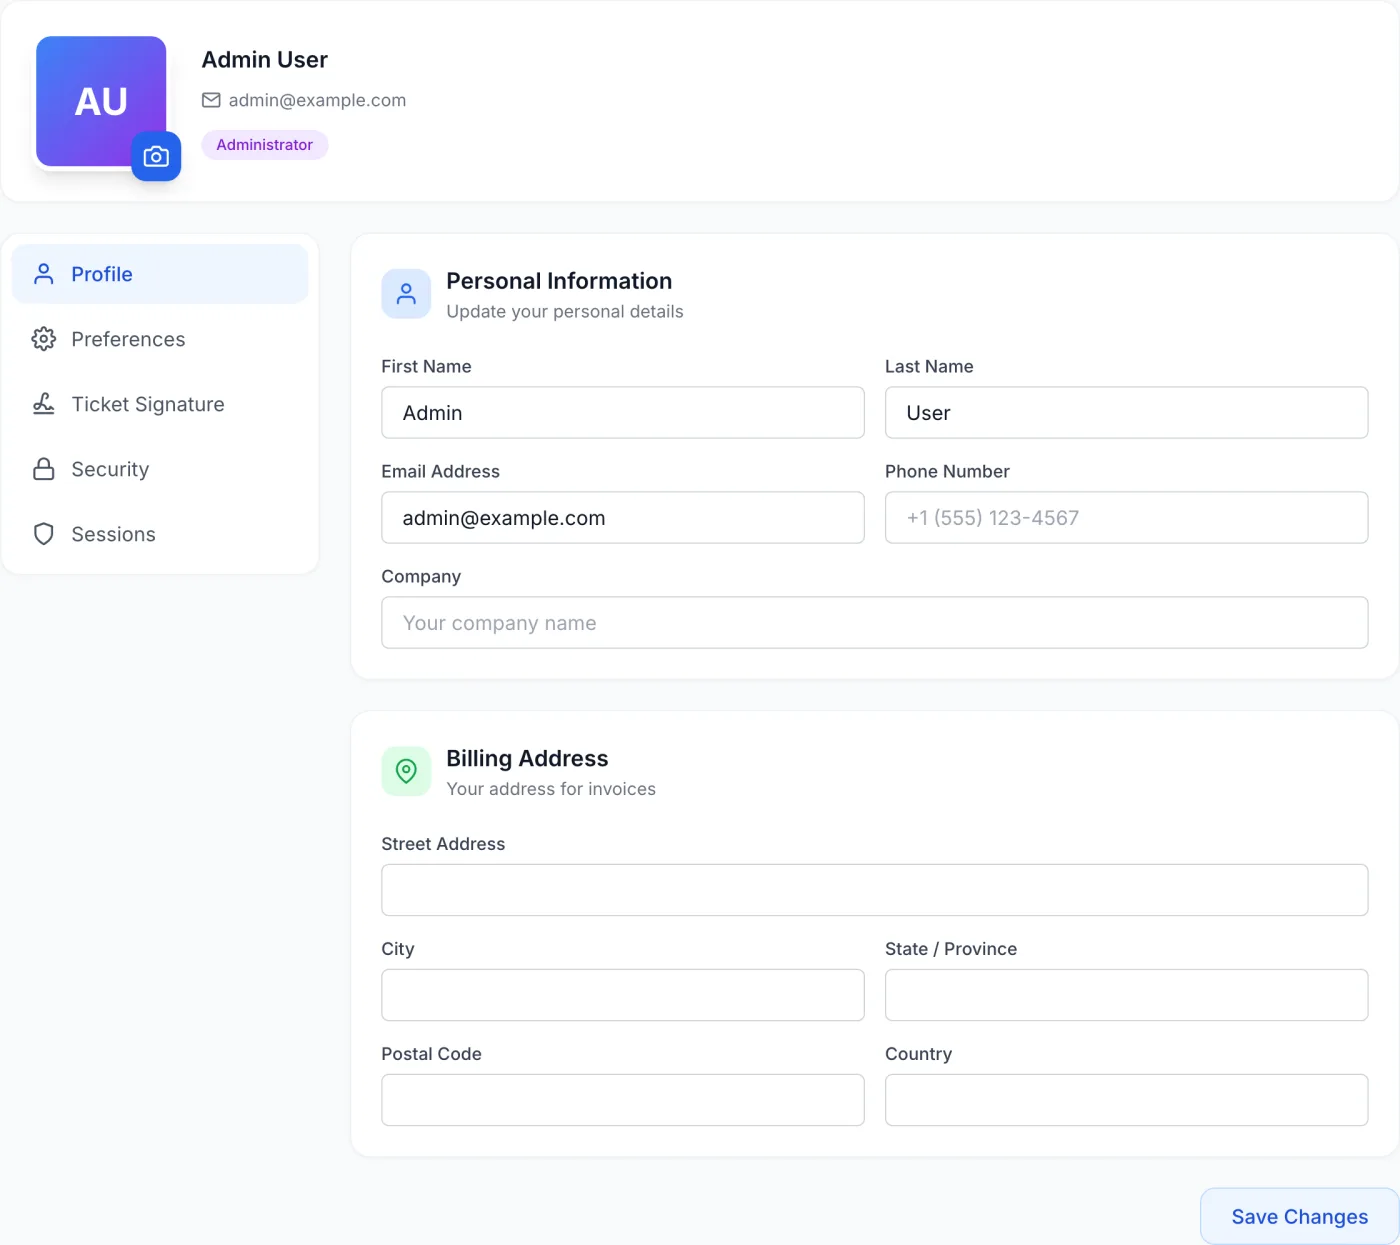
The page has two parts: a profile header across the top, and a section menu down the left side with five entries — Profile, Preferences, Ticket Signature, Security and Sessions. Click any entry to switch the panel on the right.
The profile header
The header summarises who you are and lets you manage your avatar:
- Avatar — your uploaded picture, or your initial on a coloured tile if you have not set one.
- Camera button (bottom-right of the avatar) — opens a file picker to upload a new picture. Accepted formats are JPEG, PNG, GIF and WebP, up to 5 MB.
- Delete button (red bin icon, top-right of the avatar) — appears when you hover over the avatar and a picture is already set. It removes the picture after a confirmation prompt.
- Name, email, phone, company — a read-only summary; phone and company appear only once filled in.
- Administrator badge — a purple pill marking this as a staff account.
Profile section
This is the section the page opens on. It holds three cards: Personal Information, Author profile and Billing Address. A single Save Changes button at the bottom commits all three at once; nothing here saves on its own.
- Edit any of the fields you want to change.
- Click Save Changes. The button reads Saving... while it works and confirms when it is done.
| Field | What it does |
|---|---|
| First Name | Your given name, shown in the header and against your ticket replies. |
| Last Name | Your family name. |
| Email Address | The address you sign in with and receive staff notifications at. |
| Phone Number | Optional contact number shown on your profile. |
| Company | Optional company name shown on your profile. |
| LinkedIn URL | Optional. A public profile link shown on your blog author page, so your byline points at a verifiable identity. |
| Website URL | Optional. A second public link shown alongside it on your author page. |
| Street Address | Billing address line. Must include the street number. |
| City | City for your billing address, written in full. |
| State / Province | State or province for your billing address, written in full. |
| Postal Code | Postal or ZIP code, checked against the selected country. |
| Country | Country for your billing address. |
Note: the address fields are validated before the save is sent. If one is abbreviated or malformed the save stops, the offending field is flagged in place and a message names it — for example Enter the full street address, including the street number. Correct it and click Save Changes again.
Preferences section
Preferences holds a single control, Date Format, which sets how dates are displayed throughout the admin panel for your account:
- Use platform default — follow the format configured platform-wide in Settings.
- MM/DD/YYYY (US) — month-first.
- DD/MM/YYYY (International) — day-first.
Tip: this setting saves the instant you pick a new value — there is no separate save button. A short Date format updated confirmation appears and the new format takes effect across the panel.
Ticket Signature section
Your ticket signature is a block of formatted text added to the bottom of the ticket replies you send. Use it for your name, role and any standard closing.
- Use the Enable Signature toggle at the top to control whether the signature is appended. When on, it is added automatically to your replies.
- Compose the signature in the editor below. It offers Visual, Source and Preview modes so you can write with formatting, edit the underlying markup, or check how it will look.
- Click Save Signature to store it.
Note: the signature applies only to your own outbound ticket replies. It does not change automated emails or other staff members' replies. Saved signatures shared across the whole team are configured separately — see Admin Signatures. For how replies work, see Tickets.
Security section
The Security section carries your second sign-in factor and your password.
Two-factor authentication
The Two-factor authentication card sits at the top of the section. It appears only when two-factor authentication has been switched on for the platform in Security settings; if neither method is enabled there, the card is not shown at all. When two-factor is required for staff accounts, a blue banner at the top of the card says so.
Two methods can be listed:
- Authenticator app — the method you enrol in yourself. When it is active the row is green and carries an On badge and a Remove button; otherwise it offers Set up.
- Emailed code — informational. It tells you whether a code is mailed to you at sign-in, whether it is merely available as a fallback, or that it is Not used while an authenticator app is active.
To enrol an authenticator app:
- Click Set up. Confirm your password when prompted — enrolment replaces your second factor, so it is password-gated.
- Scan the QR code with your authenticator app, or use Add to my password app to hand the key to your password manager. If you prefer to type it, the key is shown under Or enter this key manually with a copy button.
- Click Continue, enter the 6-digit code from your app, and click Verify & enable.
- A set of recovery codes is shown once. Use Copy or Download to keep them somewhere safe, then click I saved them. Each code works once and they are not displayed again.
Once enrolled, a Recovery codes row shows how many unused codes are left (the count turns amber at two or fewer) with a Generate new button. Generating a fresh set, like removing the authenticator, asks for your password first and invalidates the codes you had.
Warning: removing your authenticator also stops your existing recovery codes from working. Store the recovery codes away from the device that holds the authenticator app — they are the only way back in if you lose it.
Change your password
- Enter your Current Password. Use the eye icon to reveal what you typed if needed.
- Enter a New Password — it must be at least 8 characters.
- Re-type it in Confirm New Password.
- Click Update Password. The button stays disabled until all three fields are filled, and it reports an error if the new password is too short or the two new entries do not match.
Note: below Change Password there is a second summary card also headed Two-Factor Authentication, with an inactive button beside it. Manage your second factor from the card at the top of the section, described above.
Sessions section
The Sessions section (titled Active Sessions) lists every device that currently holds an active sign-in to your account, so you can spot and end ones you do not recognise. Each entry shows:
- The IP address the session connected from (or Unknown IP).
- A device icon — a monitor for desktop, a phone for mobile — with a short browser/device description (or Unknown device).
- Last active time.
- A Current badge on the session you are using right now.
To end a single session, click the sign-out button on that row. To end every other session at once, click Revoke All at the top right; a prompt warns that this will log you out of all other devices before it proceeds. With nothing to show, the list reads No active sessions found.
Note: your current session has no revoke button — you cannot end the session you are sitting in from this list. To end it, use Logout in the account menu in the top header. Revoking is the right move after losing a laptop or signing in on a shared computer.
Tips and notes
- The header's account menu keeps up to 5 signed-in accounts, so you can move between different logins without re-entering credentials each time. See Top Header & Global Search.
- Profile fields are not saved until you click Save Changes; the Preferences date format saves the moment you change it.
- If an avatar upload is rejected, check that the file is a JPEG, PNG, GIF or WebP and under 5 MB.
Related
Settings · Security · Admin Signatures · Tickets · Notifications · Activity Log