
WHMCS Migration
A deep guide to the six-step WHMCS migration wizard: what to prepare, what each data type becomes in FluxBilling, the order the import runs in, how re-runs behave, and what to check afterwards.
What WHMCS Migration does
The WHMCS Migration tool imports your existing billing data — clients, products, services, invoices, payments, tickets, saved payment methods and more — directly from a WHMCS install into FluxBilling. It reads your WHMCS MySQL database (optionally through an SSH tunnel) and walks you through a six-step wizard so you can pick exactly what to bring over, decide how conflicts are handled, review the plan, and watch the import run.
Nothing is written to WHMCS. Data is read out of your source database, and your old system keeps running exactly as it did, which means you can import, check the result, and import again before you switch anyone over. The one thing that runs on the WHMCS host itself is the optional saved-payment-token lookup described below, and that only reads too.
Who can run it
The migration wizard is restricted to super administrators. A staff account with an admin role but without super-admin rights will not see the page and cannot call it. This is deliberate: the wizard holds third-party credentials (a MySQL password, an SSH password, and optionally your WHMCS encryption hash) and opens outbound connections from your server.
How to open it
Go to Settings in the admin panel, open the Migration Tools group in the settings menu, and choose WHMCS Migration. A progress bar across the top shows the six stages — Connection → Data Selection → Conflicts → Preview → Progress → Results — with a Step N of 6 indicator and a percentage beneath it. (The sibling entries, EasyDCIM Migration and VPS Panel Migration, live in the same group for different sources.)
Before you start
Five minutes of preparation changes the quality of the result more than any option in the wizard.
- Take a backup of FluxBilling. The import writes real records. Re-running is safe with the default conflict rules, but restoring a backup is far easier than unpicking a bad run.
- Set your document prefixes first. Imported invoice and proforma numbers are built as your configured prefix + the original WHMCS number. Set the invoice and proforma prefixes under Billing before importing, or your historical documents will carry the default prefixes for good.
- Install and configure your payment gateway plugins. Gateway mapping can only offer targets that already exist — see Payment Gateways.
- Set up your provisioning plugins. Product module mapping matches each WHMCS server module to one of your provisioning plugins. Products whose module has no match still import — they simply arrive without a provisioning plugin attached.
- Import your infrastructure first if you want device links. Service-to-device linking matches against hardware that already exists in FluxBilling. Run the EasyDCIM Migration (or otherwise populate Inventory) before importing WHMCS services, or every link will come back “not found”.
- Decide which WHMCS statuses are proformas. FluxBilling keeps proformas and finalised invoices apart. You choose which WHMCS invoice statuses land in each; the default treats Draft, Unpaid, Cancelled and Payment Pending as proformas and everything else as invoices.
Step 1 — Connection
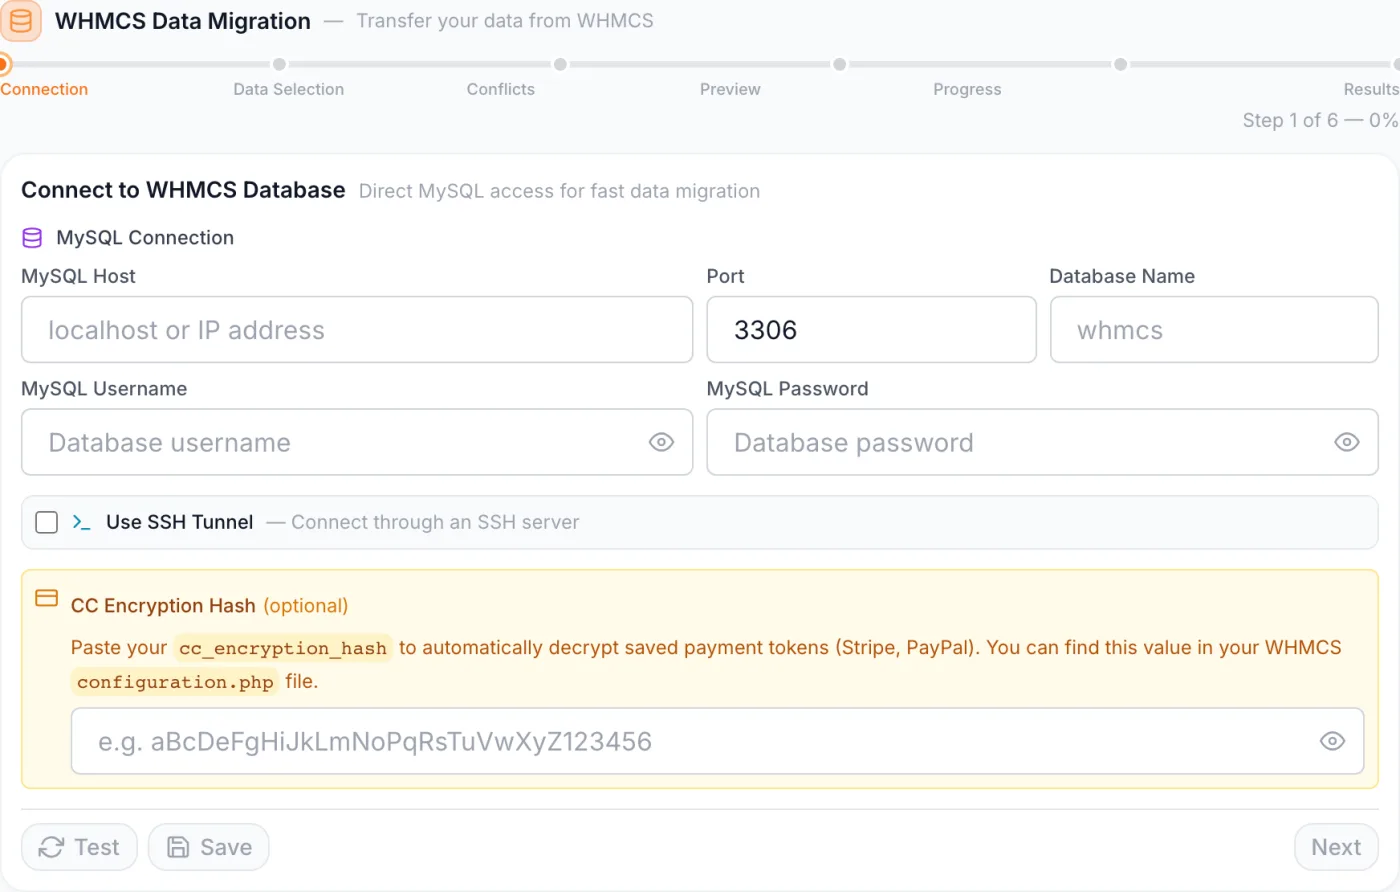
This step tells FluxBilling how to reach your WHMCS database. All data is read from MySQL, so a working database connection is required before you can continue.
- Fill in the MySQL Connection fields: MySQL Host, Port (default 3306), Database Name, MySQL Username and MySQL Password. The username and password fields have an eye icon to reveal what you typed.
- If the database is not reachable directly from your server, turn on Use SSH Tunnel and enter the SSH Host, Port (default 22), Username and SSH Password. FluxBilling then opens the MySQL connection through that SSH server. In this mode the MySQL host is usually
localhost— it is resolved on the far side of the tunnel. - Click Test. On success a green banner reads Connected! followed by a count of clients, products, invoices and services found.
- Optionally click Save to store the connection details so they load automatically next time you open the tab. Saved secrets are encrypted and are never sent back to your browser in the clear — the form shows a mask, and the mask resolves to the real value on the server when you test or import.
- Click Next. If you have not tested yet, Next runs the test for you and only advances if it succeeds. Test and Next stay disabled until host, username, password and database name are all filled in; Save needs at least a host.
A read-only MySQL user is enough, and is what we recommend.
Optional: migrating saved payment tokens
Saved cards and vaulted accounts are not card numbers — they are references held by your payment provider, encrypted inside WHMCS. To carry them across, FluxBilling has to decrypt them, and there are two ways to do that.
- Over SSH, using WHMCS itself. When the SSH tunnel is on, a blue WHMCS Installation Path box appears (default
/var/www/whmcs). Point it at your WHMCS folder and the tokens are read out on the WHMCS host by WHMCS's own code. This is the most reliable route, and it works even when the WHMCS licence has expired. The path may contain only letters, digits and the characters. _ - /. - With the encryption hash. The amber CC Encryption Hash box, always visible on this step, takes the
cc_encryption_hashvalue from your WHMCSconfiguration.php. FluxBilling then decrypts the tokens itself. Hash formats from WHMCS 7.x and 8.x are both handled.
The installation-path route is tried first whenever an SSH tunnel is configured; the hash is the fallback. If neither works, saved payment methods still import — but without their tokens, which means automatic collection will not work for those clients until a card is re-entered.
Warning: If you migrate payment tokens you must update the webhook URLs in your payment provider dashboards to point at FluxBilling. Until you do, your provider keeps notifying WHMCS about renewals and refunds, and payments will appear to go missing. The wizard repeats this reminder on the Preview and Results steps whenever an encryption hash was supplied.
Step 2 — Data Selection
Choose which data types to bring over. Each type is a card with a checkbox, and most show the number of records found. Some types depend on others; if a dependency is unchecked, the dependent card is greyed out and shows a Requires: note, and unticking a parent automatically unticks everything below it. The defaults are sensible for most migrations.
| Data type | Default | Requires | What it creates |
|---|---|---|---|
| Company Details | On | — | Your company profile, plus currencies, exchange rates, VAT rates and two billing switches. Much more than the name suggests — see below. |
| Admin Users | Off | — | Staff accounts, with their ticket signature and their support-department assignments. |
| Clients | On | — | Customer accounts. Nearly everything else depends on this. |
| Contacts | Off | Clients | WHMCS contacts, as sub-accounts linked to their parent client through team accounts. |
| Products | On | — | Product categories and products. Opens a category/product picker, module mapping and configurable-option controls. |
| Services | On | Clients, Products | Active and past services, optionally linked to matching hardware. |
| Invoices | On | Clients | Invoices and proformas, split by status, with optional line items. |
| Tickets | Off | Clients | Support tickets, optionally with their replies. |
| Payments | On | Clients, Invoices | Recorded transactions against the imported invoices. |
| Credits | On | Clients | Account credit history. |
| Payment Methods | Off | Clients, Services | Saved payment methods for automatic renewal. Needs token decryption to be useful. |
Next stays disabled until at least one type is ticked.
Product options
When Products is selected, the card expands with three sets of controls.
- Product & category picker — products are listed grouped by category, with per-category checkboxes and All / None shortcuts so you can import a subset. Leaving the picker untouched imports everything.
- Module mapping — each WHMCS server module found in your data is matched to one of your provisioning plugins, and a counter shows how many of them are mapped. Use Auto-detect to match by name, or leave a module on No plugin (skip) to import its products without one. If you have no provisioning plugins enabled, a note says so; unmapped modules simply import their products without a plugin.
- Import configurable options — off unless you tick it. Each option is auto-classified as RAM, Storage, Bandwidth, Network, OS, Location or General from its name; you can deselect individual options with All / None shortcuts, override a classification, or press Reset categories to put every one back to its auto-detected value. A second table lets you map each option to a plugin's expected option identifier, with its own Auto-detect; anything you leave unmapped gets an identifier generated for it.
Product descriptions are not discarded: each line of the WHMCS description becomes a plan feature on the imported product, so your spec bullets survive onto the order page.
Service options
- Skip modules — a checkbox per discovered server module, so you can exclude every service tied to a module you are not migrating (a panel you are retiring, for instance).
- Link services to infrastructure devices — on by default. For each service the importer looks through the WHMCS custom fields for a device identifier — field names such as Server ID, Device ID, VM ID, VPS ID, Container ID, Instance ID, External ID, Provider ID or Node ID, in any spelling or spacing — and attaches the service to the matching server or blade in your inventory.
- Ignore missing device links — shown only when device linking is on. Lets the import continue past services whose device cannot be matched, instead of recording them as failures.
Invoice options
- Types — Invoices and/or Proforma. At least one stays selected.
- Statuses — Paid, Unpaid, Cancelled, Refunded, Collections, Draft and Payment Pending. Deselect any you do not want; anything filtered out is counted as skipped and reported, not silently dropped.
- Proforma statuses — which WHMCS statuses become proformas. Everything else becomes an invoice.
- Include invoice line items — on by default; brings across the individual lines on each document.
Gateway mapping
When you select Payments or Payment Methods, a mapping table lists each WHMCS gateway name with a dropdown to match it to one of your enabled FluxBilling payment methods, and counts how many are mapped. If you leave the table completely untouched, FluxBilling matches what it can on its own: every enabled payment plugin declares which WHMCS gateway names it recognises, and those are matched automatically.
Nothing is thrown away when a gateway cannot be placed:
- A payment on an unmapped gateway still imports; it is recorded as a manual payment, so the client's payment history stays complete and you can correct the gateway later.
- A saved payment method on an unmapped gateway imports inactive, carrying its original gateway name. It is never charged in that state. Install or enable the matching payment plugin, then re-point the method — the reason is written into the error list so you can find them.
Step 3 — Conflicts
Decide what happens when an incoming record matches one that already exists in FluxBilling. A dropdown appears for each selected type that supports conflict handling, with the matching key in brackets.
| Type | Matched by | Choices |
|---|---|---|
| Admin Users | Skip (keep existing) · Update existing | |
| Clients | Skip (keep existing) · Update existing · Flag for review | |
| Products | name | Skip (keep existing) · Update existing · Create duplicate |
| Invoices | invoice # | Skip (keep existing) · Update existing |
The default is Skip everywhere. That makes re-running the wizard safe — already-imported records are left untouched — but it also means a second run will not refresh anything unless you switch the type to Update existing.
Warning: There is no rehearsal mode. Nothing on this step, or anywhere else in the wizard, holds a write back: once you press Start Migration, the import writes real clients, services, invoices and payments. Your dress rehearsal is a restorable backup plus a small first pass, as described under Running it more than once below.
Step 4 — Preview
A summary table lists every selected data type with its record count, the conflict rule that will apply, and a Ready status (or a short note, such as how many products you picked out of the total, how many modules are skipped, or that contacts will be linked as team members). Below it, badges summarise your key choices — an estimated duration, a Passwords from DB note, how many module mappings and classification overrides you set, whether device linking and Ignore missing devices are on, and whether payment tokens will be decrypted. A caution line reminds you to have a backup because the action cannot easily be undone.
The estimate is a rough one: roughly a minute per hundred records across everything you selected. Real throughput is usually much faster — records are fetched and written in large batches — but a first run on a big database is a good time to leave the tab open and let it work.
Click Back to adjust anything, or Start Migration to begin.
Step 5 — Progress
Once started, the import runs on the server and the wizard follows it live, with an overall bar, an elapsed-time counter, a per-type row of created / updated / failed counts, and a line naming the phase in progress. If any records fail, an expandable Errors Details panel groups them by record type and by reason, listing the affected source IDs. Entities are processed in a fixed order, because later ones depend on earlier ones:
- Company Details — company profile, currencies and exchange rates, VAT rates, billing switches.
- Admin Users — staff accounts and their departments.
- Clients — customer accounts.
- Product Categories, then Products, then Configurable Options.
- Services — followed by a client-status sync that promotes every imported client holding an active service to active.
- Contacts, Tickets and Credits — these three run at the same time.
- Invoices — then VAT and currency are backfilled onto the imported documents.
- Payments — then payment and service currencies are backfilled.
- Payment Methods.
- Auto-Renewal Linking.
Warning: Cancel is a stop, not an undo. The Cancel button asks you to confirm and says so plainly: the import stops after the batch it is working on, records already imported are kept, and nothing is rolled back. You are then taken to the Results step, which shows exactly what landed, with the run marked Migration Cancelled. There is no pause or resume — the wizard holds one connection open for the whole run, so the only controls are to let it finish or to stop it.
The job runs on the server, not in your browser. Closing the tab does not stop it.
Step 6 — Results
When the job finishes, a header shows whether the migration Completed, Failed or was Cancelled, with the finish time. A results table breaks down Created, Updated, Skipped, Failed and Total for each data type, with a grand-total row. If anything failed, the reasons are listed below it (the first fifty, with a count of the rest).
- Report — downloads a file containing the job details, the exact configuration used and every error, so you have a record of what ran.
- New Migration — resets the wizard back to the Connection step. Your saved connection details are kept.
If you supplied an encryption hash, the reminder about payment-gateway webhook URLs appears here as well.
What actually comes across
Every import is a translation, not a copy. This is what each type becomes in FluxBilling.
Company Details
Despite the name, this is the option that carries your financial configuration.
- Company profile — name, legal name, e-mail, address, city, state, postcode, country, phone and VAT number. WHMCS keeps the company address in several different places depending on version and setup; the importer tries each in turn, ending with your first admin's profile address as a last resort. Two-letter country codes are expanded to full country names.
- Profile fields are only filled when they are empty or still hold a placeholder. If you have already typed your company name into FluxBilling, the import will not overwrite it. Clear a field first if you want the WHMCS value to win.
- Three settings are overwritten regardless. If your WHMCS VAT number begins with an EU country code, your company country is set from it, because a VAT registration is the more reliable source. Your VAT-enabled switch is set from the WHMCS tax setting. And your billing document mode is set from the WHMCS order type — proforma-first there makes it proforma-first here, anything else makes it direct invoicing. Check all three under General and Billing after the run, because the document mode changes how every new sale is billed.
- Currencies and exchange rates — every WHMCS currency is created with its symbol and number formatting, your WHMCS default becomes your base currency, and the enabled-currency list is set to match. Each rate is written both ways (base to target and back) and marked as a manual override, so nothing overwrites it until you say so.
- VAT rates — WHMCS tax rules are imported per country. Where WHMCS holds two levels for a country, the primary level wins. A WHMCS tax rule with no country becomes your default tax rate.
Admin Users
- Staff accounts arrive with their name, e-mail, ticket signature (switched on when there is one) and their support-department assignments.
- A WHMCS full administrator arrives as a super administrator here, which is the level that can reach this very wizard and your billing settings. Review the imported staff list before you hand anyone a password, and demote whoever should not hold it — see Team Members for how account roles work.
- Two WHMCS admins sharing one e-mail address collapse to one account, and the duplicate is reported.
Clients and Contacts
- Passwords come across. Your clients keep the password they already use — the stored password is carried over, not reset. Where WHMCS holds nothing usable, the account gets a random password instead and that client must use “forgot password” to get in.
- Imported clients are marked e-mail-verified, so nobody is asked to re-verify an address they confirmed years ago.
- Credit balance, preferred currency and last-login time are carried over; clients with no currency of their own default to EUR. Phone numbers stored in the WHMCS dotted format are normalised.
- Status mapping: WHMCS Active and Inactive both arrive as inactive, and the sync that runs after the services import promotes anyone with an active service to active. WHMCS Closed becomes terminated, which blocks login. If you import clients without services, expect everyone to sit at inactive until you import services too.
- One account per e-mail address. If two WHMCS clients share an e-mail, the first is imported and the others are reported as duplicates in the error list. Check that list — those clients need merging by hand.
- Contacts become sub-accounts attached to their parent client as team members, so the people who used to receive WHMCS contact e-mails can sign in to the client portal in their own right. See Team Members.
Products and Services
- WHMCS product groups become product categories; the products land inside them.
- Billing cycles are normalised. Monthly, Quarterly, Semi-Annually and Annually map straight across. Biennially and Triennially both become annually, and One Time and Free Account both become monthly. Anything unrecognised also becomes monthly. If you sell two- or three-year terms, review those services after importing and correct the price and renewal date to match what the customer actually bought.
- Service status mapping: Active, Suspended, Terminated, Cancelled, Pending and Fraud all map to their FluxBilling equivalents; anything unrecognised arrives as pending.
- Where a service carries a device identifier in its custom fields and the matching hardware already exists in your inventory, the service and the device are linked. Devices linked and devices not found are counted separately, so you can see how well the match went.
Invoices, Payments and Credits
- Numbers are preserved. Each document keeps its original WHMCS number behind your configured prefix —
INV-1042for WHMCS invoice 1042, for example, withINV-andPRO-as the defaults. Where a WHMCS invoice has no number of its own, its internal ID is used so the reference still matches your records. - Your counters are advanced. After the import, the next invoice and proforma numbers are pushed past the highest number imported, so newly issued documents cannot collide with history. A counter that is already higher is left alone.
- Subtotal, tax and total are taken as WHMCS recorded them — historical documents are not recalculated against your current VAT rules. Currency comes from the client's preferred currency.
- Documents whose client was not imported are reported as failures rather than being attached to the wrong account. Import clients and invoices together.
- Payments are attached to their invoices or proformas, and duplicates are detected by transaction reference (or, where there is none, by gateway, amount and date) so a re-run does not double-count. Credits arrive as credit history against the client.
Tickets
- Status maps across Open, Answered, Customer-Reply, Closed, On Hold and In Progress, defaulting to Open; priority across Low, Medium, High and Urgent, defaulting to Medium.
- Departments are matched by name. A WHMCS department whose name contains “sales” lands in Sales, “billing” in Billing, “abuse” in Abuse, and everything else in Support. Any of those four that does not exist yet is created for you. If your departments are named something else entirely, expect them all in Support — check Departments afterwards and move what needs moving.
Payment Methods and Auto-Renewal Linking
- Saved methods are imported with their provider token where one could be obtained, and are classified as card, bank account or other from what the matching plugin declares. Tokens are stored encrypted and are never displayed back.
- A saved method whose client was not imported is skipped, and the reason is written to the error list — a silently missing method means a dead automatic payment for that customer.
- Auto-Renewal Linking turns automatic payment on. It runs when you import both Payment Methods and Services. Every migrated client who has a service from this run, has no automatic payment method set yet, and does have at least one active saved method gets that method attached and automatic payment switched on. This is what makes renewals keep collecting after the switch — and it means your clients will be charged automatically from FluxBilling, so make sure your gateway configuration and webhooks are correct before the first renewal run.
What is not imported
The wizard covers billing and support data. It does not bring across:
- Domain registrations and registrar configuration
- Affiliates, quotes, and orders as a separate history (services and invoices carry the outcome)
- Knowledge-base articles, downloads, announcements and e-mail templates
- WHMCS addon modules, hooks, custom code and theme customisations
- Client-side or product-side custom fields as fields (service custom fields are read only to find device identifiers)
- Gateway configuration itself — you configure your gateways in FluxBilling as plugins
Set the equivalents up in FluxBilling directly: Email Templates, Blog and Payment Gateways.
Running it more than once
The importer remembers the link between each WHMCS record and the FluxBilling record it created. That is what makes a second pass useful rather than dangerous:
- Types you did not select the first time can be added later, and they will attach to the clients, products and invoices already imported.
- With conflict rules on Skip, existing records are left exactly as they are.
- Invoices are matched by document number and clients by e-mail, so a re-run does not duplicate them even if the mapping is missing.
A good pattern for a large migration: run once with Clients and Products only, check a handful of accounts by hand, then run again adding Services, Invoices, Payments and the rest. Remember that client statuses only settle once services are in.
After the migration
- Update payment-gateway webhooks to point at FluxBilling, in every provider dashboard you use.
- Check the error list in the downloaded report — duplicate e-mails, unmatched clients, dormant saved methods and unlinked devices are all listed there with reasons.
- Review two- and three-year services, and anything that was One Time in WHMCS, since those cycles were normalised.
- Check your ticket departments and move any that landed in Support by keyword fallback.
- Verify company details, currencies, VAT rates, the VAT switch and your billing document mode under General and Billing.
- Review imported staff accounts and remove super-admin rights from anyone who should not have them.
- Spot-check invoice numbering by issuing one new document and confirming it follows your history.
- Review automatic payment on a few migrated clients before the next renewal run.
- Keep WHMCS running read-only for a while. It costs nothing and it is the only complete copy of anything the import did not cover.
Troubleshooting
| What you see | What it means |
|---|---|
| Connection refused, access denied, host not found, or a timeout | The database is not reachable from your server, or the credentials are wrong. The banner names which of the four it was. If the source only listens locally, turn on the SSH tunnel and set the MySQL host to localhost. |
| “Client N not found” on invoices, payments or credits | That record's client was not imported — either it was filtered out, it was a duplicate e-mail, or Clients was not selected. Import the clients, then re-run. |
| “Duplicate email” in the client errors | Two WHMCS clients share one address. Only the first was imported; merge the others by hand. |
| Devices not found | Your hardware is not in FluxBilling yet, or the WHMCS custom field holding the device ID is named something the matcher does not recognise. Import your inventory first, or turn on Ignore missing device links to continue and link by hand later. |
| Saved methods imported but automatic payment does not collect | The tokens could not be read, or the gateway was not mapped and the method came in inactive. Configure the gateway, then re-run the Payment Methods step with the WHMCS installation path (or the encryption hash) supplied. |
| Everyone landed as inactive | Client status is promoted by the services import. Run it with Services selected and the clients holding an active service become active. |
| Nothing happens after Start Migration | The job runs on the server and the page follows it. If you close the tab the import keeps going; reopen the wizard and start a new run only after checking the results of the last one. |
Related
EasyDCIM Migration, VPS Panel Migration, Clients, Products, Billing, Payment Gateways, Departments.