
Client Portal Overview
Sign in to the client portal, read the dashboard, navigate the sidebar, and manage your profile, payment methods, sessions, SSH keys, and preferences.
The client portal is your hub for everything on your account. Once you sign in you can review your services, pay invoices and proformas, top up your credit balance, open support requests, and keep your contact details and security settings up to date — all from one place.
Signing in
Open the login page and enter your email address and password, then select Sign In. Use the eye icon inside the password field to reveal what you typed, and tick Remember me if you want to stay signed in on this device.
- Create an account — If your provider allows self sign-up, the text Don't have an account? and a Create one link appear below the form. Registration runs as a short guided wizard: first your Full Name, Email and Password (with confirmation); then your Billing Address (street address, city, state/province, postal code, country); and finally, when your provider publishes legal links, an Almost there! step where you accept the Terms of Service and Privacy Policy. Numbered step markers at the top show where you are, and you move with the Back and Continue buttons. Registration passwords must be at least 8 characters and contain an uppercase letter, a lowercase letter and a number. If your provider has not enabled self sign-up, the link is hidden and accounts are created for you.
- Forgot password? — Select Forgot password? on the login page, enter your email address, and select Send Reset Link. Follow the emailed link to choose a new password. A reset link that has lapsed shows Invalid Reset Link with a Request New Link button.
- Sign in with another service — If your provider has enabled it, an Or continue with divider and one or more sign-in buttons appear beneath the form. Select one to authenticate with that service instead of a password.
- Verification Required — If your account uses two-step verification, you are asked for a six-digit code after your password. There is a single code field: type or paste the six digits and the form submits on its own once the sixth digit lands, or select Verify. Where the code is emailed to you, a Resend code link appears under the field with a short countdown before it becomes available again. Where the code comes from an authenticator app, there is nothing to resend; instead a link lets you switch to one of your recovery codes. Back to login abandons the attempt.
- Setting up an authenticator — If your provider requires an authenticator app for your account and you have not set one up, sign-in pauses on a setup step: scan the code shown (or add the key to your password manager), enter a code from the app to confirm, then save the one-time recovery codes you are given. They are shown once, so store them before you continue.
- Check Your Email — If email verification is required, you are asked to confirm your address before you can sign in. Use the link in the email, or Resend verification email on that screen.
Note: Which of these options you see depends on how your provider has set the portal up. If a button described here is not visible, that feature has not been enabled for your account.
What's on the dashboard
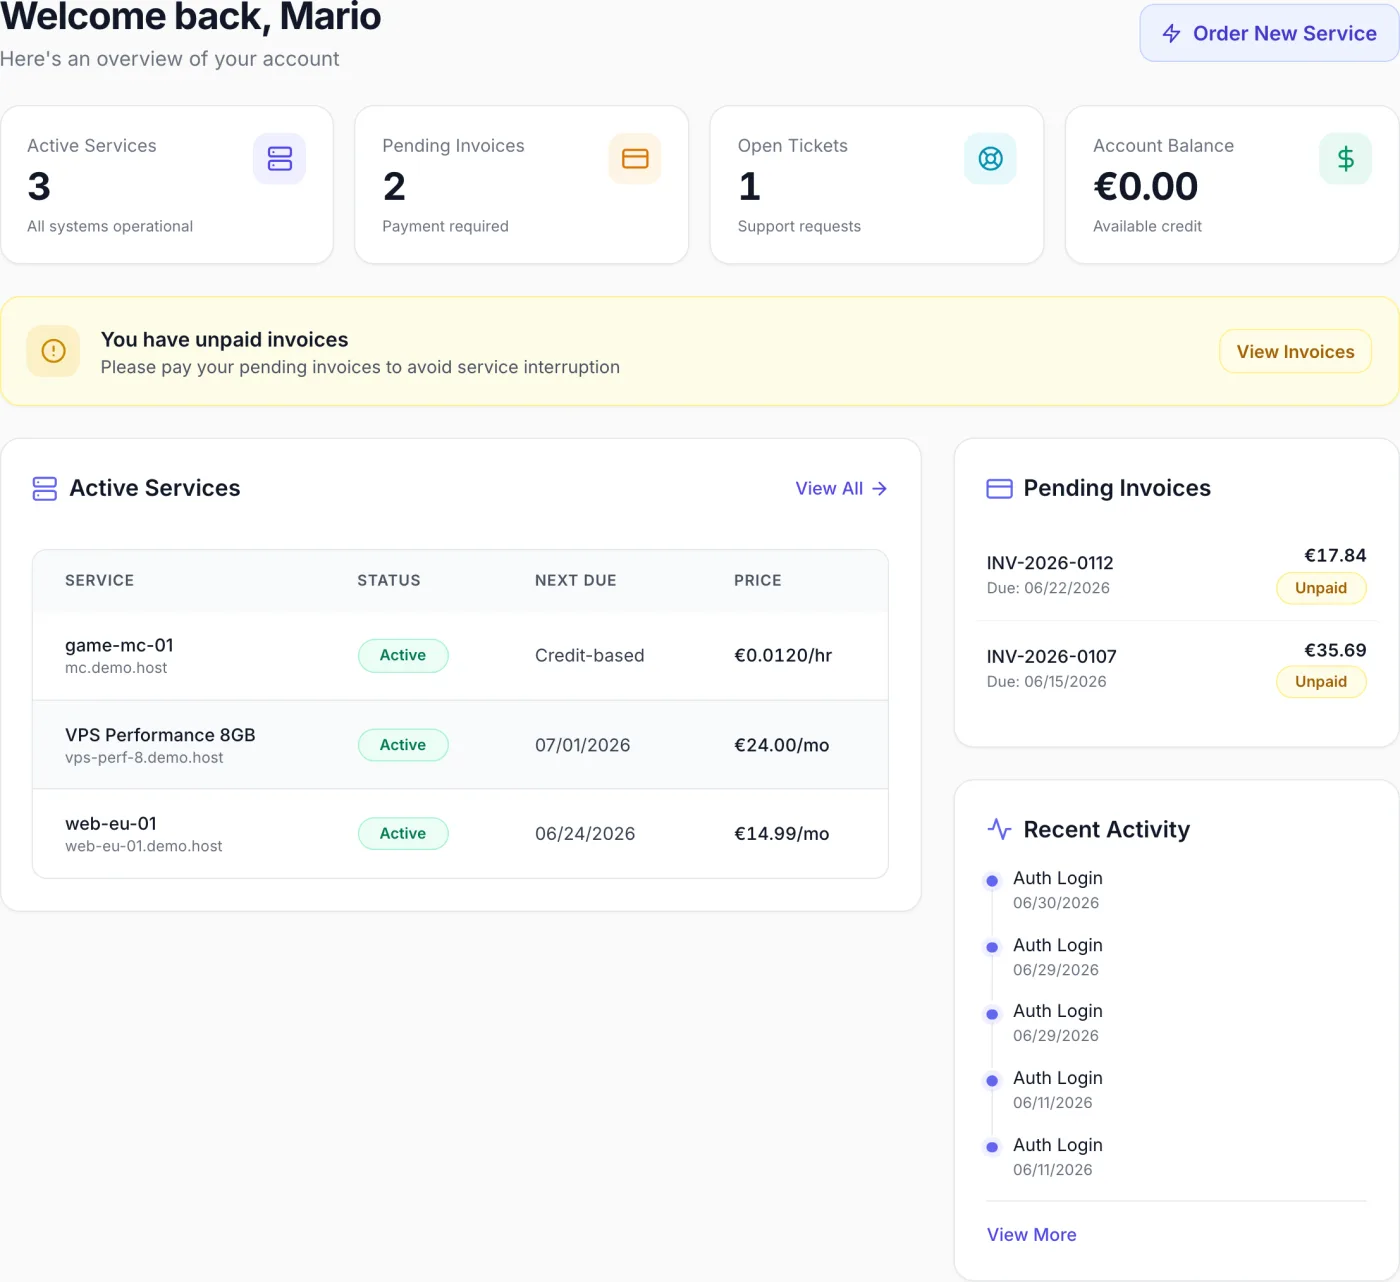
The dashboard opens after you sign in and greets you with Welcome back, and your first name. Four summary cards sit across the top; each is clickable and jumps to the matching section.
| Card | What it shows | Where it takes you |
|---|---|---|
| Active Services | How many services are currently running, with the note All systems operational. | Your services list. |
| Pending Invoices | How many invoices are unpaid. The card turns amber and reads Payment required when at least one is outstanding, and All paid otherwise. | The Billing page. |
| Open Tickets | How many support requests are open. | Your tickets list. |
| Account Balance | Your available credit, shown in your currency. | The Billing page. |
Below the cards you will find:
- Payment reminder — When you have unpaid invoices, a yellow panel reading You have unpaid invoices appears with a View Invoices button.
- Active Services — Your five most recent active services, with columns for Service, Status, Next Due and Price. Under each service name is a short line naming its type and its hostname, IP address or location. Select a row to open that service. View All in the card header opens the full list. Hourly services show Credit-based instead of a renewal date, and their price is shown per hour.
- Pending Invoices — Up to five unpaid invoices with their due dates, amounts and status badges. Select one to open it and pay.
- Recent Activity — The latest events on your account. If there are more than five, a View More link opens the full list in a pop-up.
- Order New Service — A button in the top-right of the page that opens the order catalogue.
If you have no active services yet, the Active Services card shows No services yet with its own Order New Service button instead of a table.
Finding your way around
The portal is organised around a sidebar on the left. On a phone or narrow screen the sidebar is hidden — tap the menu icon at the top-left of the page to slide it open, and tap the dimmed area outside it to close it again.
The sidebar is split into a Main Menu group and an Account group:
- Dashboard — The account overview described above.
- My Services — Every service on your account, with its status and management controls.
- Billing — Your invoices and proformas, your credit balance and your credit history. See Account Credit.
- Support Tickets — Open, reply to and track support requests.
- Settings (under Account) — Your profile, billing address, payment methods, security, team and preferences.
Two more entries can appear at the bottom of the sidebar:
- Reseller — Shown when your provider runs a reseller programme and you are not a reseller yet. It opens an application page describing wholesale pricing and an Apply Now form asking for your Company Name, and optionally a Business Registration Number, Tax ID / VAT Number and Additional Notes. After you submit, the page reads Application Pending until it is reviewed.
- A Reseller group — Once your application is approved, a whole section appears with Reseller Portal, Products, Orders, Services, Customers, API Access and Peer Connections. These give you wholesale prices and margins, the ability to place orders for your own end-customers, service management for those customers, and keys and webhooks for automating orders. The group is hidden if your provider has switched the reseller module off. Each of those pages is described in The Reseller Area.
A card at the top of the sidebar shows your name, email and avatar; selecting it opens your profile. Your provider can choose to hide this card.
Along the top of every page is a header bar containing a language switcher, a notification bell, and your account menu. Select your avatar in the top-right to open a menu with Profile, Settings and Logout. A Website link back to your provider's main site can also appear here. A shopping-cart icon with a count badge appears only while your cart holds at least one item; selecting it goes straight to checkout.
The notification bell shows a count of unread notifications and a short list with Mark all as read and View all; View all opens the full Notifications page.
Managing your profile and security
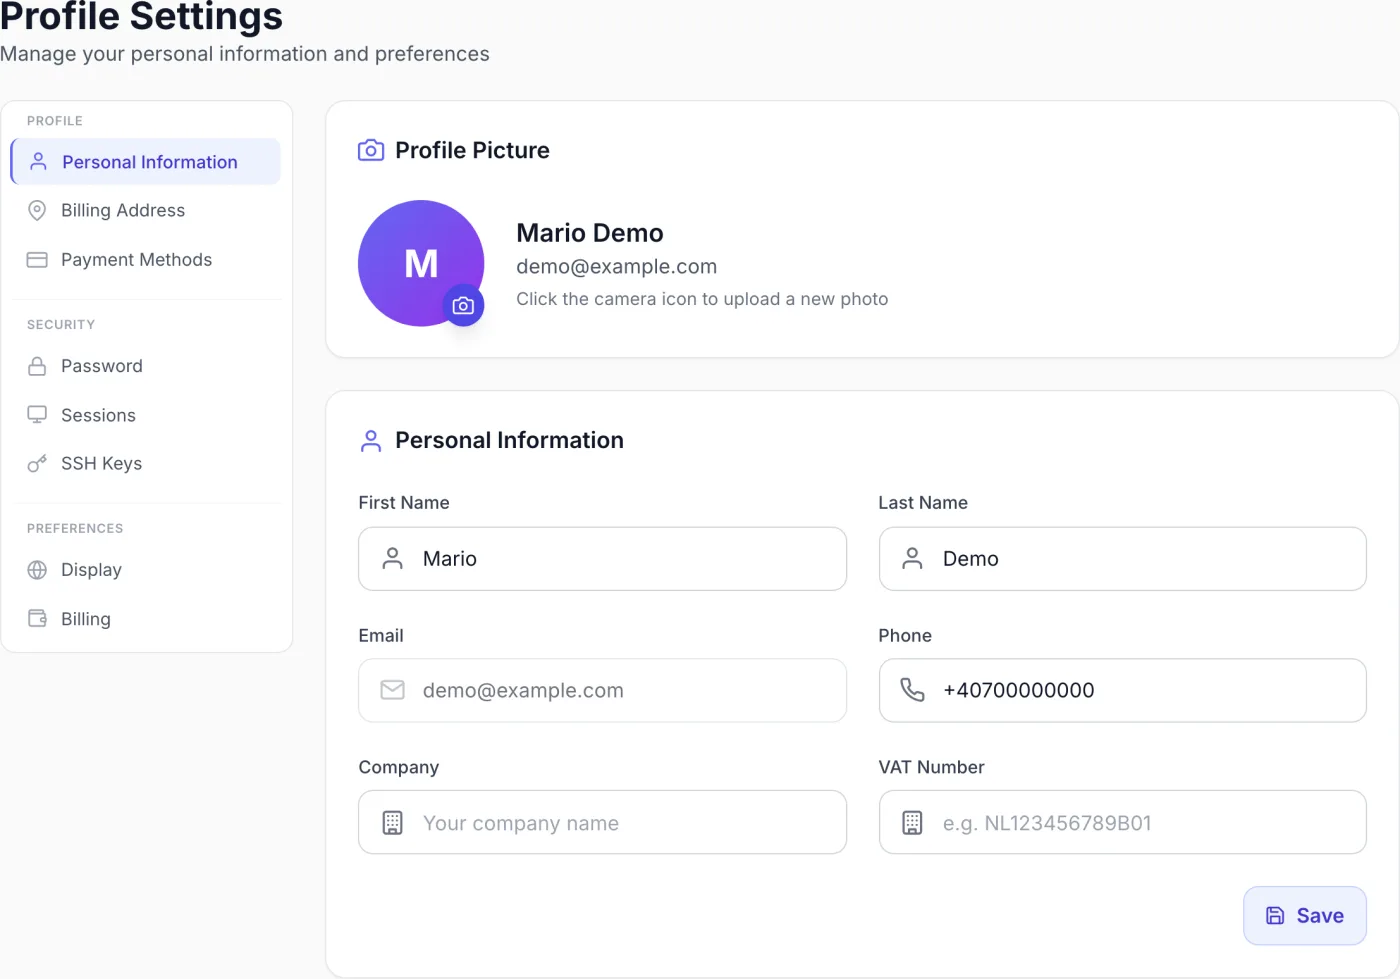
Select Settings in the sidebar (or Profile from the account menu) to open Profile Settings. The page has its own menu down the left side, grouped into Profile, Security, Team and Preferences. On a narrow screen this menu collapses into a dropdown at the top of the page.
The sections under Security — your password, two-factor authentication, signed-in devices, SSH keys and API keys — are covered step by step in Account Security.
Section reference
| Section | What you can do |
|---|---|
| Personal Information | Update your First Name, Last Name, Phone, Company and VAT Number, then select Save. Your Email is shown but cannot be edited here. The card also shows when you became a customer, and lets you upload a profile picture. |
| Billing Address | Keep your Address, City, State/Province, Postal Code and Country up to date so your invoices are correct, then select Save. The form checks that the street address includes a street number and that the postal code matches the country you picked. |
| Payment Methods | See your saved payment methods, mark one as your Default with Set Default, or delete one with the trash icon. Cards show their expiry and are flagged Expired when they lapse. Add payment method lets you store one in advance: pick a provider, authorise it on their page, and you are brought straight back. Methods you save are also collected when you complete a payment with the save option ticked. |
| Password | Enter your Current Password, then your New Password twice, and select Update Password. The new password must be at least 8 characters and contain an uppercase letter, a lowercase letter and a number. You are asked to sign in again afterwards. |
| Sessions | See every device signed in to your account, each with its Location, IP Address and Last Active time. Your own session is labelled Current. Select Revoke next to any other session to sign it out, or Revoke All Others to sign out everywhere except here. |
| SSH Keys | Add the public SSH keys you want installed on your dedicated servers when you reinstall their operating system, so you can log in without a password. Give each key a Name, paste its Public key, and select Add Key. Remove a key with its trash icon. Only ever paste a public key here, never your private key. |
| API Keys | Create keys so scripts and tools can manage your own services. Each key has a Label, a fixed set of Scopes, and optional restrictions: Allowed IPs, an expiry date and an hourly request limit. The key itself is shown once at creation and cannot be recovered, and you can Revoke a key at any time. The section carries a Beta tag and appears only when your provider has the customer API enabled. See Customer REST API for what a key can then do. |
| Team Members | Invite other people to your account and grant them specific permissions. This section only appears when your login belongs to a shared account — see Team Members. |
| Display | Choose your Date Format (MM/DD/YYYY or DD/MM/YYYY). A Language selector also appears when your provider offers more than one language. |
| Billing (under Preferences) | Control whether your credit balance is applied to renewals automatically. Choose Use Platform Default, Always Apply Credit or Never Apply Credit. A banner at the top says whether auto-credit is currently active. If your provider has not allowed customers to override this, the current behaviour is shown as Preference Override Not Available and the options are unavailable. |
Uploading a profile picture
In Personal Information, select the camera button on your avatar and choose an image (JPEG, PNG, GIF or WebP, up to 5 MB); it updates immediately. To remove a picture you have set, use the small trash button on the avatar and confirm.
Note: Some fields may be read-only. If your provider has locked certain profile or address fields, those inputs appear dimmed with the notice that they cannot be changed here. Open a support ticket if a locked detail needs updating.
What "apply credit automatically" actually does
When auto-credit is on, your balance is used on its own for renewals of services you already have, at the moment the renewal document is issued. Funds added later are not applied to an existing document by themselves — you pay it with credit from the Billing page. Hourly services draw from the balance directly as they run. A new order, an upgrade or an add-on is never paid from your balance without you asking — on those you choose Use Credit Balance at checkout. Credit top-ups themselves are always paid with a payment method, never from the balance. See Account Credit for how to add funds, set up automatic top-up and read your credit history, and Invoices & Payments for the documents themselves.
Tips
- Keep your Billing Address accurate — it appears on every document, and any tax calculation depends on the country you have on file.
- Check Sessions now and then. If you see a device or IP address you do not recognise, revoke it and change your password — Account Security walks through both.
- If you run dedicated servers, add your SSH Keys before a reinstall so password-free access is ready as soon as the server is rebuilt.
- The notification bell is on every page, so you can catch up on account events without leaving what you are doing.
Related
Placing an Order, Invoices & Payments, Account Credit, Account Security, Managing Your Services, Getting Support, Team Members, The Reseller Area, Referrals & Rewards.