
Tickets
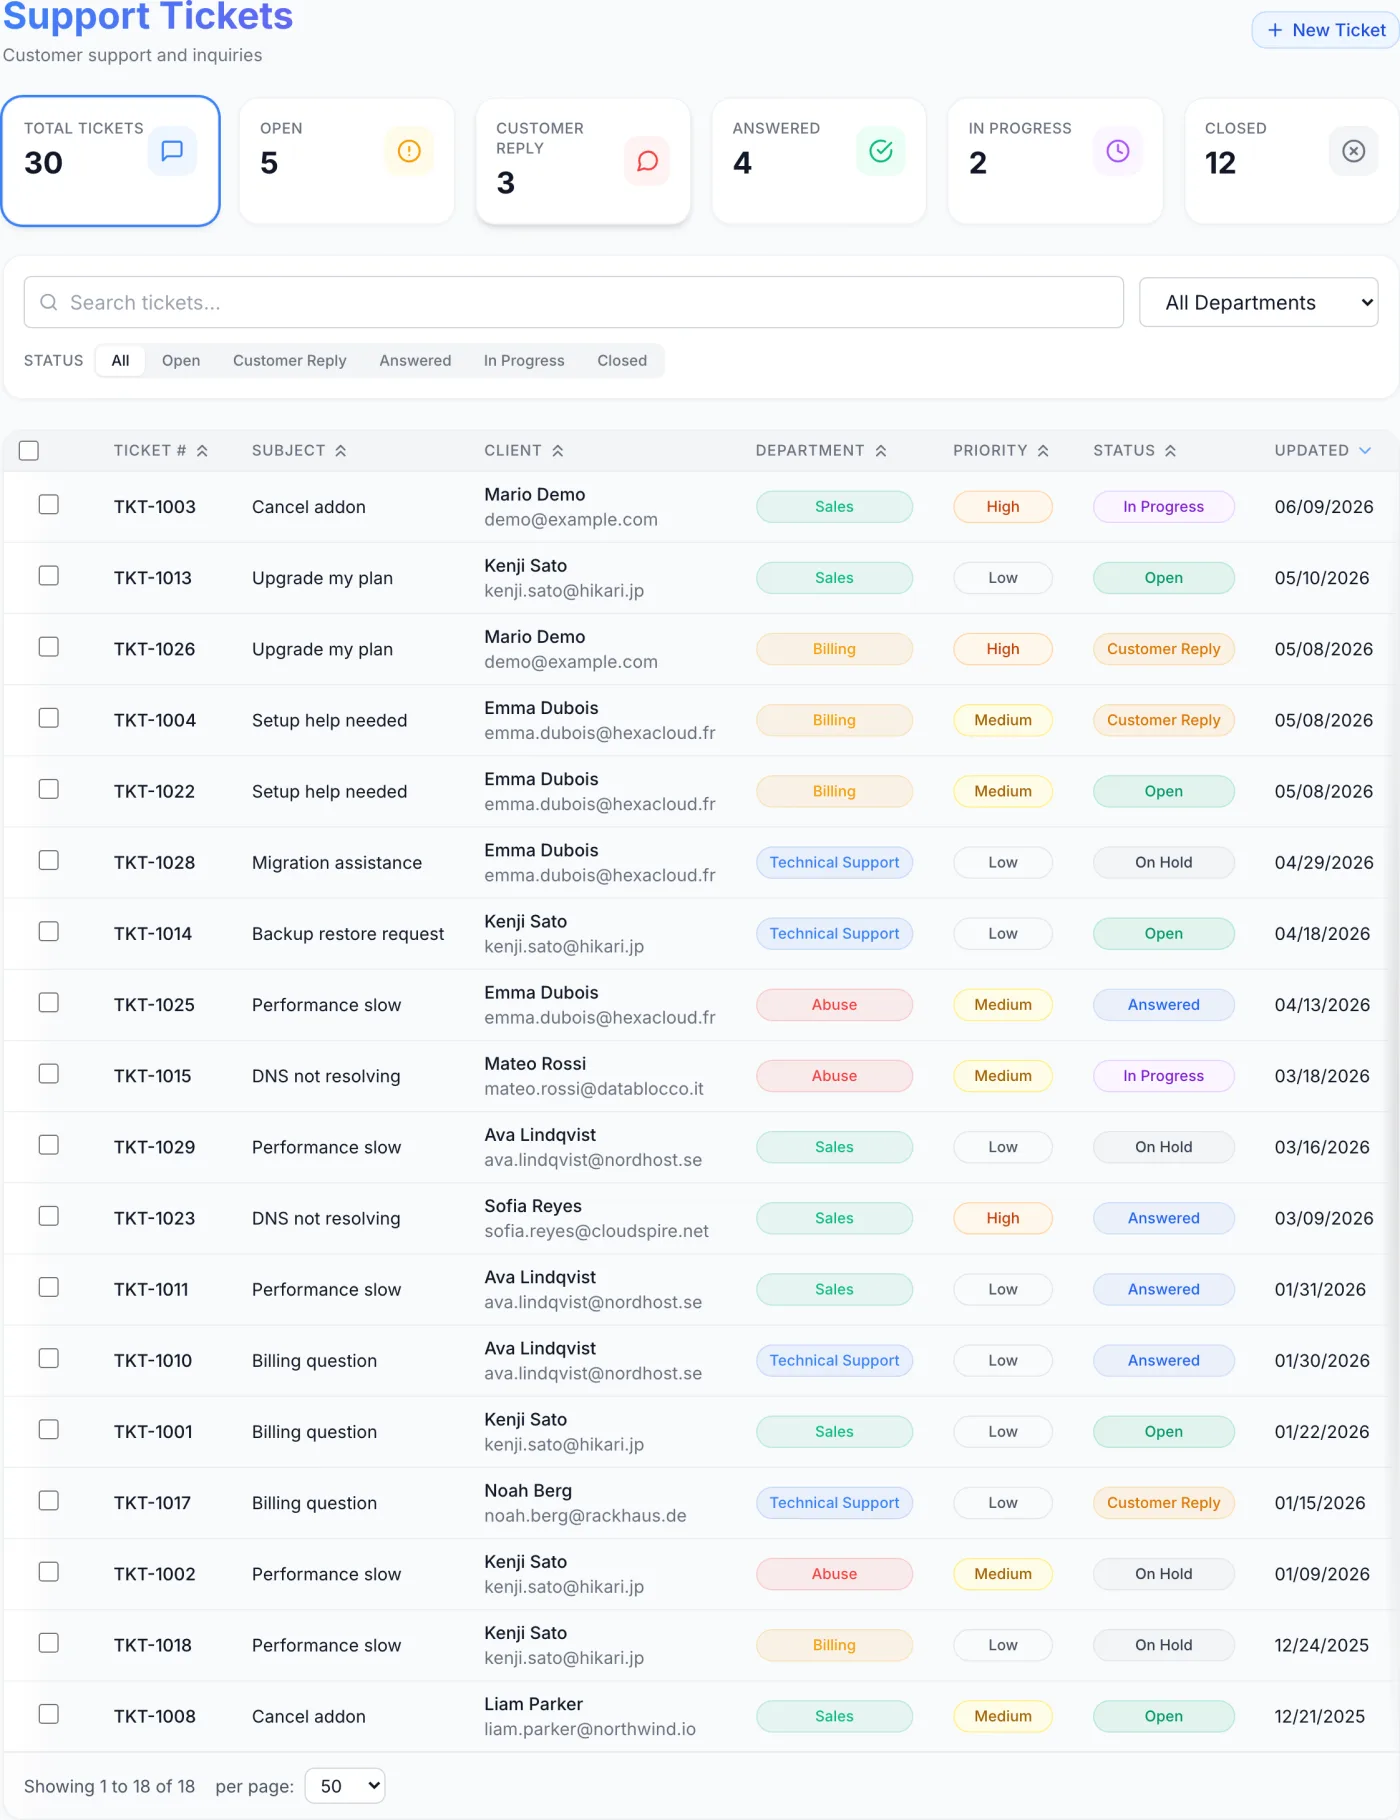
The staff support inbox: KPI tiles, search and department/status filters, ticket list, pop-out view, and bulk close, delete, and merge actions.
What the Tickets page is for
Support Tickets is your staff support inbox. Every customer support request lands here: tickets your customers raise from their client area, tickets staff open on a customer's behalf, e-mails imported from a department mailbox, live-chat conversations, and submissions from a public contact form. The page gives you one filterable queue and a status system that tells you at a glance whether you or the customer owes the next reply.
How to reach it
Open the admin panel and click Tickets in the sidebar. The page header reads Support Tickets with the subtitle Customer support and inquiries, and a New Ticket button sits in the top-right corner.
What you can see
The queue is scoped to the departments you belong to. A super administrator sees every department; everyone else sees only tickets in their own departments, and only those departments appear in the department filter. A staff member who has not been added to any department sees an empty queue and zero counters — department membership is managed in Departments, and how roles and departments combine to decide what a staff member may do is explained in Staff & Permissions.
Reading the page at a glance
Across the top are six KPI tiles, each showing a live count within your departments:
- Total Tickets — every ticket, closed ones included.
- Open
- Customer Reply
- Answered
- In Progress
- Closed
Clicking any tile filters the list below to that status, and the tile gains a highlighted ring. Click the same tile again, or the Total Tickets tile, to clear the filter and return to the default view.
Filtering and searching
- Search — type into the Search tickets... box to match on ticket number, subject, client name, e-mail address, department name and the formatted Updated date. Filtering happens as you type and narrows the rows already loaded; it does not search inside message bodies.
- Department — use the All Departments dropdown to narrow the list to one department.
- Status — on desktop a row of tabs appears (All, Open, Customer Reply, Answered, In Progress, Closed); on smaller screens this becomes a dropdown whose first entry is All Statuses. The All view deliberately hides closed tickets so your queue stays focused — switch to the Closed tab to see them.
Tip: The KPI tiles and the status tabs control the same filter. Clicking the Customer Reply tile is identical to clicking the Customer Reply tab — use whichever is closer to your cursor.
Note: The queue loads up to 2,000 tickets at a time, newest activity first. On a large archive, use the department and status filters (which are applied before the list is loaded) rather than relying on the search box alone.
The ticket list
Each row represents one ticket. The table columns are:
| Column | What it shows |
|---|---|
| Checkbox | Selects the row for a bulk action. The header checkbox selects or clears every visible ticket at once. |
| Ticket # | The ticket's reference number. It carries the ticket prefix you set in Billing settings (TKT- unless you change it) followed by a sequential number, for example TKT-1042. |
| Subject | The ticket subject line, truncated if long. |
| Client | The customer's name and e-mail. Registered customers are a clickable link to their profile. Small badges appear here for special tickets: Chat (came in through live chat), Guest (arrived without a signed-in account — a public form, a live chat or an inbound e-mail), and Staff (the first message was written by a staff member, so the ticket was opened on the customer's behalf). Hovering the Staff badge shows who opened it. |
| Department | The assigned department, shown as a pill in that department's colour, or Unassigned when the ticket has no department. Hidden on narrow screens. |
| Priority | Low, Medium, High or Urgent, colour-coded. |
| Status | Open, Customer Reply, Answered, In Progress or Closed. |
| Updated | When the ticket last changed. Hidden on narrow screens. |
| Actions | An Edit link that opens the ticket, plus a pop-out button (see below). |
Click a column header to sort by it; the list defaults to most-recently-updated first. Clicking anywhere else on a row opens the ticket. If nothing matches your filters you see No tickets found.
Opening and working a ticket
- Open the conversation — click a ticket row, or its Edit link, to open the full ticket view, where you read the thread, change status, department, priority and assignment, and post a reply or an internal note. See Ticket Details.
- Pop-out — click the small pop-out icon in the Actions column to open the ticket in a floating panel you can drag, resize and minimise. It stays on screen while you move to other pages of the admin panel, so you can keep an eye on a conversation while you check the customer's services or invoices. You can have several pop-outs open at once; they cascade from the bottom-right corner and close when you reload the page.
- Create a ticket — click New Ticket in the top corner to raise a ticket on behalf of a customer. See New Ticket.
Bulk actions
Tick the checkboxes on one or more rows, or the header checkbox to select every visible ticket. A blue action bar appears above the table showing how many are selected, with these buttons:
- Merge Selected — appears only when two or more tickets are selected. Combines duplicate tickets from the same customer into one.
- Close Selected — sets every selected ticket to Closed after a confirmation prompt. Tickets already closed are left alone.
- Delete Selected — permanently deletes the selected tickets and all their messages. This cannot be undone, so a confirmation is required.
Bulk actions respect your department access: tickets in departments you do not belong to are skipped, and the result message tells you how many were skipped.
Note: Close Selected changes the status quietly. If you want the customer to receive the "ticket closed" e-mail, open the ticket and use the Close Ticket button there instead.
Merging duplicate tickets
When a customer opens several tickets about the same issue, merge them so the whole conversation lives in one place:
- Select two or more tickets that belong to the same customer, then click Merge Selected. The button stays disabled while the selection spans different customers, and hovering it explains why.
- In the Merge tickets window, choose which ticket to keep. The most recently updated one is pre-selected and marked Keep this ticket; the others are listed as Will be merged into the selected ticket, each with its number, status, priority, subject and last-updated date.
- Read the amber warning, then confirm with the Merge N into #… button.
The kept ticket absorbs every message, its attachments, and any linked services from the others; the source tickets are then permanently deleted. A staff-only note is added to the kept ticket recording which ticket numbers were merged in, so the history is never lost. You can merge up to 50 tickets in one go.
Warning: Merging only works across tickets from the same customer — matched on the customer account, the company account, or the guest e-mail address for tickets submitted without an account. The merge cannot be undone, so check your selection first.
The status pipeline
Status reflects who owes the next action, and most of it is hands-off:
- Open
- A new ticket awaiting its first staff reply. Public form submissions, live chats, e-mail imports and tickets you raise on a customer's behalf all start here.
- Customer Reply
- The customer has responded — the ball is in your court. Set automatically when the customer replies in their client area or answers the notification e-mail.
- Answered
- Staff has replied and is waiting on the customer. Set automatically when you send a public reply.
- In Progress
- A manual "working on it" marker you set yourself when you need to do background work before replying.
- Closed
- Resolved. Closed tickets are hidden from the default All view; use the Closed filter to find them. Staff can reopen a closed ticket from the status dropdown inside it, and an e-mail reply from the customer reopens it automatically.
Internal notes are the exception: posting one never changes the status, because the customer cannot see it. The only status you normally set by hand is In Progress.
Where tickets come from
- The client area. Signed-in customers open and answer tickets from their own portal — see Getting Support.
- Staff, on a customer's behalf. The New Ticket form.
- E-mail. Connect a mailbox to a department and incoming mail becomes tickets. A message that matches an existing conversation is added to it as a customer reply; anything else opens a new ticket at the mailbox's default priority. If the sender's address matches an active customer the ticket is attached to that customer; otherwise it is kept as a guest ticket carrying their name and address. Automatic replies and bounce messages are ignored so a holiday responder cannot start a loop. Mailboxes are configured per department in Departments.
- Live chat. Chat conversations from your website arrive as tickets with the subject Live Chat and a Chat badge. Setting the widget up, and choosing which department chats land in, is covered in Live Chat.
- A public contact form. Visitors can submit without an account when public submission is switched on.
Settings that shape the inbox
Several inbox behaviours are controlled from Settings > Tickets:
- Auto-close — turn on Enable Auto-Close and set an inactivity period between 1 and 365 days. Tickets sitting in Answered whose last staff reply is older than that window are closed by a daily check; a closing message is added to the conversation and the customer is notified in their portal and by e-mail. A Run Check Now button runs the sweep immediately. Only Answered tickets are affected, so moving a ticket to In Progress keeps it out of the sweep.
- Attachment retention — how many days ticket attachments are kept, from 0 to 30, where 0 means keep them forever. Expired files are deleted; the messages themselves are always preserved.
- Reply ratings — lets customers rate individual staff replies from 1 to 5 stars. The stars then appear beside the reply in the ticket and feed the staff figures in Reports.
- Public ticket submission — accept tickets from a contact form on your website, choosing a default department, a default priority (Low, Medium or High) and which departments visitors may pick. Leave the department list empty to offer all of them. These submissions arrive carrying the Guest badge, and a submission whose e-mail matches an existing customer is linked to that customer's account. The tab also gives you a ready-made HTML contact form to copy.
Tip: Turn on reCAPTCHA in Security settings before you publish a public contact form, otherwise the form has no spam protection.
Note: Departments are created in Departments. They drive the department filter here, control which staff see which tickets, carry the colour used for the department pill, and are the routing destinations for public submissions and inbound e-mail.
Related articles
Ticket Details · New Ticket · Settings > Tickets · Live Chat · Departments · Staff & Permissions · Clients