
Blog Editor
Write, format, schedule, and optimize a blog post in FluxBilling: rich-text editor, status and author sidebar, featured image, SEO fields, and AI drafting.
What the Blog Editor is for
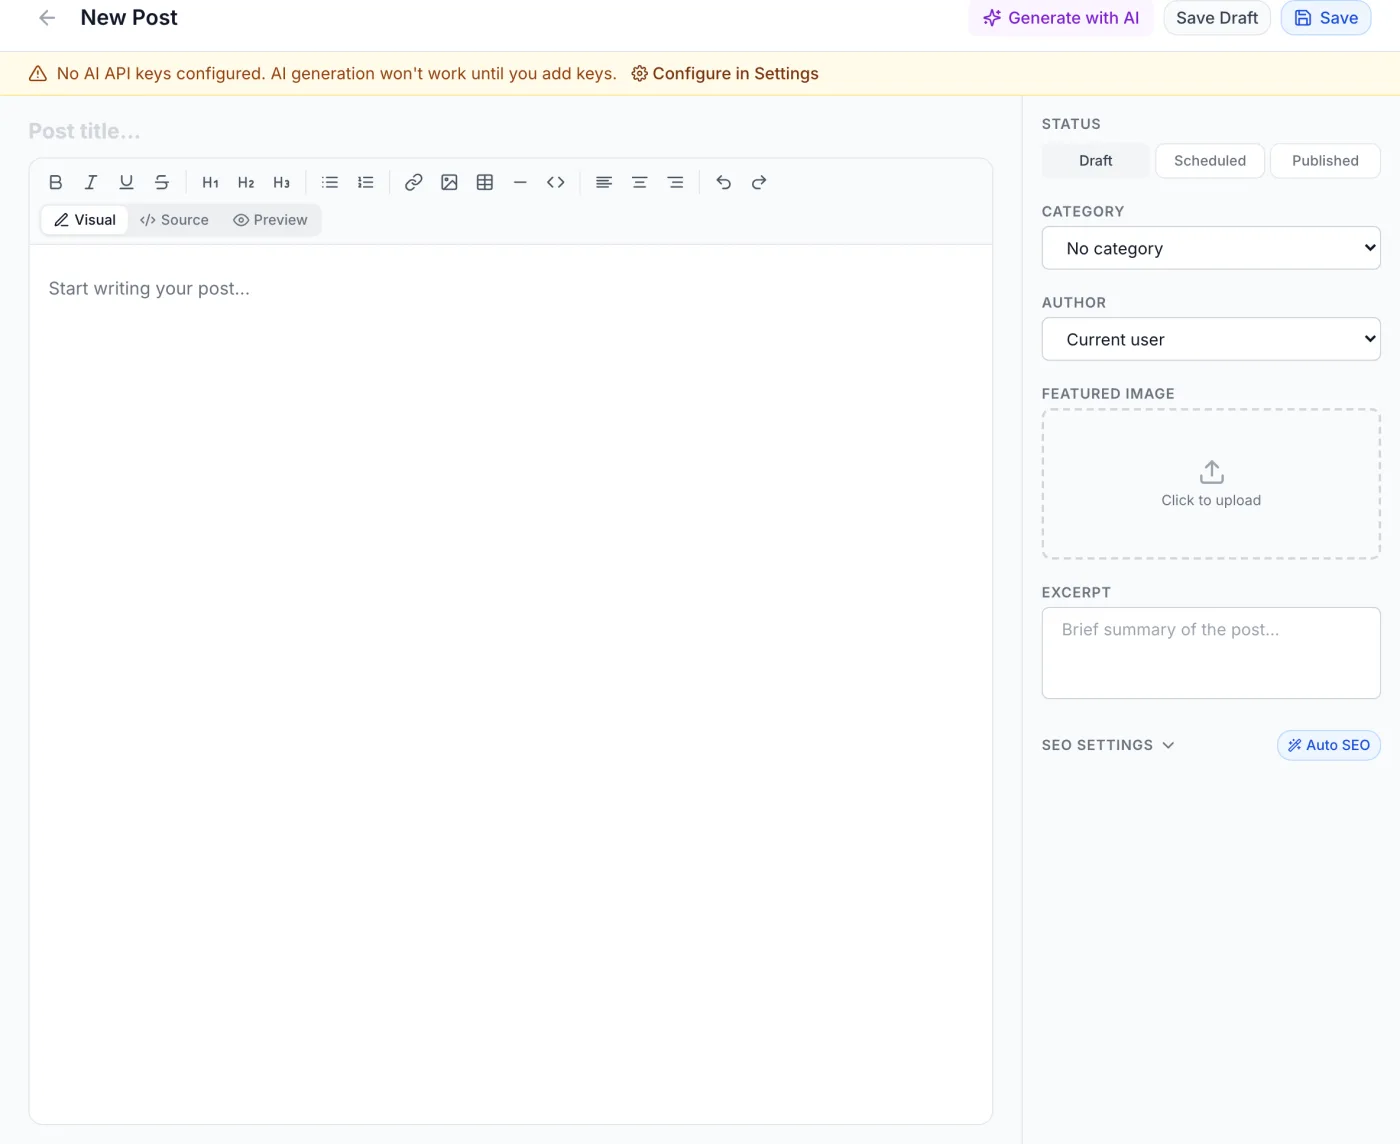
The Blog Editor is the per-post composer where you write, format, schedule and optimise a single article. It pairs a full-height rich-text writing area with a sidebar holding everything that is not the body text — status, publish date, category, author, featured image, excerpt and search-engine settings — plus an assistant that can draft a whole post for you.
How to reach it
Open the Blog page from the admin sidebar, then click New Post to start a fresh article or click a row in the post list to edit an existing one. The top bar reads New Post when creating and Edit Post when editing. The back arrow at the top-left returns you to the post list; it does not warn about unsaved work, so save before you leave.
The writing area
- Title — the large bold field at the very top, placeholder Post title…. A title is required; saving without one is refused with Title is required.
- Body editor — the rich-text area below the title. A toolbar runs across the top, with a three-way mode toggle at its right-hand end:
- Visual — a what-you-see-is-what-you-get editor; the formatting buttons are active only in this mode.
- Source — the raw HTML behind your post, for adjusting markup directly.
- Preview — a read-only render of the finished post.
In Visual mode the toolbar offers, left to right: bold, italic, underline, strikethrough; Heading 1, Heading 2, Heading 3; bullet list and numbered list; insert link, insert image, insert table, horizontal rule and code block; align left, align centre, align right; and undo and redo. Inserting a link or an image prompts you for its address. Inserting a table drops in a 3×3 table with a header row. The formatting buttons are greyed out in Source and Preview modes.
The sidebar fields
| Field | What it does |
|---|---|
| Status | Three pill buttons — Draft, Scheduled and Published. The selected pill is highlighted (grey, amber and green respectively). Choosing Scheduled reveals a Publish Date picker directly below. |
| Publish Date | A date-and-time picker, shown only while Status is Scheduled. The post goes live on its own at the moment you choose. |
| Category | A dropdown of your blog categories, defaulting to No category. Categories themselves are managed on the Blog page. |
| Author | A dropdown of active administrators, defaulting to Current user (you). The chosen person’s name and avatar appear on the post, together with any public links they have filled in under Author profile on their Account page. |
| Featured Image | A dashed upload box labelled Click to upload. Pick an image file and a preview appears with a small remove (×) button in its top-right corner. The file is uploaded when you save the post. |
| Excerpt | A three-line summary used in post listings and as the fallback search-engine description. Left empty, it is filled in for you when you save. |
| SEO Settings | A collapsible section — click the label to expand or collapse it. It holds URL Slug, Meta Title, Meta Description and Keywords, described below, and carries the Auto SEO button. |
Featured image limits
- Image files only — JPEG, PNG, GIF, WebP or SVG — up to 5 MB.
- Everything except SVG and GIF is scaled down to at most 1200 pixels wide and converted to WebP when it is stored, so a large photograph is safe to upload as it is.
- Removing the image with the × button clears it from the post the next time you save.
SEO Settings fields
- URL Slug
- The post’s web address segment, placeholder
post-url-slug. On a new post it is filled in from the title as you type. See the warning below for how the final address is decided. - Meta Title
- The title search engines display. The field stops at 70 characters and a live counter shows your length; the placeholder suggests aiming for 50–60.
- Meta Description
- The snippet search engines show under the title. The field stops at 200 characters with its own counter; the placeholder suggests 150–160.
- Keywords
- A comma-separated list of target keywords, in the shape
keyword1, keyword2, keyword3.
Empty SEO fields fill themselves
Every time you save, any of these that you left blank is filled in from your content: the excerpt from the first 160 characters of the body, the meta title from the post title (trimmed to 60 characters), the meta description from the excerpt, and the keywords from up to eight meaningful words in the title. This happens with no AI involved, so a post never goes out with empty search-engine fields. Anything you type yourself is kept exactly as written.
How the post address is decided
Warning: On a brand-new post the address is always built from the title — whatever you type into URL Slug before the first save is not used. To set a custom address, save the post first, then edit URL Slug on the saved post and save again.
Warning: On a saved post, changing the title and leaving URL Slug untouched re-derives the address from the new title — the old link stops working. If you want the address to stay put after a rename, edit URL Slug to the value you want in the same save. Reopen the post afterwards to see the address it ended up with.
If the address you ask for is already taken by another post, a number is appended to keep it unique.
Saving and publishing
Three controls in the top bar handle saving:
- Save Draft — stores the post as a draft whichever Status pill is selected. Use it to keep working without going live.
- Save / Update — saves the post at the status selected in the sidebar. The button reads Update once the post is published and Save otherwise.
- Generate with AI — opens the draft generator, described below.
Saving a new post keeps you in the editor, now editing the saved post, so a second Save updates it instead of creating a duplicate.
What each status does when you save
- Published — the post goes live immediately. If no publish date is set, or the date sits in the future, it is pulled back to now.
- Scheduled with a future Publish Date — the post goes live on its own within a minute of that time; nothing else is needed from you.
- Scheduled with a Publish Date in the past — the post goes live within a minute and keeps that earlier date as its publish date, which is how you backdate an article.
- Draft — nothing is public.
Warning: A post left on Scheduled with an empty Publish Date never goes live — there is no time for it to wait for. Always set the date before saving a scheduled post.
Note: Save Draft does not move the Status pills. After using it, the sidebar can still show Published selected on a post that is now a draft — check the pill before your next save, or the post will go live.
Auto SEO
Next to the SEO Settings label is an Auto SEO button with a wand icon. Click it and the editor reads your title and body, then fills in the excerpt, meta title, meta description and keywords in one step, expanding the SEO section so you can review the result. If an AI provider is configured it uses AI and says so; otherwise it derives the fields from your content. You need at least a title or some body text before it will run — without either it answers Add a title or content first.
Warning: Auto SEO replaces all four fields, including wording you typed yourself. Run it before you polish the excerpt and meta text, not after — and review what it produced before saving.
Generate with AI
The Generate with AI button in the top bar opens a dialog that drafts a complete post. Fill in the fields and click Generate Blog Post — generation typically takes 15 to 30 seconds.
| Field | Purpose |
|---|---|
| Topic or Idea | What the post should be about. Required — the Generate button stays disabled until you fill it in. |
| Category | Optional context for the writing, defaulting to No specific category. It does not set the post’s own category — choose that in the sidebar afterwards. |
| AI Provider | A grid of buttons listing the providers available to your installation. It starts on the default set in AI settings. |
| Model | Appears only when the selected provider offers a choice of models. |
| Custom Instructions | Free-text guidance on tone, angle or length, labelled (override default). Pre-filled with your saved default instructions and editable for this generation only. |
After generation a Generated Content Preview shows the proposed title, excerpt and the opening of the body, with the meta title and keywords underneath. If the draft resembles articles you already have, a Similar posts found warning lists them with their statuses so you can avoid publishing a near-duplicate.
- Regenerate clears the preview and returns you to the form — adjust the topic or instructions and press Generate Blog Post again.
- Use This Content drops the title, body, excerpt, meta title, meta description and keywords into the editor and closes the dialog, replacing whatever those fields held. Nothing is saved yet, so edit freely first. The post is marked as AI-drafted, which is what the sparkle icon in the post list means.
Note: AI features need a provider key. If none is saved, a notice bar appears below the top toolbar reading No AI API keys configured. AI generation won’t work until you add keys. with a Configure in Settings link. The keys, the default provider and model, and the default instructions live on the AI tab under Settings → Integrations — see AI Settings. The Generate with AI button stays visible either way; without a provider the generation itself fails.