
Order Details
Walkthrough of the Order Details page: status and payment fields, line items, totals, invoice link, upgrade banner, and edit, complete, cancel, and delete actions.
What the Order Details page is for
Order Details is the single-order cockpit. It gathers everything about one transaction — the products ordered, their configuration, the money, the notes your team left and the services that came out of it — onto one screen, so support staff can answer “what happened with this order?” without hunting through other pages.
How to open an order
Open the Orders page from the sidebar and click any row. The link at the top left takes you back where you came from and its wording tells you where that is: Back to Client when you arrived from a client's profile, Back when you arrived from somewhere else in the panel, and Back to Orders when you opened the page directly or reloaded it.
Reading the page
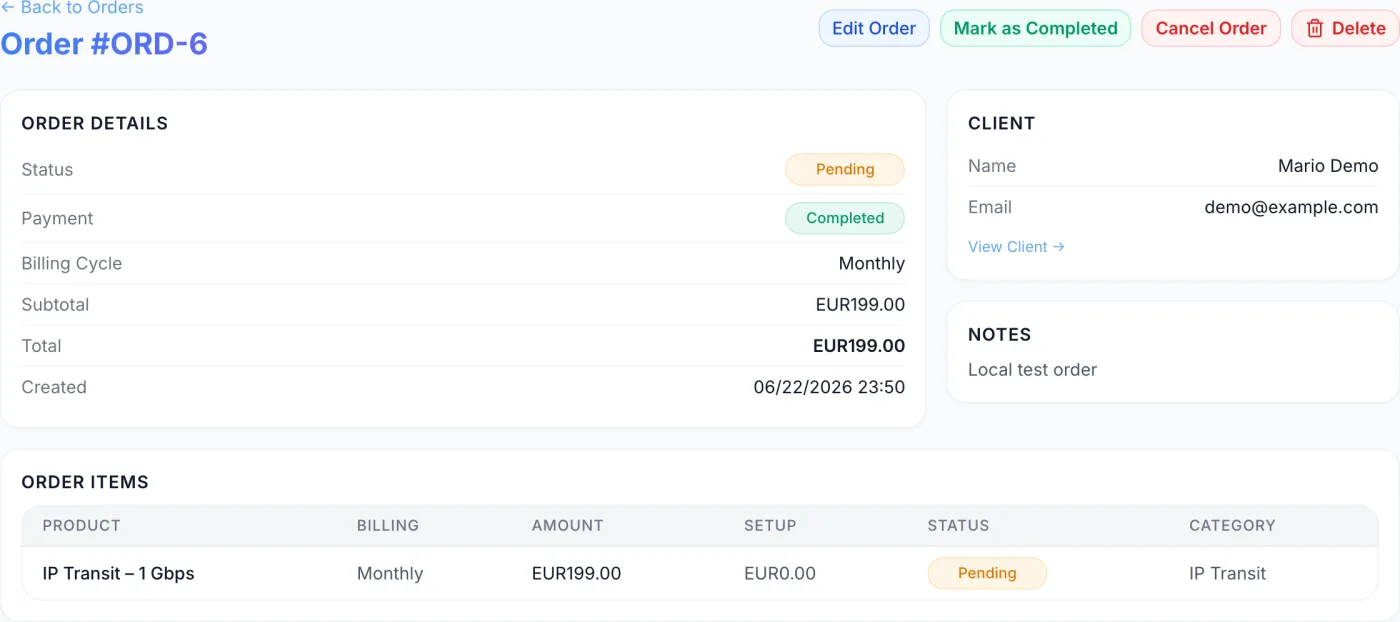
The header shows Order # followed by the order number. When the order is a plan change rather than a new purchase, an Upgrade badge appears beside it and an Upgrade Details banner sits above the cards (covered below).
Below the header are four cards:
- Order Details — status, payment, billing cycle and the money.
- Client — the customer's name and email address. Both the name and the View Client link open that client's profile.
- Notes — internal notes that only staff see, never the customer. When there are none it reads No notes.
- Order Items — one row per product on the order.
Note: This page does not link to the order's invoice or proforma. To find the billing document, open the client from the Client card and use the Billing tab on their profile, or search the Invoices page.
The Order Details card
| Field | What it shows |
|---|---|
| Status | The order's lifecycle state: Pending, Completed, Cancelled or Fraud. |
| Payment | The payment state: Pending, Processing or Completed. |
| Billing Cycle | The cycle the order was placed on, for example Monthly, Annually or Hourly. |
| Subtotal | The recurring product amount, before setup fees. Hourly orders show four decimal places for precision. |
| Setup Fee | The one-time setup charge. This row only appears when a setup fee above zero applies. |
| Total | The full charged amount. For hourly orders this reads Credit-based, because hourly usage draws on the client's credit balance rather than a fixed total. |
| Created | The date and time the order was placed. |
The Order Items table
Each row is one product on the order, with these columns: Product, Billing (that line's own cycle), Amount, Setup, Status and Category.
Under the product name the row repeats the detail captured when the order was placed:
- Host, OS and Location, where they were set.
- Every add-on chosen on that line, with its own charge and whether it is recurring or one-time, plus its setup fee if it has one.
- Any custom field values captured for the product's category. Fields that only staff can see carry an (admin) tag.
The Status badge shows the state of the service that line produced once one exists; until then it shows the line item's own state.
Tip: A row that has produced a service is clickable and highlights on hover — click it to jump to that service. On an upgrade order the rows link to the service that was upgraded, since an upgrade acts on an existing service rather than creating a new one. Rows with no service behind them yet are not clickable.
Editing an order
- Click Edit Order in the header. The Status and Payment values turn into dropdowns and the Notes card becomes an editable box.
- Set Status to Pending, Completed, Cancelled or Fraud.
- Set Payment to Pending, Processing or Completed.
- Type or update the internal notes (placeholder Internal notes…).
- Click Save to apply, or Cancel to discard. Changes take effect immediately on save, and the change is written to the activity log.
Note: The Payment list also offers Refunded, but an order's payment record only holds Pending, Processing or Completed — choosing Refunded and saving is rejected and the order is left unchanged. Refunds belong on the document that was actually paid: open the invoice and use its Refund action, described in Invoice Details.
Warning: Editing Status and Payment here only rewrites the order's own record. It does not take payment, issue a refund, provision anything, or change the invoice or the services. Use it to correct bookkeeping, not to drive the order forward.
Header actions
| Button | When it appears | What it does |
|---|---|---|
| Edit Order | Always | Switches the page into edit mode so you can change Status, Payment and Notes. |
| Mark as Completed | Only while the order's status is Pending | Asks you to confirm, then sets the status to Completed and sends the customer your order-completed email. |
| Cancel Order | Only while at least one line item is still pending | Asks you to confirm, then sets the order's status to Cancelled. |
| Delete | Always | Permanently removes the order, optionally with its services. Cannot be undone. |
Note: Mark as Completed confirms the order on paper. It does not deliver anything by itself — services are provisioned when the order's invoice or proforma is paid, or immediately at creation for an order marked billing-exempt. Marking a still-unpaid order Completed will not build the customer's server. What happens between that payment and a working service is followed end to end in Provisioning & Delivery.
Cancelling
Cancel Order changes the order's status and nothing else: services, invoices and proformas that already exist are left exactly as they are, and you should close those out yourself if the sale is off.
Tip: If the cancelled order used a discount code and was never paid, cancel it with Cancel Selected from the Orders list rather than with this button. That route also hands the customer's use of the code back, so a single-use voucher can be redeemed again. The button here does not.
Deleting an order
Clicking Delete opens a confirmation dialog with a checkbox, unticked by default, offering to also delete and terminate the services this order allocated. Leave it unticked to remove only the order record while the services keep running; tick it to tear the services down as well. Confirm to finish.
Warning: Deletion is permanent. If you only want to flag a bad order rather than erase it, set the Status to Fraud instead so the record and its history survive.
Upgrade orders
When a customer moves an existing service to a different plan, the resulting order is an Upgrade order and carries an extra Upgrade Details banner showing:
- From and To — the previous and the new product.
- Upgrade Status — whether the change completed, failed or is still pending.
- Service — a link to the affected service.
- Credit and Charge — the credit carried over from the old plan and the amount charged for the change. These appear only when a credit was applied, and a Fee figure joins them when an upgrade fee was charged.
Common tasks
- Confirm an order you have accepted manually
- Click Mark as Completed and confirm. Remember this is bookkeeping only — check that the invoice is paid, or the service will not be built.
- Record a refund
- Open the paid invoice from the client's Billing tab and use its Refund action. Refunds are not recorded on the order.
- Flag a fraudulent order
- Click Edit Order, set Status to Fraud and save. The order is flagged without being deleted.
- Jump to the created service
- In the Order Items table, click any row that has a service behind it.
- Leave a note for your team
- Click Edit Order, type in the Notes box and save. Customers never see it.
Related
Orders · New Order · Provisioning & Delivery · Invoices · Invoice Details · Services · Client Details