
Security
Configure FluxBilling security: reCAPTCHA v3, disposable-email blocking, trusted-proxy real IP, email 2FA policy, and database backup and restore.
What the Security page does
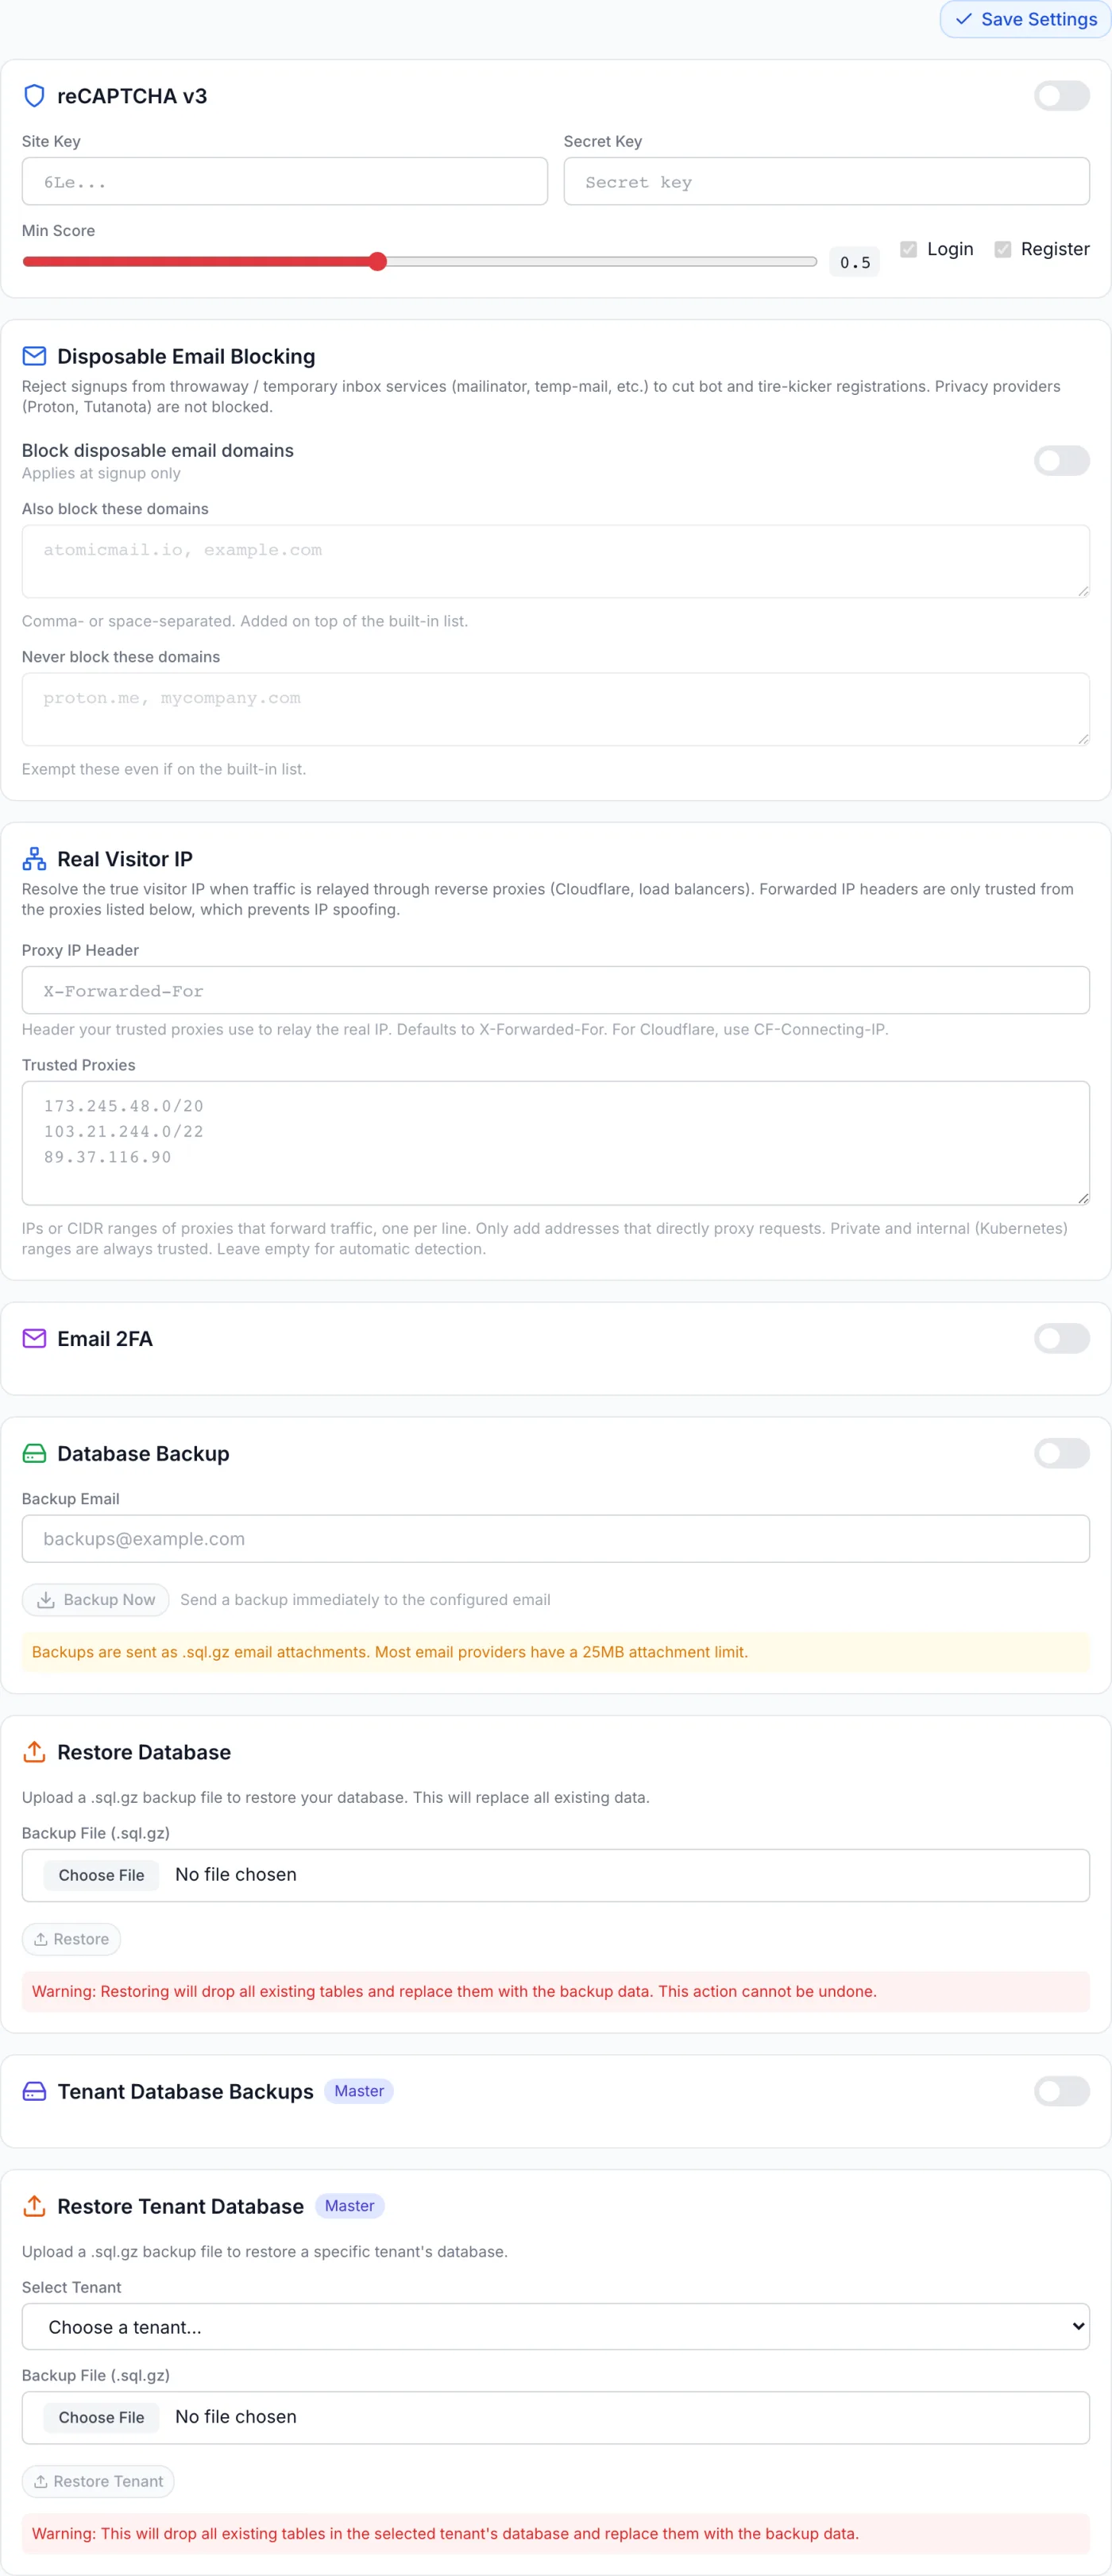
The Security page brings your platform-wide protective controls together in one place: spam and bot defences (reCAPTCHA and disposable-email blocking), real visitor-IP resolution for sites behind a proxy or CDN, two-factor authentication policy, and a database backup-and-restore tool for your own installation. Everything here applies across the whole installation, so changes affect both your admin staff and your customers.
How to reach it
Open the admin panel sidebar and go to Settings. In the settings menu, expand the System group and click Security (the shield icon). The page is one long scrolling form with a Save Settings button in the top-right corner that commits every setting on the page at once.
Note: Backup Now and Restore run immediately when you click them and are not tied to the Save button. Everything else — reCAPTCHA, disposable email, proxy, two-factor policy and the backup schedule — only takes effect after you click Save Settings.
reCAPTCHA v3 (spam protection)
reCAPTCHA v3 scores each visitor silently in the background and rejects submissions that look automated, with no puzzle for genuine users to solve. Use it to keep bots out of your login and registration forms. It is off by default.
- Turn the reCAPTCHA v3 toggle on (top-right of the section).
- Paste your Site Key and Secret Key from your reCAPTCHA account. The Secret Key is masked; use the eye button to reveal it.
- Drag the Min Score slider. It runs from 0.1 to 1.0 in steps of 0.1, defaulting to 0.5. The current value is shown beside the slider.
- Tick which forms it protects with the Login and Register checkboxes. Both are ticked by default.
- Click Save Settings.
A higher Min Score is stricter (more submissions rejected as suspicious); a lower score lets more traffic through. The default of 0.5 is a balanced starting point.
Disposable Email Blocking
This section rejects sign-ups that use throwaway or temporary inbox services — the kind used by bots and tyre-kickers — at the moment a customer registers. Mainstream privacy providers such as Proton and Tutanota are not blocked.
- Turn on Block disposable email domains. The block applies at signup only.
- Optionally add your own domains to Also block these domains. Entries are comma- or space-separated and are added on top of the built-in list.
- Optionally list domains in Never block these domains to exempt them, even if they appear on the built-in list.
- Click Save Settings.
Real Visitor IP (trusted proxies)
When your platform sits behind a reverse proxy, CDN, or load balancer, every request appears to come from the proxy rather than the real visitor. This section restores the true visitor IP so that rate limiting, IP bans and login-attempt tracking work correctly.
| Field | What it does |
|---|---|
| Proxy IP Header | The header your trusted proxies use to relay the real client IP. Defaults to X-Forwarded-For. Behind Cloudflare, set it to CF-Connecting-IP. |
| Trusted Proxies | Proxy IP addresses or CIDR ranges, one per line. Forwarded headers are only trusted when they arrive from these addresses, which is what stops a visitor spoofing their IP. Add only addresses that directly proxy requests to your platform. Private and internal ranges are always trusted, and leaving the box empty enables automatic detection. |
Warning: getting this right matters. Without trusted-proxy configuration behind a CDN, every visitor appears to share the proxy's single IP, so an IP ban or a rate limit can accidentally block all of your traffic at once. See IP Ban for how blocked addresses are managed.
Two-Factor Authentication
One card holds the whole two-factor policy. There are two independent methods, and you can run either, both, or neither.
Authenticator apps
The Authenticator apps toggle lets users secure their account with a rotating code from an authenticator app or password manager. Nothing is emailed — the code is generated on the user's own device.
Email 2FA
The Email 2FA toggle sends a short, time-limited verification code to the user at login, which they must enter to complete sign-in.
Code delivery channel
Under the two toggles, Code delivery channel decides how the code reaches a user who is not using an authenticator app. Email (built-in) is the default and always available. If you have installed and enabled a two-factor delivery plugin, it appears in this list as an alternative — for example to send codes another way. The delivery falls back to email if the chosen channel fails.
- With no delivery plugin installed and enabled, the dropdown offers only Email (built-in) and a note says so.
- If a plugin you had selected is later removed or disabled, the option stays visible marked (unavailable) with a red warning, so you can pick another channel or switch back to email and save. Codes go by email in the meantime.
Requiring two-factor
Once at least one method is on, an amber block appears with two independent switches:
| Switch | What it does |
|---|---|
| Require 2FA for clients | Every customer must set up two-factor at login. |
| Require 2FA for admins/staff | Every admin and staff account must set up two-factor at login. |
Turning Require 2FA for admins/staff on asks you to confirm first, in a dialog headed Require 2FA for all admins? — because the person flipping it is themselves an admin. Turning it off is immediate. If you switch off the last remaining method (both Authenticator apps and Email 2FA off), both force switches are cleared for you, so nobody can be locked out by a requirement with no way to satisfy it. What a staff member then goes through is described in Staff & Permissions, and what a customer sees in Account Security.
Code policy fields
| Field | What it controls | Range | Default |
|---|---|---|---|
| Expiry (min) | How long an emailed code stays valid. Shown only while Email 2FA is on. | 1–30 | 5 |
| Max Attempts | How many wrong code entries are allowed before the attempt is rejected. Applies to both methods. | 1–10 | 3 |
| Cooldown (sec) | Minimum wait before a user can request a fresh code. Shown only while Email 2FA is on. | 30–300 | 60 |
Warning: test your email delivery before requiring two-factor for staff. Any account that cannot receive its code — if email sending is broken, for instance — will be unable to log in. Confirm your Email configuration is working first, or use authenticator apps, which do not depend on email at all.
Database Backup
The platform can email you a compressed backup of your database on a schedule, and you can also trigger one on demand.
- Turn the Database Backup toggle on.
- Choose a Frequency of Hourly or Daily (Daily by default).
- For Daily, pick the Hour (UTC) from the dropdown, 00:00 through 23:00. The field is hidden for hourly backups.
- Enter the Backup Email address that should receive each backup file.
- Click Save Settings to store the schedule.
To send a backup right away, click Backup Now. The button stays disabled until a Backup Email is set, and the file goes to that same address.
Note: backups are sent as
.sql.gzemail attachments, and most email providers cap attachments at around 25 MB. If your database grows beyond that, the backup email may fail to deliver. For very large datasets, keep an additional backup method.
Restore Database
The Restore Database tool rebuilds your database from a backup file. This is destructive and irreversible — it drops all existing tables and replaces them with the contents of the uploaded file.
- Under Backup File (.sql.gz), choose a
.sql.gzbackup from your computer. The selected file name and size in MB are shown once picked. - Click Restore. The button is disabled until a file is selected.
- A Confirm Database Restore dialog appears naming the file and warning that all current data will be permanently replaced. Click Yes, Restore Database to proceed, or Cancel.
Warning: there is no undo. Restoring overwrites everything — users, invoices, services, tickets and settings. Only restore a backup you trust, and ideally take a fresh Backup Now first so you can roll back if the restore is not what you expected. A large file may take several minutes; leave the page open while it runs.
Common tasks at a glance
| Goal | What to do |
|---|---|
| Block bots on sign-up forms | Enable reCAPTCHA v3, paste your keys, tick Login/Register, Save. |
| Stop throwaway-email registrations | Enable Block disposable email domains, optionally add extra domains, Save. |
| Fix wrong visitor IPs behind a CDN | Set the Proxy IP Header and list your CDN or load-balancer ranges in Trusted Proxies, Save. |
| Offer app-based two-factor | Turn on Authenticator apps, set Max Attempts, Save. |
| Require a login code by email | Turn on Email 2FA, set Expiry / Max Attempts / Cooldown, Save. |
| Make two-factor mandatory | With a method on, switch Require 2FA for clients and/or for admins/staff, confirm the admin dialog, Save. |
| Schedule automatic backups | Enable Database Backup, pick frequency and email, Save. |
| Send a backup immediately | Set the Backup Email, save, then click Backup Now. |
| Roll back to a backup | Upload the .sql.gz file under Restore Database, click Restore, confirm. |
Related
IP Ban · General · Staff & Permissions · Account Security · Email · Activity Log