
EasyDCIM Migration
A deep guide to the EasyDCIM migration tool: connect over SSH, choose which inventory to import, and understand how sites, racks, devices, blades, ports and credentials are translated into FluxBilling.
What the EasyDCIM Migration tool does
The EasyDCIM Migration tool is a guided importer that copies your existing datacenter inventory into FluxBilling. It connects to your EasyDCIM MySQL database — directly or over an SSH tunnel — reads your physical infrastructure, and re-creates it inside FluxBilling so your sites, racks, devices, blade servers, network ports and cable connections all carry over without manual re-entry.
The import is read-only on the source and all-or-nothing on this side. Nothing is written back to EasyDCIM. On the FluxBilling side the whole import runs as one transaction — if any part of it fails, or you cancel it, everything is undone and your inventory is left exactly as it was before you pressed Start.
Who can run it
Like the other migration tools, the EasyDCIM importer is restricted to super administrators. It holds a MySQL password, an SSH password and your application key, and opens outbound connections from your server.
How to reach it
Open the admin panel and go to Settings. In the settings menu, find the Migration Tools group and select EasyDCIM Migration. (The neighbouring WHMCS Migration tool handles billing data, and VPS Panel Migration handles hypervisor takeover.)
Before you start
- Read access to the EasyDCIM database. A read-only MySQL user is enough and is what we recommend.
- Your EasyDCIM application key, if you want stored IPMI, SSH and SNMP credentials to arrive readable. The panel's own hint tells you where to find it: it is the
APP_KEYvalue in the EasyDCIM.envfile, and it usually starts withbase64:. - Run this before the WHMCS import if your WHMCS services are meant to end up linked to this hardware. The WHMCS importer links a service to a device only if the device is already in FluxBilling.
- A backup, as always — the transaction protects you from a half-finished run, not from a run you did not want.
The five-step wizard
A stepper across the top tracks your position: Connection → Selection → Preview → Progress → Results, with a Step N of 5 indicator. You move forward one step at a time and can step back from Selection and Preview to adjust earlier choices.
Step 1 — Connection
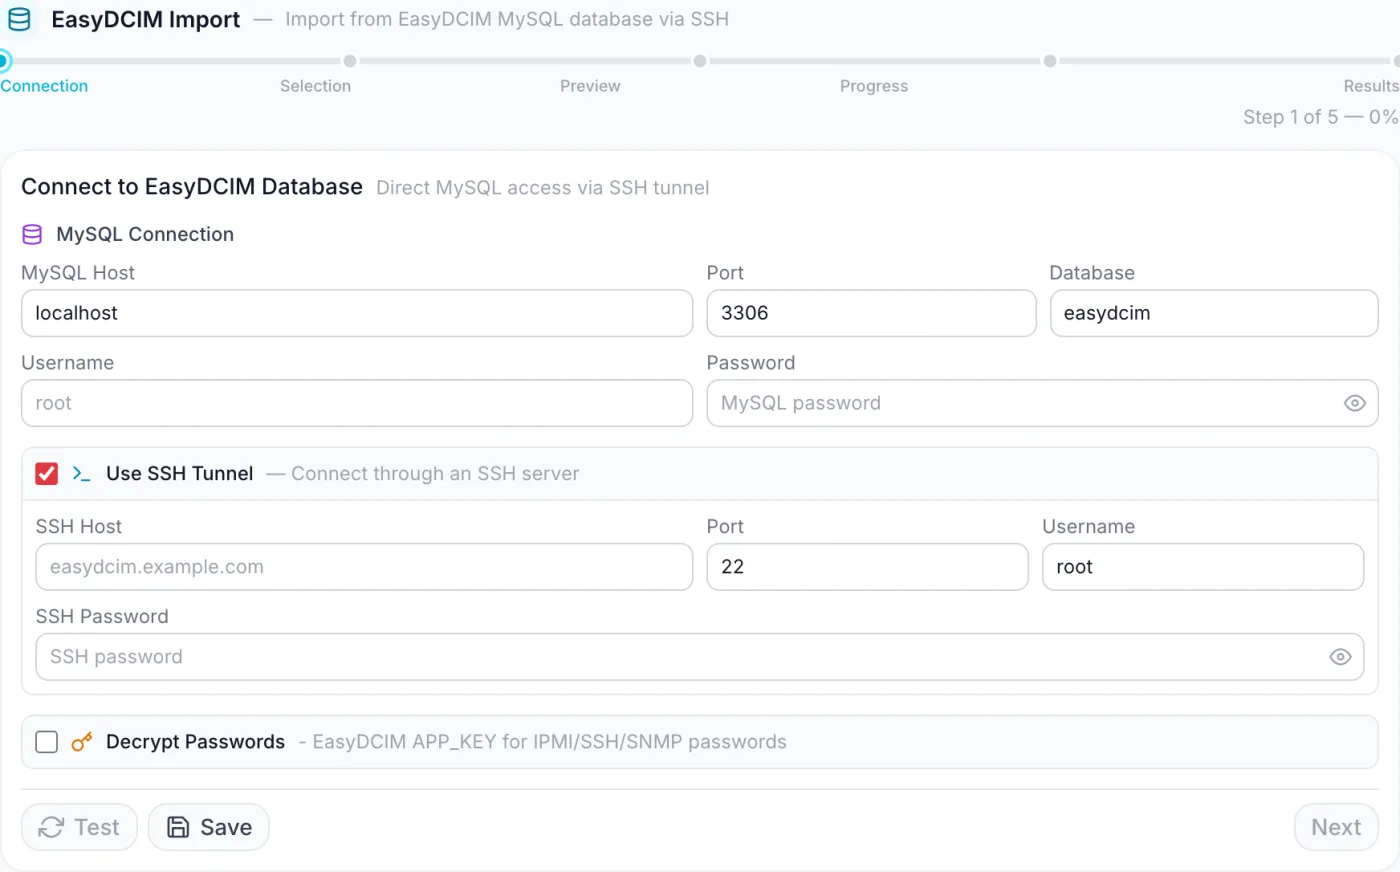
This is where you point FluxBilling at the source database and confirm it can read your data. The form arrives pre-filled with the usual answers: host localhost, port 3306, database easydcim, Use SSH Tunnel already ticked, and SSH user root on port 22.
- Fill in the MySQL connection details: MySQL Host, Port, Database, Username and Password.
- Leave Use SSH Tunnel on if the database is only reachable from the EasyDCIM server (the usual case) and enter the SSH Host, Port, Username and SSH Password. The MySQL host is then resolved on the far side of the tunnel, so
localhostis normally correct. Untick it to connect to the database directly. - Optionally tick Decrypt Passwords and paste your application key so stored IPMI, SSH and SNMP credentials come across in readable form. Without it, those passwords import empty.
- Click Test. On success a green Connected! line lists how many locations, datacenters, racks, devices and blades were found, and connections too when there are any.
- Click Save to keep the connection details for next time, then Next to continue.
The wizard pre-fills a saved configuration automatically the next time you open the page, so you rarely re-type credentials. Saved secrets are encrypted and never sent back to your browser in the clear — the form shows a mask, and the mask resolves to the real value on the server when you run the import.
Next runs Test for you. If you click Next before testing, the wizard tests first and only advances once it succeeds. Test and Next stay disabled until username, password and database are filled in — and, when the SSH tunnel is on, until its host, username and password are provided too. Save needs at least a MySQL host.
| Field | What it does |
|---|---|
| MySQL Host | Address of the source database. Defaults to localhost — correct when you reach it through an SSH tunnel into the EasyDCIM server. |
| Port | Database port. Defaults to 3306. |
| Database | Name of the source database to read from. Defaults to easydcim. |
| Username / Password | Credentials for the source database. The password is masked, with an eye icon to reveal it. |
| Use SSH Tunnel | Checkbox, on by default. When on, FluxBilling connects to the database through an SSH server instead of directly. |
| SSH Host / Port / Username | The SSH server FluxBilling logs into to reach the database. Port defaults to 22, user to root. |
| SSH Password | Password for the SSH login, masked with a reveal toggle. |
| Decrypt Passwords | Checkbox that reveals a key field. Provide the EasyDCIM application key to decrypt stored IPMI, SSH and SNMP secrets so they import as real values. |
Step 2 — Selection
Choose which kinds of inventory to bring over. Each row shows the entity name, a short description, the number of records found in your source data, and any dependency it has. The heading shows how many of the six types are selected; all six start ticked.
| Entity | What it imports | Requires |
|---|---|---|
| Locations | Country-level groupings, created from your sites (see below). | — |
| Datacenters | Your individual EasyDCIM sites, filed under their country. | — |
| Racks | Server racks inside datacenters, with their height in units. | Datacenters |
| Devices | Physical servers, switches and chassis — position, model, serial, asset tag, status, IPMI, SSH and SNMP configuration. | Racks |
| Blade Servers | Blades housed inside chassis devices, in their bays. | Devices |
| Port Connections | Cable connections between switch ports and server NICs — and, alongside them, the full port list of every device. | Devices |
Dependencies select themselves. Because racks live in datacenters and devices live in racks, ticking a dependent type automatically ticks the ones it needs, all the way up the chain. Optional types can be left off — importing Devices without Port Connections is perfectly valid if you do not need the cabling map. Blades that sit in an imported chassis come across with the devices, so they arrive whether or not you tick them separately. Next stays disabled until at least one type is selected.
How your hierarchy is remapped
The two systems name one level differently, and the importer translates rather than flattens:
- An EasyDCIM location — an individual site such as Frankfurt Equinix FR5 — becomes a FluxBilling datacenter.
- A FluxBilling location is a country. The importer reads the country flag set on each EasyDCIM site, groups the sites by it, and creates one location per country with the right name and flag. Sites whose country cannot be determined are grouped under an unknown-country entry you can rename afterwards in Locations.
So four sites across Romania and Germany arrive as two locations and four datacenters, with racks and devices hanging beneath them exactly as they did before.
Step 3 — Preview
Before anything is written, the wizard reads your source data again and shows what it found. A row of count cards tallies how many records of each selected type will be imported, and sample tables show a handful of actual rows so you can sanity-check what you are about to bring in — location names and country codes, each datacenter with the location it maps to, rack names and heights, device labels with manufacturer, model and type, and a sample of port connections.
Reading this step changes nothing. Review it, then click Start Import to begin, or Back to change your selection.
Step 4 — Progress
Once the import is running, this step shows live progress: an overall bar and elapsed-time counter at the top, and below them a row per selected entity showing records processed out of the total plus running created / updated / failed tallies. The entity currently being worked on is highlighted. If any records fail, an expandable Errors Details panel groups the failures by type and by reason and lists the affected source IDs.
Note: A Cancel button is offered while the import runs, and it does exactly what its confirmation says: because the whole import is one transaction, cancelling rolls it back completely and no records are imported at all. There is no pause or resume — an open transaction cannot be parked, so the only choices are to let it finish or to undo the whole thing. If the import fails on its own, the same rollback applies, so there is never anything half-imported to clean up.
Step 5 — Results
When the job finishes you get a summary banner — Import Completed, Completed with Errors, Import Failed, or a cancellation line spelling out that the run was rolled back and no records were imported — followed by a per-type breakdown of records created, updated, skipped and failed, with any errors listed underneath. Click New Import to reset the wizard back to the Connection step.
What actually comes across
Devices
- Identity and placement: name, device type, manufacturer, model, serial number, asset tag, notes, rack, starting rack unit, and the units it occupies (the end position is derived from the size, so a 2U server occupies both units in your rack view).
- Status is translated, not copied. Both the numeric statuses used by older EasyDCIM releases and the text statuses used by newer ones are understood:
| In EasyDCIM | Becomes |
|---|---|
| Active, in use, production, deployed | Allocated |
| Inactive, offline, powered off, free, available | Available |
| In repair, repair, maintenance, RMA | Maintenance |
| Reserved, planned, staged | Reserved |
| Decommissioned, retired, disposed, removed | Decommissioned |
| Faulty, broken, failed, defective | Faulty |
| Anything unrecognised | Available |
- IPMI: address, username and password. Where a device has no IPMI address but does have a management IP, that address is used instead.
- SNMP: version, community, and for v3 the username, authentication protocol and password, and privacy protocol and password. Versions are normalised to v2c or v3 — a device recorded as SNMP v1 arrives as v2c, its closest working equivalent. A device with any SNMP data is flagged as SNMP-configured so Monitoring can pick it up.
- Secrets are encrypted the moment they land. IPMI, SSH and SNMP passwords are stored encrypted, and the panel never displays them back in the clear.
- A first network interface, named
eth0, is created from the device's MAC and management address so the device is immediately identifiable on the network. - Chassis are imported before blades, automatically, so every blade has its enclosure to sit in.
Blades
Blades are detected from the chassis-to-bay relationships in your source data, and fall back to type-name detection where those relationships are missing. They are imported as blade servers attached to their parent chassis, and are excluded from the plain device count so nothing is counted twice. A blade whose chassis was not imported is reported rather than guessed at.
Ports and connections
Selecting Port Connections imports two related things: the cable connections themselves (which switch port is patched to which server NIC), and the full data-port list of every device, so your switch port maps are complete rather than only showing patched ports. Virtual interfaces are deliberately left out — VLAN interfaces, loopbacks and null interfaces are skipped, and only real data ports are imported. Connections whose two ends cannot both be resolved to imported devices are reported as skipped rather than guessed at.
What is not imported
This tool moves infrastructure only. Clients, services, orders, invoices and any billing data held in EasyDCIM are not touched — that is what the WHMCS Migration tool is for. Also not imported: EasyDCIM users and permissions, its own IP address management, its modules and automation, and any custom fields beyond the device attributes listed above.
Running it again
Re-running is safe and is often the right move. Every imported record remembers the source record it came from, so a second pass matches by source identity and updates instead of duplicating:
- Devices, blades, racks and datacenters are matched by their source ID.
- Locations are matched by country.
- Nothing that exists is duplicated, and the results table shows you the split between created and updated.
That makes the importer usable as a refresher while you are still running both systems side by side — add a rack in EasyDCIM, re-run the import, and it appears in FluxBilling with everything else left alone.
Tips and gotchas
- Credentials without the key import blank. If you skip Decrypt Passwords or supply the wrong key, the inventory itself still imports — only the stored IPMI, SSH and SNMP passwords arrive empty rather than failing the run. You can re-enter them per device later, or re-run the import with the correct key.
- Test before every run. The connection test doubles as a record count, so it is the quickest way to confirm you are pointed at the right database and that the tunnel is up.
- Set the country flag on your EasyDCIM sites first. That flag is what the country grouping reads; sites without one all land under a single unknown-country location you then have to sort out by hand.
- Import in dependency order. If you only want a subset, keep the chain intact — racks without their datacenters have nowhere to live, which is why the wizard ticks the dependencies for you.
- Expect fewer locations than sites. That is the country grouping doing its job, not data loss: your sites are the datacenters.
- Check the skipped counts on port connections. A large skipped figure usually means one side of those links is a device you chose not to import.
After importing
- Your migrated hardware appears under Inventory, the sites under Datacenters, and the countries under Locations. Racks and their elevations are in Rack Management.
- Open a few devices and verify placement, model, status and the IPMI and SNMP fields before you start selling from them.
- Confirm the country groupings are named the way you want, and fix anything that landed under an unknown country.
- Check Switch Inventory if you imported port connections — that is where the cabling map surfaces.
- Register a Local Agent at each site so the imported IPMI and SNMP details can actually be used.
- Then run the WHMCS Migration, with Link services to infrastructure devices on, so your existing services attach to the hardware you just imported.
Related
WHMCS Migration, VPS Panel Migration, Inventory, Locations, Rack Management, Monitoring, Local Agents.