
Datacenter Details
Per-datacenter view of racks and capacity, with Add Rack, bulk delete, and a Client Boxes section for tracking and moving client-owned loose hardware.
What the Datacenter Details page is for
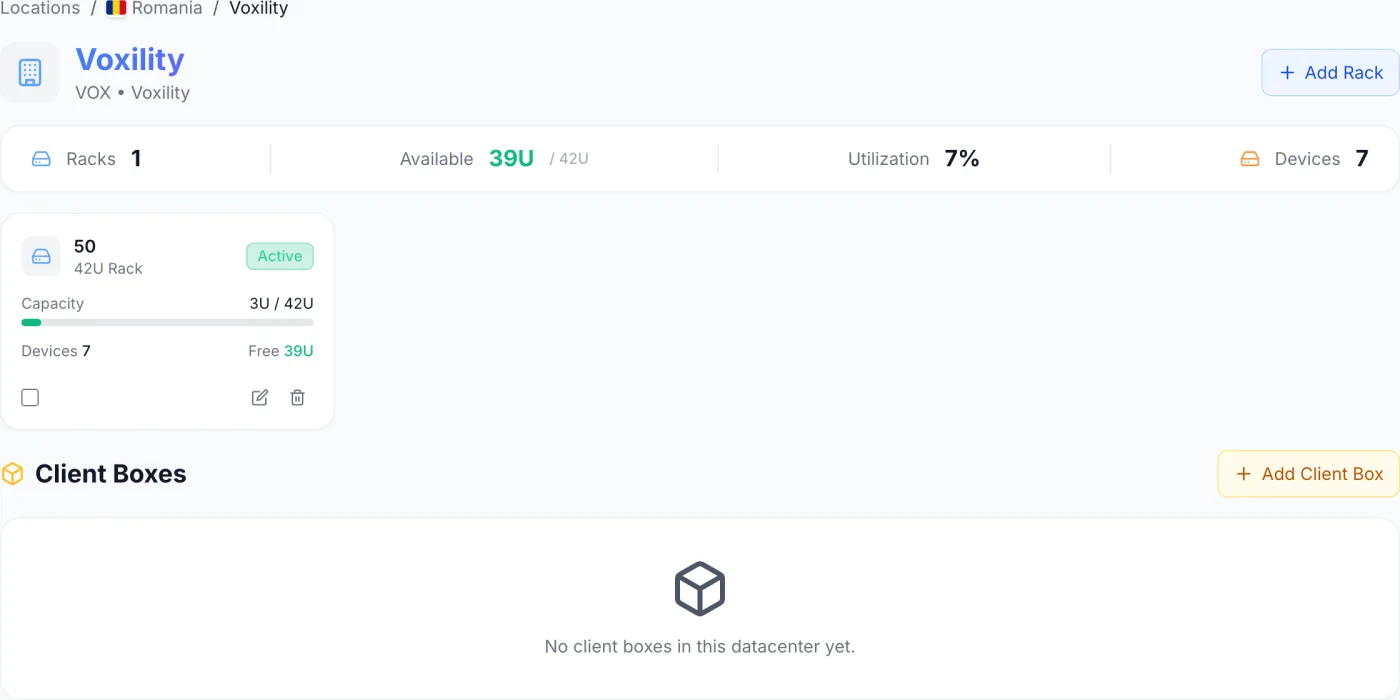
The Datacenter Details page is the per-building view of your infrastructure. It lists every rack inside one datacenter, summarises how full those racks are, and tracks any client boxes — loose, client-owned hardware colocated at the site but not mounted in one of your racks. From here you add and edit racks, read a capacity summary, and manage individual loose items such as spare drives, cables and transceivers.
How to reach this page
Open Locations from the admin sidebar, click a location to open its Location Details page, then click one of the datacenter cards. The breadcrumb at the top of the page reflects this path: Locations / Location / Datacenter. The first two segments are links, so you can step back to the location or the full Locations list at any time.
Reading the header and capacity strip
The header shows the datacenter name, and beneath it a subtitle built from the short name and the provider when those are set — for example AMS1 • Northgate Facilities. Directly below sits a single-row capacity strip summarising every rack in the building:
| Metric | What it shows |
|---|---|
| Racks | Total number of racks defined in this datacenter. |
| Available | Free rack units across all racks, shown as free U with the total U beside it (for example 120U / 168U). |
| Utilization | A single percentage: used rack units divided by total rack units across every rack in the datacenter. |
| Devices | The combined count of devices mounted across all racks here. |
Note: Utilization is weighted by capacity, not a plain average of the rack percentages: it sums used U and total U across the whole datacenter, so a half-empty 42U rack counts for more than a half-empty 24U rack. Client boxes are tracked separately and never affect these rack numbers.
Working with racks
Racks appear as a grid of cards below the capacity strip. Each card shows the rack name, its size (such as 42U Rack), an Active or Inactive pill, a coloured capacity bar (used U / total U), the device count, free U, and the row and aisle when those have been entered. The capacity bar is green below 70%, yellow from 70% to 89%, and red at 90% and above.
The rack pill is a label here, not a switch. To change whether a rack is active, edit the rack.
Open a rack
Click anywhere on the body of a rack card to open the visual Rack Management editor, where you place and remove devices unit by unit.
Add a rack
- Click Add Rack at the top right of the page (or Add First Rack if the datacenter is empty).
- Fill in the fields of the Add New Rack dialog, described below.
- Click Create Rack. The rack appears as a new card and the capacity strip updates.
The Add New Rack / Edit Rack form contains these fields:
| Field | What it does |
|---|---|
| Name (required) | A label for the rack, e.g. Rack A1 or Cabinet 12. |
| Code | A short identifier, suggested automatically from the name (e.g. rack-a1) and editable while creating. It is locked once the rack exists. |
| Height (RU) | Rack size in rack units: 24U, 42U (Standard), 45U or 48U. This sets how many U slots the rack editor draws. |
| Row | Optional row label, e.g. Row A. |
| Aisle | Optional aisle label, e.g. Cold Aisle 1. |
| Power Budget (kW) | Optional maximum power allotted to the rack. Setting it turns on the power gauge in the rack editor. |
| Circuit Amps | Optional rated amperage of the rack's power circuit. |
| Voltage | Circuit voltage: 110V, 208V, 230V or 400V. Defaults to 208V. |
| Redundancy | Power redundancy level: N, N+1, 2N or 2N+1. Defaults to N+1. |
| Display Order | A number controlling where the card sorts among the others. |
| Active | A checkbox. Inactive racks still appear but carry the grey Inactive pill. |
Edit or delete a single rack
Each rack card has a small pencil (edit rack) and trash (delete rack) button along its bottom edge. Editing reopens the same form, titled Edit Rack, with Update Rack as the save button. Deleting opens a Delete Rack? dialog listing the devices and loose items affected; if the rack still holds loose items, the dialog offers a Move Loose Item(s) First button so you can relocate them before the rack goes.
Warning: Deleting a rack removes the rack and every loose item stored in it. The devices mounted in it are kept — they lose their rack and U position and return to the unracked pool you see in Inventory and in the Unassigned Devices panel of any rack editor.
Delete several racks at once
- When a datacenter has more than one rack, a Select all racks checkbox appears above the grid; each card also has its own checkbox.
- Tick the racks you want to remove.
- A red Delete button appears in the header showing the count. Click it.
- Confirm in the Delete Racks? dialog, which lists how many racks and how many devices are affected.
Client Boxes
Below the rack grid, the Client Boxes section tracks client-owned hardware colocated at this datacenter that is not mounted in your racks — a shelf of spare parts, a customer-supplied chassis, a storage tote and so on. The heading carries a count badge when boxes exist. Each box row shows its label, an item-count badge, the linked client (company name or email) and an optional location description.
Add a client box
- Click Add Client Box at the top right of the section.
- Enter the fields below and click Create Box.
| Field | What it does |
|---|---|
| Label (required) | A name for the box, e.g. Client Box #3 or Storage Shelf A. |
| Client (optional) | Type to search your clients by email, name or company and pick one to link the box to its owner. Clear the field to unlink. |
| Location Description | Free text describing where the box physically sits, e.g. Shelf 2, Row B, near Rack A3. |
| Notes | Any extra remarks about the box. |
Manage items inside a box
Click a box row to expand it and reveal its loose items. Each item lists its name, quantity, type, manufacturer, model, serial number, purchase date, warranty expiry and a colour-coded condition badge (New, Used, Refurbished or Faulty). Hover over an item to reveal its Move, Edit and Delete buttons.
Use the Add Item button inside the expanded box to record a new piece of hardware. The item form offers:
| Field | What it does |
|---|---|
| Type (required) | SSD, HDD, NIC, Transceiver (SFP/QSFP), Cable, Power Supply, Memory (RAM), Fan Module, Riser Card, Rail Kit, Drive Caddy or Other. |
| Condition | New, Used, Refurbished or Faulty. |
| Name (required) | A descriptive name for the part. |
| Quantity | How many of this item the box holds. A quantity above one shows as a badge on the row. |
| Serial Number | Optional serial for a single tracked unit. |
| Manufacturer / Model | Optional brand and model details. |
| Purchase Date / Warranty Expiry | Optional dates for asset and warranty tracking. |
| Notes | Any extra remarks about the item. |
Move an item to another rack or box
The Move button on an item opens a dialog where you switch between a Rack and a Client Box destination, search the list, pick a target and confirm. The item's current rack is excluded from the list. This is the same dialog you get from the Move Loose Item(s) First button when deleting a rack or a box that still holds items.
Edit or delete a box
Each box row has a pencil (edit box) and trash (delete box) button on the right. A box that still contains items cannot be deleted: the dialog says This box has N item(s). Move all items before deleting. and offers Move Items First. Move or delete the items, then delete the box.
Note: Client boxes are inventory records only — they consume no rack capacity and are not counted in the Utilization figure. Bill colocation of client-owned gear through your normal colocation products rather than through this page.
Related articles
Location Details · Rack Management · Locations · Inventory · IPAM