
Settings
FluxBilling's Settings page is the platform-wide hub for branding, email, billing, payment gateways, security, appearance and migration tools.
What the Settings page is for
Settings is the platform-wide configuration hub. Anything that affects every staff member or every customer — not just your own login — is configured here: your branding, contact details, email and ticket behaviour, languages, billing rules, payment gateways, appearance, security, and the tools for importing data from another platform. Personal preferences (your name, password, two-factor, date format) live on the separate Account page instead.
How to reach it
In the admin header (top-right), click the Settings gear — or pick Settings from the header overflow menu on a smaller screen. Settings is not a sidebar item; the header is the way in. The page opens on the General section by default. A search box sits at the top of the left navigator — type a few letters (for example email or tax) to filter the section list instantly, and use the × inside it to clear the filter. On a narrow screen the navigator collapses into a dropdown button showing the current section; tap it to reveal the same grouped list and search box.
The page is only available to super-admins and to staff whose role includes settings access. See Staff & Permissions for what each role and permission grants.
How the page is organised
The left navigator groups every section under a heading. Click a section name to load its form on the right. The table below maps each group to its sections and to the dedicated guide for each.
| Group | Section | What it controls |
|---|---|---|
| Organization | General | Branding, contact emails, access control, feature toggles, navigation links, date format, and the daily task schedule. See General. |
| Departments | Support and sales departments. See Departments. | |
| Admin Signatures | Saved staff reply signatures. See Admin Signatures. | |
| Communication | Outgoing mail provider and per-event senders. See Email. | |
| Tickets | Ticket defaults and auto-close. See Tickets. | |
| Live Chat | The embeddable live-chat widget: on/off switch, appearance and behaviour, whether visitors may chat as guests, which department chats land in, an allowed-domains list, and the snippet you paste into your own website. It can also be shown inside the client portal. See Live Chat. | |
| Localization | Languages & Translations | Enabled languages and per-string overrides. See Languages & Translations. |
| Financial | Billing | Currency, tax, document numbering, grace periods, auto-pay. See Billing. |
| Invoice Export | Bulk invoice and accounting export. See Invoice Export. | |
| Payment Gateways | Connect and configure payment methods. See Payment Gateways. | |
| Reseller Program | Reseller tiers and commissions. See Reseller Program. | |
| Promotions | Discounts & Referrals | Coupon and referral-reward defaults. See Discounts & Referrals. |
| Integrations | Plugins | The provisioning, gateway, notification and AI integrations installed on your panel — and the visual builder for writing your own. See Managing Plugins and Introduction to Plugins. |
| AI | Titled AI Settings. Choose the default AI provider and model used for blog post generation and ticket reply assistance, store its key, and set the standing instructions sent with each request — one set for blog content and a separate set for drafted ticket replies. See AI Settings. | |
| Domain Search Widget | A snippet you paste into your own website so visitors can check domain availability and start an order. It only appears once you have products configured for the domain extensions you sell. See Domain Search Widget. | |
| Marketplace | The built-in catalogue of plugins and themes you can install on your panel, with a Browse tab and an Installed tab. See Installing from the Catalogue. | |
| Infrastructure | Bare Metal | Bare-metal provisioning settings. See Bare Metal. |
| Local Agents | On-site agent connections. See Local Agents. | |
| Panel Links | Links to other FluxBilling panels your company runs that share virtualization and game-hosting hardware with this one. You generate a key here and the operator of the other panel pastes it in. See Panel Links. | |
| Appearance | Themes | Colour themes for both panels. See Themes. |
| Icons | The icon library used across the panels. See Icons. | |
| Custom Code | Inject your own styles and scripts. See Custom Code. | |
| Migration Tools | WHMCS Migration | Import from WHMCS. See WHMCS Migration. |
| EasyDCIM Migration | Import from EasyDCIM. See EasyDCIM Migration. | |
| VPS Panel Migration | Take over virtual machines from another VPS control panel. See VPS Panel Migration. | |
| System | Security | Login, session, two-factor and access protections. See Security. |
| IP Ban | Block or review banned IP addresses. See IP Ban. | |
| License | Activate and view your own license. See License. | |
| Performance | Performance | Page prefetching and data caching. See Performance. |
Note: not every section appears for everyone. Departments and Admin Signatures are shown only to super-admin staff. Reseller Program appears only when the Resellers module is on; Bare Metal and Local Agents only when the Inventory module is on; VPS Panel Migration only when the VPS Clusters module is on. Because those three modules also depend on Locations, switching Locations off hides their sections too. A group whose sections are all hidden disappears with them. If you are sitting on a section when you switch its module off and save, the page drops you back on General.
Saving your changes — there is no autosave
Nothing you change is stored until you save it. How you save depends on the section:
- General, Billing, Email and Admin Signatures show a single Save Settings button in the top-right of the page header. Click it to commit every changed field in that section at once. A green banner confirms the save and a red banner reports a failure. An amber banner means the settings were saved but a follow-up step (restarting the daily task schedule after you changed its hour) did not complete — your values are stored either way.
- Every other section (Payment Gateways, Themes, Departments, Security, Live Chat, Performance, and so on) carries its own save, add and delete buttons inside the form — follow the buttons shown there.
Warning: if you edit fields and switch to a different section without saving, your unsaved changes are discarded. Save before navigating away.
Key controls in General
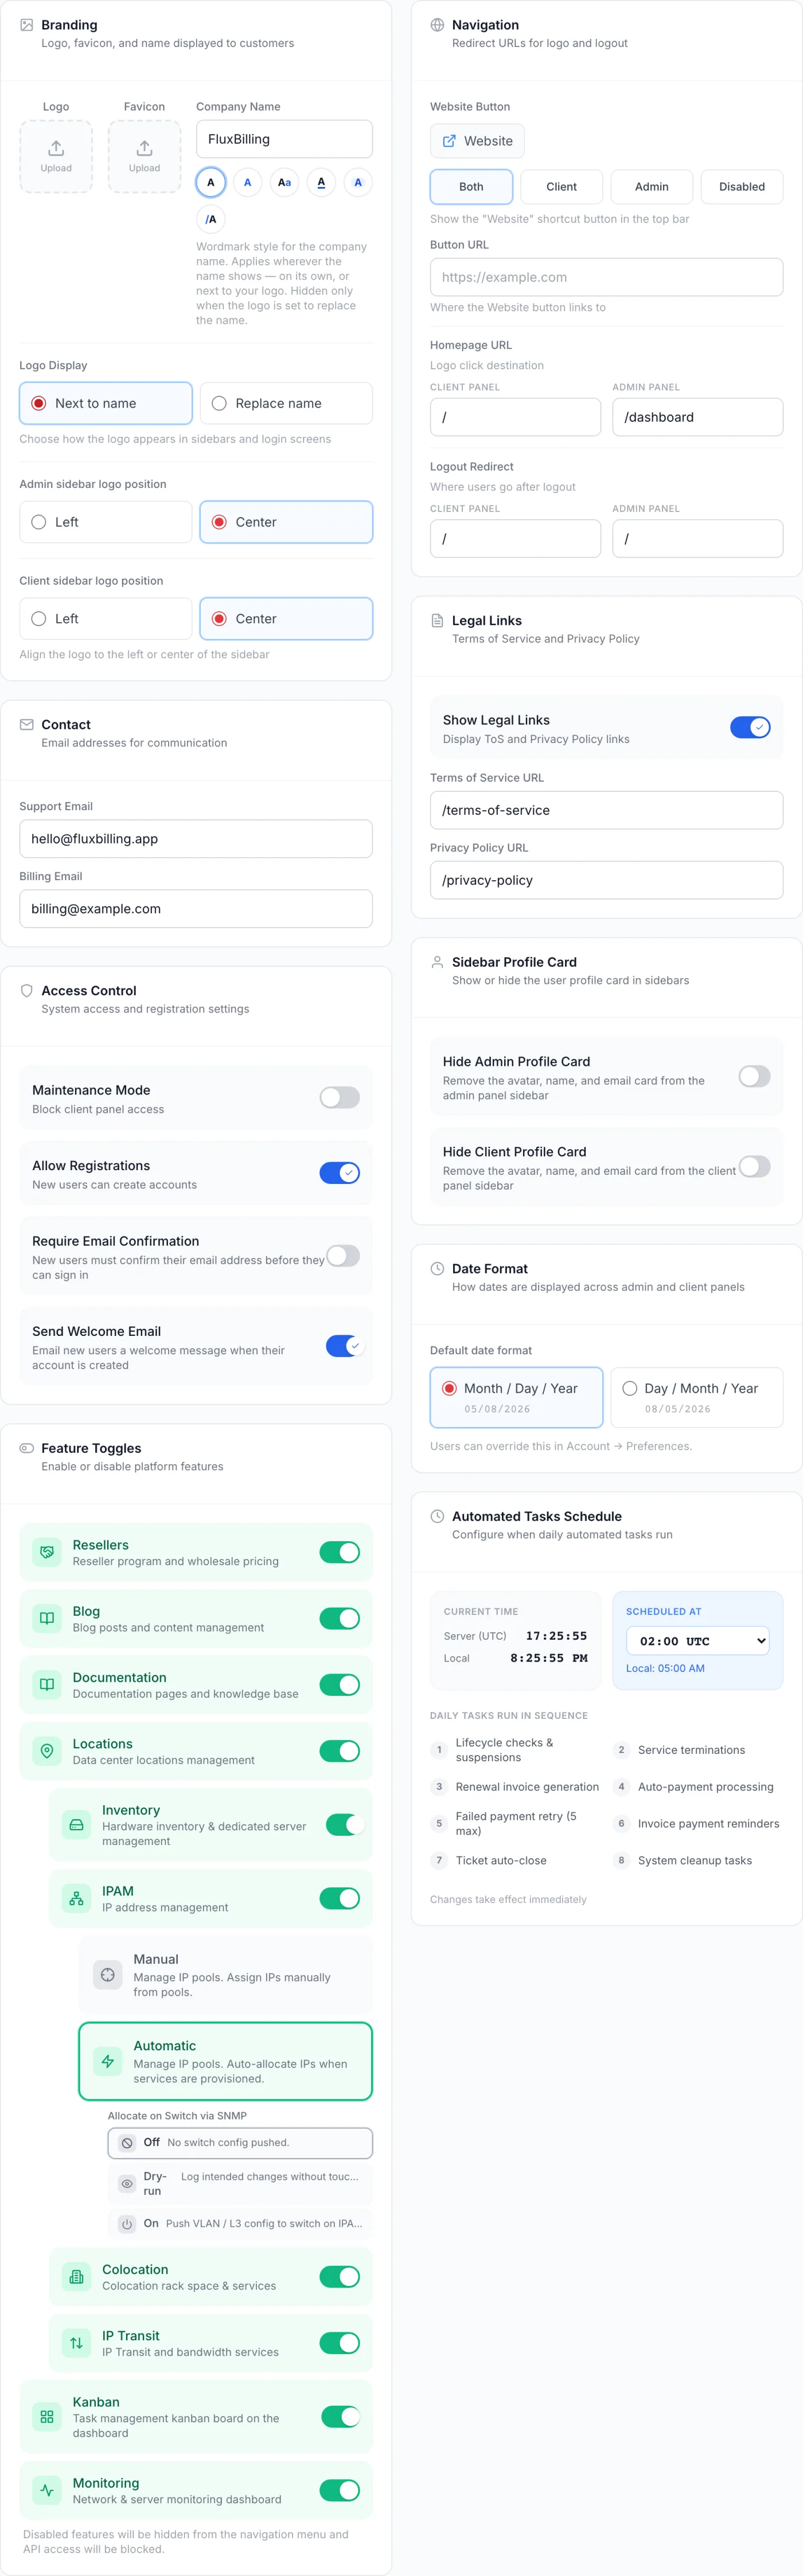
The General section carries the settings most operators touch first. The full walkthrough is in General; the highlights are below.
Branding
Upload a Logo and a Favicon, set your Company Name, and pick a wordmark style — Plain, Accent color, Two-tone, Accent underline, Highlight pill or Leading slash. Logo Display chooses whether the logo sits Next to name or Replaces name, and the logo position (Left or Center) is set separately for the admin sidebar and the client sidebar. Logos accept JPEG, PNG, GIF, WebP or SVG up to 5 MB; favicons accept PNG, ICO or SVG up to 1 MB. Each upload has Change and Remove controls once a file is in place.
Access control
Four toggles govern who can get in and what new signups experience:
- Maintenance Mode
- Blocks the customer-facing client panel. A Maintenance Message field appears so you can explain why; staff can still sign in to the admin panel.
- Allow Registrations
- Lets new visitors create a customer account. Turn it off to make the platform invite-only.
- Require Email Confirmation
- New customers must confirm their email address before they can sign in.
- Send Welcome Email
- Emails a welcome message to each new customer when their account is created.
Feature toggles
The Feature Toggles card switches whole modules on or off. A green row means the module is active and visible in navigation; a grey row means it is hidden and its pages are blocked. If a section of the panel described in this documentation is not on your screen, this card is the first place to look — Modules & Feature Toggles lists what each one covers and what a customer sees when it is off. The toggles are:
- Resellers — the reseller program and wholesale pricing.
- Blog — blog posts and content management.
- Locations — data centre locations.
- Inventory — hardware inventory and dedicated server management.
- IPAM — IP address management.
- Colocation — colocation rack space and services.
- IP Transit — IP transit and bandwidth services.
- VPS Clusters — running virtualization nodes as clusters and selling VPS from them, described in VPS Hosting Overview. Game hosting lives inside this module as one of its tabs — see Game Hosting Overview.
- Kanban — the task board on the Dashboard.
- Customer API — the API keys customers create for themselves in the client portal. See Customer REST API.
- Monitoring — the network and server monitoring pages. This row appears only when your license includes monitoring.
Note: Inventory, IPAM, Colocation, IP Transit and VPS Clusters are indented under Locations because they depend on it. Switching Locations off greys all five out and disables them until you turn Locations back on. Disabling a module is non-destructive — your data is preserved and reappears the moment you re-enable it. As the hint under the card says, disabled features are hidden from the navigation menu and their access is blocked.
Switching IPAM on reveals two extra controls indented beneath it: an IPAM mode selector (automatic allocation versus manual), and a switch-automation option. Leaving IPAM in manual mode means no switch configuration is pushed, and the panel says so under the selector.
Navigation, legal links, profile cards and date format
Set the Website Button shortcut shown in the top bar — Both, Client, Admin or Disabled — and the Button URL it opens. A live mini preview sits above the choice. Below it you set the Homepage URL (where clicking the logo goes) and the Logout Redirect, each separately for the Client Panel and the Admin Panel. Legal Links carries a Show Legal Links toggle plus Terms of Service URL and Privacy Policy URL fields. Sidebar Profile Card lets you hide the avatar/name/email card from the admin sidebar, the client sidebar, or both. Date Format sets the platform default — Month / Day / Year or Day / Month / Year — and notes that each person can override it under Account → Preferences.
Automated tasks schedule
FluxBilling runs a chain of daily housekeeping tasks. The Automated Tasks Schedule card shows the current server time in UTC alongside your local time, and lets you pick the hour (in UTC) at which the daily chain runs from a 00:00–23:00 dropdown, with a live label showing the equivalent time in your own timezone. The list beneath names the eight tasks that run in sequence:
- Lifecycle checks & suspensions
- Service terminations
- Renewal invoice generation
- Auto-payment processing
- Failed payment retry (5 max)
- Invoice payment reminders
- Ticket auto-close
- System cleanup tasks
Tip: pick an off-peak hour so heavy work does not collide with your busiest traffic. The card notes that changes take effect immediately once you save.
What each of those eight steps actually does to a customer’s services and documents is set out in Billing Automation.
Tips and gotchas
- Sensitive values are write-only. Mail-server passwords, gateway secrets and license keys are stored encrypted, so re-opening a section never shows the existing value — the field appears blank until you type a new one. Leaving it blank keeps the saved value.
- Use the search box. With this many sections, typing in the navigator search is faster than scanning the groups. It matches on group names and section names alike, and shows No settings found when nothing matches.
- Sections have their own web address. The address bar updates as you switch sections, so you can bookmark or share a direct link to a specific section. Switching sections also scrolls you back to the top of the page.
- Some changes refresh navigation immediately. Saving feature toggles or branding updates the sidebar without a full reload.
Related
General · Modules & Feature Toggles · Staff & Permissions · Billing · Email · Live Chat · AI Settings · Domain Search Widget · Panel Links · Security · Account · Notifications · Activity Log