
Blog
Create, schedule, and organize public blog posts in FluxBilling, manage categories, and embed your content on any external site through a public API.
What the Blog page is for
The Blog page is the built-in content module for publishing articles. You draft, schedule, categorise and manage posts here; published posts are then served publicly as read-only data that your own website renders — either with the ready-made embed snippets this page hands you, or with your own page templates.
How to reach it
Open Blog from the main admin sidebar, near the bottom alongside the email tools. The menu item appears only when the Blog module is enabled and your staff role can view Settings. If you do not see it, an administrator can switch it on under Settings → General → Feature Toggles, where it is listed as Blog — Blog posts and content management. Turning the module off later hides the menu item and stops the public blog data being served, without deleting any posts or categories.
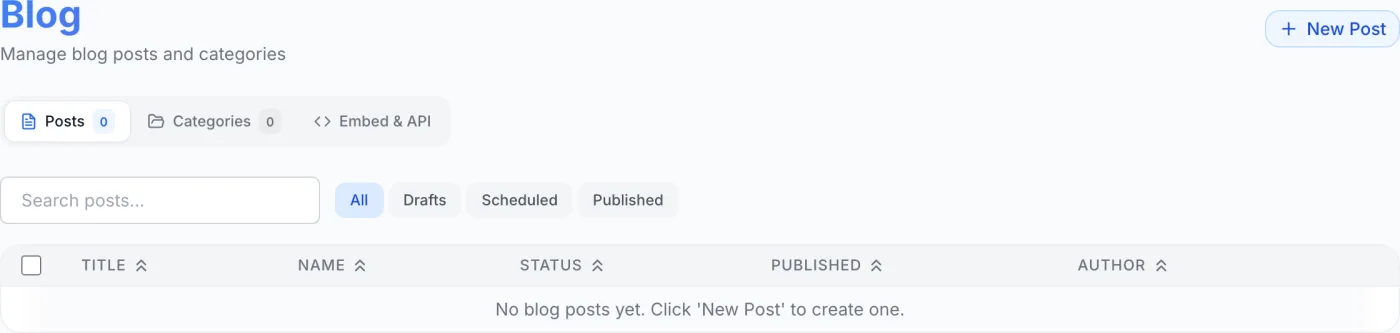
The page is headed Blog with the subtitle Manage blog posts and categories, a New Post button in the top-right corner, and three tabs below: Posts, Categories and Embed & API. Posts is the default tab. The Posts and Categories tabs each carry a small badge with the number of posts and categories.
Note: The AI writing options — which provider and model to use, and the standing instructions sent with every generation — are not on this page. They live under Settings → Integrations → AI, and the draft generator itself sits inside the Blog Editor.
The Posts tab
The Posts tab lists every article in a sortable table.
- Search — type in the box marked Search posts… to filter by title or excerpt.
- Filter by status — click one of the pills: All, Drafts, Scheduled or Published. The list narrows immediately and returns to page one.
- Sort — click a column header to reorder the table. It opens newest-created first.
- Open a post — click any row, or its pencil icon, to open it in the Blog Editor.
- Create a post — click New Post to open the editor with a blank draft.
The list is paginated at 25 posts per page, with page controls underneath.
Post table columns
| Column | What it shows |
|---|---|
| Select | A checkbox per row, and a select-all checkbox in the header, used for bulk deletion. |
| Title | The post title. A small sparkle icon sits next to titles that were drafted with the AI generator. |
| Name (category) | The category the post is assigned to, shown as a pill. A dash means the post has no category. |
| Status | A coloured badge: draft (grey), scheduled (cyan) or published (green). |
| Published | The publish date and time. For a scheduled post this is the future go-live time, shown in cyan. A dash means no date is set. |
| Author | The author’s name with their avatar, or their initials when no avatar is set. |
| Actions | The row buttons described below. |
On a narrow screen the Category, Published and Author columns are hidden so the title, status and actions still fit.
Row actions
- View on website (eye icon) — published posts only. Opens a new browser tab at
/blog/plus the post’s URL slug on the same address as your panel, which is where your public site is expected to publish the post. - Copy API URL (code icon) — published posts only. Copies the post’s public read-only address to your clipboard so you can pull it into an external page.
- Edit (pencil icon) — opens the post in the editor.
- Delete (bin icon) — asks “Delete this blog post permanently?” and removes it. There is no recycle bin.
Deleting several posts at once
- Tick the checkbox on each post you want to remove, or use the header checkbox to select every post on the current page.
- A red bar appears reading N selected, with a Clear link and a Delete selected button.
- Click Delete selected and confirm — the prompt states the count and warns that it cannot be undone. A message then reports how many were deleted.
Note: Selections only cover the posts you can currently see. Changing the search, status filter, sort order or page drops any selection that is no longer on screen, so a bulk delete always acts on exactly what is in front of you.
The Categories tab
Categories are the groupings you assign posts to. Create, rename and delete them here.
- Switch to the Categories tab.
- In the form at the top, fill in Name (the Add button stays disabled until you do) and, if you want one, a Description.
- Click Add. The new category appears in the list below.
- To change one, click its pencil icon — the form loads its values and the button becomes Update, with a Cancel link beside it. Make your change and click Update.
- To remove one, click its bin icon and confirm.
Each row shows the category name, its description and the number of posts assigned to it. Assigning a post to a category is done in the Blog Editor, not here.
Warning: Deleting a category does not delete its posts — they become uncategorised, and the confirmation says so. An uncategorised post stays published; it loses its category pill and stops appearing under that category on your public site.
The Embed & API tab
This tab gives you everything needed to show your blog on an external website or app. It opens with a note explaining that every address listed returns JSON, accepts requests from any origin and needs no authentication, so it can be called straight from a public page.
| Section | What it provides |
|---|---|
| API Base URL | The root public address for your blog, with a one-click copy button. |
| Endpoints | Four addresses, each with its own copy button: the list of published posts (accepting page, limit and category options), a single post by its URL slug (which also returns up to three related posts from the same category), the categories that have at least one published post, and an XML sitemap for search-engine submission. |
| HTML Embed — Post List | A ready-to-paste snippet that renders a responsive grid of your latest twelve posts on any page. Click Copy HTML. |
| HTML Embed — Single Post | A snippet that reads the post slug from the page address and renders the full post body — drop it into your post-page template. |
| Response Shape | A short reference of the fields returned by the list and single-post calls, with a reminder that image addresses come back relative and must be prefixed with the base address to load. |
Note: The post-list snippet links each card to
/blog/plus the post slug on the site you paste it into. If your posts live at a different path, edit that line in the snippet before publishing it.
What is public, and when
- Only posts with the status published, whose publish time has already passed, are served publicly. Drafts and posts still waiting for their scheduled time are not readable from outside the panel.
- A post set to Scheduled goes live on its own: the platform checks every minute, so it appears within a minute of the time you chose. No manual step is needed.
- The public category list only includes categories that have at least one published post, so an empty category never shows up on your site.
- View on website and Copy API URL only appear on published posts — a draft or scheduled post has no public address yet.
Drafting posts with AI
AI assistance is optional and lives inside the Blog Editor. A Generate with AI tool there takes a topic, an optional category for context, a provider and model, and one-off instructions, and produces a draft you review before applying. The provider, model and default instructions it starts from are set under Settings → Integrations → AI, on the AI Settings tab.
Tips and gotchas
Tip: Turning the Blog module off hides the menu and stops the public blog data being served, but it does not delete posts, categories or AI settings. Turning it back on restores everything as it was.
Warning: Deleting a post — on its own or in a bulk selection — is immediate and permanent. If you only want to take a post off your site, open it and set its status back to Draft instead.