
Proforma Details
Walk through the Proforma Details page: statuses, line items, partial and manual payments, and automatic conversion to an invoice.
What the Proforma Details page is for
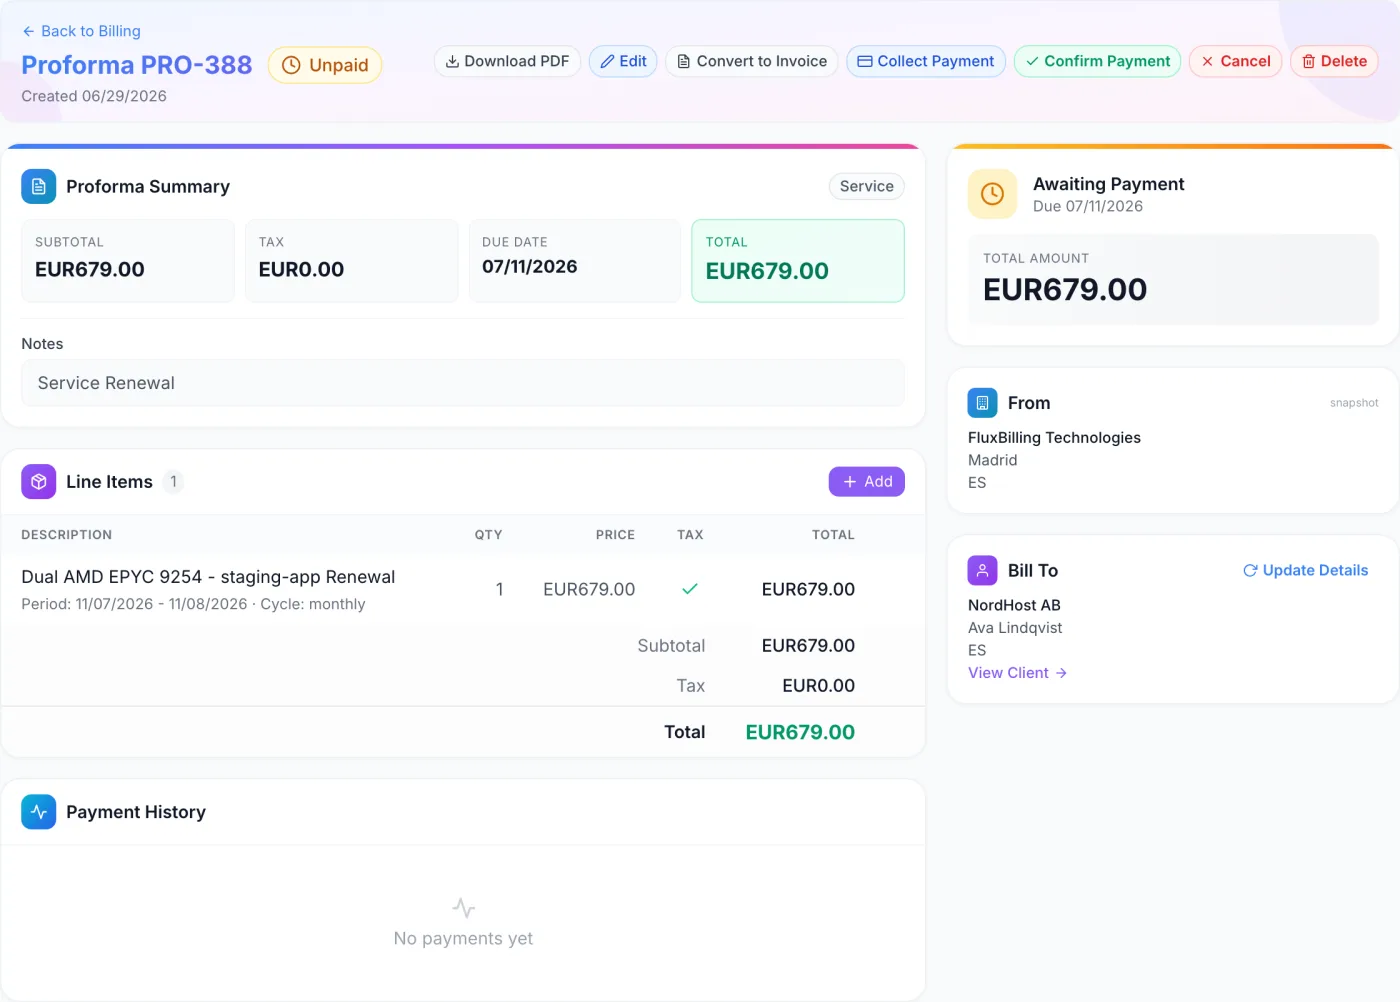
The Proforma Details page is the whole of one proforma in one screen. A proforma is a request for payment, not a tax document. It carries its own numbering, it can be paid in instalments, and when it is settled in full it normally becomes an invoice with an invoice number of its own — so a tax document is only ever issued once the money is secured. The layout mirrors Invoice Details, with actions and statuses specific to proformas.
When proformas exist at all
Proformas are only produced when your company is set to issue them. Open Settings → Billing and set Billing Document Type to Proforma (the alternative is Invoice). From then on new orders, renewals, upgrades, add-on purchases and credit top-ups all raise a proforma, and payment converts it to an invoice. Choose this when your process or your jurisdiction wants the customer to settle before a tax invoice is issued.
How to reach the page
There is no separate proforma menu item. Proformas sit alongside invoices under Invoices in the sidebar, on the list titled Invoices & Proformas. Use the Proformas tab there, then open any row — each proforma carries a purple Proforma badge and its configured prefix, PRO- by default. You can also open one from a client’s record; arriving that way, the back link reads Back to Client instead of Back to Billing.
Header and actions
The header shows the proforma number (for example PRO-6), a coloured status badge and the creation date. Below it, the buttons available depend on the status. Payable here means Unpaid or Pending.
| Button | What it does | When it appears |
|---|---|---|
| Download PDF | Downloads the proforma as a PDF. | Always |
| Edit | Puts the page into edit mode. | Always |
| Convert to Invoice | Promotes the proforma to an invoice without recording any payment, and takes you to the new invoice. | Not paid, not cancelled, not already converted |
| Collect Payment | Charges a payment method the client has saved on file. | Payable |
| Pay with Credit | Settles the proforma, in whole or in part, from the client’s account credit balance. | Payable, except on a credit top-up proforma |
| Confirm Payment | Records a payment you received outside the platform. | Payable |
| Cancel | Sets the proforma to Cancelled. | Payable |
| Delete | Removes the proforma permanently. | Always |
While editing, the buttons become Save and Cancel.
Statuses
| Status | Meaning |
|---|---|
| Unpaid | Issued and awaiting payment. Nothing has been collected. |
| Pending | A payment has been started and is waiting on the gateway to confirm. |
| Paid | Settled in full. Normally this state lasts only moments before the proforma becomes an invoice — unless consolidated monthly invoicing is on, in which case it stays here until the month is closed out. |
| On Hold | A renewal proforma parked while an upgrade for the same service is in progress. The upgrade releases or cancels it. |
| Cancelled | Voided. No tax invoice is issued. |
| Expired | A proforma you have decided has lapsed. You set this yourself; nothing sets it automatically. |
| Converted | It has become an invoice. A link to that invoice is shown in the summary card. |
Note: in edit mode the badge becomes a dropdown from which you can set Unpaid, Paid, Cancelled or Expired. Converted is never set by hand — it is applied when the proforma actually becomes an invoice.
Reading the page
Directly under the header sit two cards side by side:
- From — your company’s legal name, address and VAT number as captured when the proforma was issued. A small snapshot tag says these were frozen at that moment.
- Bill To — the client’s company or name and address, a View Client link, and an Update Details button that re-reads both cards from your current company settings and the client’s current profile.
Below them, the left-hand column carries the summary, the line items and the payment history; the right-hand column carries a single payment status card.
Summary card
Four tiles: Subtotal, Tax (with the VAT rate in brackets when one applies, and an Exempt note when the document is VAT-exempt), Due Date (a date picker in edit mode) and Total. A badge in the top right reads Credit Deposit for a top-up of the client’s balance, or Service for everything else. Beneath the tiles are the customer-facing Notes and, once the document has been converted, a link to the invoice it became.
Payment status card
The right-hand card states Awaiting Payment with the due date, Payment Received with the paid date, Proforma Cancelled, Proforma Expired or Converted to Invoice, and shows the total. When part of the amount has already been collected it also breaks out Already paid and Amount due, so a part-paid proforma never reads as fully outstanding.
Line items
Columns are Description, Qty, Price, Tax (a green tick when the line is taxable, a grey cross when it is not) and Total, with Subtotal, Tax and Total rows at the foot. Each description can carry the frozen service context captured when the document was issued — hostname, IP address and port, location, hardware details, the billing period and cycle, the renewal date, and any options chosen.
To add or change lines, click Edit. In edit mode an Add button appears in the card header, opening a small form:
| Field | What it does |
|---|---|
| Description | The label the customer sees for this line. |
| Qty | Quantity. The line total is quantity multiplied by price. |
| Price | Unit price, before tax, in the document’s currency. |
| Taxable | When ticked, this line is included in the tax calculation. |
A trash icon appears on each row on hover while the proforma is neither paid nor cancelled, so you can remove a line without entering edit mode.
How the totals are worked out
Line total is quantity times unit price. Subtotal is the sum of all line totals, including any negative discount line. Tax is calculated from the taxable lines only, at the document’s VAT rate, and is added on top. Total is subtotal plus tax. You cannot type a tax figure by hand — it is recalculated from the lines every time you save. How that rate was chosen for this document is explained in VAT & Tax.
Payment History
The Payment History card lists every payment recorded against the proforma, newest first, including part payments. Each entry shows the gateway used, a status badge (Completed, Pending, Failed, Refunded or Disputed), the transaction reference if there is one, the amount and a timestamp. When there are payments, two chips at the top of the card summarise the amount paid and the amount remaining.
Hovering an entry reveals a trash icon that deletes that payment. If the proforma is no longer covered it returns to Unpaid. Deleting a payment made from account credit also returns the amount to the client’s credit balance and reopens the proforma for that amount. Neither can be undone.
Recording a payment
Confirm Payment — money received elsewhere
| Field | What it does |
|---|---|
| Payment Gateway | Choose Manual / Cash, Bank Transfer, Account Credit, or any payment gateway you have enabled. Account Credit deducts from the client’s stored balance and says so. |
| Amount | Optional. Leave blank to record the full total, or enter less for a part payment. |
| Transaction ID | Optional reference, such as a bank reference or receipt number. |
| Notes | Optional free text for your own records. |
When the recorded payments cover the full amount, the proforma becomes an invoice and you are taken to it. A part payment is logged, the remaining balance is updated, and the proforma stays open.
Collect Payment — charge a saved method
Lists the methods the client has stored, each with its gateway, the card expiry where known, and a Default badge on the preferred one. Pick one and choose Charge Now. If the client has no saved methods, the dialog says so.
Pay with Credit — draw on the account balance
Shows Available credit and Amount due side by side, then an Amount to apply box pre-filled with the smaller of the two, and warns you when the balance is empty or covers only part of the document. Click Apply Credit to record it. Offered on every payable proforma except a credit top-up, which cannot be paid from the balance it is topping up. See Credit Balance for how that balance is funded and what it settles without being asked.
Consolidated monthly invoicing
If Consolidated Monthly Invoicing is switched on in Settings → Billing, a settled proforma is not converted straight away. It stays at Paid, and the client receives one invoice at the start of the following month covering everything they settled. The cash timing does not change — only the tax document is deferred.
While a proforma is settled and waiting for that invoice, it is the only record of money you have taken, so the platform protects it:
- You cannot change its status by hand — it must stay Paid so the month-end run still picks it up.
- You cannot delete it.
Both refusals explain themselves and tell you the way out: delete its payment, which reopens the proforma as Unpaid, or refund the payment, which cancels it. Once the month has been closed out the proforma moves to Converted and links to its monthly invoice, and the ordinary rules apply again.
Consolidated Monthly Invoicing covers the conditions for switching it on, exactly which payments fold onto the month’s document, and what happens if you switch it off mid-month.
The PDF
The proforma PDF has the same shape as an invoice PDF: your company block, the word PROFORMA, the document number and a status stamp, the date and due date, the Billed To block from the frozen customer details, the item table with any service context printed underneath each description, then Subtotal, VAT (or Exempt) and Total. When money has already been collected against it, a Transaction History table lists each payment with its date, gateway, reference, amount and status.
Long documents paginate cleanly — the item table repeats its header on each new page, the totals block is kept whole, and the transaction table breaks between rows. A document of more than one page is stamped Page N of M in the bottom right; a one-page document carries no page number.
What the client sees
In the client portal a proforma appears in the client’s billing list beside their invoices. Opening it shows the same From and Bill To details, the line items and the totals, with Download PDF and Print buttons and, while it is unpaid, a Pay Now button that takes them to checkout. Part payments are shown as Amount paid and Amount due. Once the proforma becomes an invoice, the invoice is what they see and download. See Invoices & Payments.
Tips and warnings
Numbering is independent. The proforma number and the invoice number it eventually produces come from two separate sequences. Prefixes and starting numbers for both are configured on the Billing settings page, in the Document Numbering section.
Cancelling never moves money. A proforma holds no captured payment of its own, so cancelling one refunds nothing. If money has been taken, delete the payment or refund it from the invoice the proforma became.
Warning: deleting a proforma also deletes the payments recorded on it. Nothing is refunded and credit spent on it is not returned. Use Cancel for anything that should stay on the record.
Tip: renewals replace themselves. When a service’s next renewal document is raised, any earlier unpaid or on-hold document for that same service is cancelled first, so a client is never chased twice for the same cycle. If your company has continuous invoice generation switched on, this replacement does not happen and each cycle’s document accumulates instead. Billing Automation sets out when each of these documents is raised.
Related articles
Invoices & Proformas · Invoice Details · Consolidated Monthly Invoicing · Credit Balance · VAT & Tax · Billing Settings · Invoices & Payments · Service Details