
Invoices & Payments
View invoices and proformas, pay outstanding documents, top up and apply account credit, track credit history, and download or share billing PDFs.
What the Billing page is for
The Billing page is your complete billing history and the place you pay outstanding documents. Every invoice and proforma issued to your account lives here, alongside your credit balance, your full credit transaction log, and the tools to pay, download, print or share a document.
How to reach it
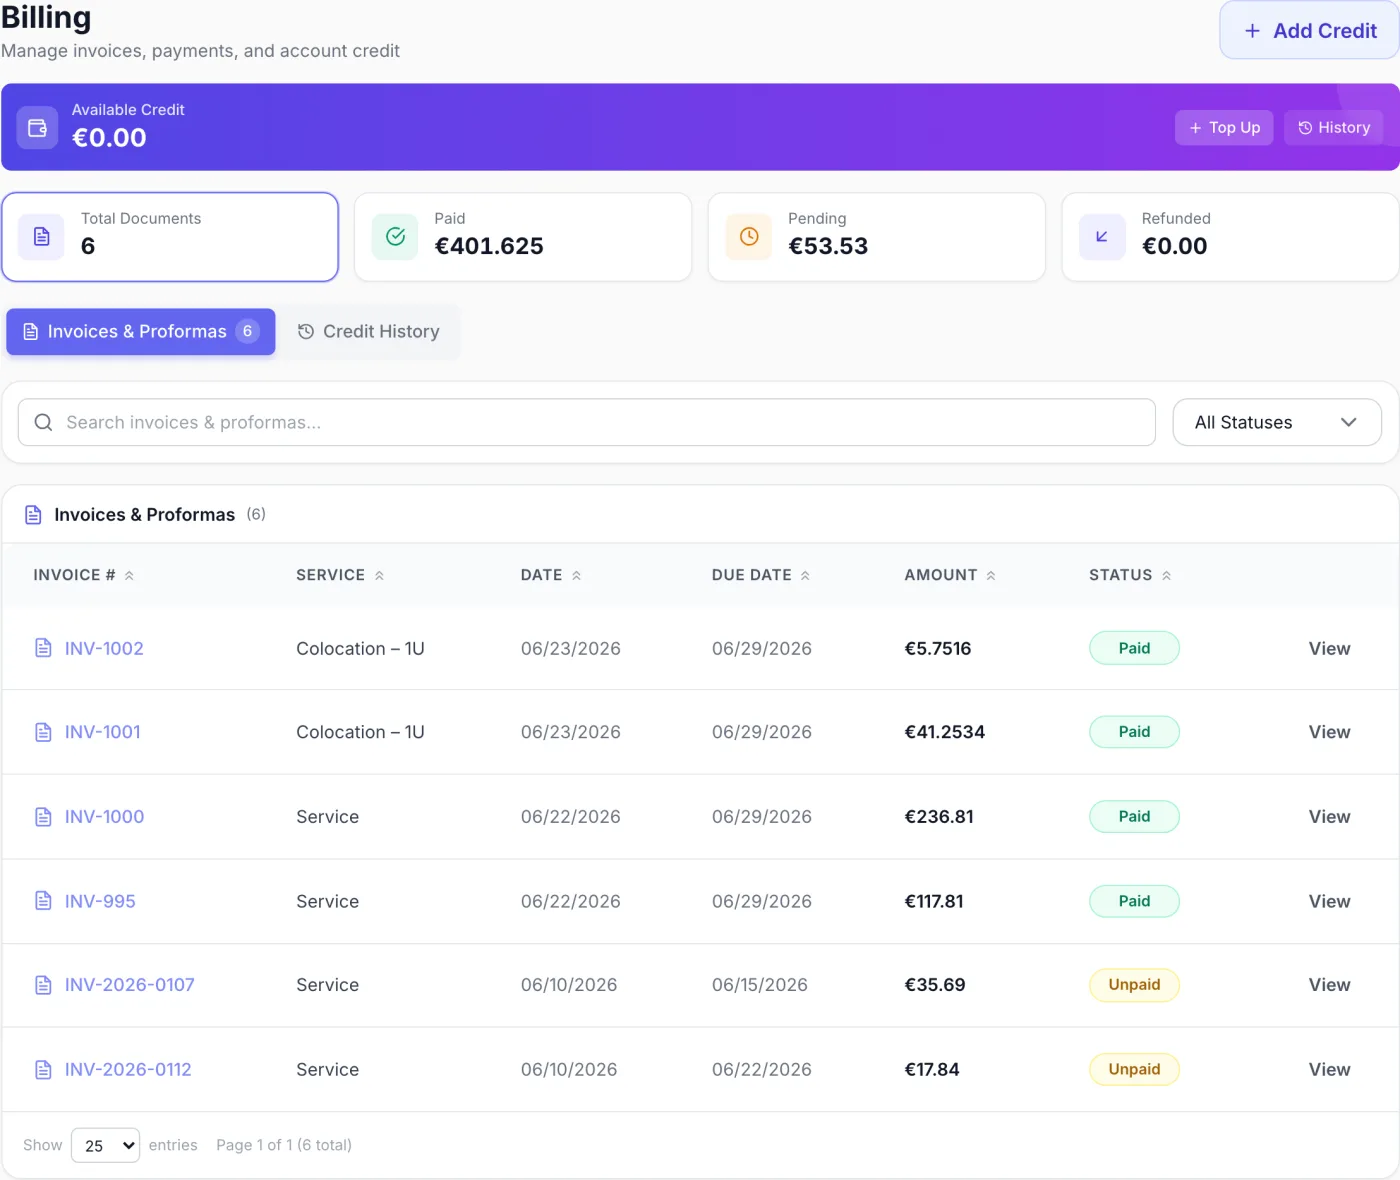
Choose Billing from the sidebar. The page header reads Billing with the subtitle Manage invoices, payments, and account credit.
The layout at a glance
- Available Credit card — the gradient banner at the top shows your current balance, with a Top Up button and a History button that switches to the credit log. Account Credit covers the balance on its own.
- Add Credit — in the top-right of the header; opens the same window as Top Up.
- Summary tiles — four cards: Total Documents (a count), then Paid, Pending and Refunded (amounts of money, not counts). Select a tile to filter the list below by that status; select the same tile again, or Total Documents, to clear the filter.
- Tabs — Invoices & Proformas (your document list, with a count) and Credit History.
- Search and status filter — the search box (Search invoices & proformas...) matches the document number or its description; the dropdown offers All Statuses, Paid, Unpaid, Pending and Refunded.
- Document table — columns Invoice #, Service, Date, Due Date, Amount, Status, and an actions area.
Reading the document table
Invoices and proformas appear together in one list. Each row shows:
- A document number — invoices carry a blue file icon and an
INV-style number; proformas carry a purple receipt icon and aPRO-style number. Select the number to open the document. - Service — a short description of what the document covers.
- Date and Due Date.
- Amount and a Status badge.
- Actions — a Pay link appears on proformas that are still unpaid or pending, and a View button opens any document.
Select a column heading to sort, and use the page-size and page controls at the bottom of the table to move through a long history. On a narrow screen the Service and Date columns are hidden to keep the table readable.
Invoice or proforma?
A proforma is a request for payment. It is not a tax document: it tells you what is owed and lets you pay it. Which one you receive for an order depends on how your provider bills.
- Where your provider issues invoices directly, an invoice is raised and you pay it.
- Where your provider issues proformas, a proforma is raised. Its detail page says Once paid, it will be converted to a final invoice. Once that conversion happens the proforma drops out of your list and the invoice takes its place.
- Where your provider groups a whole month onto one document, a paid proforma stays in your list marked Paid and is not converted one-for-one. Early in the following month a single invoice arrives covering everything you settled during that month; it is issued already Paid, and each line names the proforma it came from and the date you paid it. Nothing extra is owed — the money was taken when you paid each proforma.
Document statuses
| Status | What it means |
|---|---|
| Unpaid | The document is due and has not been paid yet. |
| Pending | Payment is in progress or awaiting confirmation — a bank transfer being processed, for example. |
| Paid | Payment was received and confirmed. |
| Refunded | A previously paid invoice has been refunded. |
| On Hold | The document has been put on hold; the Pay Now button is hidden while it is. Ask support if you are unsure why. |
| Cancelled | The document was voided and no payment is owed. |
| Overdue | An unpaid invoice that is past its due date. |
Pay an invoice or proforma
- Find the document with an Unpaid or Pending status.
- For a proforma, select the Pay link in its row. For an invoice, open it and select Pay Now.
- You land on the Checkout page, which names the document and shows an Order Summary.
- Choose how to pay (next section), then select the payment button.
Choosing how to pay
The checkout page is split into a Payment Method panel and an Order Summary sidebar. Your options:
| Option | What it does |
|---|---|
| Use Credit Balance | A switch that applies your credit, shown only when you hold a balance. A green Covers Full Amount badge appears when your balance pays the lot; otherwise an amber note gives the Remaining amount to pay another way. + Add more credit tops up without leaving the page. |
| Saved Payment Methods | Methods you have stored appear here, with a Default star badge on your preferred one and the expiry on cards. Selecting one charges it without leaving the page. |
| Payment Method | The gateways your provider has enabled. Some open a hosted page, some show card fields on-site, and bank transfer shows the details to pay manually. |
| Save this payment method for future purchases | A checkbox shown for gateways that support storing a method. Where your provider requires storing it, a plain notice appears instead saying the method will be kept so future invoices can be paid automatically. |
| Terms checkbox | Where your provider publishes legal links, you must agree to the Terms of Service and Privacy Policy before the payment button becomes active. |
The summary lists your items, then Subtotal, Tax/VAT, Already Paid (anything already settled on this document), Credit Applied, and Total. The button reads Pay €25.00, Pay with your saved method, Pay Now when credit covers everything, or Checkout, and shows Processing payment... while it works. Beneath it sit the notes Secure payment processing and Instant activation after payment.
Paying by bank transfer
Choosing bank transfer shows a Bank Transfer Details panel instead of redirecting you: Bank Name, Account Holder, IBAN / Account Number, BIC/SWIFT, Routing Number, Currency, Reference and Amount, with Choose Another Method and Done at the bottom.
Warning: You must write the Reference shown into the transfer description. A transfer without it cannot be matched to your document, which delays or blocks confirmation of your payment. Use Copy reference and paste it into your bank's description field.
Top up your credit balance
- Select Top Up on the balance card, or Add Credit in the header.
- The Add Credit window shows a preview: your Current balance, an arrow, and the After balance.
- Pick a preset amount or type a custom amount — the field shows the allowed minimum and maximum.
- Choose a Payment Method. Where the gateway supports it you can tick Save this payment method for future top-ups and automatic payments.
- Select the confirm button, which shows the amount (for example Add €50.00). Depending on the gateway you may be redirected to complete payment.
Note: Account credit cannot pay for a credit top-up. If you open a top-up document and try to pay it from your balance, the page shows Credit Not Available — use a payment method instead.
How your credit balance is spent
Your credit balance is a prepaid amount held on your account. It is used in three different ways:
- Renewals — when automatic credit is switched on, the balance is applied on its own to renewal documents for services you already have, and the document shows a Credit Applied line.
- Hourly services — usage is deducted from the balance directly as the service runs. There is no document to pay each hour.
- Everything else — a new order, an upgrade or an add-on is never paid from your balance on its own. You choose Use Credit Balance at checkout when you want to spend it.
You control the automatic part yourself under Settings → Preferences → Billing: Use Platform Default, Always Apply Credit or Never Apply Credit. If your provider has not allowed customers to override this, the current behaviour is shown but the options are unavailable. See Client Portal Overview.
Warning: Hourly services need funds. If your balance runs out, the service is suspended after a short grace period, and a service left suspended is eventually terminated. Keep enough credit on the account, or top up as soon as you are notified.
Saved payment methods and automatic payment
Manage stored methods under Settings → Profile → Payment Methods. You can Set Default, delete a method, or use Add payment method to store one in advance — you are sent to the provider to authorise it and brought straight back. The first method you store becomes your default.
Where your provider runs automatic collection, your default stored method is charged for documents as they fall due, and can also be used to top your balance back up when it drops below the level your provider has set. Both are notified to you by email. If you would rather pay by hand, remove your stored methods or ask support to take you off automatic collection. Automatic top-up is described in Account Credit.
Credit History tab
Switch to Credit History (or use History on the balance card) to see every movement on your balance. The table has columns Type, Description, Date, Amount (additions in green with a +, deductions in red) and Balance After. Types are:
- Deposit
- Funds you added.
- Deduction
- Credit used toward a document or an hourly charge.
- Refund
- An amount returned to your balance.
- Adjustment
- A manual correction applied to your balance.
Tip: Hourly charges for the same service within a period are collapsed into one row naming the service, its hostname and IP address. Select View N hours on that row to open a breakdown of every individual charge with its date, amount and running balance.
Download, print or share a document
Open an invoice or proforma to reach these actions:
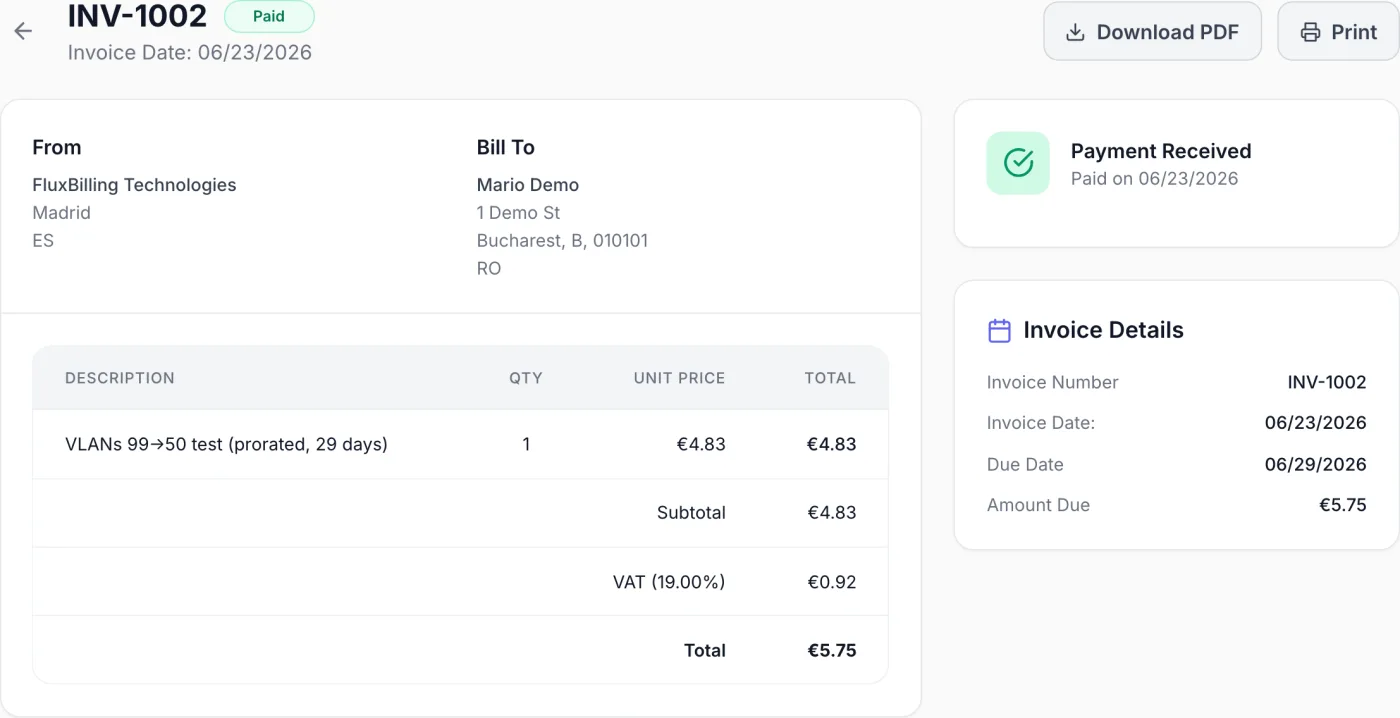
- Download PDF — saves a PDF with the From and Bill To addresses, line items, subtotal, VAT and total.
- Print — prints that same PDF layout rather than the on-screen page.
- Share — available on unpaid invoices where your provider allows sharing (proformas have no Share button). Select Share, then Generate Share Link, to create a link that lets someone view and pay the invoice without logging in. Copy Link copies it; Revoke Link disables it at any time.
Note: On a shared link only payment gateways are offered — account credit cannot be used to pay a shared invoice. The link stays active until you revoke it. Whoever opens it sees the invoice number, due date, items and totals, and a Pay button.
Reading a proforma
A proforma detail page shows the From and Bill To addresses, the line items with Qty, Unit Price and Total, then Subtotal, VAT (with its rate, or marked Exempt), Total, and — where something has already been settled — Already Paid and Amount Due. A side panel repeats the Proforma #, Date, Due Date and Amount Due with a pay button, and states Awaiting Payment until it is settled.
Tips and gotchas
- Tell the two documents apart by the icon and prefix: a blue file with
INV-is an invoice; a purple receipt withPRO-is a proforma. - If a payment shows as Pending after you completed it (common with bank transfers), do not pay again — the status updates once the payment is confirmed.
- Returning from a payment provider, the Billing page verifies the payment for you and reports the outcome; if it is still processing, come back in a moment rather than paying twice.
- Change your default saved method, or remove one, from your profile settings rather than the checkout page.
Related
Placing an Order, Account Credit, Managing Your Services, Client Portal Overview.