
Payment Gateways
Install, connect, and switch on payment gateway plugins so customers can pay at checkout. Covers credentials, sandbox mode, icons, and the Connect step.
The Payment Gateways tab lists every payment method installed on your platform and lets you switch each one on or off. Every gateway arrives as a plugin — there are no processors built into the core product. You install a gateway plugin, enter its credentials and checkout appearance on the Plugins page, and enable it so customers can pay invoices and orders at checkout.
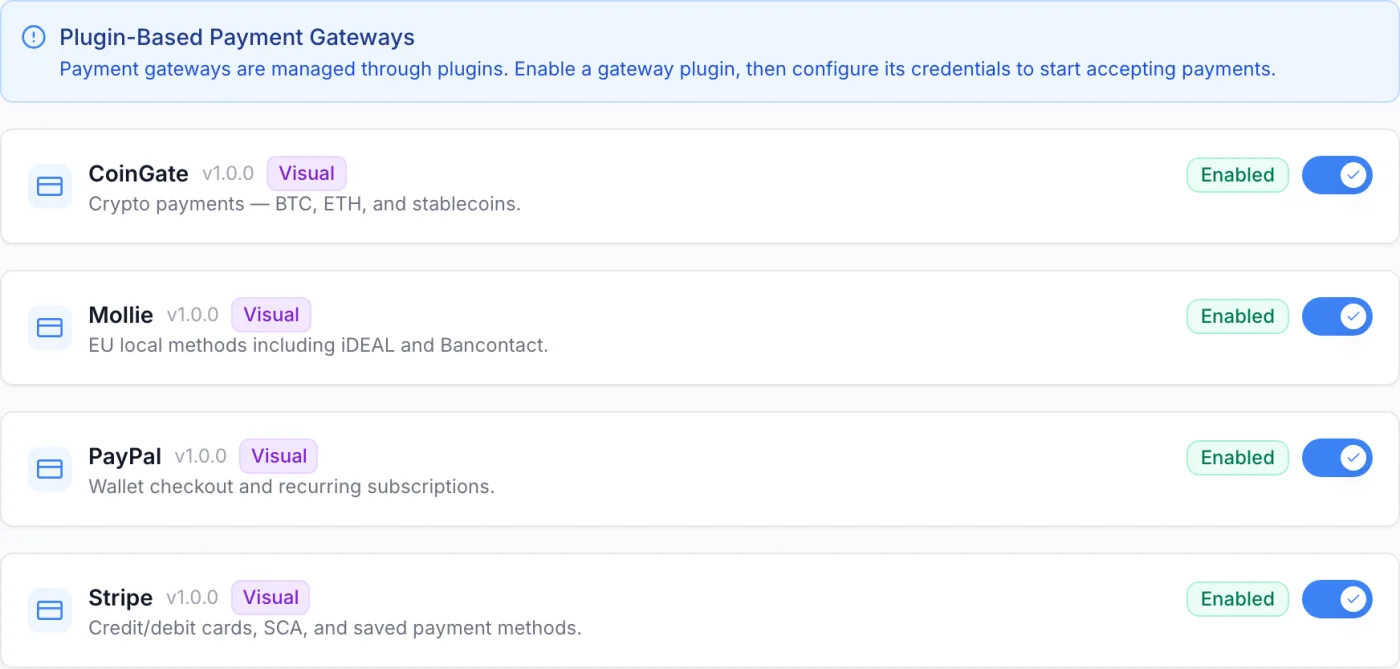
Where to find it
Open Settings from the admin sidebar, expand the Financial group, and click Payment Gateways. This tab is the on/off control centre. Credentials and display details for each gateway are configured separately on the Plugins page (Settings → Integrations → Plugins).
What is on this tab
- Plugin-Based Payment Gateways banner — an information notice at the top explaining that gateways are managed through plugins: enable a gateway plugin, then configure its credentials to start accepting payments.
- Gateway cards — one card for each installed payment-gateway plugin, showing the gateway's icon, its display name, its version number and a short description. Plugins built in the plugin builder also carry a small Visual label.
- Enabled / Disabled badge — the gateway's current state.
- On/off toggle — the switch on the right of each card turns the gateway on or off immediately, with no confirmation step.
- Empty state — with no gateway plugins installed, the tab shows a No Payment Gateways Installed message. It names the gateways available as plugins: Stripe, PayPal, CoinGate and Bank Transfer.
Note: this tab is deliberately simple — it only switches gateways on and off. To enter API keys, set the checkout name and icon, or connect to a provider, use the gateway's plugin on the Plugins page. There is no Configure button on the cards here.
Install a gateway
- Go to Settings → Integrations → Plugins.
- Add a payment-gateway plugin — click Import to upload a plugin file, or New Plugin to build one.
- Once installed, the gateway appears both on the Plugins page and on this Payment Gateways tab.
See Introduction to Plugins and Packaging, Importing & Updating.
Configure a gateway
All of a gateway's settings live on its plugin.
- Open the Plugins page.
- Find the gateway's card and click Configure.
- The configuration window opens with two tabs across the top: Settings and Checkout Display.
- Make your changes, then click Save Configuration at the bottom. A green confirmation appears when the settings are stored. Cancel closes without saving.
Settings tab
Everything that decides how the gateway behaves.
- Enabled — a checkbox that makes the gateway available to customers. It is the same on/off state as the toggle on the Payment Gateways tab.
- Sandbox/Test Mode — a checkbox that routes transactions through the provider's test environment instead of charging real money.
- Outbound API IP — where it applies, a read-only address with a copy button. This is the address your platform uses when it calls the payment provider; add it to any IP allowlist the provider offers.
- Credential fields — defined by the plugin itself, typically API keys, secrets and connection details. Sensitive fields are masked; use the eye button beside a field to reveal or hide its value. Fields marked with a red asterisk are required. Where a plugin groups its fields, the groups appear either as sections or as small pill tabs, with a dot marking a group that already has values.
- Callback URL — some gateways show a read-only address with a copy button. Paste it into the provider's dashboard so they can notify your platform about completed payments. A separate notice appears for plugins that need a webhook configured.
Setup checklist (PayPal and Stripe)
For those two gateways, the Settings tab shows a short numbered checklist plus a link that opens the provider's own dashboard in a new tab — the sandbox or live dashboard, matching your Sandbox Mode checkbox — so you can copy the keys you need without hunting through their site. The steps tell you exactly which page to open, which values to copy, and to finish with the Connect button.
Connect and verification
Gateways that support it show a Connect button at the bottom of the Settings tab, directly under the credential fields. Clicking it saves what you typed, validates the credentials against the provider, and where supported registers the webhook automatically.
- On success a green line reads Connected as your account, with a badge for the environment (live or sandbox) and, underneath, the webhook reference and when it was last verified.
- If validation fails, a red Last connection attempt failed line shows the provider's error message.
- Once connected, the button changes to Reconnect so you can re-run it after changing keys.
Tip: Connect both validates your keys and can correct Sandbox Mode to match the environment those keys belong to — if you pasted test keys it keeps the gateway in sandbox and tells you it did. Always Connect after changing credentials so the verification line stays accurate.
Checkout Display tab
Everything the customer sees when they pick this method at checkout.
| Field | What it does |
|---|---|
| Display Name | The label shown to customers, for example “Credit/Debit Card”. Required — the Save button stays disabled until it has a value. |
| Description | An optional line of helper text shown under the name at checkout. |
| Icon | Choose Preset to pick from a grid of built-in icons (credit card, wallet, Bitcoin/crypto, bank building, dollar sign, banknote, cash, shopping cart, receipt, coins, piggy bank, landmark, shield, transfer, globe, location, star, sparkle), or Custom URL to point at your own image. PNG, SVG or JPG; around 64×64 px works best. |
A live Preview box shows how the name, description and icon will look to customers as you type. While Sandbox Mode is on, the preview carries a yellow Test badge.
Enable or disable a gateway
- On the Payment Gateways tab, flip the toggle on the gateway's card. The change takes effect right away.
- Alternatively, use the Enabled checkbox on the plugin's Settings tab and click Save Configuration.
Enabled gateways appear at checkout; disabled gateways do not.
Switch from test to live payments
- Open the gateway's Configure window on the Plugins page and stay on the Settings tab.
- Replace any test keys with your live credentials.
- Untick Sandbox/Test Mode.
- Click Connect to validate, then Save Configuration.
- Make sure the gateway is Enabled so it shows at checkout.
Warning: test thoroughly in Sandbox Mode before going live. A live gateway charges real cards, so confirm the connection line shows the correct account and environment first. With Sandbox Mode off, the Preview box drops its yellow Test badge, so you can see at a glance that the gateway is live.
Tips and notes
- The Payment Gateways tab and the plugin's Enabled checkbox control the same on/off state — changing one updates the other.
- The display name and icon are purely cosmetic for checkout — they do not affect how the payment is processed.
- If a gateway is not behaving, open its configuration window and use Connect to read the exact error message from the provider.
- Credit balance is not available in guest checkout, and account credit cannot be used to buy more credit — those customers need a gateway. See Settings: Billing.
Related
Invoices · Invoices & Payments · Introduction to Plugins · Settings: Billing