
IPAM
Manage subnets, VLANs, and IP addresses from one IPAM page — register CIDR blocks, split them into children, and allocate addresses to devices.
IP Address Management (IPAM) is your central register of network numbers. It tracks every subnet, VLAN, and individual IP address you own, what each one is allocated to, and how much of each block is in use. When a service is provisioned, the platform can draw a free address or block from the space you have marked as auto-allocatable here, and it returns that space to the pool when the service ends.
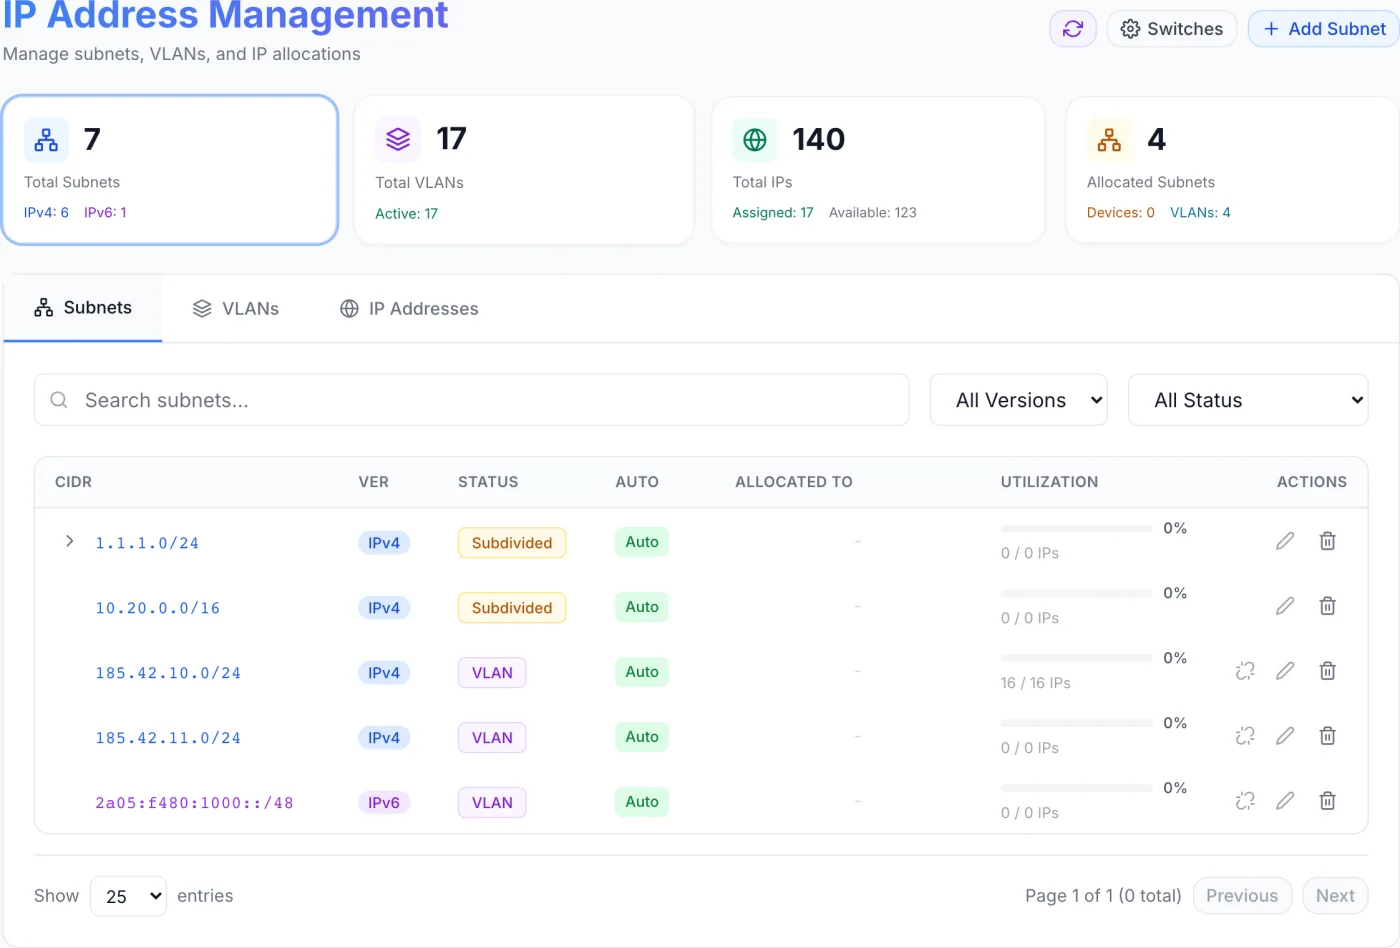
Opening the page
In the admin sidebar, open IPAM. The page header reads IP Address Management — Manage subnets, VLANs, and IP allocations.
The item appears only when the IPAM module is enabled for your company and your role has permission to view addressing. If you do not see it, ask an administrator to enable the module or grant you access.
Three controls sit in the top-right of the header:
- Refresh (circular-arrow icon) — re-pulls the tiles and all three tables.
- Switches — opens the Switch Automation Jobs page, the history of automated switch-port changes.
- Add button — changes with the tab you are on: Add Subnet, Add VLAN, or Add IP. Only one shows at a time.
Automatic and Manual addressing
How IPAM behaves at provisioning time is a company-wide choice. Open Settings, stay on the General tab, find the IPAM switch in the Features list, and pick one of the two modes shown underneath it:
| Mode | What it does |
|---|---|
| Automatic | Manage IP pools. Auto-allocate IPs when services are provisioned. This is the default. Ordering a product that asks for addresses draws them from your auto-allocatable space without anyone touching the panel. |
| Manual | Manage IP pools. Assign IPs manually from pools. Everything on this page still works, but provisioning never picks an address for you — you allocate by hand. |
Note: turning the IPAM module off hides this page. Existing allocations are preserved and become read-only; turning the module back on restores Automatic mode.
The summary tiles
Four tiles run across the top. The first three are clickable and switch you to the matching tab.
| Tile | What it shows |
|---|---|
| Total Subnets | Count of all registered subnets, split into IPv4 and IPv6 sub-counts. |
| Total VLANs | Count of all VLANs, with how many are currently active. |
| Total IPs | Count of individually tracked addresses, split into Assigned and Available. |
| Allocated Subnets | Subnets handed out, broken into how many went to devices versus VLANs. Informational only — it does not switch tabs. |
Subnets tab
This is the default tab. It lists your blocks as an expandable tree — a parent block that has been split shows a chevron you can click to reveal its children.
Filtering
Use Search subnets… to find a block, the All Versions dropdown to limit to IPv4 or IPv6, and the All Status dropdown to filter by Unallocated, Allocated (Device), Allocated (VLAN), or Subdivided.
Columns
| Column | Meaning |
|---|---|
| CIDR | The block in address/prefix notation, blue for IPv4 and purple for IPv6. If the block has a role, a small grey role badge sits next to it. |
| Ver | An IPv4 or IPv6 badge. |
| Status | Unallocated, Device, VLAN, or Subdivided. |
| Auto | A button reading Auto (green) or Manual (grey). Auto means the block is eligible for automatic allocation when services are provisioned. Click it to switch; the change saves immediately. |
| Allocated To | The server, blade, or VLAN the block is assigned to, or a dash if free. A block that was linked to a VLAN because a device joined that VLAN shows an orange Temp badge; hover it for the explanation. |
| Utilization | A coloured bar with a percentage, plus an assigned / total address count underneath. The bar is green up to 50%, amber above 50%, and red above 80%. |
| Actions | Allocate (link icon, on free blocks) or Deallocate (broken-link icon, on assigned blocks), plus Edit and Delete. |
Note: a subnet marked Subdivided has been split into smaller child blocks. You allocate from the children, not from the parent — the parent stays visible as a container.
Add a subnet
- Click Add Subnet.
- Enter the CIDR Notation — for example
10.0.0.0/24or2001:db8::/32. The form validates the format as you type and refuses an impossible prefix length. - Optionally pick a Parent Subnet to create this block inside an existing one. Blocks already allocated to a device or a VLAN cannot take children, so they are not offered.
- Choose a Role (see the table below), or leave it as None.
- Add a Description if you want a note on the block.
- Pick a Location to scope the block to one of your sites, or leave it as None for a block usable anywhere.
- Turn Auto-allocatable on if you want provisioning to draw from this block. The hint under the switch reads Eligible for automatic allocation to services.
- Click Create.
Note: there is no free-text name on a subnet — the Role and the Description carry that information now. The CIDR itself cannot be changed later; the field is locked when you edit an existing block, with the hint CIDR cannot be changed after creation.
Subnet roles
A role tells the platform what a block is for, and it is enforced: a block with a role only ever serves allocations that match it. A block with no role serves any purpose.
| Role | What it means |
|---|---|
| None | General-purpose space. Any allocation purpose may draw from it. |
| Distribution | Customer-facing public addressing. Serves the Public IP purpose only, and cannot be handed to network gear or a PDU. |
| Management | Out-of-band and network-management addressing — remote-management interfaces and switch management. Cannot serve public addressing. |
| IP Transit | Space consumed by IP transit services. It is allocated from the transit service itself, not from the device pickers here; only the structural VLAN binding is available on this page. This option appears only when the IP Transit module is enabled. |
| Virtual Server | Space reserved for the virtual-server module. No dedicated-server allocation can ever take it. This option appears only when the VPS module is enabled. |
Note: a block that has been split cannot carry a role. The dropdown greys out with the hint Subnets with child subnets cannot have a role. Set roles on the leaf blocks instead.
The subnet tree
Click any subnet row, or its Edit pencil, to open Subnet Tree: <block> — a two-panel window. The left panel is the hierarchy, showing the parent, its children, and every individual address that has been created inside a leaf block. The right panel describes whatever you selected and offers the actions for it.
With a subnet selected, the right panel shows:
- A summary line with the block, its IP version badge, its status, an Auto: On/Off badge, the Gateway (or Auto), and a usage bar.
- An editable card with the Role dropdown, the Location dropdown, and a Description box, with a Save button that only lights up once you change something.
- A Virtual Server card when the role is set to Virtual Server (see below).
- An Allocated To panel, an Unavailable panel with the recorded reason, or a Temporary Device Allocation panel, whichever applies.
- A green Can Split preview showing the two halves you would get, or a Can Merge panel naming the sibling, or a Missing Child panel.
The action buttons along the bottom appear only when they are possible for the selected block:
| Button | What it does |
|---|---|
| Split | Carves the block into two equal halves, previewed before you confirm. Offered only on an unallocated leaf block that has no addresses created inside it and is not temporarily allocated. |
| Merge | Recombines two child halves into their parent. Offered when a split parent has exactly two children and both are free, available, and unsplit. Both children are removed and the parent becomes available again. |
| Regenerate | Recreates the missing half when a split parent is left with only one child. |
| Allocate to VLAN | Opens the allocation window with the VLAN target pre-selected. |
| Allocate | Opens the same window on the device targets. |
| Deallocate | Frees an assigned block. |
| Populate IPs | Creates an address record for every usable address in the block so you can manage them one by one. Offered only on a leaf block that is allocated to a VLAN and has no addresses yet. The confirmation shows how many will be created and warns you when the block is large. |
| Clear IPs | Removes those address records again. Offered only while none of them is assigned or marked unavailable. |
| Make allocatable / Make non-allocatable | The same auto-allocation switch as the Auto column, from inside the tree. |
| Mark unavailable / Mark available | Blocks the subnet from future allocations without deleting it. You are asked for a Reason — for example reserved for a migration, an upstream outage, or quarantine. Existing allocations are unaffected. |
| Delete | Removes an unallocated, unsplit block. |
With a single address selected, the right panel shows its status, parent block and VLAN, the device or blade it is paired with, its purpose and notes, and offers Allocate to device or Release, the Mark unavailable switch, and the Virtual Server card. An address whose parent block is not on a VLAN cannot be allocated; the panel says so.
Allocate a subnet or an address
- Click the Allocate (link) icon on a free row, or an Allocate button in the subnet tree.
- Choose the target under Allocate to: Dedicated, Blade, Network (switches, routers, firewalls), PDU, or VLAN. The VLAN target exists for whole subnets only, not for single addresses.
- For the Dedicated and Blade targets, pick a Purpose: Public IP or Network Mgmt. The Network and PDU targets always allocate as network management, so no purpose choice is shown.
- Search the list and select the server, blade, network device, PDU, or VLAN.
- Click Allocate.
Note: equipment at a different site from the block is hidden from the picker, so a block scoped to one location can only be allocated to equipment at that location. A block with no location can be allocated anywhere. When the block carries a role, a banner at the top of the window reads Subnet role: … — only matching allocations are allowed, and targets the role forbids are greyed out.
VLANs tab
Lists your VLANs with a search box and an All Status / Active / Inactive filter. Columns are VLAN ID, Name (with the description underneath), Location, a count of linked Devices and Subnets, and a Status button you click to activate or deactivate. Clicking anywhere else on the row opens the VLAN view: the subnets allocated to that VLAN, the devices that carry it, and buttons to Allocate to Device or Populate IPs for the selected subnet.
Row actions are Manage Devices (people icon), Edit, and Delete.
Add a VLAN
- Click Add VLAN.
- Enter a VLAN ID between 1 and 4094.
- Give it a Name (required) and an optional Description.
- Under Locations, click Add Location and pick a location. You may narrow each row to one data centre or leave it as All in Location. Add as many rows as the VLAN spans; duplicates are refused.
- Leave Active ticked, then click Create.
Note: the VLAN ID is locked after creation, and at least one location row is required — saving with none shows Pick at least one location. If you have no locations yet, the form says so and points you at Locations.
Manage devices on a VLAN
The people icon opens VLAN Devices. Click Add Device, switch between Devices and Blades, search, pick one, choose the VLAN Mode (Access, Trunk, or Hybrid), tick Native VLAN if it applies, and click Add. The assigned list shows Device, Type, Mode, Native, and a remove action.
Note: adding a device to a VLAN can also link that VLAN's subnets to the device — the confirmation says how many were linked. Those links are the Temp rows you see on the Subnets tab, and they are removed again when the device leaves the VLAN.
IP Addresses tab
Lists individually tracked addresses with a search box, a subnet filter, and a status filter (Available, Assigned, Reserved, Quarantine). Columns are IP Address (with a version badge), Subnet, Type, Status, Assigned To, Hostname, and Actions. An address reserved for the virtual-server module carries an extra indigo VPS badge next to its status.
The actions are Release (only on assigned addresses), Edit, and Delete. Delete stays disabled on an assigned address, with the tooltip Release before delete.
Add an IP address
- Click Add IP.
- Choose Manual to type a specific address, or Auto-Assign to let the platform take the next free one and pair it with a device.
- Select the Subnet. Only blocks that are already allocated to a VLAN are offered — an address cannot exist outside one.
- In Manual mode, enter the IP Address and choose its starting Status: Available or Reserved.
- In Auto-Assign mode, switch between Devices and Blades, search, and pick the target.
- Set the Type: Primary, Secondary, Management, IPMI, or Floating.
- Add optional Notes, then click Create (or Auto-Assign).
When you edit an existing address, the address itself and its subnet are read-only; you can change the Type, the MAC Address, and the Notes.
IPv6
IPv6 is handled the same way as IPv4 throughout: enter an IPv6 block in the same CIDR field (prefix lengths from 0 to 128 are accepted), filter by version, and split, merge, allocate, and release exactly as you would a v4 block. IPv6 blocks and addresses are drawn in purple and carry an IPv6 badge so the two families are easy to tell apart in a mixed list, and the Total Subnets tile counts them separately. A product can ask for v4 addresses, v6 addresses, or both, and each family is drawn from auto-allocatable space of that family.
Tip: creating individual address records inside a very large IPv6 block is rarely what you want. Allocate the block itself to the customer's service and leave the addresses inside it untracked.
How addresses reach a service and come back
A product can carry addressing rules — how many addresses or blocks a service gets, of which family, and for what purpose (see Products). What happens next depends on the mode:
- In Automatic mode, provisioning searches the auto-allocatable space at the service's location, respecting subnet roles, and binds what it finds to the new service. The order is checked against available space before hardware is consumed, so a shortage is reported up front rather than half-way through a build.
- In Manual mode nothing is drawn automatically; you allocate from this page after the service exists.
When a service is terminated, everything that was allocated to it is released in one step: each address returns to Available with its device pairing cleared, and each whole block returns to Unallocated. If switch automation is enabled, the matching switch configuration is removed at the same time — see Switch Automation Jobs.
Note: management addressing is deliberately not released. Addresses allocated for IPMI or Network Mgmt belong to the hardware rather than the customer, so they stay attached and the next service on that machine keeps the same remote-management address.
Reserving space for virtual servers
The VPS module draws its addresses from IPAM, but only from space you have explicitly given it. There are two ways to give it space, and they mean the same thing at different sizes:
- Set a whole block's Role to Virtual Server. Every address inside it belongs to the VPS module.
- Select a single free address in the subnet tree and click Mark as Virtual Server in the Virtual Server card. Use this to carve individual addresses out of an otherwise mixed block. An address that is already in use must be released first.
Either way the address becomes invisible to dedicated-server allocation — no ordinary allocation purpose can take it.
Pointing the space at the right nodes
The Virtual Server card also carries the scope. It lists your virtual-server Groups and Nodes; tick the ones allowed to draw from this space and click Save scope.
- With nothing selected the card reads Any VPS node may allocate from this space.
- With something selected it reads Only the selected nodes and groups may allocate from this space.
This is what ties addressing to plan targeting. A virtual-server plan is offered on a group of nodes, so binding a block to that same group guarantees the machines built from that plan get addresses that are actually routed where they run. A node that can reach marked space uses it and will not quietly fall back to general addressing; a node with no marked space in reach keeps using the general pool as before.
An address that sits inside a Virtual Server block shows the card read-only, with the note that the scope belongs to the block — change it there and it changes for every address in the range.
Pagination
Below each table a Show … entries selector (25, 50, or 100) sets the page size, and Previous / Next step through pages. The indicator between them reads Page X of Y (Z total).
Tips and gotchas
- Clicking the first three summary tiles jumps straight to the matching tab.
- Turn Auto on only for blocks you are happy to have handed out automatically. Leave customer-specific or reserved blocks on Manual.
- Give blocks a role early. A role-tagged block cannot be mis-allocated later, and the allocation window tells you exactly why a target is refused.
- A block must be allocated to a VLAN before you can populate or allocate the individual addresses inside it.
- Release an assigned address before deleting it; the Delete button stays disabled until you do.
- The Utilization bar counts assigned addresses against the block's capacity, so a freshly added block shows 0% until you populate or assign addresses.
- Use Mark unavailable with a written reason instead of deleting a block you intend to bring back — the reason is shown to whoever looks next.
Related
Switch Automation Jobs · Inventory · Locations · Services · Products · IP Transit