
Products
Run your catalogue from the Products page: the product table and its actions, the category picker, and every field in the five-section product editor — General, Configuration by product type, Pricing, Delivery and Upgrade Paths.
What the Products page is for
Products is your catalogue manager. Every saleable item lives here — dedicated servers, VPS plans, game servers, colocation, IP transit, and anything provisioned through a plugin. A product defines what the customer sees on the order page, how it is priced, what it provisions to and where, and which billing cycles it offers. When a customer completes an order, the product determines the resulting service.
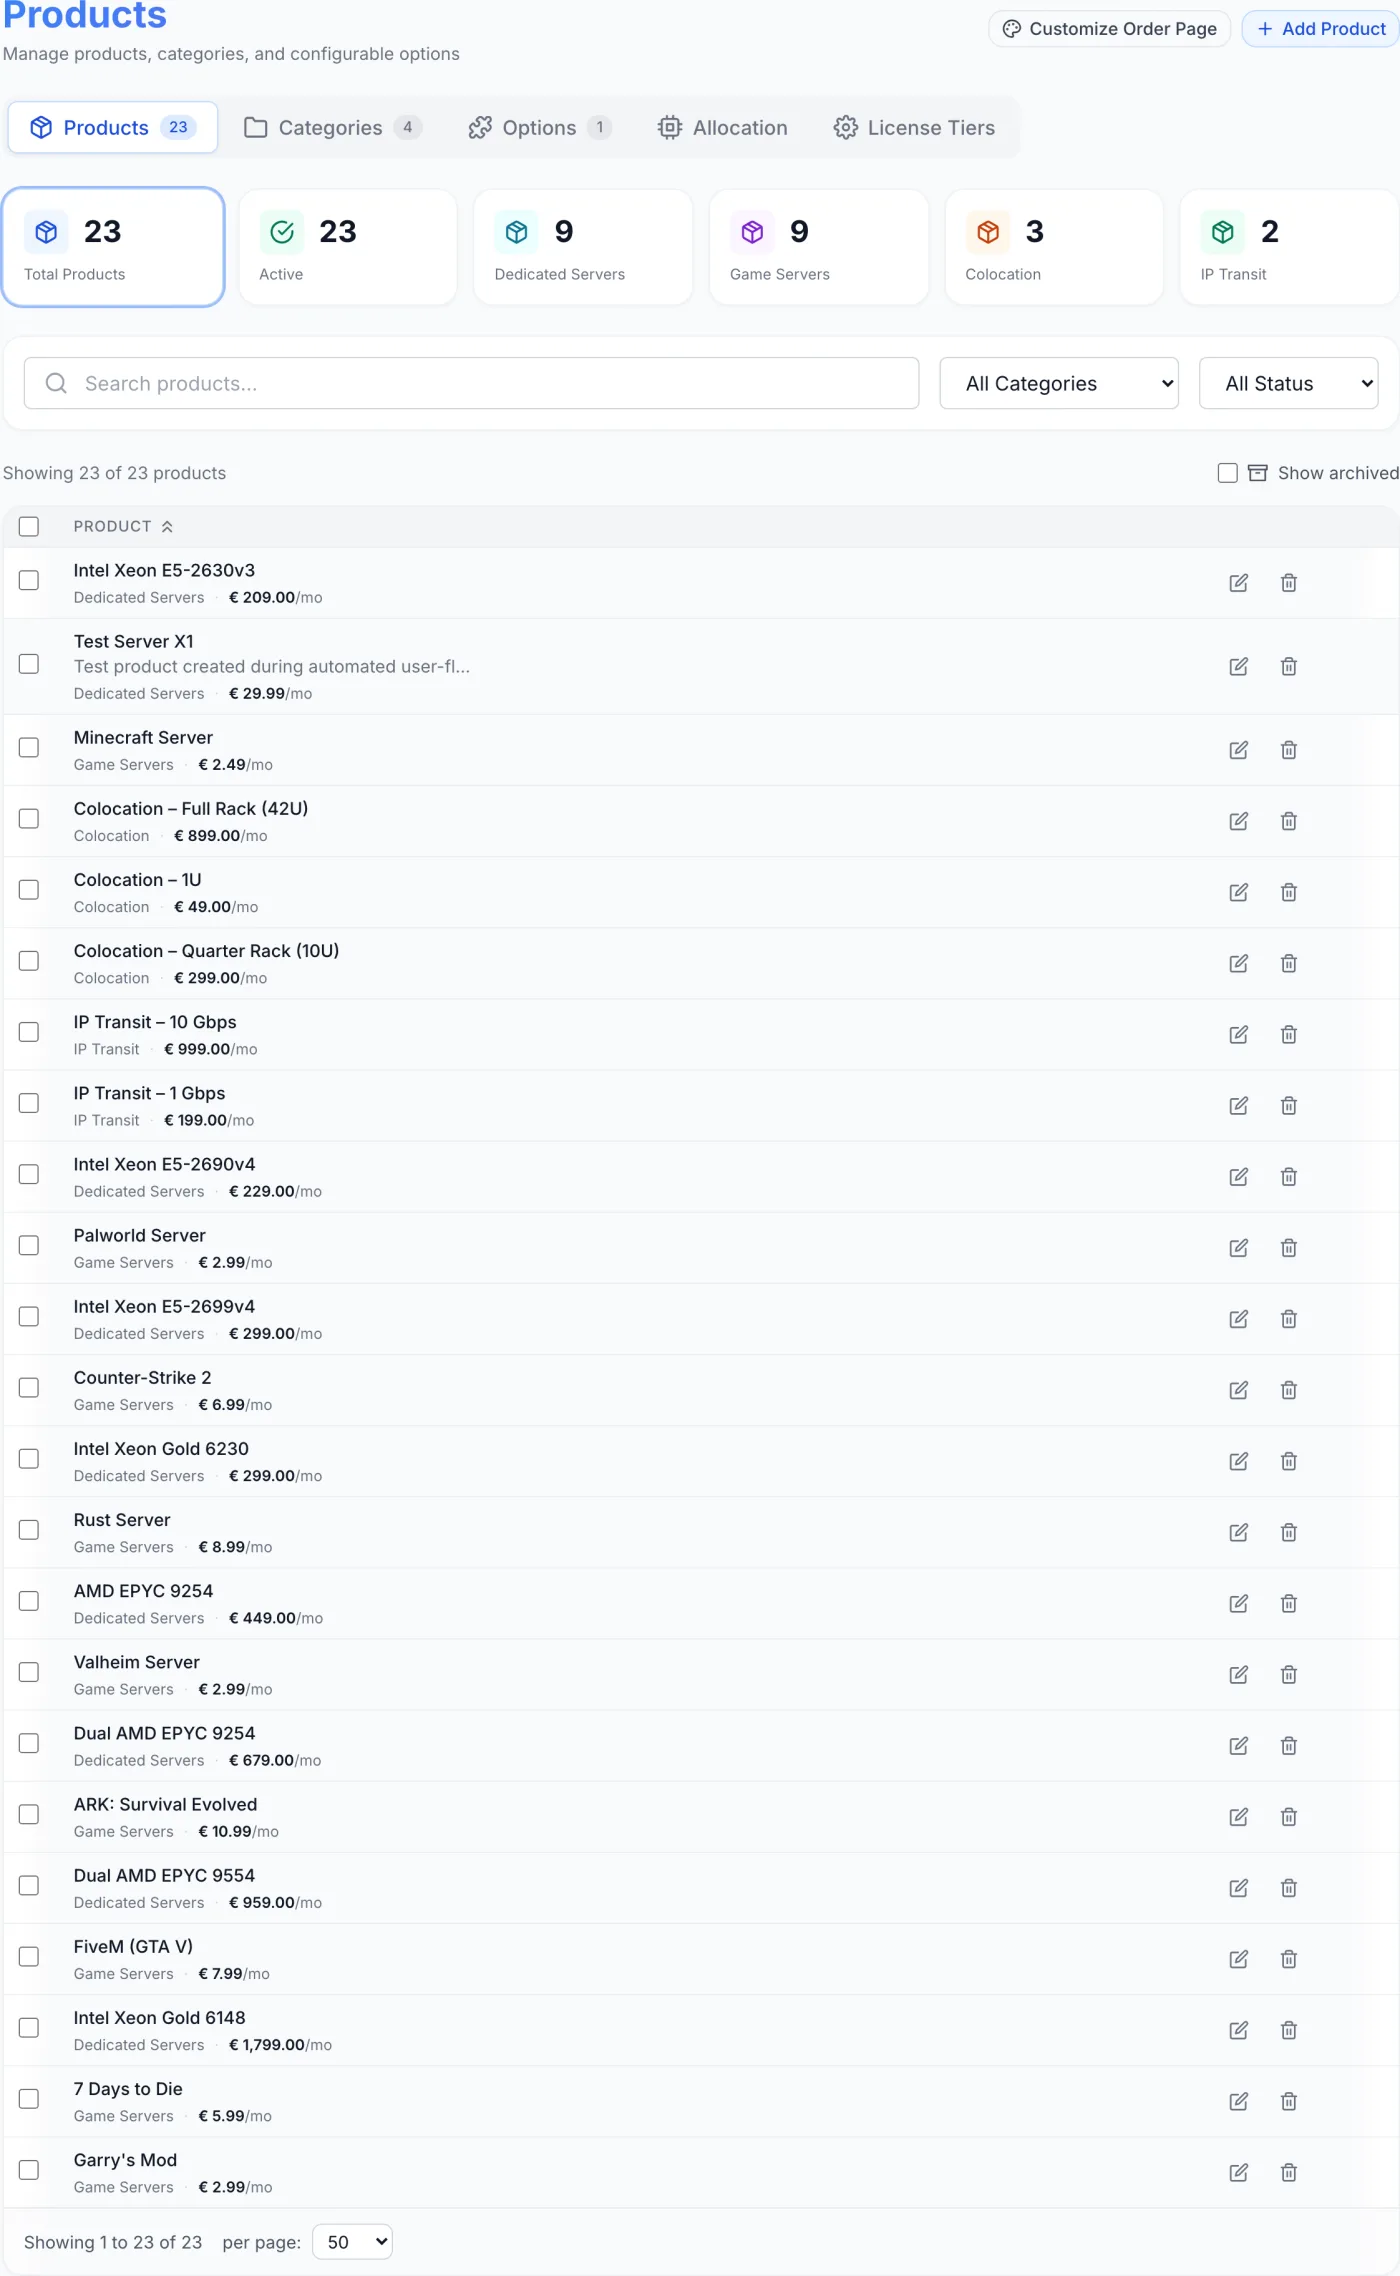
How to reach it
Open the admin panel and click Products in the sidebar. The page opens on the Products tab by default.
Page layout: the tab strip
A tab strip near the top switches between four areas. The first three carry a count badge:
- Products — the catalogue itself, shown as a sortable table.
- Categories — the groups that organise products on the storefront and set their type, billing cycles and provisioning model. See Product Categories.
- Options — configurable add-ons customers can attach at order time. See Product Options.
- Allocation — the matching engine that pairs a dedicated-server order with a real machine in Inventory, with its own sub-tabs. See Allocation & Equivalences. This tab only appears when the Inventory module is enabled.
Header buttons
Above the tabs, on the Products, Categories and Options tabs (they are hidden on the Allocation tab):
- Customize Order Page — opens the editor for the public order page's subtitle, Quick Stats row, category grid layout and Why Choose Us? section. See Customize Order Page.
- Reorder — on the Categories tab always, and on the Products tab once a single category is selected in the filter. Opens a list where you move entries up or down with arrow buttons, then click Save Order.
- Add Product / Add Category / Add — the primary button; its label follows the active tab.
The Products tab
At the top, stat tiles show Total Products, Active, and up to four category tiles — click any tile to filter the table to it. Below the tiles you can search by name or description, filter by category, and filter by status (All Status / Active / Inactive). A Showing X of Y products counter sits beside the filters, with Clear filters to reset, and Show archived to surface retired items.
On wide screens each row shows the display-order number, product name and short description, a coloured category badge, the monthly price, the provisioning binding, and a status pill; on narrower screens the category and price collapse under the product name and the copy-link and archive actions are hidden. The table sorts by display order by default, and every headed column can be sorted by clicking it.
A dedicated-server product that is active, not archived and has no operating-system images assigned carries an amber No OS images badge — clients cannot order it until images are assigned in the Delivery section.
The provisioning badge reads Manual when nothing is bound, the plugin's name when a plugin is, or a built-in label such as Dedicated Auto, Colocation Auto or IP Transit.
Row actions
- Click the status pill to toggle a product between Active and Inactive. An inactive product is hidden from the storefront but keeps all its data.
- Copy order link puts a shareable direct-order URL on your clipboard — handy for marketing a single product.
- Edit opens the product editor described below.
- Archive / Unarchive retires the product entirely: it is deactivated and hidden, while existing services keep running and renewing. A product with pending or active services cannot be archived; a Cannot Archive dialog lists the services (with their customer and status) that must be cancelled or terminated first.
- Delete removes the product. You are asked to confirm. If the product has orders or services, a Cannot Delete Product dialog opens instead and offers three ways forward: Delete everything (the product and all its orders and services, permanently), Reassign to another product (move the orders and services to a product you pick, then delete this one), or Mark as deleted (deactivate it and append
[Deleted]to its name, keeping orders and services as they are).
Warning: Ticking the row checkboxes reveals Force Delete Selected. The confirmation only asks whether to permanently delete the selected products, but the action also removes every order, service and add-on assignment attached to them, and it cannot be undone. Up to 50 products can be deleted in one go. It exists for cleaning up test data — for anything a customer has ever bought, archive instead.
Creating a product
- On the Products tab, click Add Product.
- Choose a category. The first screen groups your active categories by type — Dedicated Servers, Colocation, IP Transit, VPS, Game Servers and Plugin / Other — each category showing how many products it already holds. Types whose module is switched off are not offered. If you have no categories yet, the screen points you to create one first. Click a category; the rest of the editor adapts to it.
- Work through the five sections described below. A Category button above the form takes you back to the picker while creating.
- Click Create Product.
A new VPS or game product opens on the Configuration section rather than General, because that is where its plan is seeded — a product saved without ever visiting it would sell no plan at all, and the editor flags exactly that.
The product editor
Opening Edit on a row, or finishing the category step on a new product, opens a full-height editor with five sections in a tab strip, the same five for every product type: General → Configuration → Pricing → Delivery → Upgrade Paths. Only Configuration changes shape by type. Hovering a tab shows a short summary of what it holds.
The editor checks for blocking problems as you go and shows a count pill on the affected tab — a missing name on General, a missing or zero monthly price on Pricing, an incomplete or unselected plan on Configuration — and the footer reads N need attention. These are warnings, not locks: a product still saves. Upgrade Paths is greyed out until the product has been saved once, because paths link two saved products.
The footer holds Cancel and Create Product / Update Product.
Section 1 — General
Identity
- Product Name — required. The name doubles as the plan name for VPS and game products, which is why those plan editors have no name box of their own.
- Order Link — the slug after
/order/product/. Lower-case letters, digits and hyphens only; auto-generated from the name if left blank. - Category — shown when editing, so you can move a product between categories. Changing the category changes which Configuration section you see.
- Description — optional short text shown to customers.
Status
Three toggles, each with its effect spelled out beneath it: Active (orderable in the storefront), Taxable (VAT is applied at checkout) and Resellable (visible to reseller accounts).
Features
Short bullet points displayed as checkmarks on the order page. Type one and press Enter (or a comma), or click Add; click the × on a chip to remove it. Duplicates are ignored. Available for every product type.
A product that arrived from an upstream reseller connection shows an Upstream Reseller Product banner at the top of this section: its pricing and provisioning are managed by the upstream connection, and service management is proxied there.
Section 2 — Configuration
This is the type-specific half of the product. Every type starts with the same Provisioning card, and below it draws the fields that type needs.
Provisioning
The dropdown decides what happens when an order completes. Which entries appear depends on the product's category type:
- Manual — offered on every type, and the value a new product starts on. The resulting service lands in Services as Pending for your staff to fulfil by hand.
- Dedicated (Automated) — dedicated categories only. Provisioning follows the hardware-allocation switch on the Delivery section.
- VPS (built in) / Game server (built in) — the native modules, offered on VPS and game categories. See VPS Hosting Overview and Game Hosting Overview for what has to exist on your hardware before either can deliver.
- Colocation / IP transit — the native handling, offered on those two category types.
- A plugin — any enabled infrastructure plugin. The plugin owns the full lifecycle (create, suspend, resume, terminate) and contributes its own configuration fields, drawn below the card exactly as the plugin's author laid them out.
Every field in the sections below shares one anatomy: a chip row with a Custom escape where a preset list exists, a select with a named “leave it to the default” row where blank has a meaning, and a help line where the effect is not obvious. A stored value that is not in the current list is kept and shown in amber rather than silently cleared, and a field that no longer applies but still holds a value stays on screen with an amber note so you can clear it.
Dedicated Servers — Hardware Specifications
These specs are shown on the order page and, when hardware allocation is on, are what the Allocation engine matches against real machines — so make them reflect your actual hardware.
| Group | Field | What you pick |
|---|---|---|
| Compute | Cores | Preset chips from 1 to 256, or a custom number. |
| Threads | Free number. Left blank, it is filled in as twice the cores when you save. | |
| CPU Brand | Any, Intel, AMD, or a custom brand. | |
| RAM | Preset chips from 4 GB to 2048 GB, or custom. | |
| RAM Type | Blank, DDR3, DDR4 or DDR5. | |
| Storage | Disks | Disk count, 1× to 48×, or custom. |
| Size | Per-disk size, 120 GB to 8 TB presets, or custom GB. | |
| Disk type | HDD, SSD, NVMe, or custom (SAS, SATA…). | |
| Network | Bandwidth | Port speed, 100 Mbps to 400 Gbps presets, or custom Mbps. |
| Qualifier | Shared, Guaranteed, Unmetered, or custom (Burstable…). |
On save these structured values are turned into the human-readable strings the storefront prints — “16 core / 32 threads”, “128GB DDR4 RAM”, “2 x 960 GB NVMe”, “1 Gbps Unmetered” — so you never type marketing copy for specs twice. Only dedicated products get those derived strings; colocation and IP transit keep the bandwidth text you type.
Colocation — Colocation Specifications
- Rack & Power: Rack Units (RU) chips — 1U, 2U, 4U, Quarter (10U), Half (21U), Full (42U), or a custom value from 1 to 48; Power (kW); Cross-Connects.
- Connectivity: Bandwidth (free text, for example
1Gbps), BGP Sessions, Included Subnets (for example1x /24 IPv4), Included VLANs.
IP Transit — IP Transit Specifications
- Capacity: Port Speed chips — 1, 10, 25, 40 or 100 GbE, or custom; Bandwidth; Committed Rate; Burst Rate; and, for the transfer model only, Included Transfer (GB).
- Billing: Billing Model — Flat Rate, 95th Percentile, Committed + Burst (95th), or Transfer (per GB/TB); Billing Direction — Bidirectional, Inbound Only, Outbound Only; Overage Rate per Mbps (flat, 95th and committed+burst models) or Overage Rate per GB (transfer model). Fields that do not apply to the chosen model are hidden — unless they still hold a value, in which case they stay visible with an amber note so nothing bills on a setting you cannot see.
- BGP & Routing: Provider ASN (shown to clients) and BGP Sessions.
- Included: Included Subnets and Included VLANs.
- Overage Pricing — a separate card. It starts on the flat rate, explaining that overage bills at the single rate above, with a Tiered button. Switching to tiered seeds three example bands you then edit: each row has Up to (Mbps) and Rate per Mbps, and Add Tier appends one. Leave Up to empty on the last row to make it the unlimited tier. A note confirms the tiers override the flat overage rate. The button now reads Simple and clears the bands to go back.
There is no SLA, prefix-limit or route-type field on an IP transit product. Per-session BGP details — the prefix limit and the route type — are set on the individual service, and an SLA belongs in the product description or the contract, both of which the customer actually sees.
VPS
A VPS product owns its plan: the plan is the sizing, and every product has exactly one. The Plan card shows it in one line — plan name, then vCPU, memory in MB, total disk in GB and the storage type — with an Edit Plan button that opens the plan editor in its own dialog. The plan takes the product's name. VPS Plans goes through every field in that editor and what each one does to the machine that gets built.
The plan editor covers: vCPUs, Memory (MB) and Disks (Add disk, each with a size in GB and an optional storage type and pool); Bandwidth (Mbps); Monthly transfer (GB); IP addresses allocated on creation; Snapshots per VPS (blank inherits the module default set in VPS Settings, 0 disables); a Resource limits block — CPU ceiling (%), disk read/write IOPS and throughput, inbound/outbound Mbit/s — with a note per limit saying whether it is applied when the VM is built, informational only, or enforced by the platform; Operating systems this plan offers with one marked default (nothing ticked offers every VPS-enabled image); a Description; an optional Install recipe run inside the guest at first boot; Targeting by locations, migration pools or clusters (nothing selected means any); Enabled — offered for new VMs; and Sort order.
Below the plan, VPS configuration holds the product's own defaults:
- Operating system: OS image — forces one image on every order of this product; leave it on None / cluster default to let the customer pick from the plan's catalogue. Custom image URL — used only when nothing else resolves an image; an order-time pick, the forced image above and the plan default all come first.
- Placement: Cluster placement — Automatic (by location + capacity) picks an active cluster with an online agent in the service's location, preferring free memory, and never uses a frozen cluster; Pinned cluster reveals a Cluster select. Under automatic placement a Default location can be set, or left as Any — from the order or the service. The machines you can pin to are covered in Clusters, and the named sets a plan can target in Groups & Migration Pools.
Four notices are worth knowing. On the Plan card itself: a red banner when the forced OS image is not in the plan's catalogue (an order that lands on that field would be refused at build time), and a red banner naming the reason when the plan cannot be saved — an image it can no longer offer, or a retired recipe — which also blocks the whole save. If the plan list could not be read at all, a warning says the plan is not shown and will be left exactly as it is. Inside the plan editor dialog: a warning if the plan belongs to, or is also sold by, another product (saving makes a copy for this product and leaves the others untouched), and a note saying how many VMs were already built from the plan — existing machines are never resized; only future orders get the new shape.
Game Servers
Game products follow the same pattern. Game server configuration shows the owned plan in one line — plan name and the game it installs, then memory, CPU percent, disk, player slots and extra ports — with Edit plan opening the plan editor in its own dialog. Sizing comes from the plan and the product, never from what the customer sends with the order. Game Plans covers that editor field by field.
The game plan editor covers: Memory in MB, Swap in MB, CPU percent (100 is one full core), Disk in MB (enforced as a filesystem quota), Disk priority, Process ceiling, Player slots, Extra ports, Addressing (a shared address with allocated ports, or a dedicated address per server), Backups kept and a Backup size ceiling in MB, the Catalogue entry the plan is pinned to (see Game Catalogue), Where this plan may be used (locations and nodes) and Available for sale. The card prints the minimum memory the chosen game needs, and turns it red when the plan is below it — a server built from such a plan could only fail to boot, and the save is blocked.
The product's own three fields sit above the plan card: Force this game (overrides the plan's catalogue entry for this product only — leave it on Whatever the plan sells unless one plan is deliberately sold as several games), Extra ports for this product (0–32, added on top of the plan's), and Let the customer pick the game (off by default; with it off, a game sent with an order is ignored).
Once the product has a saved plan, a Placement preview button lists which game nodes could take a server built from that plan and what is in the way everywhere else; Game Nodes explains how that capacity is worked out and why a machine gets refused. If no game node is online, a readiness banner appears at the top of the card: on an active product it warns in amber that an order would invoice, take payment and settle with no server ever created; on an inactive one it is a plain note saying you can configure and price the product now and switch it on once a node is up. Module-wide game behaviour, including the bulk seeds that build a whole storefront of these products at once, lives in Game Settings.
Plugin / Other
Choose the plugin in the Provisioning dropdown and its configuration fields appear beneath, laid out as the plugin defines them (some pull live option lists from the provider once connected). Nothing else is asked for here.
Section 3 — Pricing
Billing Cycles
Only the cycles enabled on the product's category are shown.
| Field | What it does |
|---|---|
| Monthly Price | The base price. Every auto-calculated cycle derives from it, and the editor flags a product without one. |
| Hourly | Appears only when the category enables hourly billing. Blank means monthly ÷ 720. See Hourly Billing for how a service priced this way is charged and suspended. |
| Quarterly / Semi-Annual / Annual | Optional. Blank auto-calculates as monthly × 3, × 6 or × 12; the hint under each box shows the auto figure, and if you type your own price, the percentage difference from it — a discount in green, a premium in red. |
| One-time Setup Fee | Charged once when the service is first provisioned. |
Prices are shown in your own base currency, and the symbol beside each label is that currency's. Reset to auto appears once any non-monthly cycle carries a manual price and clears them all so they fall back to the multiplication.
Prices in other currencies
This card appears only when more than one currency is enabled — on a single-currency install it is not shown at all. It lists each additional enabled currency with a badge reading converted or fixed price. Leave its boxes empty and the storefront quotes a converted price at today's rate — which moves whenever the rate does; the hint under each box shows what today's conversion would be. Type a number and it becomes a fixed price: what the storefront shows and what checkout charges, regardless of the rate. Back to converted clears a currency's fixed prices. The boxes offered are Monthly, the longer cycles your category enables, and Setup Fee; hourly has no box and is always converted from the base price, which the card says out loud.
Available Add-ons
The options a customer can buy with this product, drawn from your active options only. The card header carries a search box and an X/Y counter; below it, category chips (starting with All Categories) narrow the list further. Tick a card to attach the add-on.
Each attached card offers a price override in your base currency, and only for the legs the add-on actually has: a One-time box for one-time and “both” add-ons, a Monthly box for recurring and “both” add-ons. Leave a box empty to charge the catalogue price — the placeholder shows what that price is — type a value to override it for this product only (the card is badged Repriced), and clear the box to go back to the catalogue price.
An add-on that grants a resource — extra RAM, extra IPs, more slots — can only be honoured by the module it was written for, and its card carries a green badge naming what it grants. Add-ons for a different module are hidden from the list by default, with a line saying how many are hidden and a Show anyway button. If one is already attached, it is always shown, in red, with a warning naming the module it grants for and the module this product is, and a one-click Detach. Plain billing add-ons with no resource behind them (a support tier, a setup service) carry no badge and work on every product.
If the bound plugin declares option slugs it expects, a Plugin expects these options box lists each one with its state — attached, not attached (with an Attach button), or missing from catalogue (create it under Options first).
Section 4 — Delivery
Where and how the product is delivered. Cards appear according to type.
- Hardware allocation (dedicated) — Reserve a server from inventory when this is ordered. On, the Allocation engine picks a matching server using the hardware specifications from the Configuration section, which are summarised beside the switch; off, no server is reserved and provisioning has nothing to work on. When on, two more controls appear: Server type (Any — standalone or blade, Standalone only, Blade only) and CPU model must match, a text pattern. Leave the pattern blank unless one CPU model is genuinely required — a wrong pattern makes the product permanently out of stock.
- Available Locations (dedicated, colocation, IP transit, VPS, game) — chips for every active location; tick the ones this product can be ordered in, and a counter shows how many are selected. If you have no locations yet, a link takes you to Locations.
- Location Pricing (VPS and plugin products) — a small table with an Extra / month and an Extra setup box per location, charged on top of the product price when the customer picks that location. Amounts are per month; longer cycles scale automatically (annual is ×12), hourly is derived, and setup fees are waived on hourly. The rows are the product's own selected locations when it has any, otherwise every active location.
- OS Images (dedicated) — choose the operating-system images the product offers at order time and star one as the default, or tick Follow the OS image catalogue to offer every active image automatically, including ones added later. Images are grouped by family with Select all / Deselect all links and an N of M images selected counter; an amber warning appears while none are selected, because a dedicated product with no images cannot be ordered. On a brand-new product this card asks you to save the product first. See OS Images.
- IPAM (dedicated and IP transit; only shown when the IPAM module is enabled) — IPAM Auto-Allocation toggles automatic address allocation on order, with rules beneath it. Each rule has a Purpose (IPMI, Public IP, Transit, Network Management), an Allocation Type (a Number of IPs from a VLAN subnet, or a whole Subnet of a chosen size), an IP version, and optional Allowed VLANs (leave empty for any). When IPAM runs in manual mode a note says the rules act as templates and staff assign addresses by hand. See IPAM.
- Fulfilment (dedicated) — Overwrite Delivery Time, in minutes. When set, customers see this instead of the Allocation engine's estimate.
Section 5 — Upgrade Paths
Which products a customer can move this service to. Available once the product is saved. What a customer or your staff then does with those paths, and how the money is worked out when one is taken, is covered in Upgrades & Downgrades.
- Add Path opens a multi-select of compatible products — those on the same provisioning module, excluding archived ones — with Select all / Deselect all. A note says how many products were left out for being on a different module and why: an upgrade across two provisioning modules cannot be delivered, so it is refused when saved. If nothing else in the catalogue uses this module, the panel says that instead of pretending everything is already configured.
- Wire ladder takes this product, its existing upgrade targets and any products you have ticked — all on the same provisioning module — and links every one to every other, in both directions, ordered by price. Both directions matter: a customer who wants to move down a tier is otherwise left with cancellation as their only option. Paths that already exist keep their fee, option mapping and enabled state; only their position is realigned. A confirmation lists the rungs before anything is written.
- Each path can be edited: Target Product, Upgrade Fee (optional), Execution Mode (Manual or Automated), Notes, and an Option Mapping table that says what happens to each add-on on the way across — Keep as-is, Remove, or map it to an option on the target.
- Paths can be enabled or disabled with the toggle, reordered with the up and down arrows beside their number, or deleted. The numbering is the order customers see on their upgrade screen.
Saving
Create Product or Update Product writes the product, its add-on assignments and price overrides, its OS image selection, and — for VPS and game products — its plan, in one go. If the plan cannot be accepted (the Configuration card shows why in red), the save is refused before anything is written, so a bad plan never costs you a half-created product. Warnings in the footer do not block a save.
Tips and gotchas
- Set up the category first. Billing cycles, hourly billing and the category type all come from the category; the product editor only shows what its category allows.
- Presets drive allocation. If your hardware is named differently from the presets, define equivalences so matching still succeeds, and use the custom escape rather than the nearest preset.
- One plan per product. Editing the plan on a VPS or game product never resizes machines already built from it, and never changes what another product sells — a plan another product owns or shares is copied on save.
- Foreign add-ons cost money. An add-on attached to a product whose module cannot deliver it is on the storefront and grants nothing; checkout refuses it, so the customer meets the error rather than you. The Pricing section calls these out — detach them.
- Archive, do not delete. Deleting or force-deleting a product with history removes its orders and services with it. Archiving keeps everything and hides the product.
- The count tiles reflect what you can see. Filters and disabled modules hide rows; use Clear filters to reset.
Related
Product Categories, Product Options, Upgrades & Downgrades, VPS Plans, Game Plans, Allocation & Equivalences, Customize Order Page, OS Images, IPAM, Locations, Orders, Services.