
Departments
Create support departments to route tickets, scope which staff see them, set per-department permissions, and connect a mailbox for email-to-ticket.
What departments are for
Departments are the buckets your support tickets are routed into — for example Billing, Sales, Technical Support or Abuse. Each department controls which staff members can see and work its tickets, what those staff are allowed to do inside it, whether customers can pick it when opening a ticket, and optionally a connected mailbox that turns incoming email into tickets automatically. A department is also the destination you nominate for conversations arriving through Live Chat.
How to open the Departments page
Open Settings from the admin sidebar, then under the Organization group choose Departments. This tab is available to Super Admins only — other staff do not see it in the settings menu.
Reading a department card
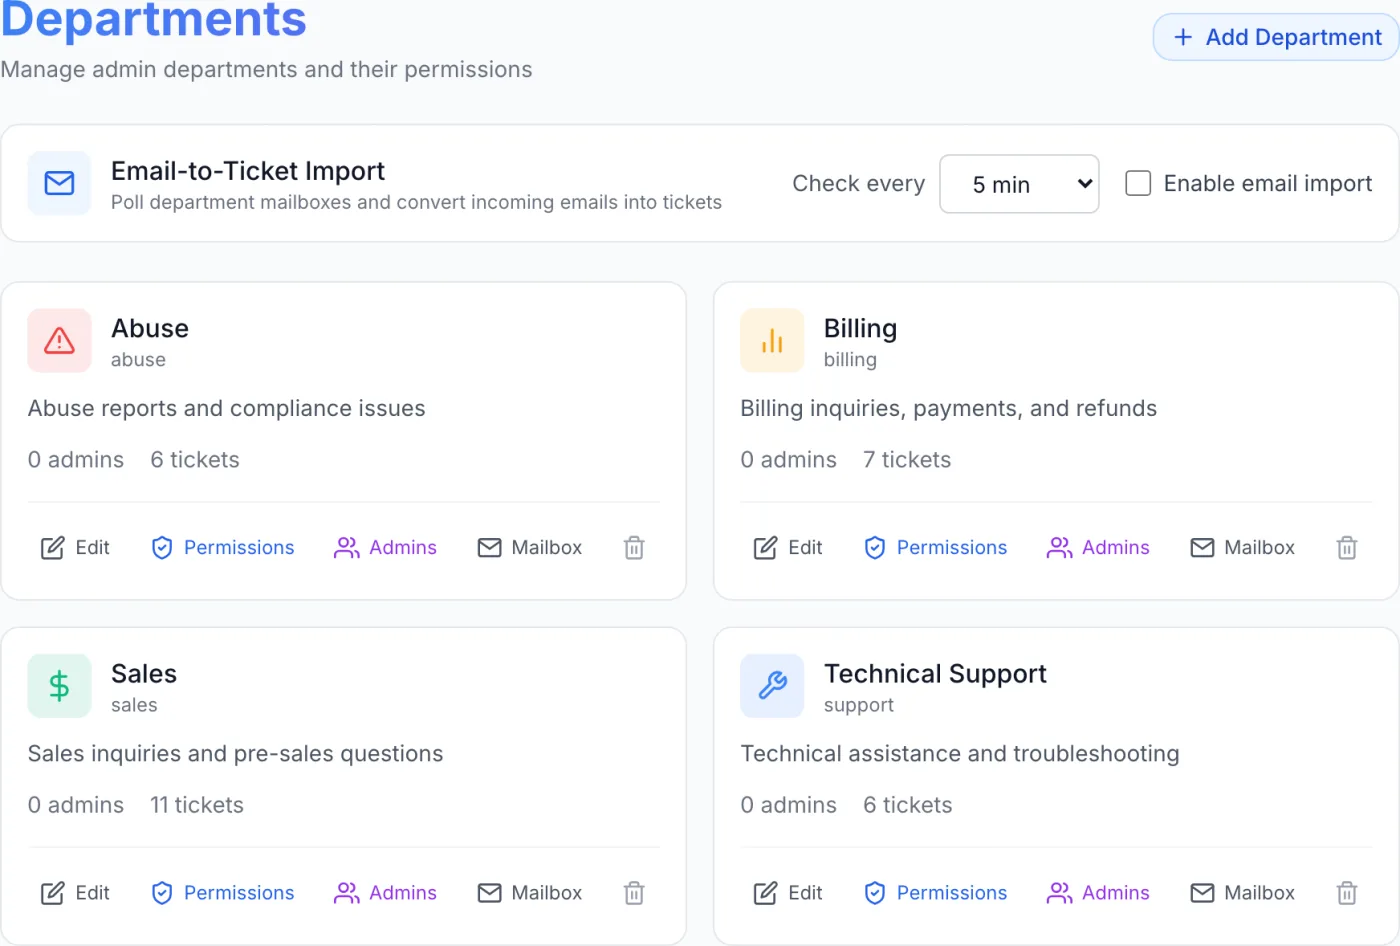
Departments are shown as cards in a grid, and inactive ones are listed alongside active ones. Each card displays the department’s coloured icon, its name, its slug (the short identifier printed just under the name), an optional description, and two counts: how many admins are assigned and how many tickets currently belong to it. A department that has been switched off is dimmed and carries a grey Inactive badge.
Along the bottom of each card are the action buttons: Edit, Permissions, Admins, Mailbox, and a trash icon to delete. The Mailbox button is shown in green when that department has a mailbox connected and switched on.
Create a department
- Click Add Department in the top-right of the page.
- Enter a Name (for example,
Billing). As you type, the Slug is filled in for you. - Adjust the Slug if you wish. Lowercase letters, numbers and hyphens only — the form refuses anything else. Keep it short.
- Optionally add a Description to explain what the department handles.
- Pick an Icon from the grid and a Color from the eight swatches. These appear on the card and on tickets so departments are easy to tell apart at a glance.
- Leave Active ticked so the department is usable. Leave Visible to Clients ticked if customers should be able to pick this department when they open a ticket from the client panel; untick it to keep the department internal-only. Both are ticked by default.
- Click Create.
Department fields reference
| Field | What it does |
|---|---|
| Name | The label shown on the card, on tickets, and — if the department is visible — to customers. Required. |
| Slug | A short, stable identifier. Lowercase letters, numbers and hyphens only. Filled in from the name while you are creating a department; from then on you edit it yourself. |
| Description | Optional free text describing the department’s purpose. Shown on the card. |
| Icon | An icon chosen from a grid of around seventy, shown on the card and on tickets. |
| Color | One of eight accent colours used to tint the icon and its badge. |
| Active | When on, the department is in use. Turn it off to retire a department without deleting it; it dims and shows an Inactive badge, and it stops appearing in the pickers on the Tickets settings tab. |
| Visible to Clients | When on, customers can select this department when opening a ticket. Turn it off for internal-only departments. |
Warning: Changing a slug after the fact breaks anything that already refers to the department by that short identifier. Rename the display name freely, but change the slug only when you have a clear reason.
Edit a department
Click Edit on a card to reopen the same window pre-filled with the current values. You can rename the department, rewrite the description, change the icon or colour, and switch Active or Visible to Clients. Editing the name does not rewrite the slug. Click Update to save, or Cancel to discard.
Assign staff with Admins
Staff only see tickets in departments they belong to, so attaching the right people is essential.
- Click Admins on the department card to open the Manage Admins window.
- Pick a person from the Select an admin to add… dropdown and click the + button. Each entry shows the person’s name and email, and Super Admins are labelled in the list.
- The people you have added appear below under an Assigned Admins heading with a count. Use the trash icon beside a person to remove them; you are asked to confirm first.
When everyone available is already attached, the dropdown is replaced by a note saying so. Click Close when you are done — each addition and removal is saved as you make it.
Tip: An admin who is not attached to any department will not see departmental tickets. If a staff member reports they cannot see tickets, check their department membership here first.
Set permissions per department
Permissions decide what assigned staff are allowed to do within this department.
- Click Permissions on the card to open the Manage Permissions window.
- Permissions are grouped into categories. Tick individual permissions, or use the checkbox on a category header to select or clear every permission in that group at once. A category with only some of its permissions ticked shows a dash instead of a check.
- Click Save Permissions to apply, or Cancel to close without changing anything.
The list on offer is drawn from the permissions your installation supports, so it reflects the ticket-handling capabilities actually available to you. Staff & Permissions lists what each permission grants and how it interacts with a staff member’s role.
Connect a mailbox (email-to-ticket)
A department can have its own mailbox, so that emails customers send become tickets, replies in the same conversation are added to the existing ticket, and staff replies are emailed back to the sender. Click Mailbox on a card to open the Department Mailbox window; the department’s name is shown under the title.
- Enter the Email Address customers will write to. Staff replies use it as the Reply-To address.
- Choose an Authentication method: OAuth 2.0 (recommended) or Password.
- Fill in the credentials for the method you picked (see the table below).
- Optionally change the Folder that is polled (it starts on
INBOX) and the Default Priority given to tickets created from this mailbox: Low, Medium, High or Urgent. - Leave Import enabled ticked so the mailbox is polled.
- Click Test Connection to confirm the settings work — it becomes available once you have entered an address — then click Save Mailbox.
Once a mailbox has been saved, two more controls appear beside Test Connection: Sync Now, which pulls mail immediately and reports how many tickets were created and how many replies were imported, and a trash icon that removes the mailbox. If the last poll failed, a red banner at the top of the window shows the error; the time of the last successful sync is shown just above the buttons.
Mailbox fields reference
| Field | Applies to | What it does |
|---|---|---|
| Email Address | All | The address customers email; also the Reply-To on staff replies. Required. |
| OAuth Provider | OAuth 2.0 | Choose Gmail / Google Workspace or Microsoft 365 / Outlook. |
| Directory (tenant) ID | Microsoft | The directory identifier of your Microsoft organisation, copied from the app registration’s Overview page. The field is labelled exactly as Microsoft labels it, and appears only for the Microsoft provider. |
| Client ID / Client Secret | OAuth 2.0 | The application credentials you create with your mail provider. |
| Refresh Token | The token that lets the platform keep reading the mailbox. Shown only for the Google provider. | |
| Email Provider | Password | Pick a preset — Gmail / Google Workspace, Outlook / Microsoft 365, Yahoo Mail, iCloud Mail, Zoho Mail, Fastmail, GMX, or Other (custom IMAP server). Known presets fill in the server details for you and hide them. |
| IMAP Host / Port / Use SSL/TLS | Password, custom only | Shown only when the provider is the custom option; enter your own mail server details. The port starts at 993. |
| Username / Password | Password | The mailbox login. Several of the presets require an app-specific password rather than your normal login, and say so in an amber note when you pick them. |
| Folder | All | Which folder to poll for new mail. Starts on INBOX. |
| Default Priority | All | Priority given to tickets created from this mailbox: Low, Medium, High or Urgent. |
| Import enabled | All | Turns polling on or off for this mailbox without deleting its settings. |
Note: OAuth 2.0 is recommended because basic mailbox passwords are being withdrawn by the large providers. For Google, create OAuth credentials with full-mailbox access and generate a refresh token for this mailbox. For Microsoft, register an application and grant it the Mail.ReadWrite application permission with administrator consent — mail is then read over the provider’s own interface, so no server address or port is needed. The window shows these reminders inline when you select each provider.
Tip: Secrets are write-only. Once saved, the password, client secret and refresh token are not shown back to you — their boxes read “Leave empty to keep current”. Leave them blank to keep the stored value, or type a new value to replace it.
Email import polling
At the top of the Departments page sits the Email-to-Ticket Import card. It controls how often all department mailboxes are checked. Use the Check every dropdown to choose an interval — 1, 2, 5, 10, 15, 30 or 60 minutes — and tick Enable email import to switch polling on. Both controls save the moment you change them and apply to every mailbox.
Delete a department
Click the trash icon on a card. A short confirmation appears — click Yes, Delete. If the department still holds tickets, that confirmation is replaced by a second window that tells you how many there are and asks what to do with them:
- Move tickets to another department — the tickets are reassigned and preserved. Pick the destination from the Move to department dropdown.
- Delete all tickets — every ticket and message in the department is permanently deleted.
Choose an option and click Delete Department to finish.
Tip: If you only want to take a department out of rotation, untick Active in Edit instead of deleting it. That keeps its history intact while hiding it from new tickets.
Related
Tickets settings, Tickets, Staff & Permissions, Live Chat, Admin Signatures, Email.