
Virtualizor Integration: Setup Guide
Connect FluxBilling to Virtualizor and sell its plans: API key pair, plugin install, connection, category and products, IPv4 add-on, test order, billing lifecycle and troubleshooting.
The Virtualizor plugin connects FluxBilling to the admin API of your Virtualizor panel, so you can sell Virtualizor plans as FluxBilling products. FluxBilling takes the order, sends the invoice and collects the payment. When the invoice is paid, the plugin creates the VPS in Virtualizor, and the customer manages it from the FluxBilling client area. The plugin is free and is listed in the plugin marketplace of every FluxBilling panel. Your Virtualizor installation and licence stay as they are.
This guide covers plugin version 5.5. It walks through the setup in the order you do it, then explains what happens to a VPS over its life and what to check when something does not work.
Who supports this integration. The plugin is built and maintained by FluxBilling. If something does not work, contact FluxBilling support at contact@fluxbilling.app or through fluxbilling.app/contact. Questions about Virtualizor itself, its licence or its servers go to Virtualizor support.
What you need before you start
- A working Virtualizor installation with its admin panel on port 4085.
- At least one plan in Virtualizor. The plan sets the CPU, RAM, disk, bandwidth and virtualisation type of the VPS.
- At least one server group containing an online server that supports the plan's virtualisation type. Recent Virtualizor versions call server groups Hypervisor Groups / Regions. In FluxBilling, each server group is a location your customers can choose.
- An IP pool attached to those servers, with free IPv4 addresses. The plugin takes addresses from Virtualizor's IP pools.
- The OS templates you want to sell, downloaded in Virtualizor.
- Network access from your FluxBilling panel to the Virtualizor admin panel on port 4085. For the VNC console, FluxBilling also needs to reach the VNC address and port that Virtualizor reports for each VPS (see VNC console).
Step 1: Create an API key pair in Virtualizor
The plugin signs every request with a Virtualizor admin API key and API password. We recommend a separate key pair for FluxBilling, so you can restrict it and replace it without touching anything else.
- In the Virtualizor admin panel, open API Credentials and choose Create API Pair.
- Select the user that will own the pair, for example yourself.
- IP Address is optional. To allow only your FluxBilling panel, enter the public IP address it connects from. Leave it empty if you are not sure which address that is, or ask FluxBilling support.
- Choose the permissions. The pair must be allowed to run every API action in the table below. If you are not sure which permissions cover them, allow all actions.
- Click Generate API Pair. Virtualizor does not show the new key in the confirmation. Open the list of API credentials and copy the API key and API password from there.
Virtualizor documents both screens, with pictures: Create API Pair and List API Credentials. You can also use the default key pair shown on Virtualizor's Server Info page.
| Action | Used for |
|---|---|
plans, servergroups, ostemplates | Filling the plan, location and operating system lists in the product editor and on the order form |
users, adduser | Finding the customer's Virtualizor user by email, or creating it |
servers, ippool, ips | Choosing the server and the free IPv4 addresses for a new VPS |
addvs | Creating the VPS |
vs | VPS details, start, stop, restart, suspend, unsuspend and delete |
managevps | Live usage figures, and plan changes |
vnc | VNC console details |
rebuild | Reinstalling the operating system |
editvs | Setting a new root password |
Step 2: Install the plugin
- In the FluxBilling admin panel, open Settings (the gear icon in the top bar).
- Under Integrations, open Marketplace. Stay on the Browse tab.
- Open the Virtualizor card and click Get for Free.
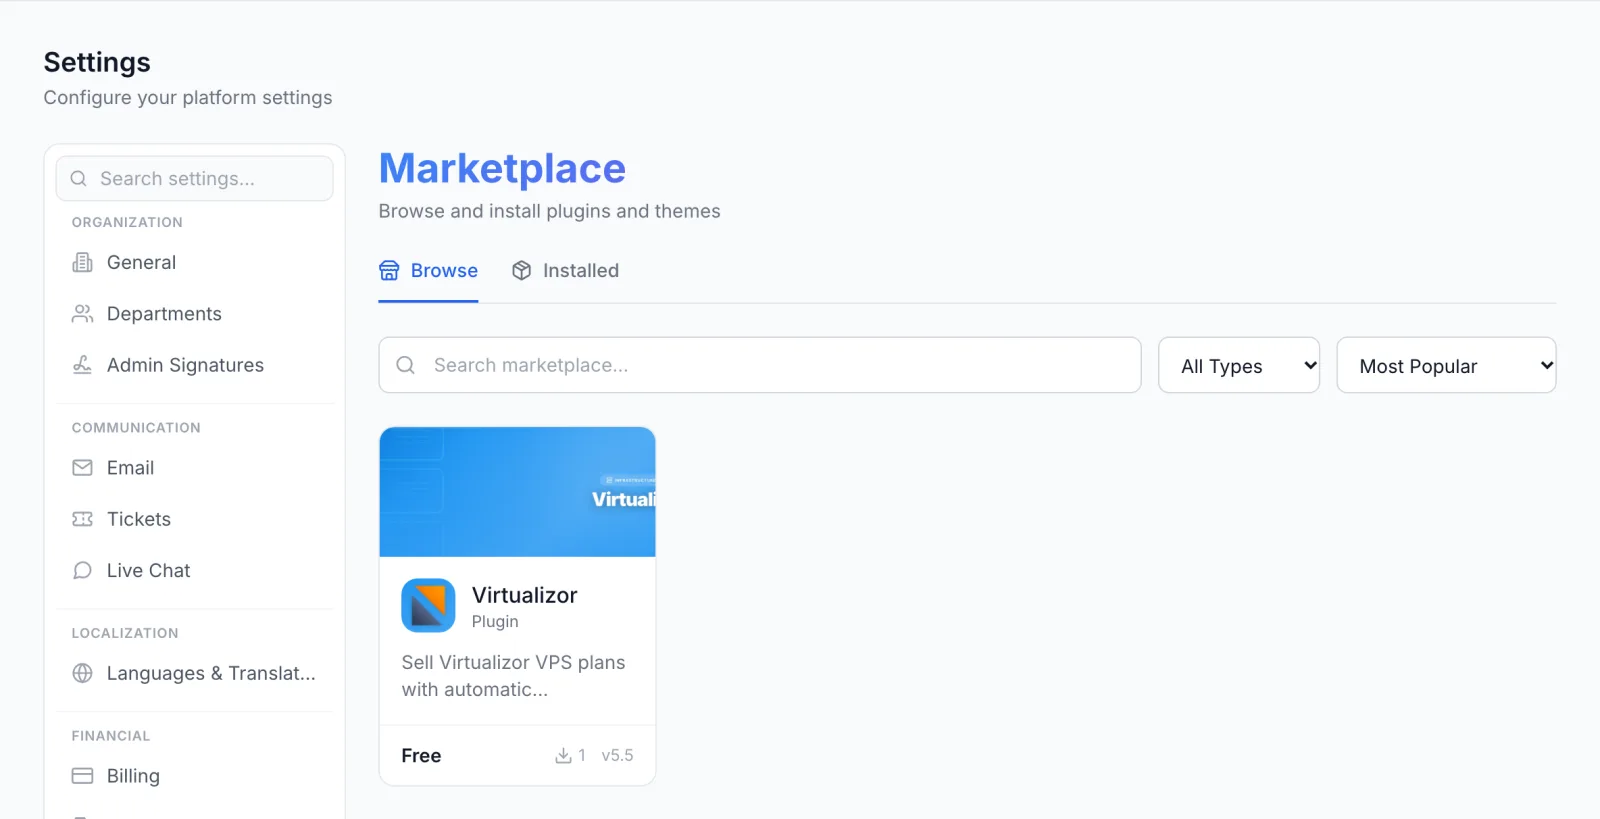
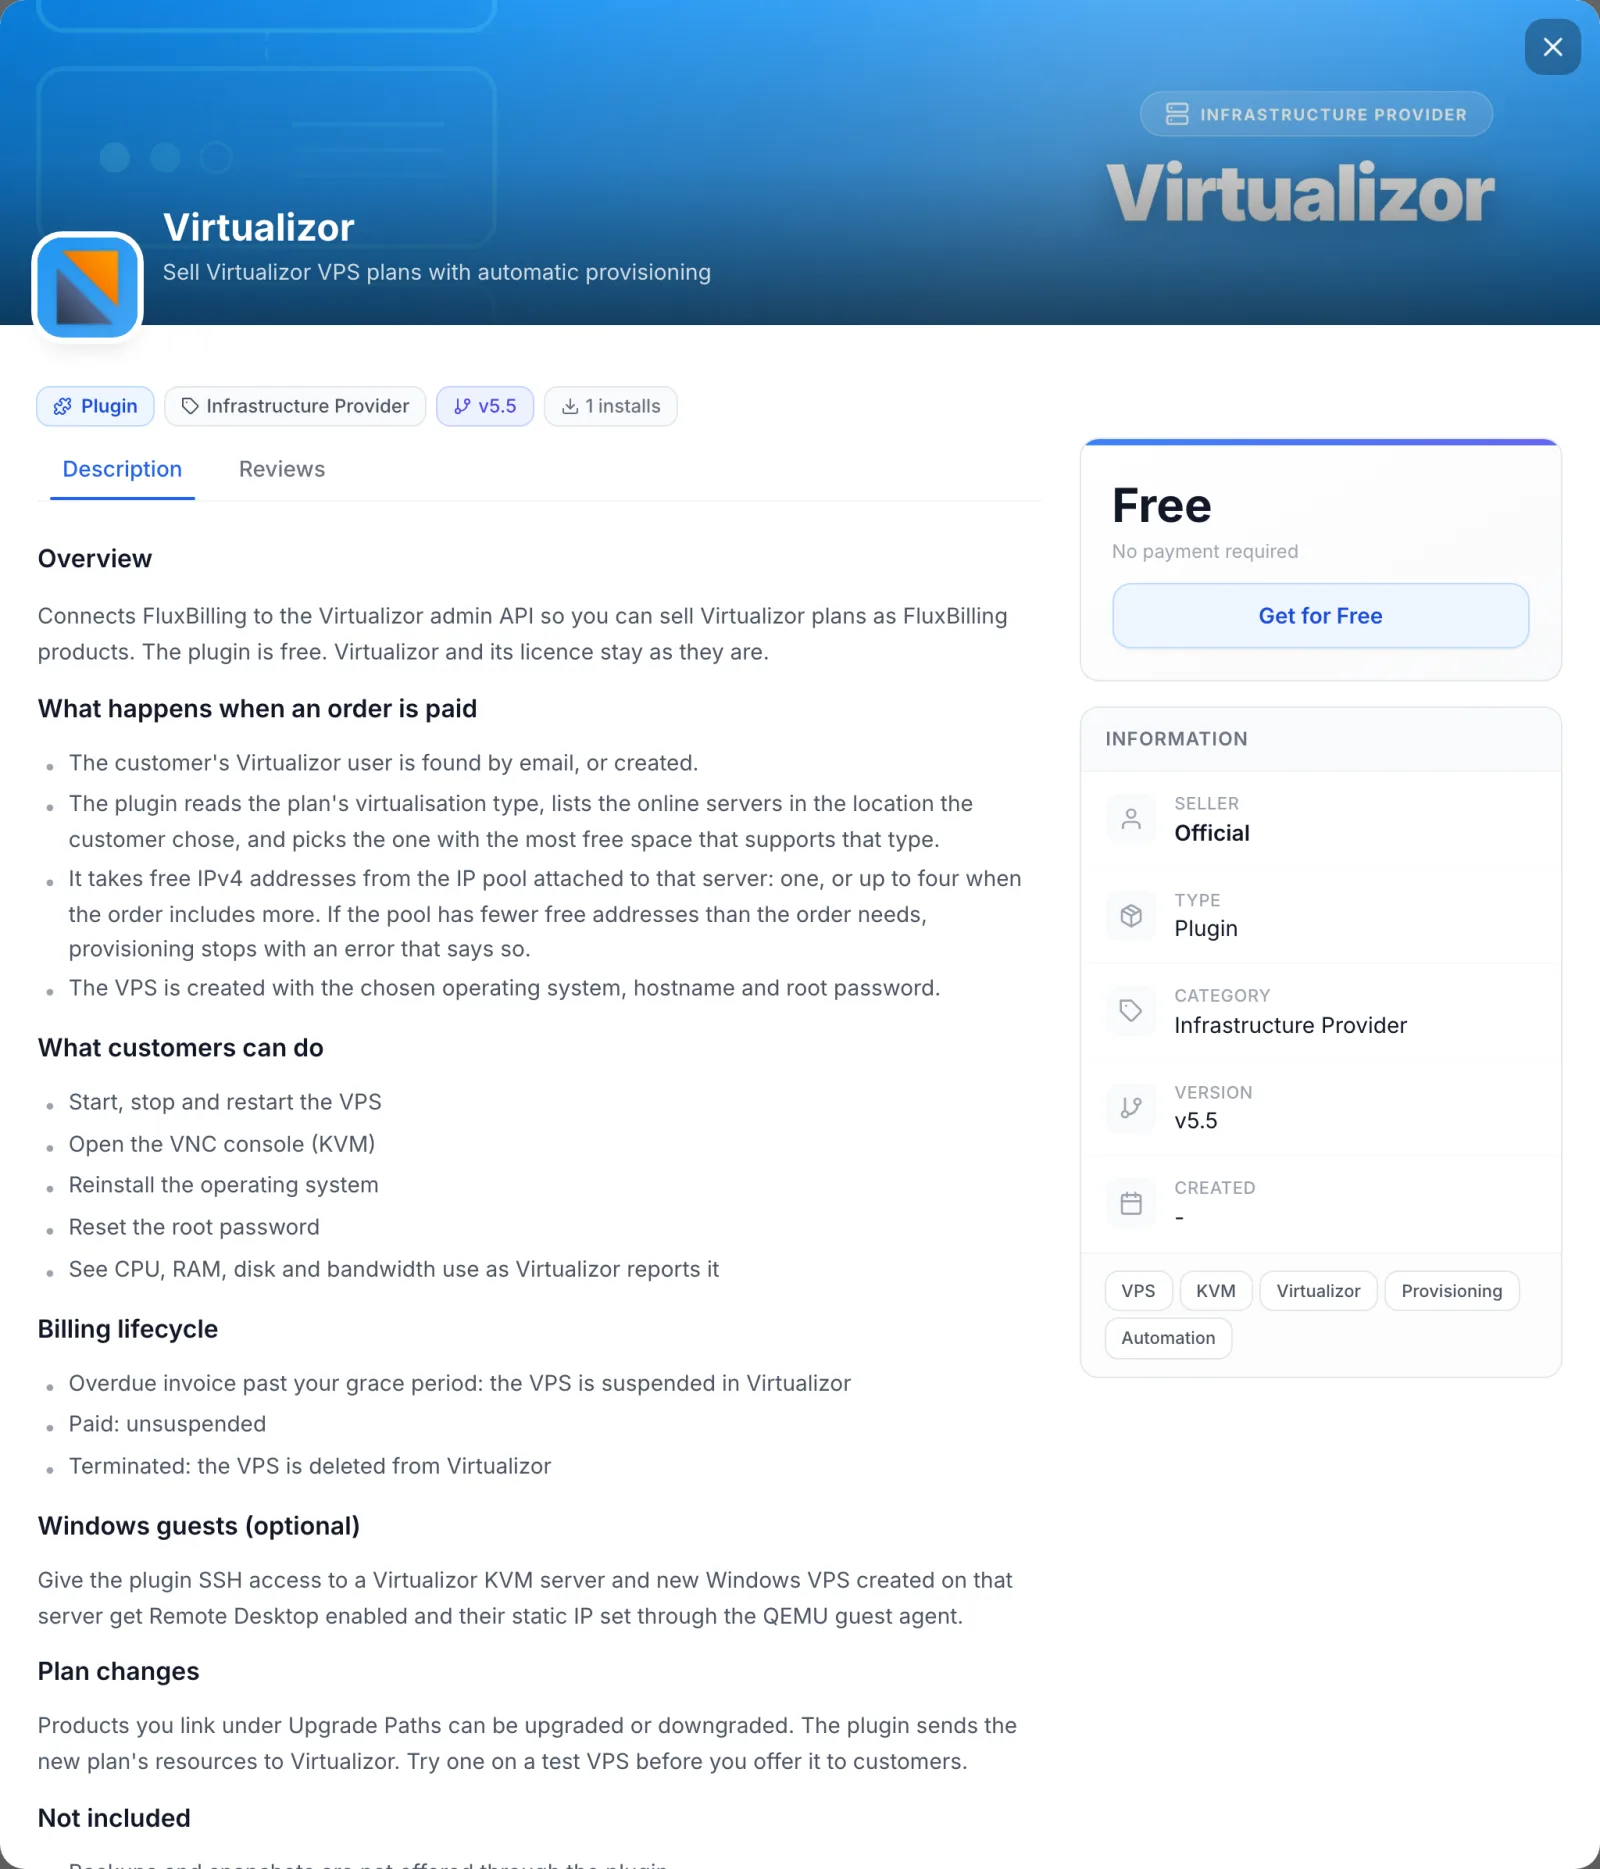
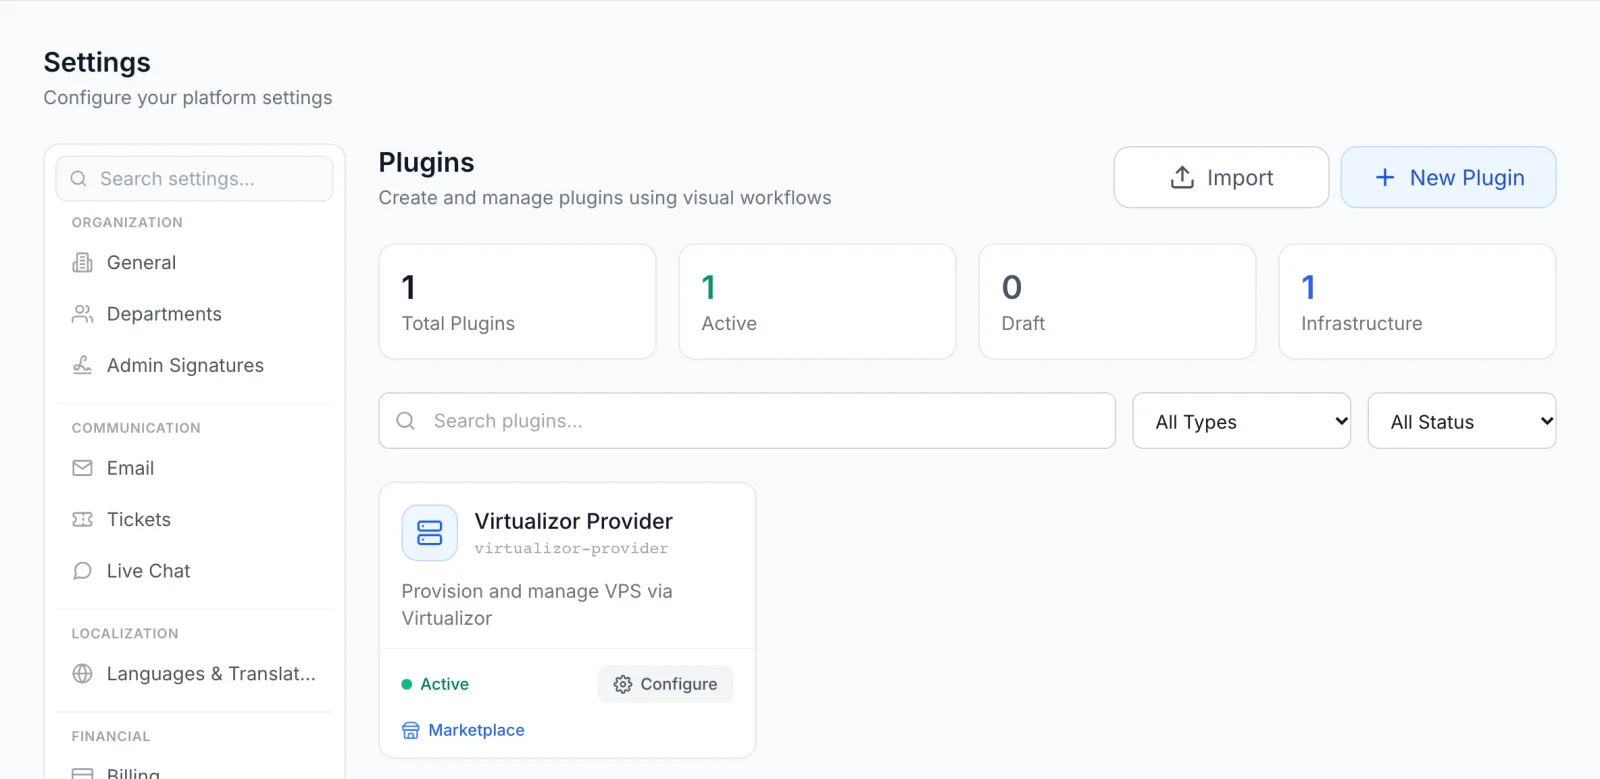
FluxBilling confirms with Plugin "Virtualizor" installed and ready to use. The plugin is switched on straight away and appears under Settings → Integrations → Plugins as Virtualizor Provider, marked Active.
Step 3: Connect it to Virtualizor
- Open Settings → Integrations → Plugins.
- On the Virtualizor Provider card, click Configure.
- Fill in the fields below and click Save Configuration.
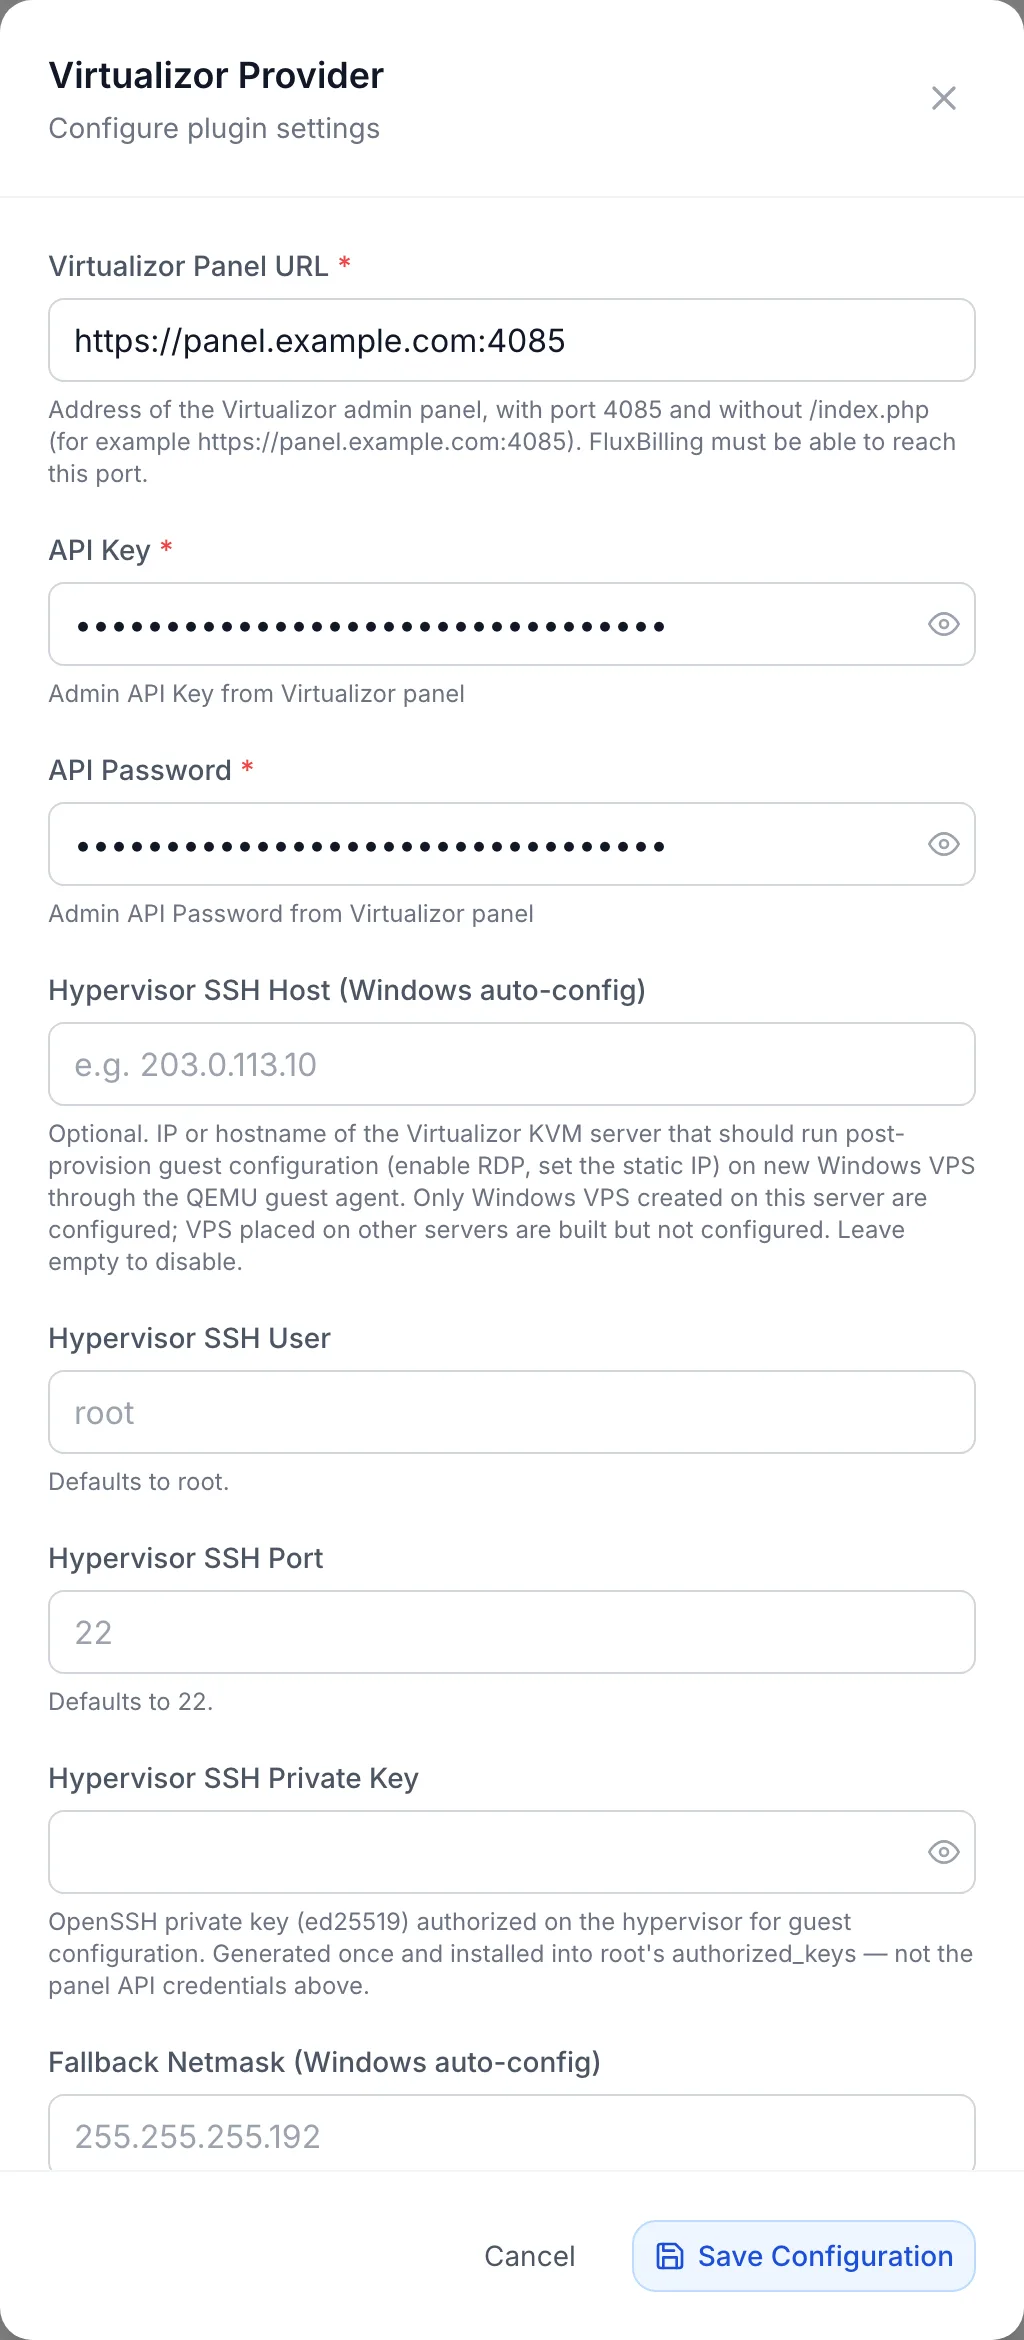
| Field | What to enter |
|---|---|
| Virtualizor Panel URL (required) | The address of your Virtualizor admin panel with port 4085, without /index.php. For example https://panel.example.com:4085. A self-signed certificate on that port is accepted. |
| API Key (required) | The API key from step 1. |
| API Password (required) | The API password from step 1. |
| Hypervisor SSH fields and Fallback Netmask, Gateway and DNS (optional) | Only for setting up new Windows VPS automatically. Leave them empty if you do not sell Windows. See Windows VPS. |
The API key and password are stored encrypted. FluxBilling shows Configuration saved successfully when the settings are saved. If a required field is missing or the URL is not valid, it saves the form but tells you the plugin is not configured until you fix the field it names.
The dialog has no connection test. The quickest check is step 5: when the Plan list in the product editor fills with your Virtualizor plans, FluxBilling can reach Virtualizor and the key pair works.
Step 4: Create a category for your Virtualizor products
In FluxBilling, the category decides how its products are delivered. Every product in the category is built by the plugin you choose here.
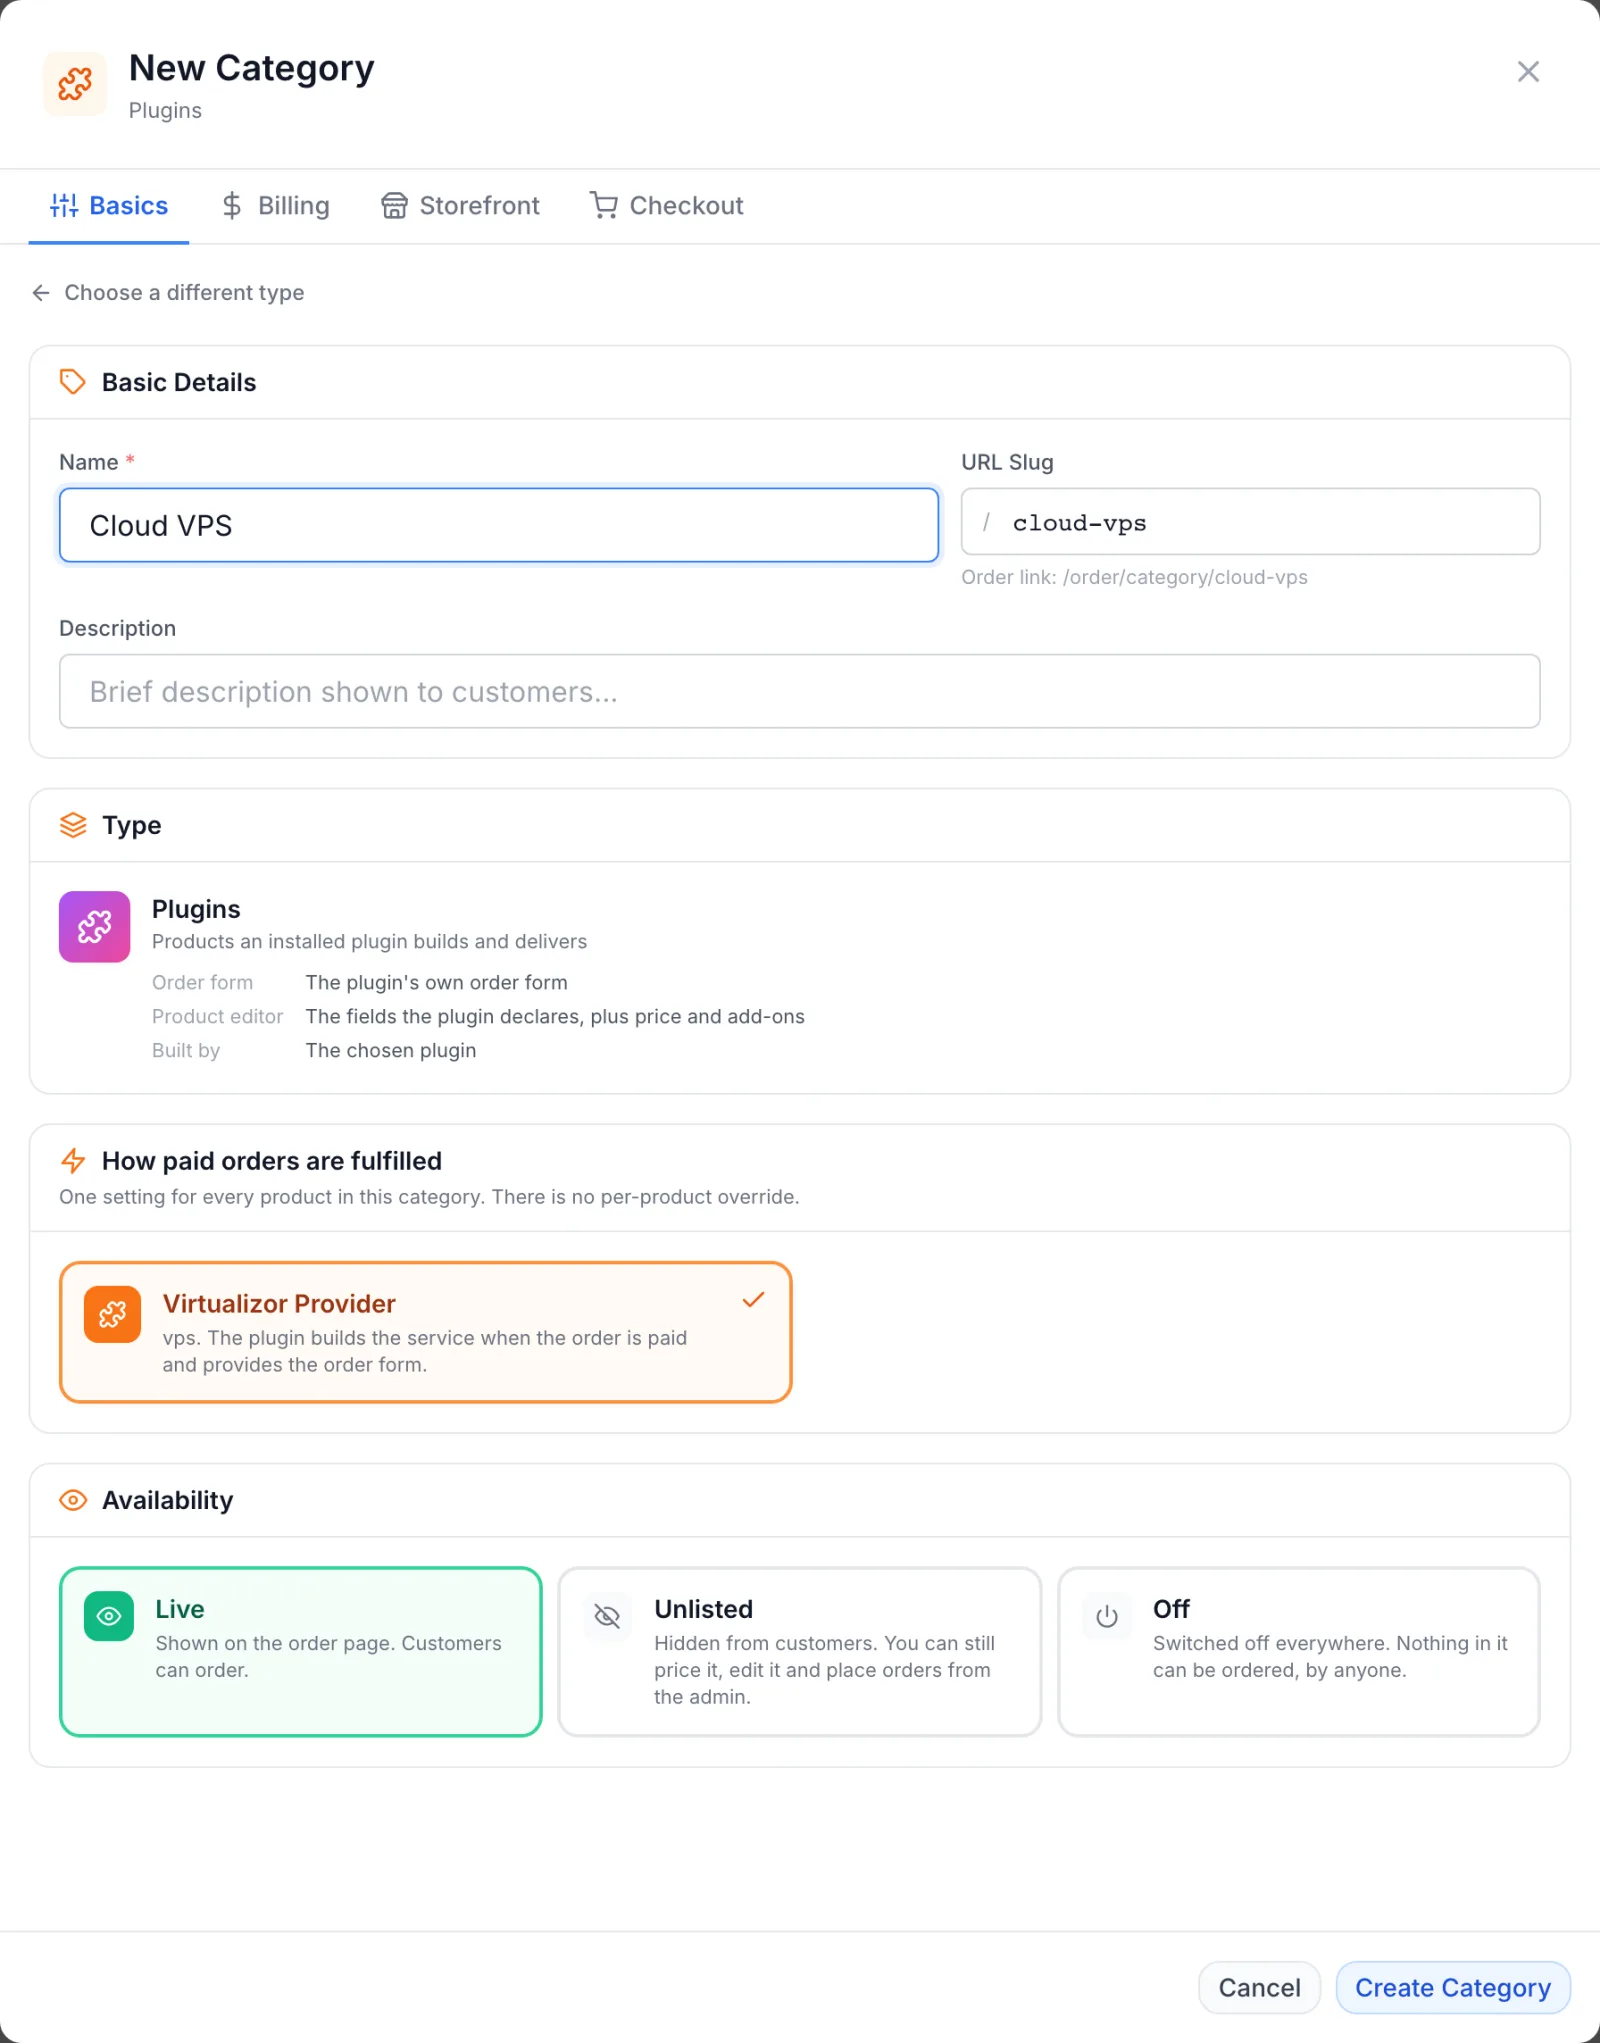
- Open Products, switch to the Categories tab and click Add Category.
- When FluxBilling asks What does this category sell?, choose Plugins. Do not choose VPS: that type is FluxBilling's own KVM module, not Virtualizor.
- Enter a Name. The URL slug fills in by itself.
- Under How paid orders are fulfilled, click Virtualizor Provider.
- Under Availability, choose Live to show the category on the order page, or Unlisted while you test.
- Click Create Category.
Step 5: Create a product for each Virtualizor plan
- On the Products tab, click Add Product and choose the category from step 4.
- On General, enter the product name and description your customers will see.
- On Configuration, fill in the Virtualizor fields described below.
- On Pricing, set the price. Prices, billing cycles, taxes and add-ons all live in FluxBilling. Only the plan, locations and operating systems come from Virtualizor.
- Click Create Product.
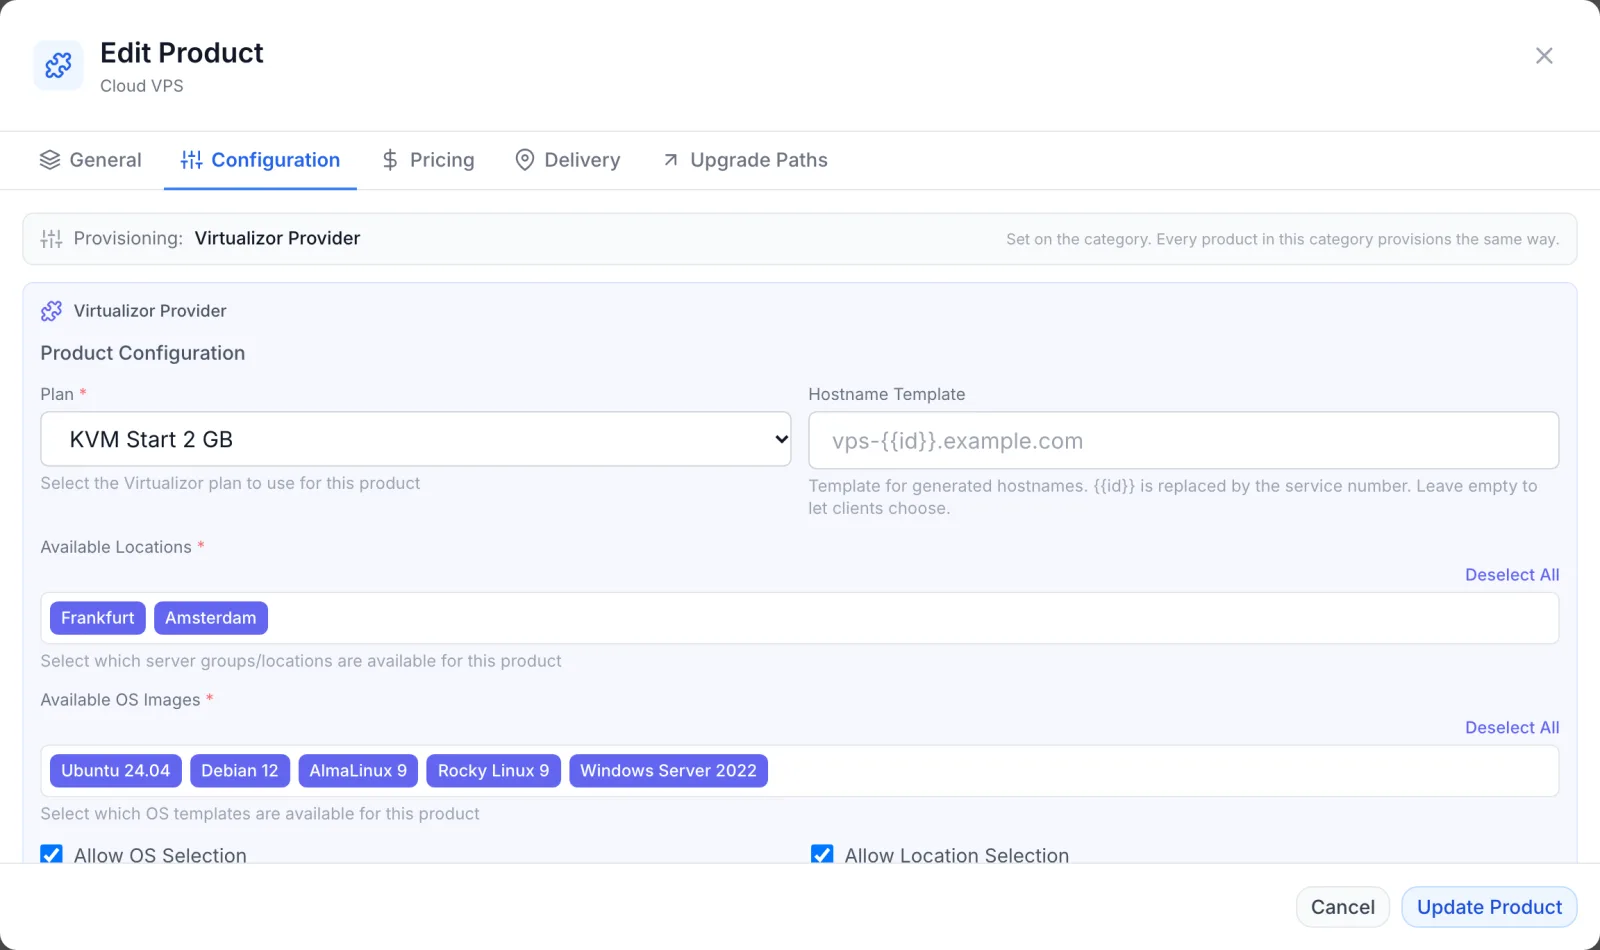
| Field | What it does |
|---|---|
| Plan | The Virtualizor plan this product builds. CPU, RAM, disk, bandwidth and virtualisation type come from the plan. |
| Hostname Template | Optional. When set, FluxBilling generates the hostname and the customer is not asked for one. {{id}} is replaced by the service number, so vps-{{id}}.example.com becomes for example vps-1042.example.com. Leave it empty to let customers enter a hostname. |
| Available Locations | The Virtualizor server groups customers can order in. |
| Available OS Images | The OS templates customers can choose at checkout. The list only shows templates that match the plan's virtualisation type. |
| Allow OS Selection | On: the customer picks the operating system. Off: the order form hides the choice and the first OS image in the product's list is used. |
| Allow Location Selection | On: the customer picks the location. Off: the order form hides the choice and the first location in the product's list is used. |
| Auto-generate Password | On: the order form does not ask for a root password and FluxBilling generates one. Off: the customer sets the root password at checkout. |
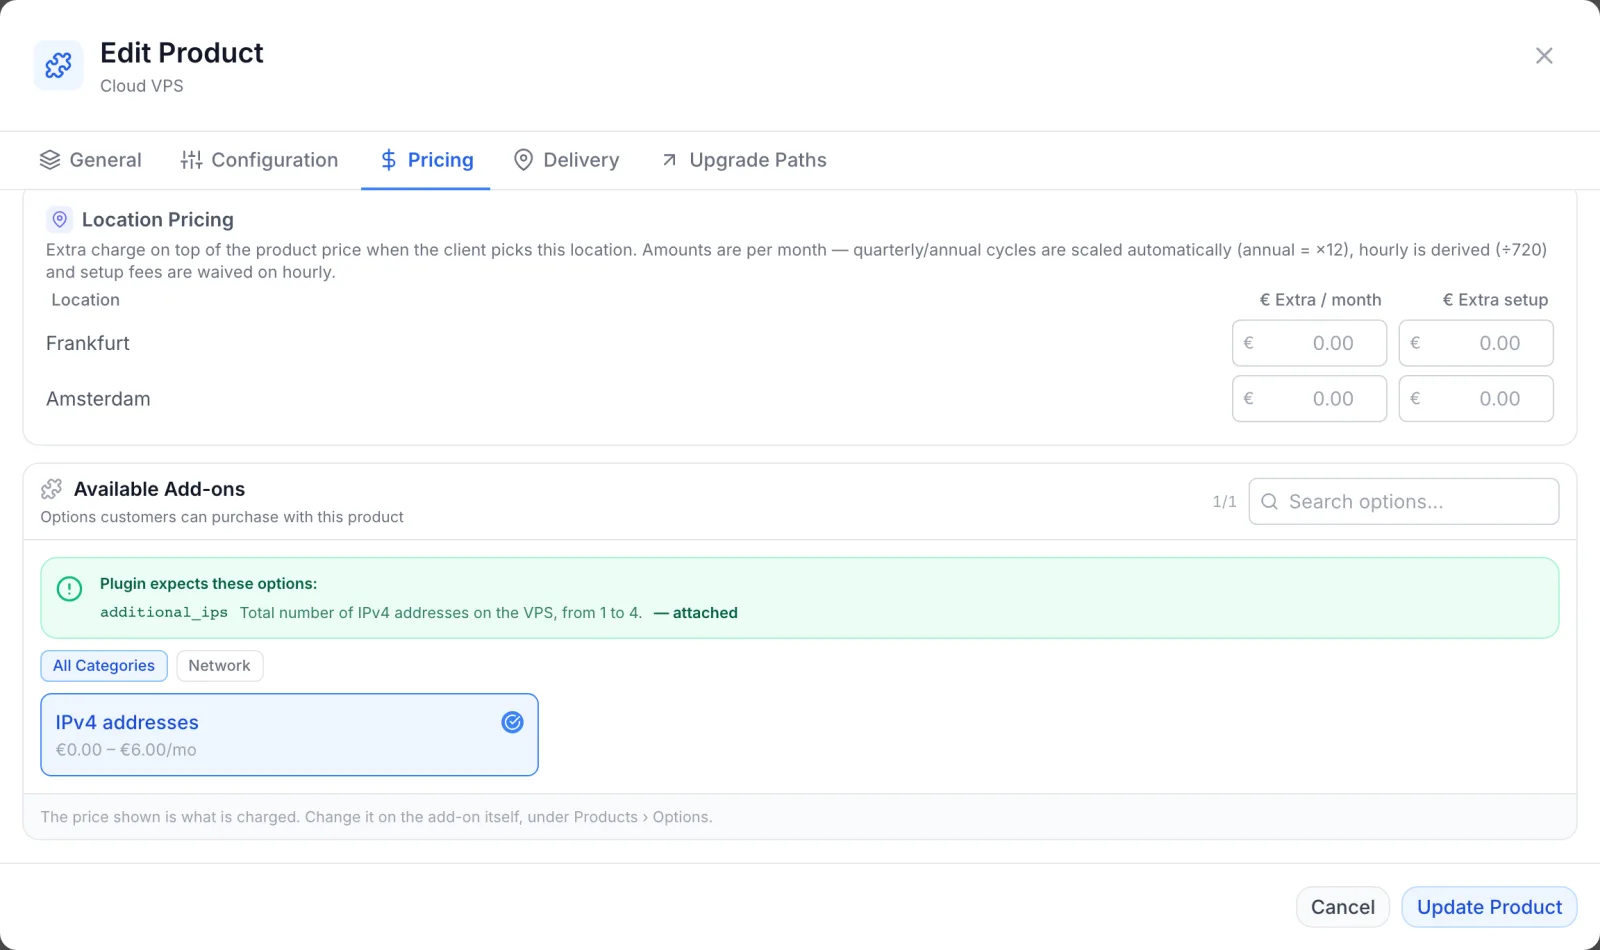
The Pricing tab also lists your locations under Location Pricing, so you can charge extra for a location, and shows the add-on the plugin understands (see the next step).
Step 6 (optional): Sell more IPv4 addresses
Each VPS gets one IPv4 address. To let customers order more, up to four in total, create one add-on and attach it to your Virtualizor products.
- Open Products, switch to the Options tab and click Add Option.
- Enter an Option Name such as IPv4 addresses.
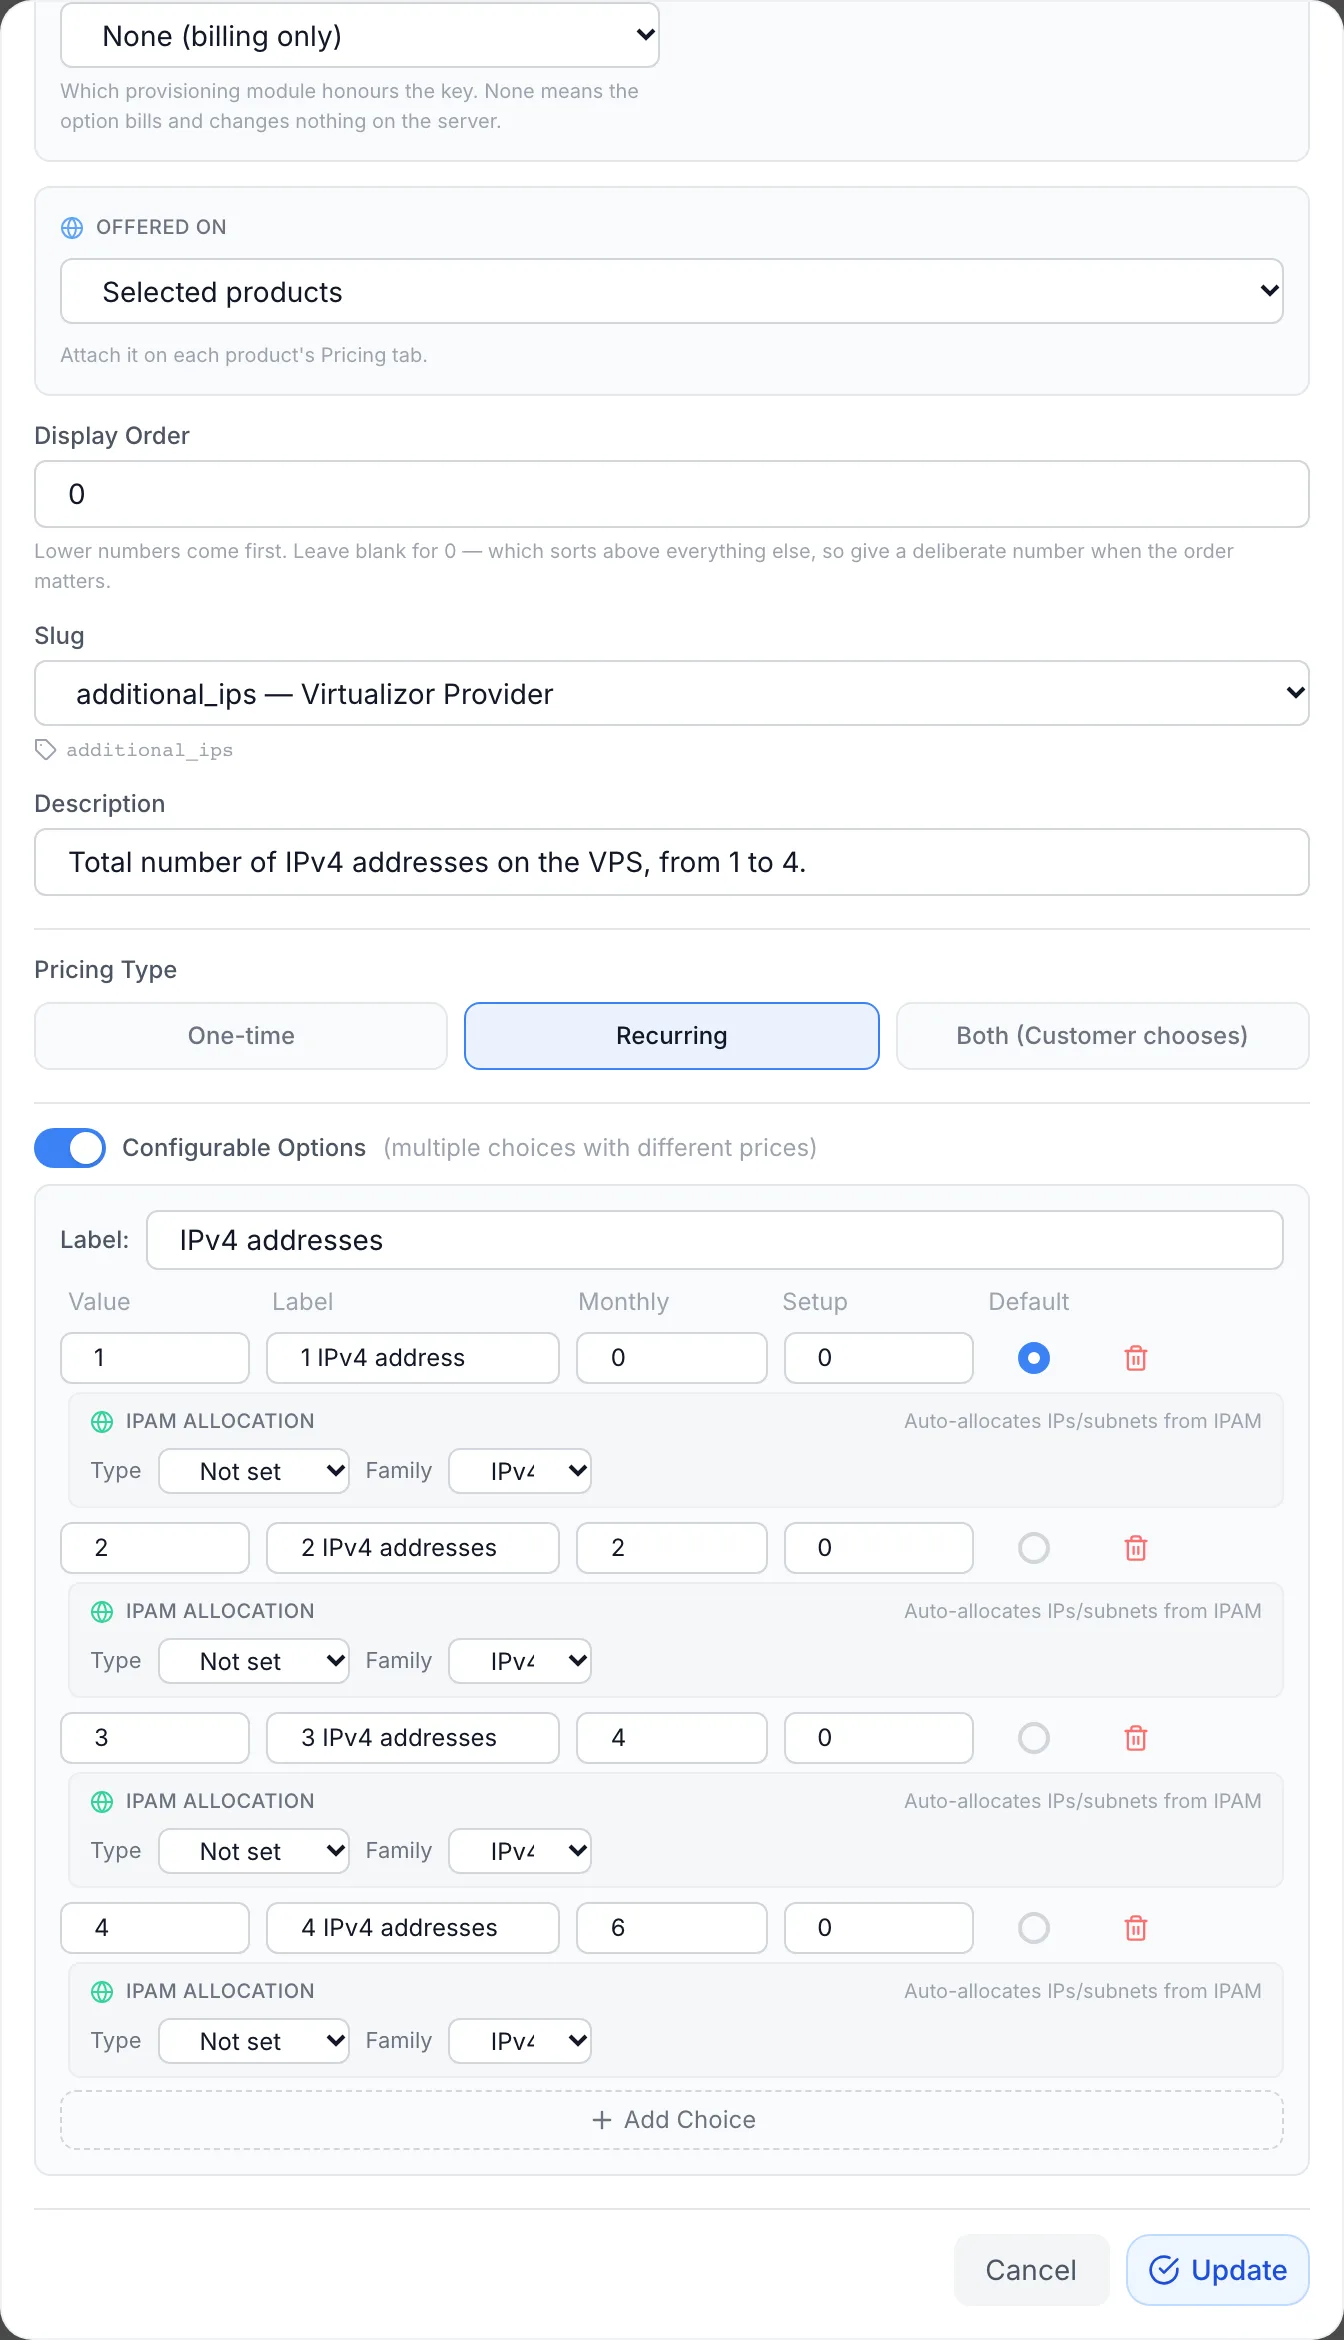
- Under Slug, choose additional_ips — Virtualizor Provider. This is the name the plugin reads. A different slug is not seen by the plugin.
- Leave Spec Service on None (billing only).
- Choose a Pricing Type, then switch on Configurable Options.
- Add one choice per address count. The Value is the total number of IPv4 addresses on the VPS, from 1 to 4. So
1means the main address only and2means one extra address. Give each choice its label and price. - Leave IPAM Allocation on each choice set to Not set. The plugin takes these addresses from Virtualizor's own IP pools.
- Click Create.
- Open each Virtualizor product, go to Pricing and use Attach under Plugin expects these options, or select the add-on in the list. It then shows as attached.
- Values above 4 are treated as 4.
- An add-on without configurable choices always counts as 1, so it adds no address.
- The addresses come from the IP pool of the server the VPS is built on. If that pool has fewer free addresses than the order needs, the build stops with an error and no VPS is created. The customer's Virtualizor user may already have been created at that point. See Troubleshooting.
The add-on takes effect when the VPS is built. Customers can change it later from the service page, and FluxBilling then bills the new choice, but the plugin does not add or remove addresses on an existing VPS. When a customer changes it, add or remove the addresses for that VPS in Virtualizor yourself.
Step 7: Place a test order
Place an order for each product before you sell it, for example from a test client account. This is what the customer sees on the order page:
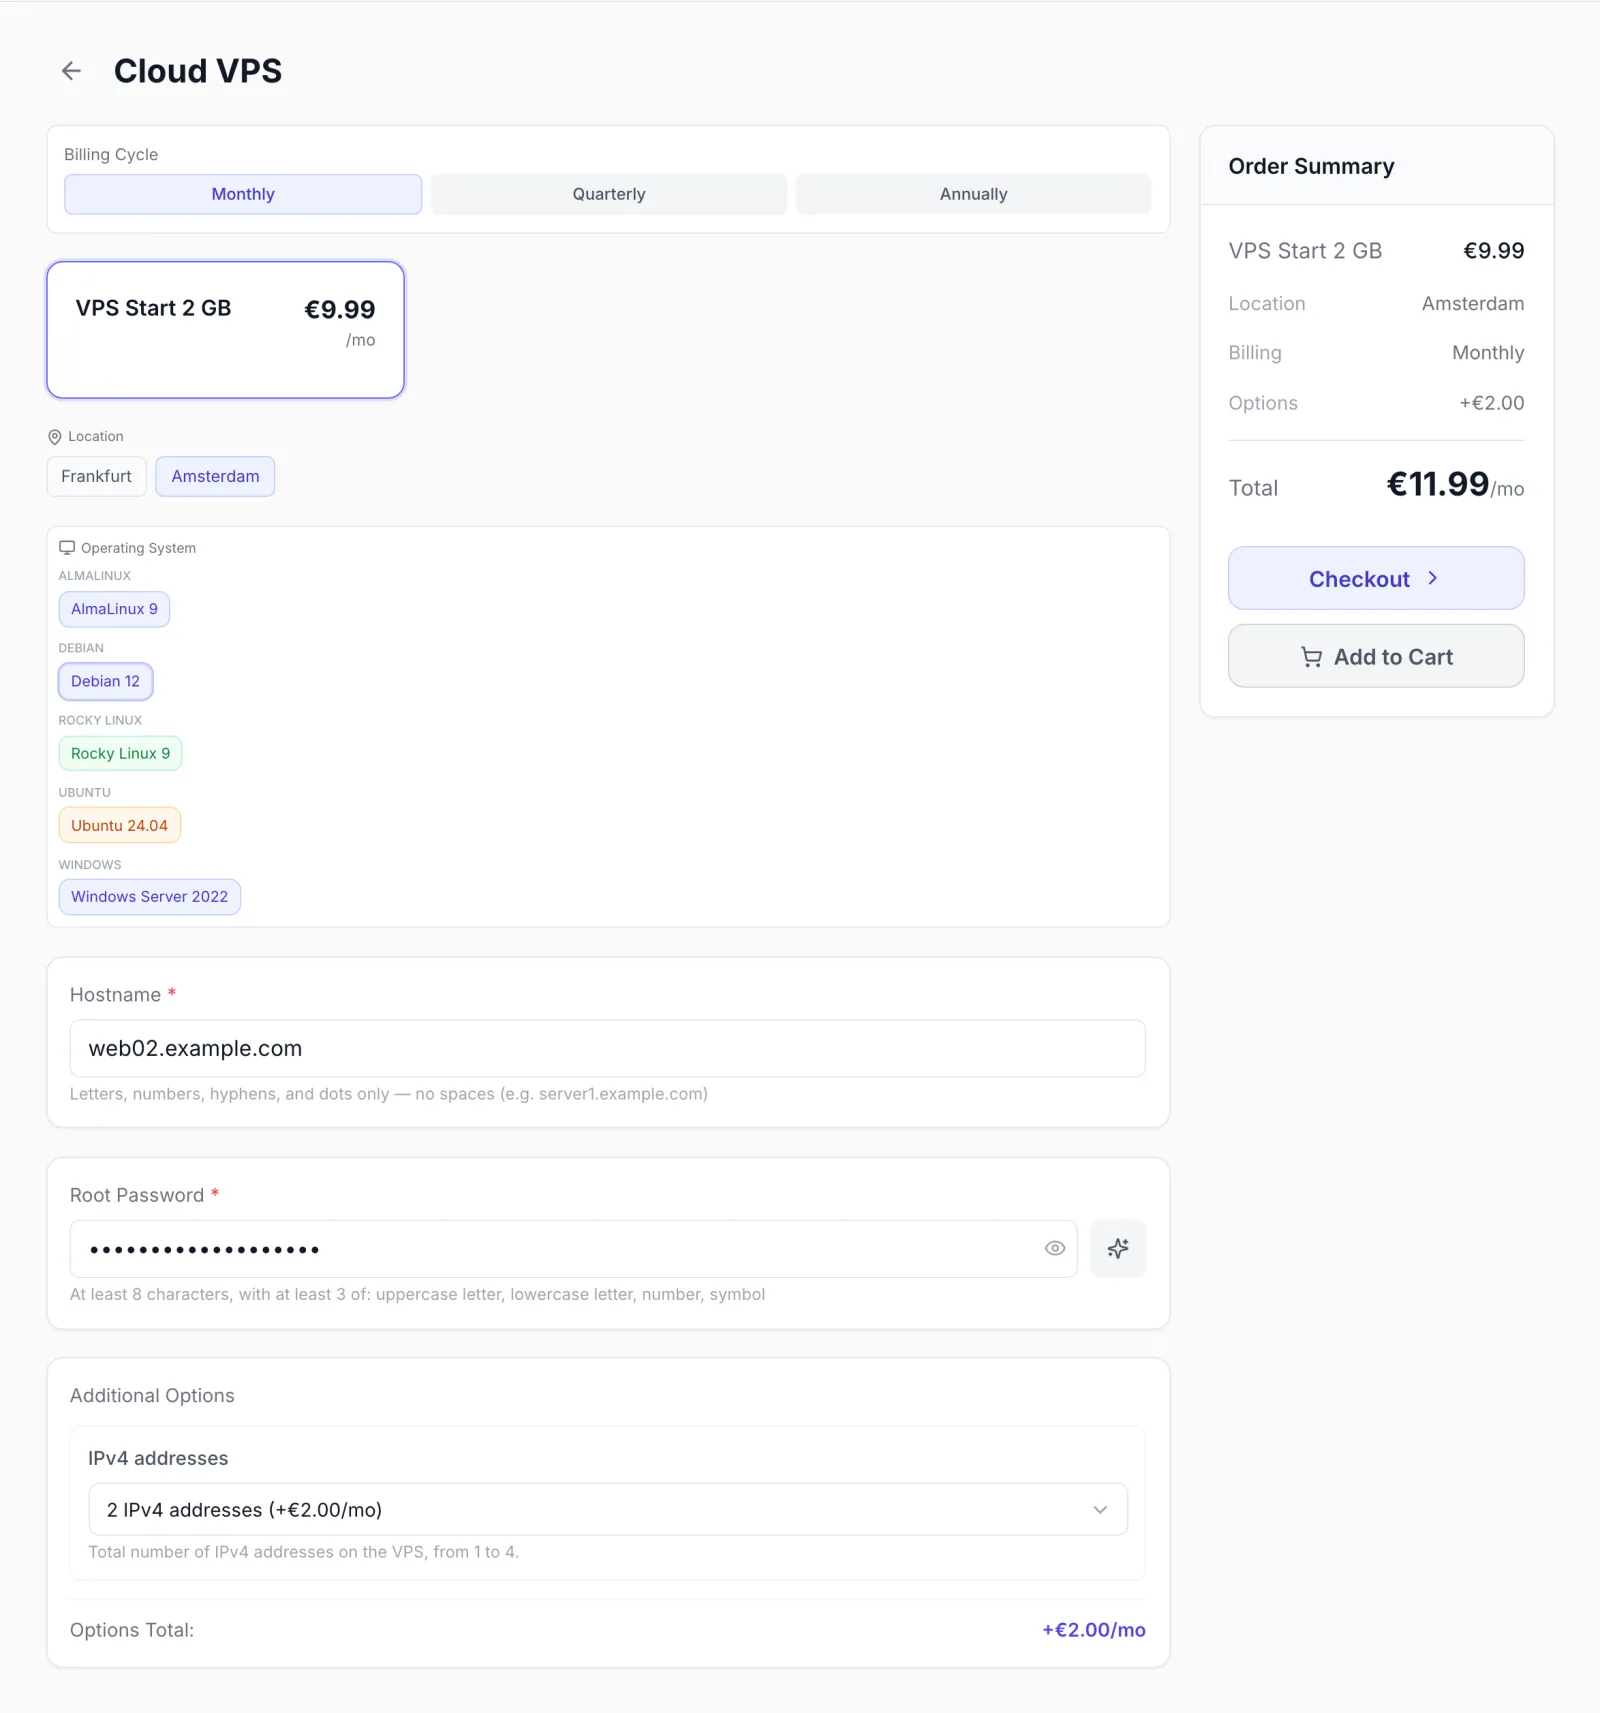
The root password must have at least 8 characters and at least three of: uppercase letter, lowercase letter, number, symbol. Hostnames may contain letters, numbers, hyphens and dots, and each part between the dots must start and end with a letter or number.
What happens when the invoice is paid
With Auto Provisioning switched on (see Billing lifecycle), FluxBilling starts the build as soon as the invoice is paid:
- The Virtualizor user. The plugin looks for a Virtualizor user with the customer's email address, ignoring upper and lower case. If there is none, it creates one, with the root password of this order as its password.
- The server. It reads the plan's virtualisation type, lists the online servers in the location the customer chose, and picks the one that supports that type and has the most free disk space as Virtualizor reports it.
- The addresses. It finds an IP pool attached to that server that has free addresses, and takes the number of free IPv4 addresses the order needs. Addresses that are already assigned or locked in Virtualizor are skipped.
- The VPS. It asks Virtualizor to create the VPS with the plan, server, addresses, operating system, hostname and root password.
- Hand-over. FluxBilling saves the VPS ID and the main IP address on the service and marks it Active. With the default email templates, the customer gets an email that the VPS is ready, with its IP address and root password.
What your customers can do
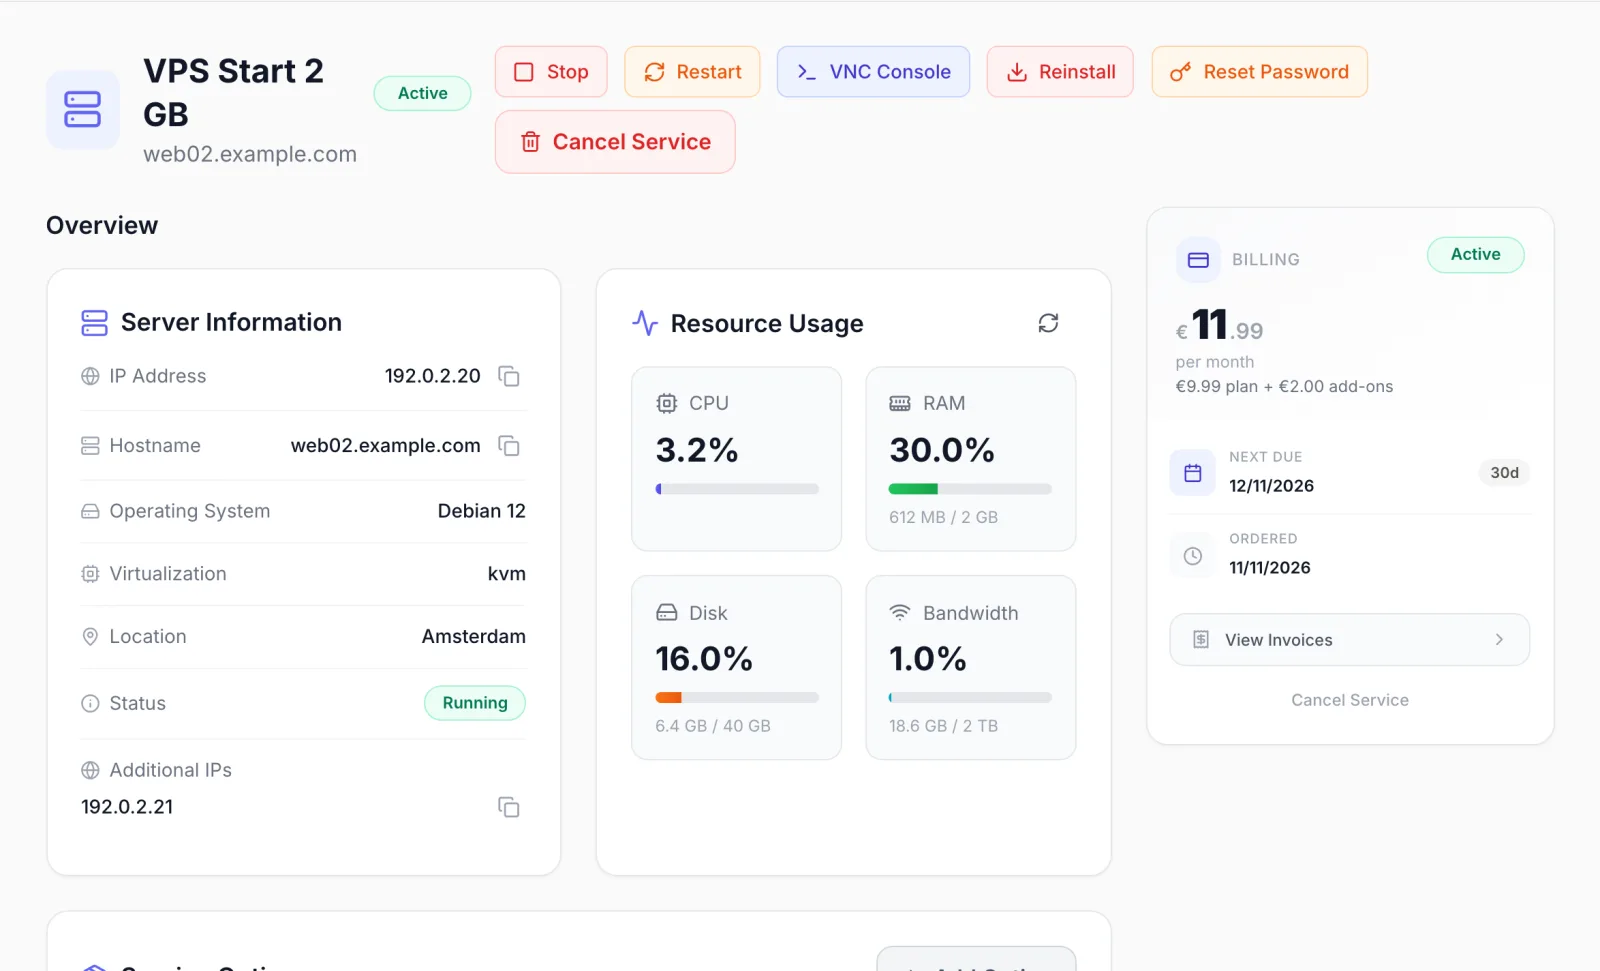
In the client area, the customer opens the service and gets these controls:
| Control | What it does |
|---|---|
| Start, Stop, Restart | Power actions in Virtualizor. Start shows while the VPS is stopped. Stop and Restart ask for confirmation. |
| VNC Console | Opens the VPS console in a FluxBilling console window. See VNC console. |
| Reinstall | Erases the VPS and installs the chosen operating system with a new root password. |
| Reset Password | Sends a new root password to Virtualizor for this VPS. |
| Server Information | IP address, hostname, operating system, virtualisation type, location, status and any additional IP addresses. |
| Resource Usage | CPU, RAM, disk and bandwidth use as Virtualizor reports it, refreshed every 30 seconds. |
While a service is suspended, these controls, the server information and the usage figures are hidden, and the customer sees a Service Suspended notice with the reason.
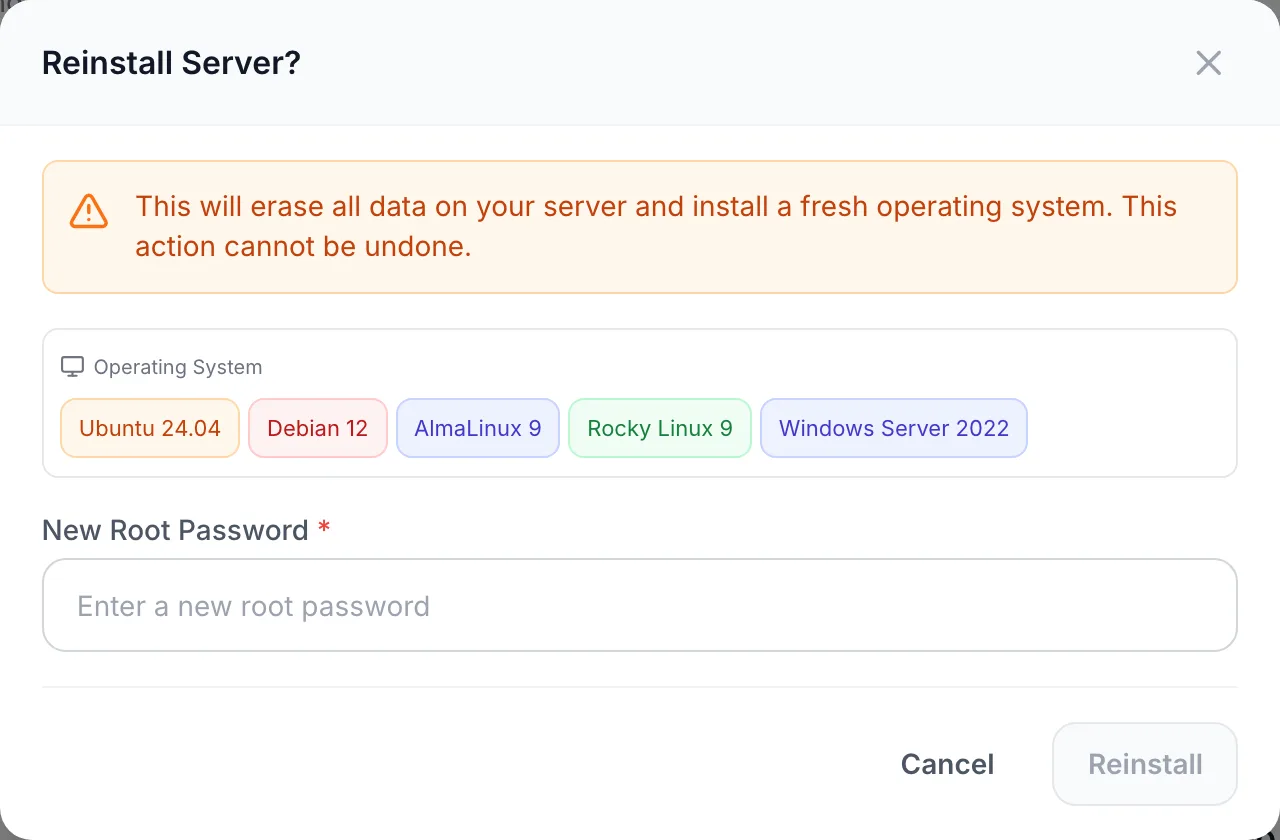
Reinstall offers every active OS template in Virtualizor, not only the ones you selected on the product, and it does not filter them by virtualisation type. If you keep templates in Virtualizor that customers should not install, such as Windows templates on a product priced for Linux, deactivate them in Virtualizor or take this into account.
VNC console
When the customer clicks VNC Console, FluxBilling asks Virtualizor for the VNC details of the VPS and opens the console in FluxBilling's own console window, so the customer does not need a Virtualizor login. FluxBilling connects to the VNC address and port that Virtualizor returns. For this to work:
- VNC must be available for the VPS in Virtualizor. If Virtualizor returns no VNC port, the customer sees Virtualizor returned no VNC port for this VPS — VNC is only available on KVM virtualization and must be enabled for the VPS.
- Your FluxBilling panel must be able to reach that VNC address and port. If a firewall only allows the VNC ports from certain addresses, add your FluxBilling panel's address.
What your staff see
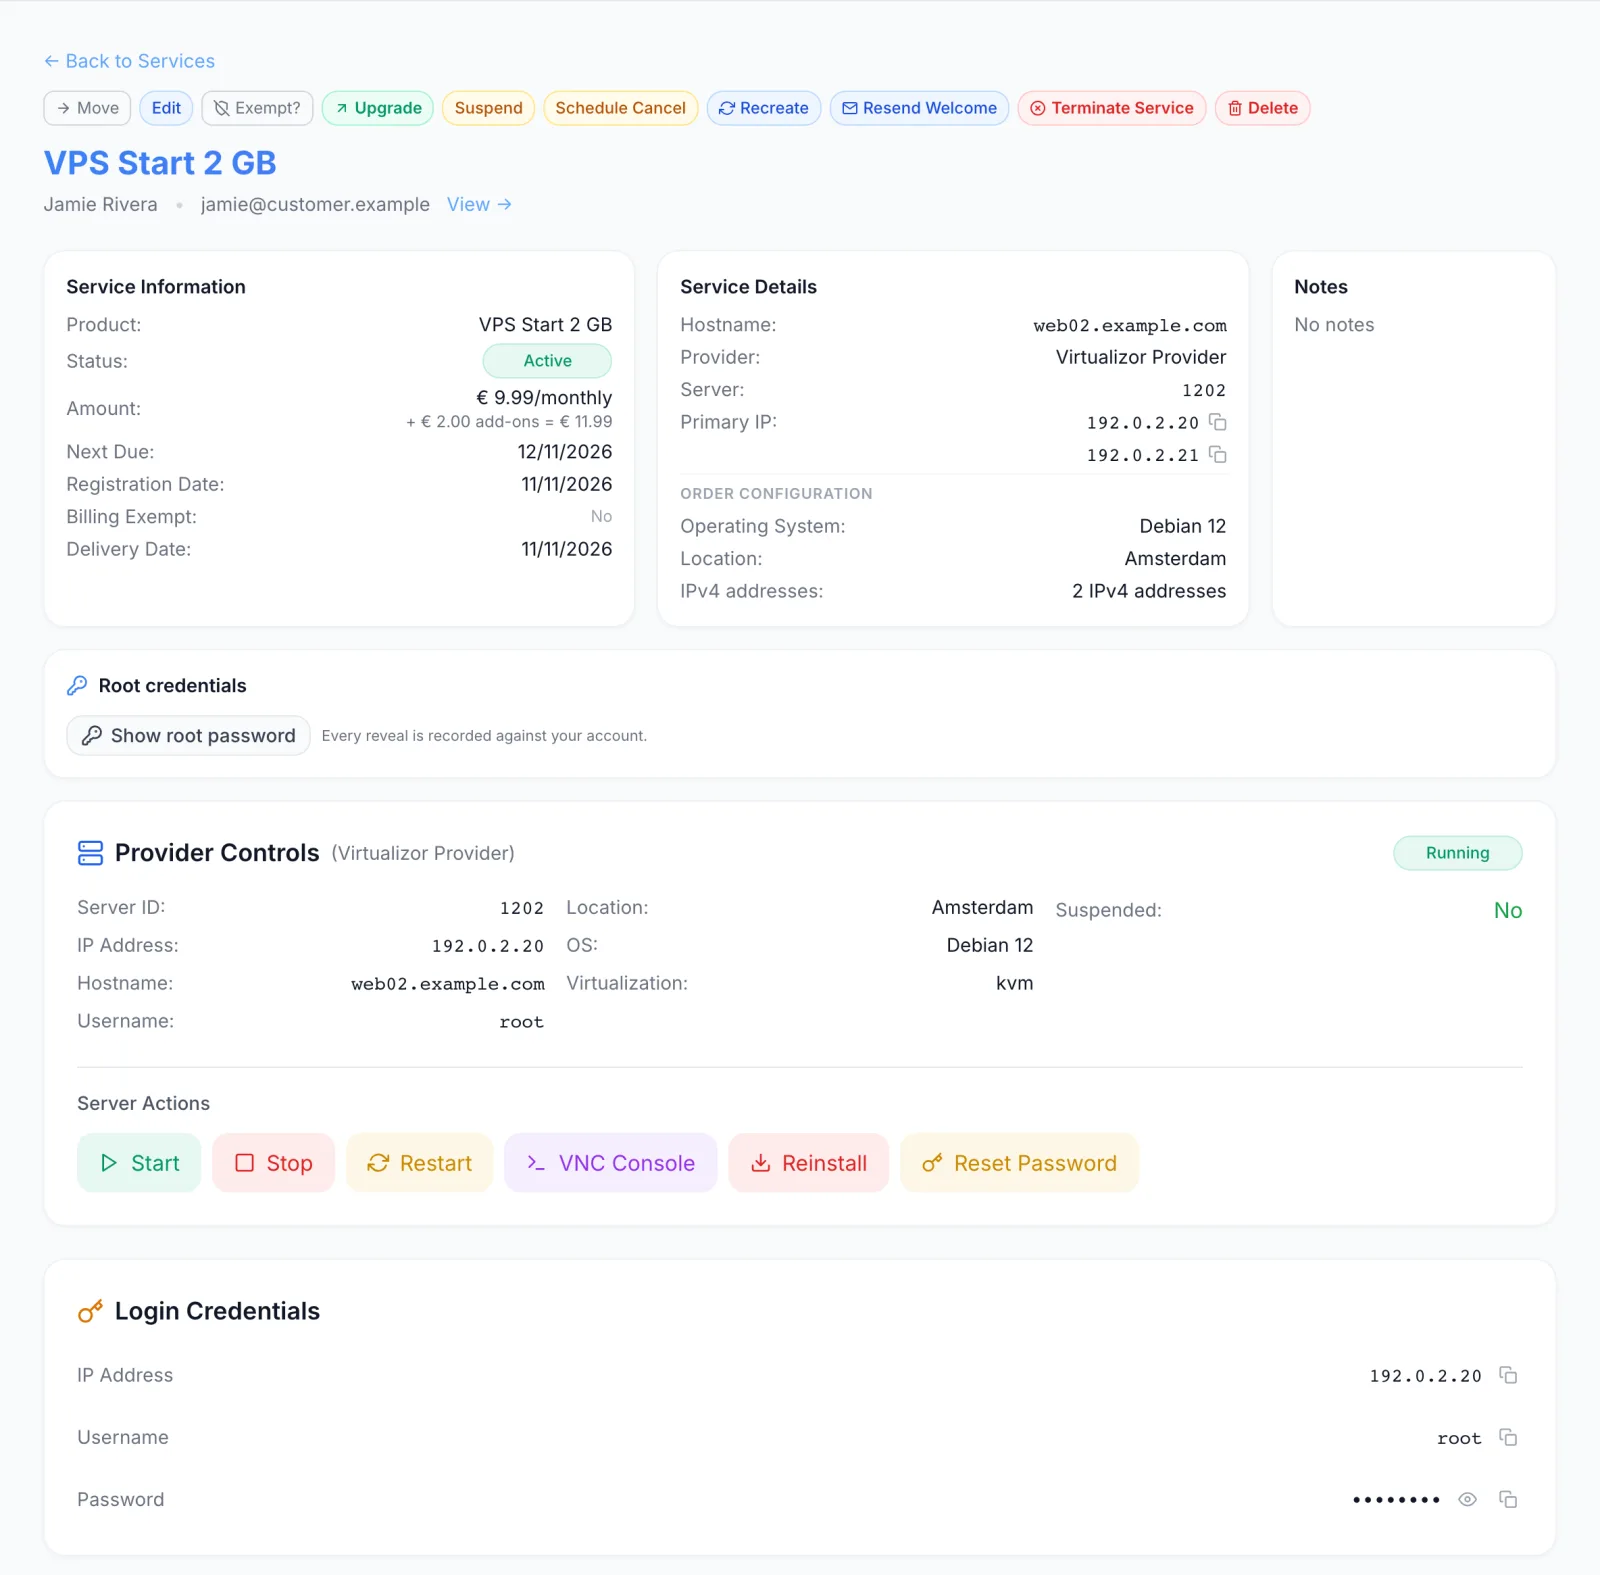
In the admin panel, the service page adds a Provider Controls card with the Virtualizor VPS ID, the same server actions (Start, Stop, Restart, VNC Console, Reinstall, Reset Password), and a Login Credentials card with the stored root password. The order configuration (operating system, location, IPv4 add-on) is listed under Service Details.
Billing lifecycle
The invoice drives the VPS. The rules are set under Settings → Billing → Automation:
- Auto Provisioning: builds the VPS when the first invoice is paid. When it is off, the paid service waits as Pending until staff provision it.
- Auto Suspension with Suspension Grace: an invoice still unpaid that many days after its due date suspends the VPS in Virtualizor.
- Paying the overdue invoice unsuspends the VPS automatically, once no earlier renewal invoice for that service is still unpaid. A suspension for abuse is not lifted by a payment.
- Auto Termination with Termination Grace: a VPS still suspended for non-payment that many days later is terminated.
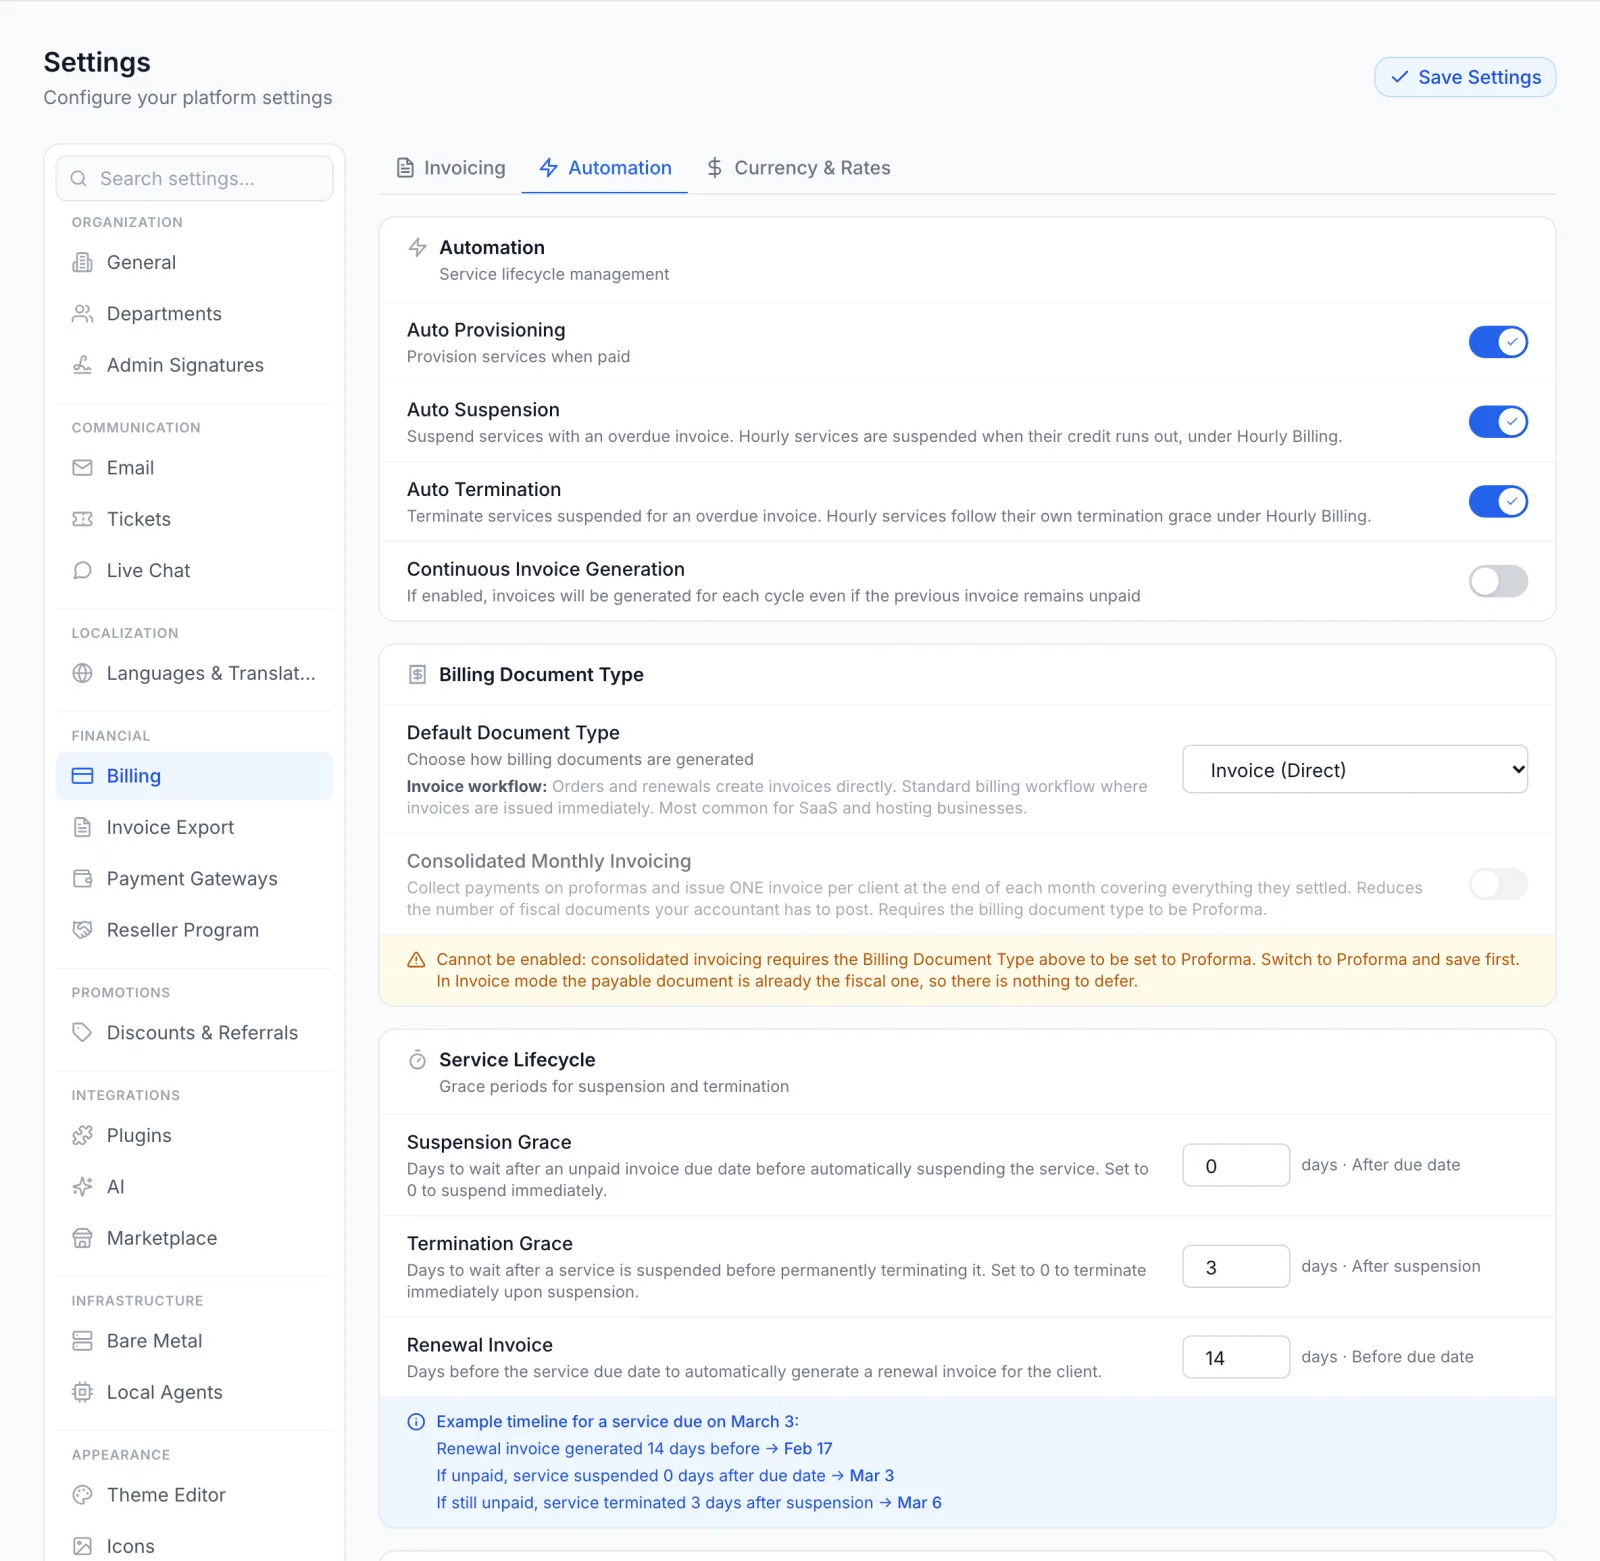
Terminating a service deletes the VPS in Virtualizor, with its disks. This happens when auto termination runs, when a customer's cancellation takes effect, or when staff terminate the service. It cannot be undone. Check the Termination Grace before you go live.
Plan changes
Customers can only move between products you link on the product's Upgrade Paths tab. When an upgrade or downgrade between two Virtualizor products is paid, the plugin sends the new plan and its resources to Virtualizor for that VPS. If Virtualizor refuses, the upgrade is marked as failed and the service keeps its current product. Try an upgrade on a test VPS before you offer upgrades to customers.
Windows VPS (optional)
Virtualizor does not configure the network or Remote Desktop inside a Windows guest. If you sell Windows, the plugin can do it right after a new VPS is built: it connects to a Virtualizor KVM server over SSH and, through the QEMU guest agent, enables Remote Desktop, opens it in the Windows firewall and sets the main IPv4 address with its netmask, gateway and DNS servers.
To use it, fill in these settings in the plugin (step 3):
| Field | What to enter |
|---|---|
| Hypervisor SSH Host | IP address or hostname of the Virtualizor KVM server. |
| Hypervisor SSH User / Port | Default to root and 22. |
| Hypervisor SSH Private Key | An OpenSSH private key without a passphrase, for example one made with ssh-keygen -t ed25519 -N "", whose public key is in authorized_keys for that user on the server. Paste the whole key. Do not use your Virtualizor API credentials here. |
| Fallback Netmask, Gateway, DNS Servers | Used only when Virtualizor's IP pool entry for the address has no netmask, gateway or name servers. |
- Only Windows VPS created on the server you enter are configured. VPS placed on other servers are built but not configured.
- Only the main IPv4 address is set inside Windows. Extra addresses from the IPv4 add-on have to be added inside Windows by hand.
- It runs when a VPS is first built, not after a reinstall.
- A VPS counts as Windows when the name of its OS template contains Windows.
- The Windows template must include the QEMU guest agent.
- This step never holds up the order. If it fails, the VPS is still delivered; connect through the VNC console to finish the network settings by hand.
Updating the plugin
Open Settings → Integrations → Marketplace, switch to Installed and click Check for Updates. When a new version is available, click Update to v…. Your connection settings and products are kept.
Troubleshooting
When a build fails, the service stays Pending. The error appears in the Automations menu in the top bar of the admin panel, as Provision via Virtualizor Provider with the reason in red and a retry button.
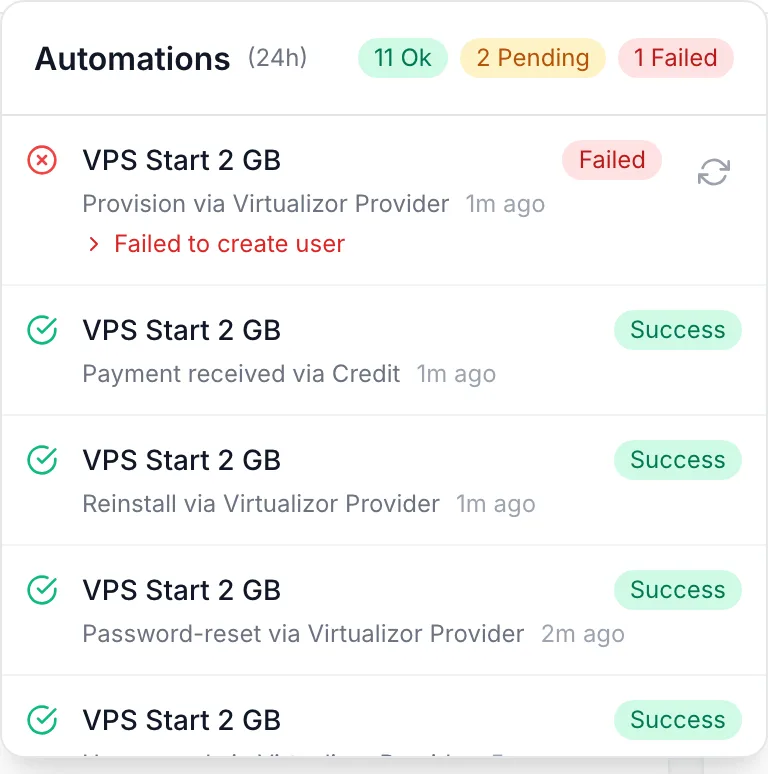
FluxBilling tries a failed build again by itself, up to two more times over the next minutes. After that, open the service and click Retry Provisioning, choose the operating system and, if you want, set a new root password. A build started this way does not email the customer, so use Resend Welcome on the service page once it has worked.
| Message or symptom | What to check |
|---|---|
| The Plan list in the product editor stays empty | FluxBilling cannot read from Virtualizor. Check the panel URL and port 4085, the API key and password, the IP restriction on the key pair, and any firewall between FluxBilling and Virtualizor. If the editor says Plugin not configured, a required setting is missing. |
| No active Virtualizor node was found in the selected location group (sgid …) for this plan. The plan needs virtualisation type: … | The server group the customer chose has no online server. Add or bring online a server in that group in Virtualizor. |
| An error from Virtualizor saying the server does not support the virtualisation type | The group has online servers, but none of them supports the plan's type. The plugin then sends the order to the emptiest online server in the group and shows Virtualizor's answer. Add a server of the right type to the group, or use a plan of a type the group supports. |
| No free IPv4 address available in the IP pool assigned to the selected location | The chosen server has no IP pool with free addresses. Add addresses to the pool, or attach a pool to that server, in Virtualizor. |
| The order needs N IPv4 addresses but the IP pool of server … has only M free | The order includes more addresses than are free. Add addresses to that pool, then use Retry Provisioning. |
| Failed to create user | Virtualizor gave no usable answer, for example because FluxBilling could not reach it during the build. Check the panel URL, port 4085, the key pair and its IP restriction, then retry. When Virtualizor does answer with an error, its own message is shown instead. |
| Other errors from Virtualizor, for example when creating the VPS | The plugin shows Virtualizor's own message. Fix the cause in Virtualizor, then retry. |
| The VNC console does not open | See VNC console: VNC must be enabled for the VPS, and FluxBilling must reach the VNC address and port. |
Limits
- Backups and snapshots are not offered through the plugin.
- Changing the IPv4 add-on after the VPS is built changes the price only. Add or remove those addresses in Virtualizor yourself.
- The plugin assigns IPv4 addresses from Virtualizor's IP pools. It does not assign IPv6 addresses, and FluxBilling's own IP address management is not involved.
- Each FluxBilling panel connects to one Virtualizor installation.
- FluxBilling does not rely on callbacks from Virtualizor: each action is judged on Virtualizor's direct answer. You do not need to set up anything for callbacks.
Moving away from Virtualizor later
If you later decide to run your hypervisors with FluxBilling's own VPS module, VPS Panel Migration can take over Virtualizor nodes while the virtual servers keep running. It is a separate product from this free plugin.
Virtualizor is a trademark of Softaculous Ltd. FluxBilling is not affiliated with Softaculous.