
Authorize.net card payments
Set up the Authorize.net plugin: API keys, Signature Key, webhook events, sandbox testing, saved cards for renewals, refunds and troubleshooting.
The Authorize.net plugin lets your customers pay FluxBilling invoices by card through Authorize.net's hosted payment page. The customer chooses Authorize.net at checkout, enters the card on Authorize.net's own secure page and comes back to your client area. Authorize.net then tells FluxBilling about the payment by webhook, and FluxBilling marks the invoice paid. Card details never pass through your FluxBilling panel. The plugin is free and is listed in the plugin marketplace of every FluxBilling panel.
This guide covers plugin version 2.9. It walks through the setup in the order you do it, then explains what your customers see, how saved cards, renewals and refunds work, and what to check when something does not work.
Who supports this integration. The plugin is built and maintained by FluxBilling. If something does not work, contact FluxBilling support at contact@fluxbilling.app or through fluxbilling.app/contact. Questions about your Authorize.net account, its fees, its fraud filters or its payouts go to Authorize.net support.
What you need before you start
- An Authorize.net merchant account, and a login to its Merchant Interface with access to API Credentials & Keys.
- To know your account's settlement currency. An Authorize.net account settles in exactly one currency. You choose it in the plugin settings (see step 4).
- A public HTTPS address for your FluxBilling panel. Authorize.net must be able to reach the panel to send webhooks. Without webhooks, card payments are taken but invoices are never marked paid.
- Optional: an Authorize.net sandbox account to test with before you go live. It is free and separate from your live account. Create one from Authorize.net's sandbox page; its Merchant Interface is at sandbox.authorize.net. Sandbox and live accounts have different keys.
Step 1: Get your API Login ID and Transaction Key
The plugin signs every request to Authorize.net with your API Login ID and Transaction Key.
- Sign in to the Authorize.net Merchant Interface (the sandbox one if you are testing).
- Open Account → Security Settings → API Credentials & Keys. In the newer Merchant Interface the path is Account → Account and API Settings → API Credentials & Keys (under Security Settings).
- Copy your API Login ID from that page.
- Select New Transaction Key and submit. Authorize.net asks for a PIN or a one-time code to confirm.
- Copy the new Transaction Key straight away. Authorize.net shows it only once.
Generating a new Transaction Key retires the old one: at once if you tick Disable Old Transaction/Signature Key Immediately, otherwise after 24 hours. If another system already uses the old key, update it too. Authorize.net describes these screens in its help articles API Login ID, Transaction Key and Signature Key and KA-07619 (newer interface).
Step 2: Get your Signature Key
Authorize.net signs every webhook with your Signature Key, and FluxBilling refuses any webhook whose signature does not match. The Signature Key is required: without it the gateway stays hidden from checkout.
- On the same API Credentials & Keys page, select New Signature Key and submit.
- Confirm with the PIN or code, then copy the key. It is a long string of 128 hexadecimal characters. Paste it into FluxBilling exactly as shown.
Authorize.net uses one Signature Key per account. If you generate a new one later, paste the new key into FluxBilling as well, or webhooks stop being accepted once the old key expires.
Step 3: Install the plugin
- In the FluxBilling admin panel, open Settings (the gear icon in the top bar).
- Under Integrations, open Marketplace. Stay on the Browse tab.
- Search for Authorize, open the Authorize.Net card and click Get for Free.
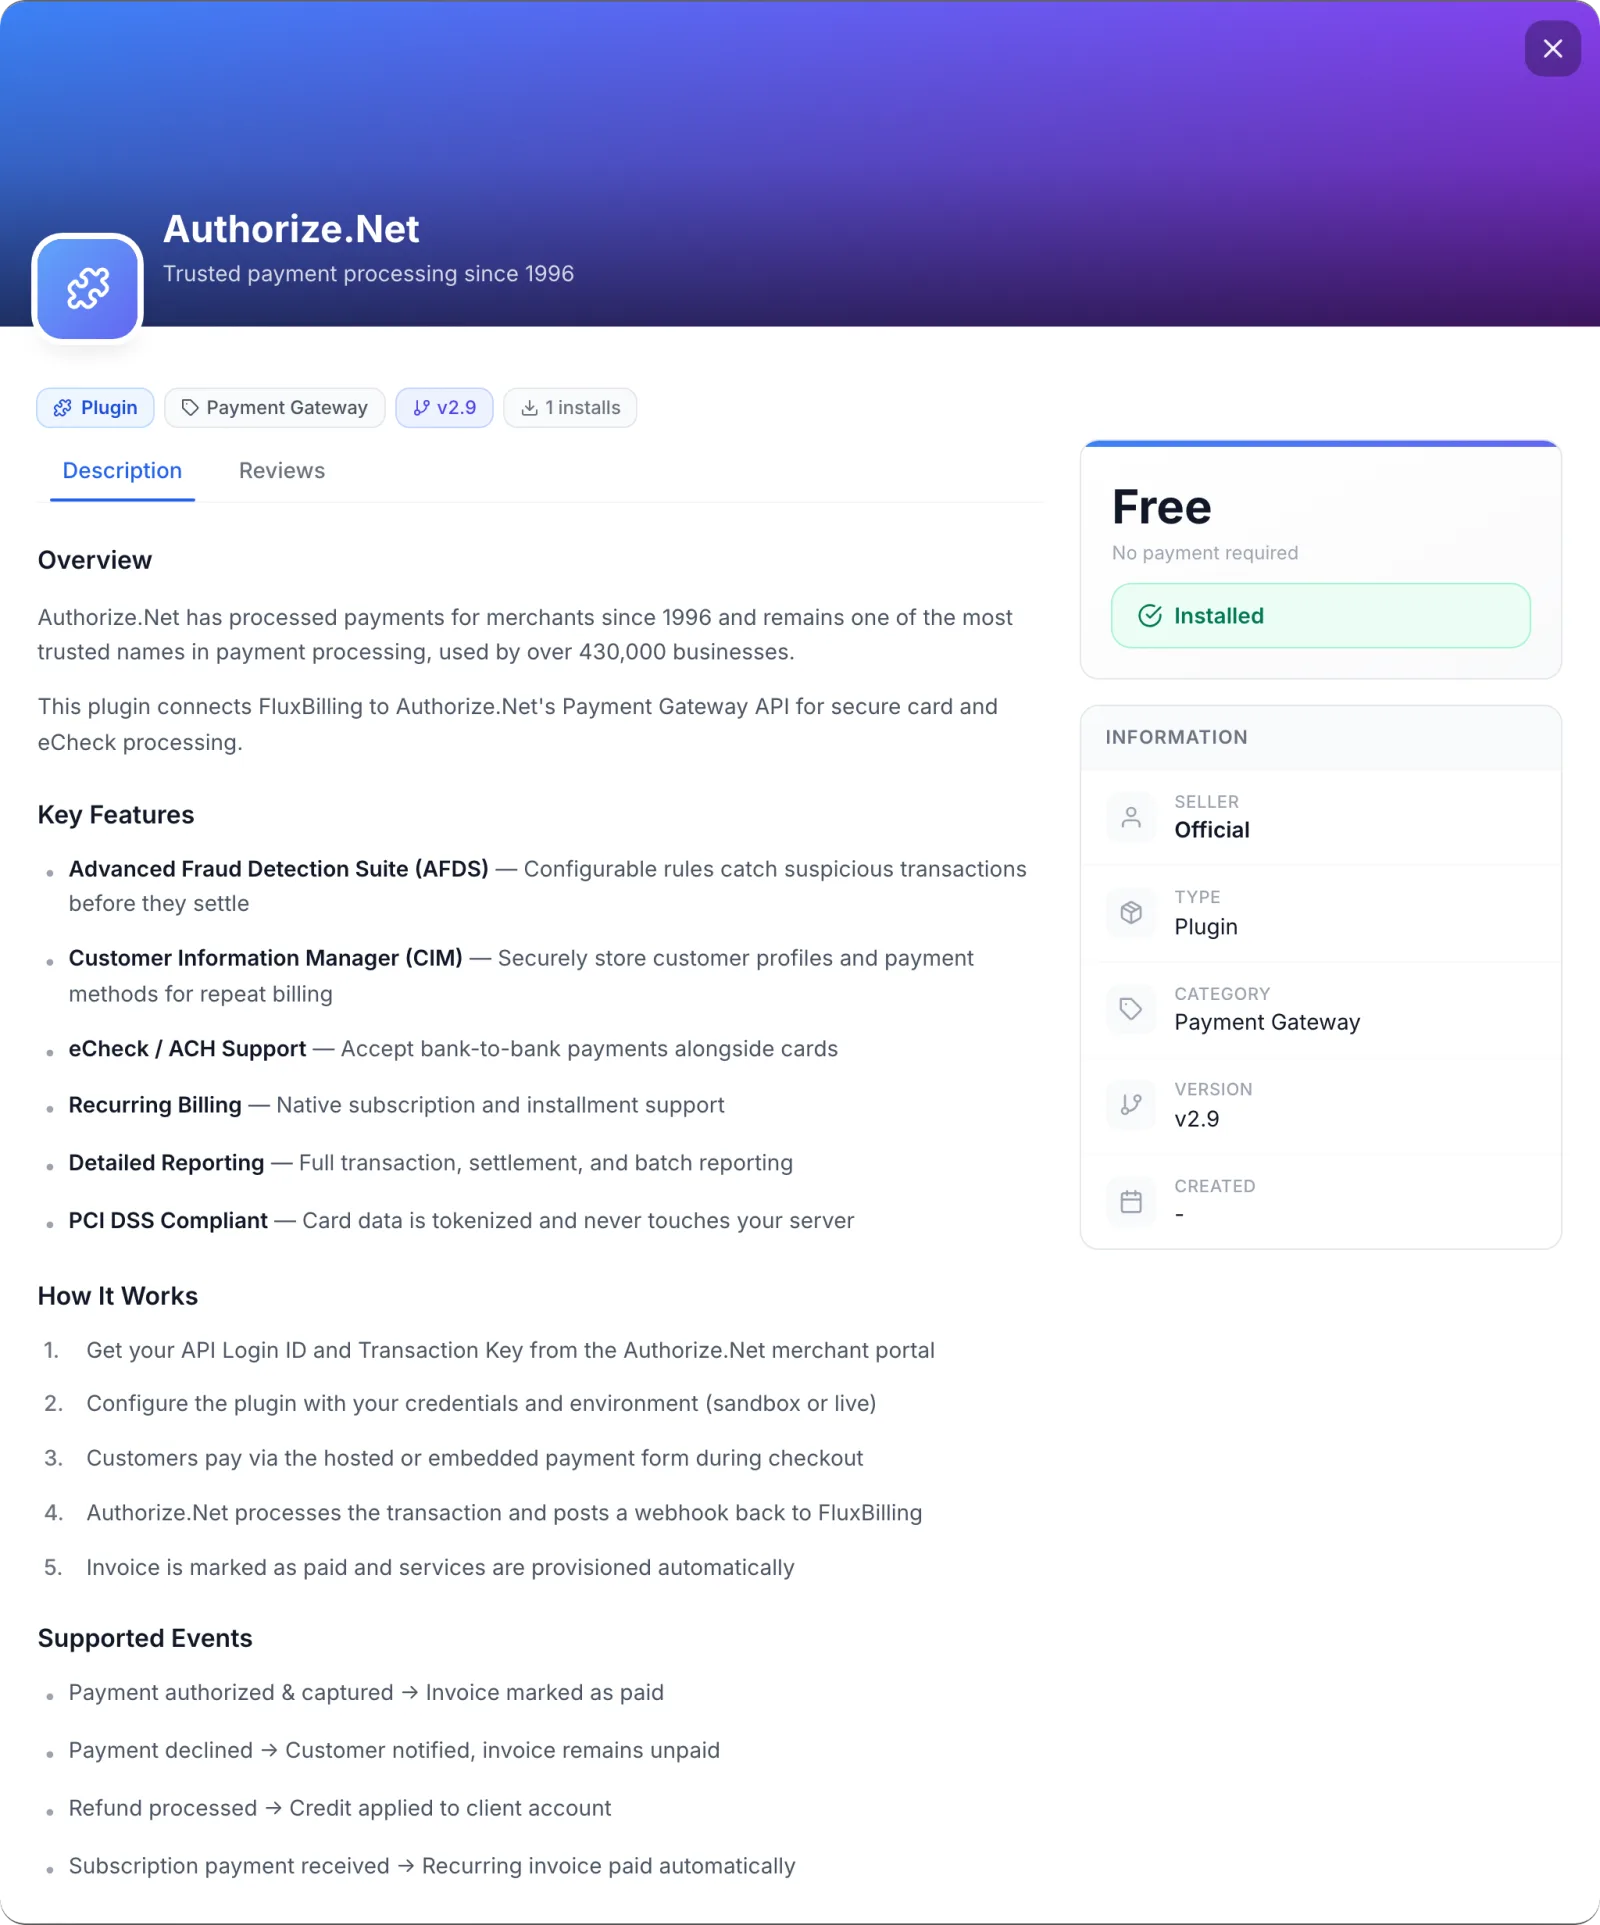
FluxBilling confirms with Plugin "Authorize.Net" installed and ready to use. The plugin appears under Settings → Integrations → Plugins as Authorize.net, marked Active, and under Settings → Financial → Payment Gateways. Your customers do not see it yet: a gateway appears at checkout only once its required settings are filled in.
Step 4: Enter your keys in FluxBilling
- Open Settings → Integrations → Plugins.
- On the Authorize.net card, click Configure.
- On the Settings tab, fill in the fields below.
- Click Save Configuration. FluxBilling shows Configuration saved successfully.
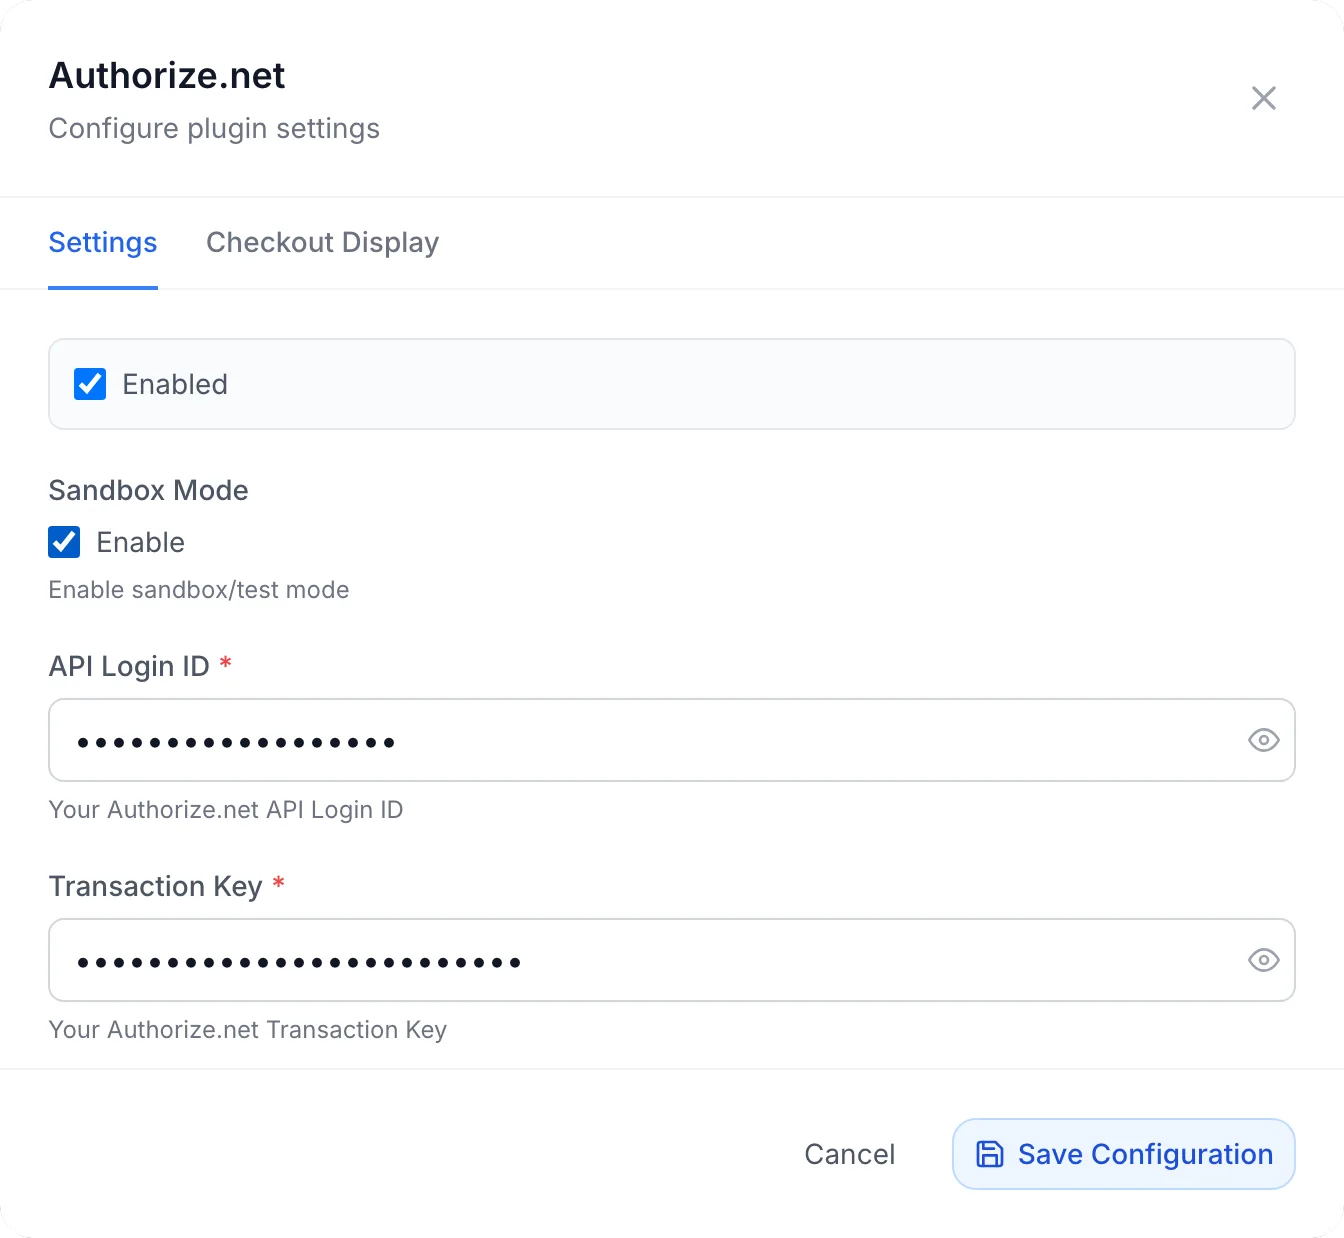
| Field | Required | What it does |
|---|---|---|
| Enabled | No | Offers the gateway at checkout. Untick it to hide Authorize.net from customers without removing your settings. |
| Sandbox Mode | No | Tick it to send every request to Authorize.net's sandbox and to send customers to the sandbox payment page. Use sandbox keys while it is ticked, and your live keys once you untick it. |
| API Login ID | Yes | The API Login ID from step 1. |
| Transaction Key | Yes | The Transaction Key from step 1. |
| Webhook Setup (Required) | - | Not a field: a reminder of which webhook events to enable at Authorize.net. Step 5 covers it. |
| Account Settlement Currency | No, but recommended | The one currency your Authorize.net account settles in. Authorize.net does not report a currency for a transaction, so FluxBilling cannot detect it. When you choose it, every completed payment is checked against the currency FluxBilling charged in: the invoice currency, or your base currency when FluxBilling converts the amount. If they differ, the invoice is not marked paid and the payment is flagged as disputed for you to review. When left empty, this check is skipped. |
| Signature Key | Yes | The Signature Key from step 2. FluxBilling uses it to verify every webhook from Authorize.net. |
The keys are stored encrypted. If a required field is empty, FluxBilling still saves the form but shows Saved, but the plugin is not configured until these are fixed: followed by the missing fields, for example API Login ID is required. Until they are filled in, customers do not see Authorize.net at checkout.
Checkout Display
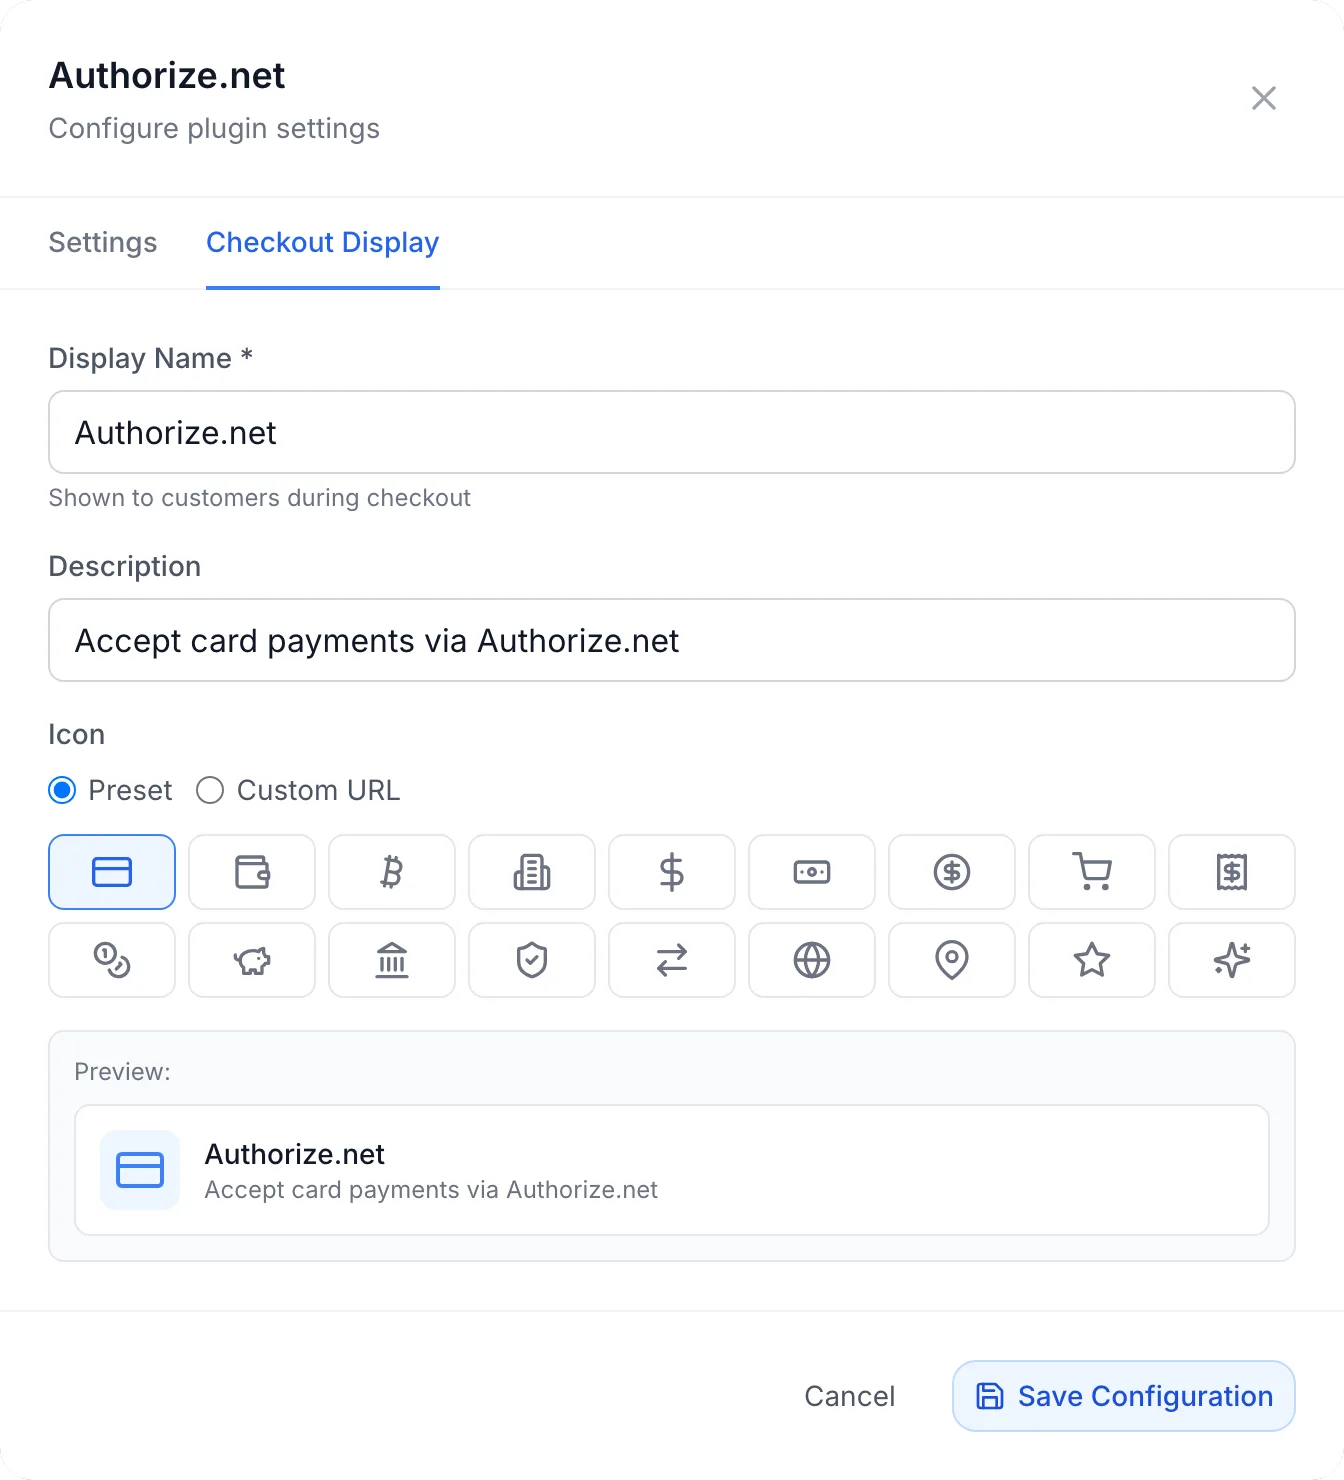
The Checkout Display tab sets how the gateway looks to customers: the Display Name (required, "Shown to customers during checkout"), a Description and an Icon, either a preset or a Custom URL. The preview shows a Test label while Sandbox Mode is on. Click Save Configuration to keep your changes.
Step 5: Create the webhook in Authorize.net
Authorize.net confirms each payment to FluxBilling by webhook. This step is required: without it, invoices paid by card stay unpaid in FluxBilling.
- In the FluxBilling Configure dialog, find the box Webhook configuration required at the bottom of the Settings tab and click Copy URL. This is your panel's own webhook address for Authorize.net.
- In the Authorize.net Merchant Interface, open the webhooks page. In the classic interface it is Account → Webhooks (under Business and Notification Settings), then Add Endpoint. In the newer interface it is Account → Account and API Settings → Webhook Notifications → Webhook → Create a webhook notification.
- Paste the address as the endpoint URL, give it a name if you like, and set it to Active.
- Enable the nine events in the table below, then save.
Authorize.net documents both versions of this screen: classic interface and new interface. You need a Signature Key on the account (step 2) before Authorize.net sends any webhook.
| Event | What FluxBilling does with it |
|---|---|
net.authorize.payment.authcapture.created | Marks the invoice paid when the charge is approved, or records the payment as failed when it is declined. |
net.authorize.payment.capture.created, net.authorize.payment.priorAuthCapture.created | Marks the invoice paid when a charge is captured. |
net.authorize.payment.void.created | Records a payment that was not yet completed as failed. |
net.authorize.payment.refund.created | Records a refund against the invoice, including refunds you issue in the Merchant Interface. |
net.authorize.payment.fraud.held | Keeps the payment pending while Authorize.net's fraud filters hold it for review. |
net.authorize.payment.fraud.approved | Marks the invoice paid when you approve a held transaction. |
net.authorize.payment.fraud.declined | Records the payment as failed when a held transaction is declined. |
net.authorize.customer.paymentProfile.deleted | Removes a saved card from FluxBilling when its payment profile is deleted at Authorize.net. |
Using Authorize.net's fraud filters? If you use the Advanced Fraud Detection Suite, the two events
fraud.heldandfraud.approvedare essential. Without them, a transaction that was held and then approved settles at Authorize.net but is never completed in FluxBilling.
Once Authorize.net starts sending events, the status under the webhook address in the Configure dialog changes from No deliveries received yet to Receiving deliveries. Deliveries failing means webhooks arrive but are refused; see Troubleshooting.
Step 6: Check it in Payment Gateways and test
Open Settings → Financial → Payment Gateways. Each installed gateway has a card with an Enabled or Disabled badge and a switch. The switch turns the whole Authorize.net plugin on or off.
The Configure dialog has no connection test button. To check the whole setup, use a sandbox account:
- Tick Sandbox Mode and enter your sandbox API Login ID, Transaction Key and Signature Key.
- Create the webhook in the sandbox Merchant Interface, as in step 5.
- In the client panel, pay a small test invoice with Authorize.net, using one of Authorize.net's test card numbers.
- Check that the invoice shows as paid in FluxBilling and that the webhook status reads Receiving deliveries.
- When it works, untick Sandbox Mode, replace the three keys with your live ones, create the same webhook in your live Merchant Interface, and save.
What your customers see
Authorize.net appears in the payment method list when a customer pays an invoice and when they check out a new order, under the name and icon you set on the Checkout Display tab.
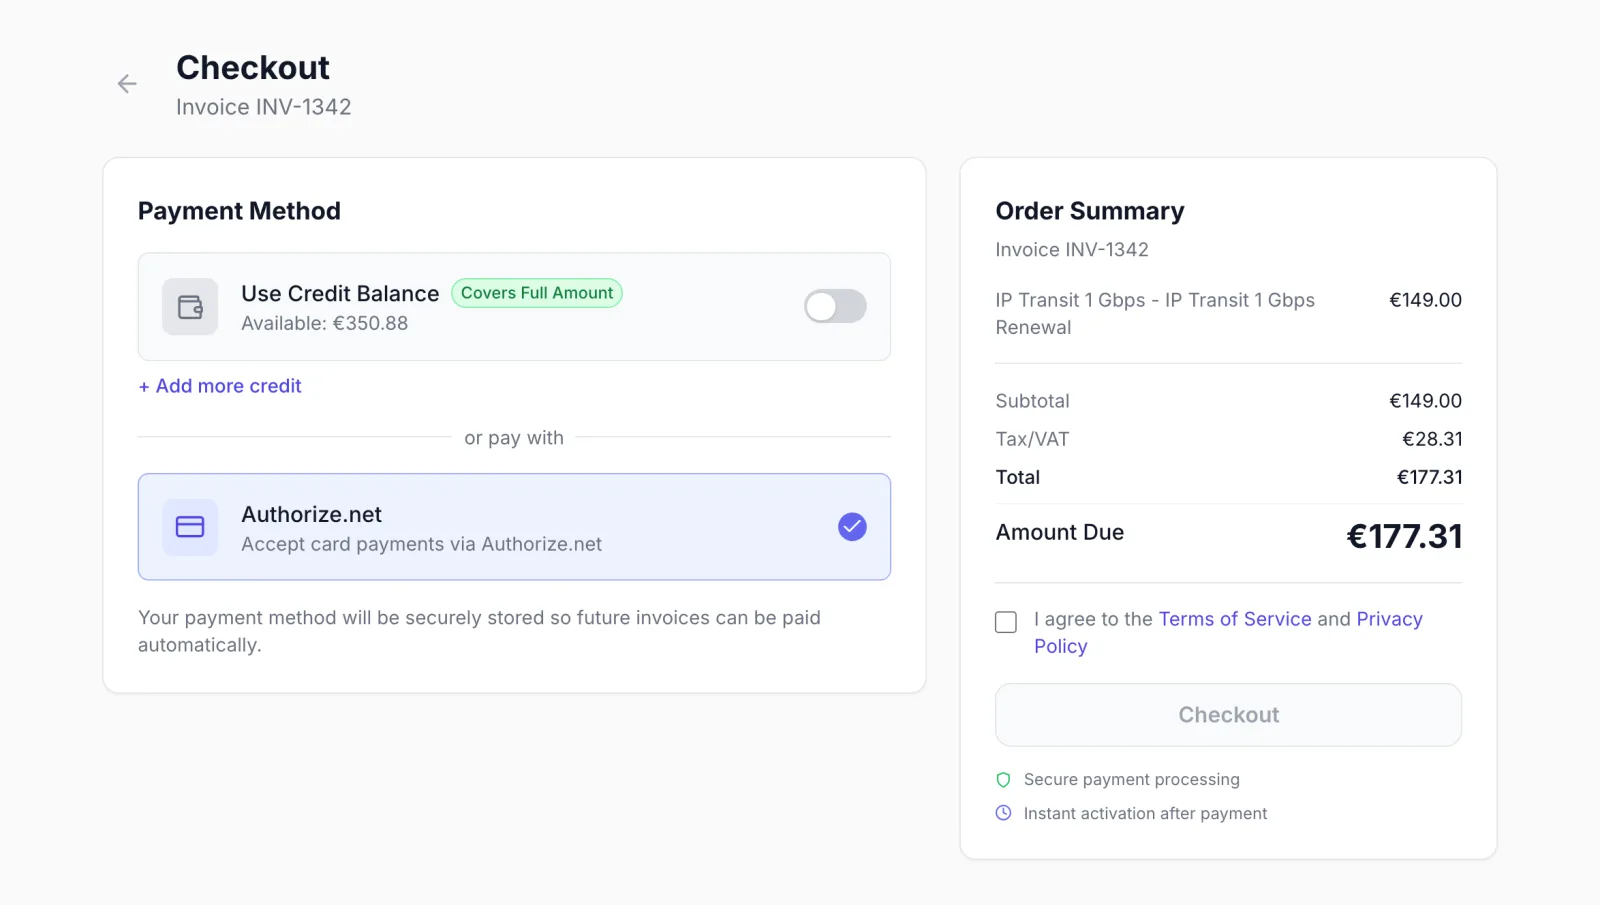
- The customer selects Authorize.net, accepts your terms and clicks Checkout.
- The browser goes to Authorize.net's hosted payment page. It shows the amount and the invoice reference, and the customer enters the card there and clicks Pay.
- After paying, the customer is sent straight back to your client area. Cancelling on Authorize.net's page also returns them to your client area.
- When Authorize.net's webhook arrives, the invoice is marked paid, and FluxBilling continues as for any paid invoice, for example by delivering the ordered service.
A declined card is shown on Authorize.net's page, and the customer can try another card there. The invoice stays unpaid until a payment succeeds.
The smallest amount the gateway accepts is 0.50 in the currency FluxBilling charges in (the invoice currency, or your base currency when it converts the amount). Below that, the customer sees Minimum payment amount is 0.5 followed by the currency code.
Saved cards and automatic renewals
Authorize.net can store a customer's card in a customer profile at Authorize.net (Customer Information Manager). FluxBilling keeps only a reference to it, with the card brand and last four digits, so it can charge the card again for renewals.
- Saving a card at checkout. When a customer pays with Authorize.net, the checkout shows the tick box Save this payment method for future purchases. If you switch on Require saving the payment method (see below), the tick box is replaced by the notice Your payment method will be securely stored so future invoices can be paid automatically. The card is saved once the payment is confirmed.
- Paying with a saved card. Saved cards are listed at checkout under Saved Payment Methods. Paying with one charges the card directly, without the hosted page.
- Managing saved cards. Customers see their saved cards under Settings → Payment Methods in the client panel, where they can Set Default or delete a card. Deleting a card in FluxBilling also deletes it from the customer's profile at Authorize.net.
Renewals are charged by FluxBilling, not by Authorize.net's own recurring billing. The settings are under Settings → Financial → Billing, in the Auto-Payment for Renewals card:
| Setting | What it does |
|---|---|
| Enable Auto-Payment | "Automatically charge saved payment methods for renewal invoices". |
| Days Before Due, Max Retries, Retry Interval | When the first charge is attempted, and how often a failed charge is retried. |
| Require saving the payment method | Every checkout on a gateway that supports it stores the customer's payment method. Customers see a notice instead of a choice. |
| Auto-enroll customers when they save a card | A customer who saves a card is switched to automatic payment with that card. Leave it off to require an explicit opt-in. |
These settings apply to every gateway that supports saved cards, not only Authorize.net. See Billing settings and Billing automation for the full picture.
Refunds
You can refund an Authorize.net payment from FluxBilling or from the Authorize.net Merchant Interface.
- Open the paid invoice in the admin panel and click Refund.
- Under Refund Method, choose Via Gateway ("Process through original payment gateway").
- Leave Amount empty for a full refund, or enter a smaller amount for a partial refund. Add a Reason if you like.
- Click Confirm Refund. FluxBilling shows Refund processed via gateway when Authorize.net accepts it.
Authorize.net can only refund a transaction after it has settled, usually within a day. Before that:
- A full refund of an unsettled payment is done by voiding the transaction instead, so the customer is never charged.
- A partial refund of an unsettled payment is refused. Wait until the transaction has settled, then refund again.
Refunds you make directly in the Merchant Interface reach FluxBilling through the net.authorize.payment.refund.created webhook and are recorded against the invoice. The other refund methods on the dialog, To balance and Manual, do not contact Authorize.net. More in Invoice details.
Payment lifecycle at a glance
| At Authorize.net | In FluxBilling |
|---|---|
| Customer opens the hosted page | A pending payment is recorded for the invoice. |
| Charge approved | Invoice marked paid; card saved if the customer chose to save it. |
| Charge declined | Payment recorded as failed; the invoice stays unpaid. |
| Held by the fraud filters | Payment stays pending while you review it at Authorize.net. If the review takes longer than about two hours, the payment shows as failed until you approve it; approving it then marks the invoice paid. Review held transactions promptly. |
| Held transaction approved or declined | Invoice marked paid, or payment recorded as failed. |
| Transaction voided | A payment that was not yet completed is recorded as failed. |
| Refund issued | Refund recorded against the invoice. |
| Payment profile deleted | The saved card is removed from FluxBilling. |
Troubleshooting
| Message or symptom | What to check |
|---|---|
| Authorize.net is not offered at checkout | One of the three required fields is empty: API Login ID, Transaction Key or Signature Key. Also check that Enabled is ticked in the Configure dialog and that the switch on Settings → Financial → Payment Gateways is on. |
| Saved, but the plugin is not configured until these are fixed: … is required | The named field is empty. Fill it in and save again. |
| The customer sees User authentication failed due to invalid authentication values. or Failed to create Authorize.net payment page after clicking Checkout | Authorize.net rejected the keys. Check the API Login ID and Transaction Key, and that Sandbox Mode matches the account they belong to: sandbox keys work only with Sandbox Mode on, live keys only with it off. A Transaction Key stops working 24 hours after you generate a new one. Authorize.net lists its error texts in its response code reference. |
| The customer paid, but the invoice is still unpaid, and the webhook status says No deliveries received yet | Authorize.net is not sending webhooks to FluxBilling. Check that the webhook exists and is Active in the Merchant Interface (the right one: sandbox or live), that its URL is the one from Copy URL, and that the payment events are enabled. Authorize.net retries a failed delivery up to ten times over several days and then sets the webhook to inactive; reactivate it there. |
| The webhook status says Deliveries failing | Webhooks arrive but their signature does not match. Paste the current Signature Key again. If you generated a new key at Authorize.net, the old one stops working within 24 hours. |
| A payment approved at Authorize.net after a fraud review never completes | The fraud.held and fraud.approved events are not enabled on the webhook. Enable them. |
| A payment is flagged as disputed instead of settling the invoice | Either the amount Authorize.net reports is lower than the invoice, or the payment was charged in a currency (the invoice currency, or your base currency when FluxBilling converts) that differs from your Account Settlement Currency. Authorize.net always charges in your account's currency. Review the payment and the invoice, and settle it with the customer. |
| Minimum payment amount is 0.5 … | The amount left to pay is below 0.50. Let the customer pay it with account credit or another method. |
| The refund fails with Authorize.net's reason The referenced transaction does not meet the criteria for issuing a credit. | A partial refund of a transaction that has not settled yet. Wait for settlement, then refund again, or refund the full amount. |
| Failed to charge saved payment method, or Authorize.net's reason such as This transaction has been declined. | The saved card was declined, has expired or was deleted at Authorize.net. Ask the customer to pay with a new card and save it. |
Limits
- One currency. Authorize.net charges in your account's settlement currency, and the plugin does not send a currency with the charge. The gateway is offered at checkout whatever the invoice currency, so if you bill in several currencies, set Account Settlement Currency so that a payment charged in another currency is flagged instead of settling the invoice. FluxBilling charges in the invoice currency or converts the amount to your base currency.
- Hosted page only. Customers always enter new cards on Authorize.net's page. There is no card form inside your client area.
- Charges are captured at once. The plugin does not authorise a card and capture the money later.
- No Authorize.net subscriptions. Renewals are charged by FluxBilling to saved cards (Auto-Payment). The plugin does not create Automated Recurring Billing subscriptions at Authorize.net.
- No connection test. The Configure dialog does not check the keys when you save. A sandbox test payment (step 6) is the reliable check.
- Webhooks are set up by hand. The plugin does not create the webhook at Authorize.net for you.
Updating the plugin
Open Settings → Integrations → Marketplace, switch to Installed and click Check for Updates. When a new version is available, click Update to v…. Your settings are kept.
Authorize.net is a trademark of its respective owner. FluxBilling is not affiliated with Authorize.net.