
Telegram notifications
Send FluxBilling events (orders, payments, invoices, tickets, services) to a Telegram chat, group or channel with a bot and per-event templates.
The Telegram Notifications plugin posts a message to a Telegram chat, group or channel when something happens in FluxBilling: a new order, a paid invoice, a new support ticket, a suspended service. You create a bot in Telegram, add it to the chat your team reads, and choose in FluxBilling which events it should report. Each event has its own message template with links back to the record in your admin panel. The plugin is free and is listed in the plugin marketplace of every FluxBilling panel.
This guide covers plugin version 1.9. The messages go to your staff, not to your customers: nothing changes in the client area, at checkout or in customer emails.
Who supports this integration. The plugin is built and maintained by FluxBilling. If something does not work, contact FluxBilling support at contact@fluxbilling.app or through fluxbilling.app/contact. Questions about Telegram itself, your Telegram account or your bot go to Telegram support.
The plugin is one of FluxBilling's notification plugins. For how notification plugins work in general, and how to build one for another channel, see Notification plugins.
What you need before you start
- A Telegram account on any Telegram app. Creating a bot is free.
- The chat that should receive the messages: a private chat with the bot, a group or a channel. The messages contain client names, email addresses and amounts, so use a private group or channel that only your staff can join.
- Outbound HTTPS access from your FluxBilling panel to
api.telegram.org.
Step 1: Create a bot and copy its token
- In Telegram, open a chat with @BotFather and send
/newbot. - Enter a display name for the bot, for example Example Hosting Alerts.
- Enter a username. It must end in
bot, for exampleexamplehosting_alerts_bot. - BotFather replies with the bot's token, a string like
123456789:ABCDefGhIJKlmnOPQRstUVWxyz. Copy it. Anyone who has the token can control the bot, so keep it private.
Telegram documents these steps in Creating a new bot. If the token is ever exposed, send /token to BotFather to generate a new one (Generating an authentication token), then enter the new token in FluxBilling.
Step 2: Add the bot to your chat and find the Chat ID
A Telegram bot cannot start a conversation by itself. Someone has to message it first or add it to a group (Telegram: bots). Set up the chat you want:
- Private chat: open the bot by its username and press Start. The messages then go to you only.
- Group: add the bot to the group as a member. A bot in a group can post without being an administrator.
- Channel: add the bot to the channel as an administrator that may post messages. Only administrators can post in a channel.
Then find the chat's numeric ID:
- Send a message in the chat. In a group, send a command addressed to the bot, such as
/start@examplehosting_alerts_bot: with Telegram's default privacy mode, a bot only sees commands meant for it. In a channel, publish a post. - In a browser, open
https://api.telegram.org/bot<your token>/getUpdates, with your token in place of<your token>(keep the wordbotin front of it). - Find
"chat":{"id":in the answer. The number after it is the Chat ID. Groups and channels have negative IDs; supergroups and channels start with-100, for example-1001234567890.
The method is described in Telegram's Bot API reference under getUpdates. It does not work while the bot has a webhook set by another program (Telegram returns an error instead); Telegram keeps incoming messages for 24 hours at most. For a public channel, you can enter the channel's username instead of the number, for example @examplehosting_alerts. Telegram accepts both forms in sendMessage.
Step 3: Install the plugin
- In the FluxBilling admin panel, open Settings (the gear icon in the top bar).
- Under Integrations, open Marketplace. Stay on the Browse tab.
- Open the Telegram Notifications card and click Get for Free.
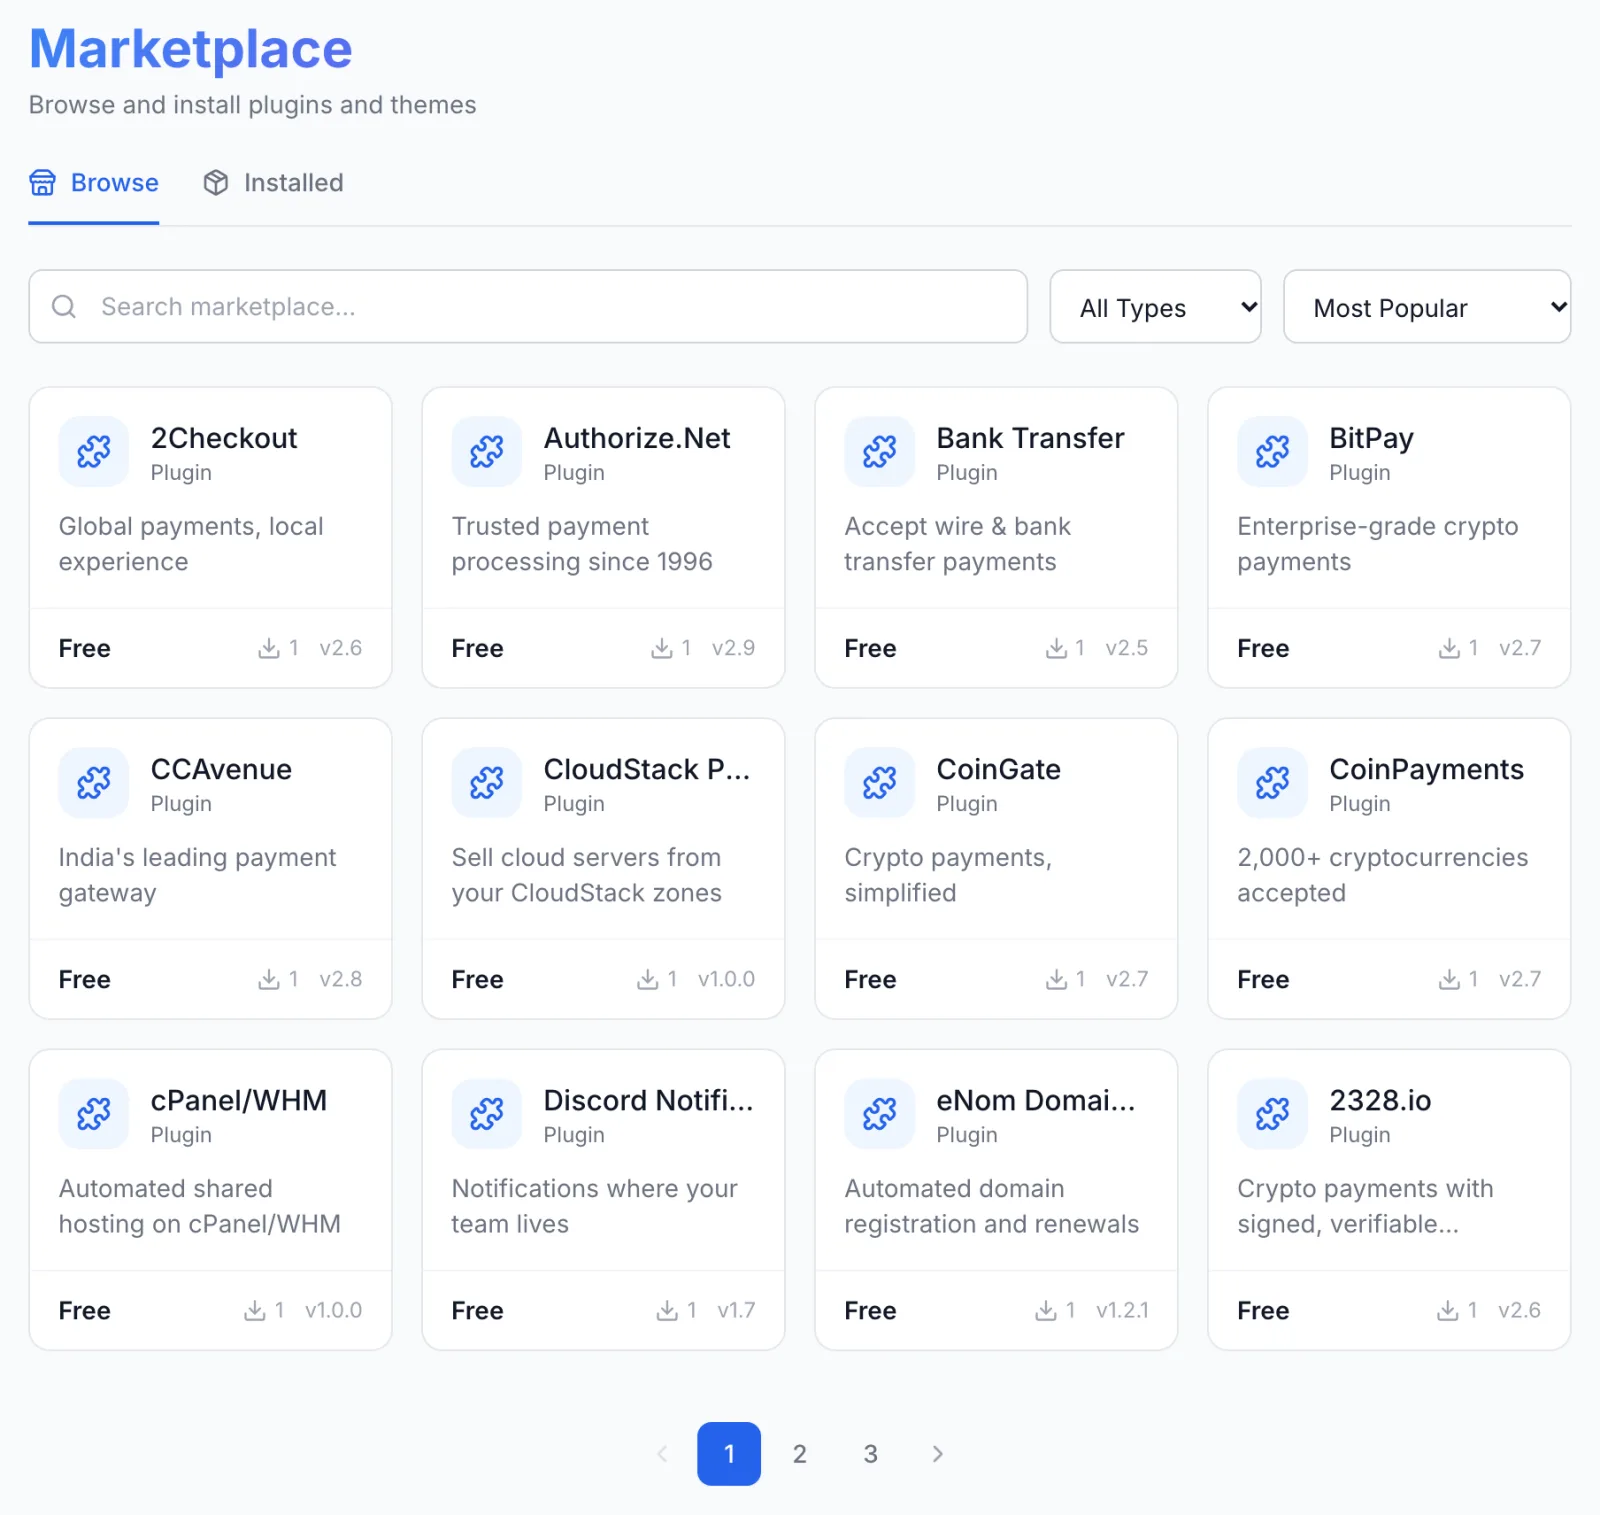
FluxBilling confirms with Plugin "Telegram Notifications" installed and ready to use. The plugin is switched on straight away and appears under Settings → Integrations → Plugins as Telegram Bot, marked Active. It sends nothing until you enter the bot token and the Chat ID and switch on at least one event: every event starts switched off.
Step 4: Enter the bot token and Chat ID
- Open Settings → Integrations → Plugins.
- On the Telegram Bot card, click Configure. The dialog opens on Notification Settings, with Connection Settings expanded and one collapsed section per event group.
- Enter the Bot Token from step 1 and the Chat ID from step 2.
- Click Save Configuration at the top of the dialog. It stays greyed out until you change something. FluxBilling confirms with Configuration saved.
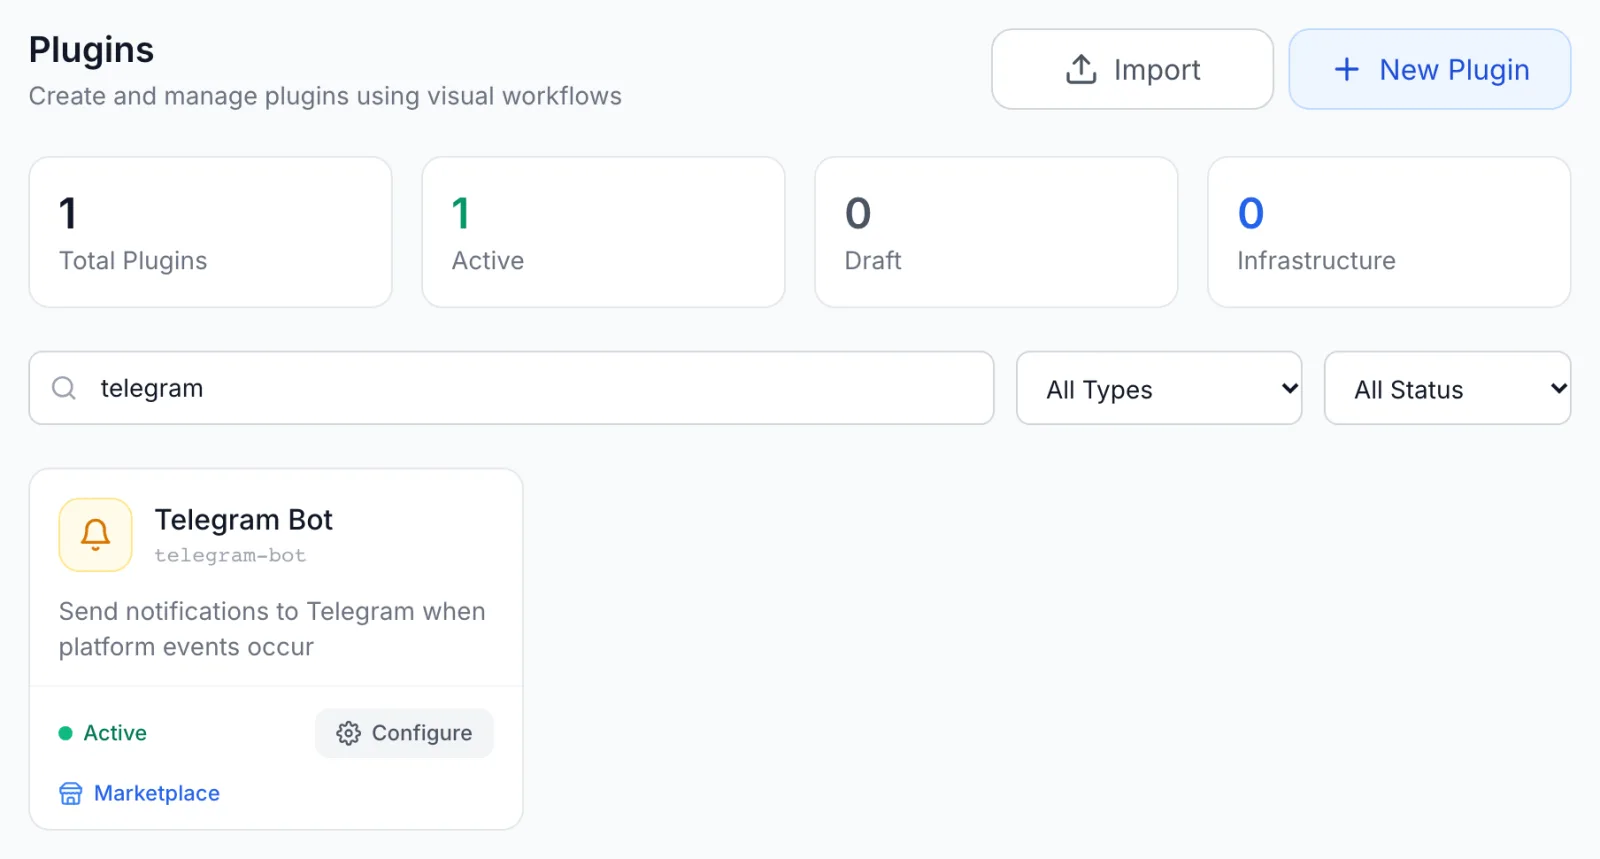
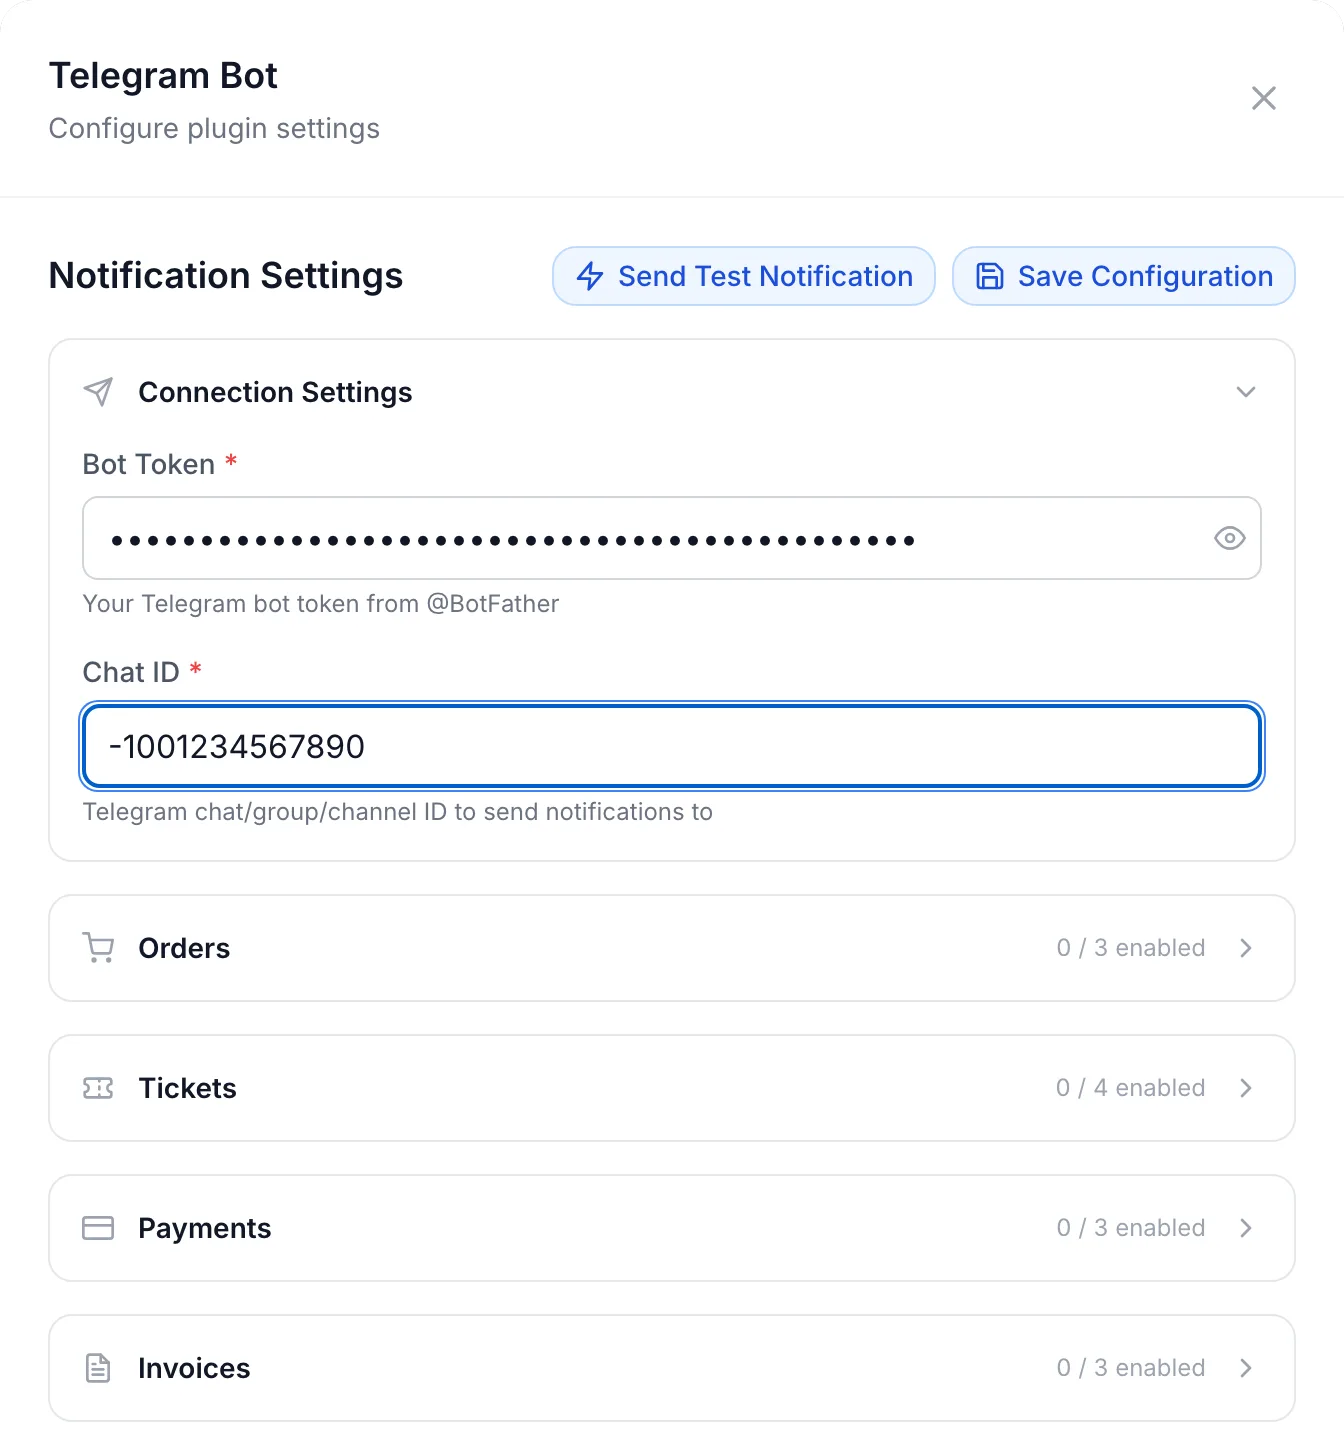
The bot token is stored encrypted and shown as dots. The eye icon next to it shows it while you type. Close the dialog with Cancel or the × in its top corner. Changes you did not save are discarded.
Step 5: Choose the events
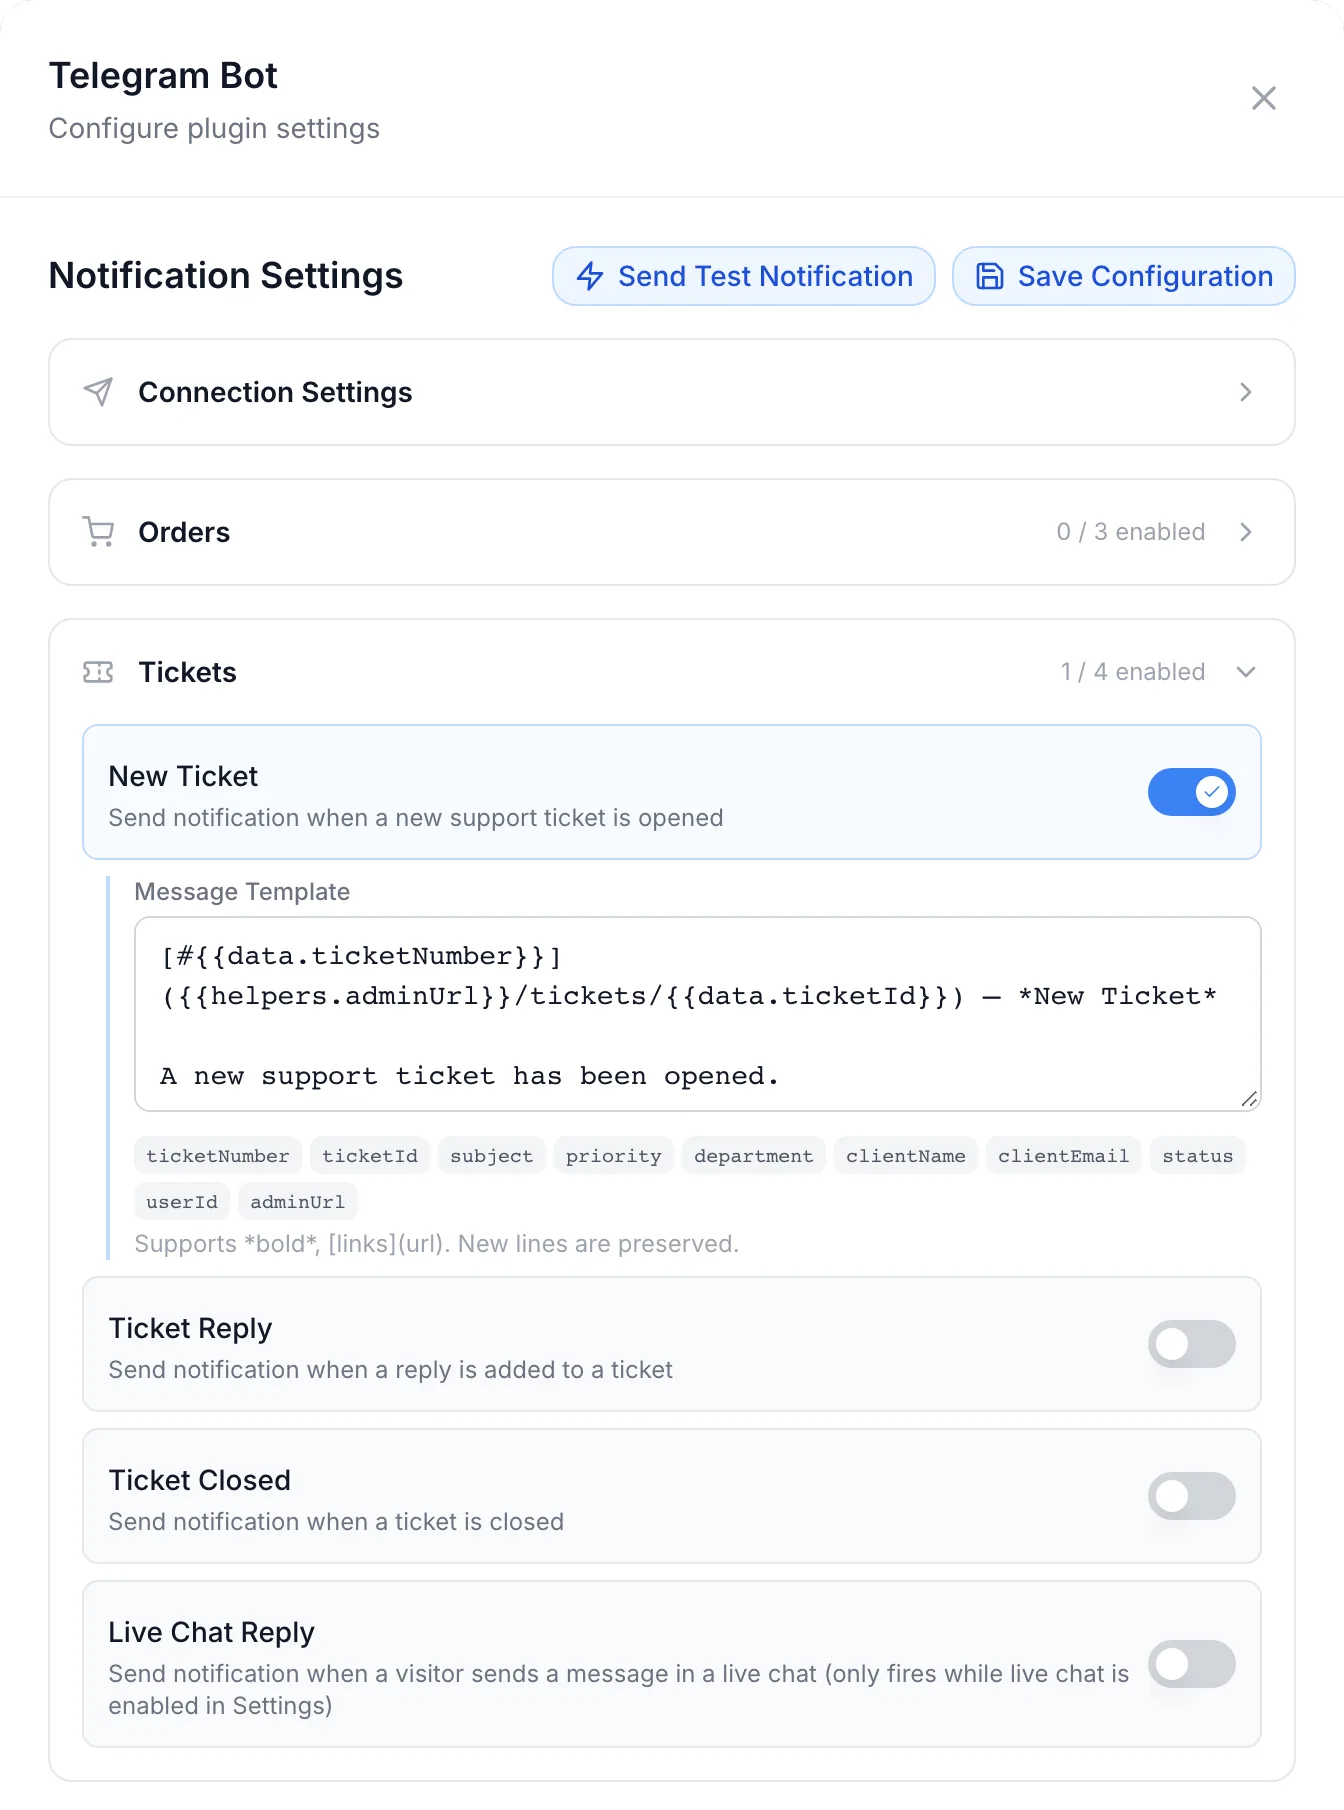
Below Connection Settings, the events are grouped into Orders, Tickets, Payments, Invoices, Users and Services. Each group header shows how many of its events are on, for example 1 / 4 enabled. Click a header to open the group, switch on the events you want, and click Save Configuration.
When you switch an event on, its Message Template appears underneath, already filled with a ready-made message. You can keep it, edit it, or come back to it later (see Message templates).
| Setting | Required | What it does |
|---|---|---|
| Bot Token | Yes | The token BotFather gave you in step 1. FluxBilling uses it to send each message as your bot. |
| Chat ID | Yes | The chat, group or channel the messages go to: the numeric ID from step 2, or @username for a public channel. One chat per plugin. |
| One switch per event, for example New Order or Payment Failed | No | Sends a message each time that event happens. All switches are off after install. |
| Message Template (under each event that is on) | No | The text of that event's message. It comes filled with a default message. If you empty the box and save, the default message is used again. |
Events you can send
These are the events you can switch on. Each one fires on your own panel, for your own clients and services.
| Group | Setting | Sent when |
|---|---|---|
| Orders | New Order | A client places an order. The default message shows the order number and total. |
| Orders | Order Paid | The payment for an order is confirmed. |
| Orders | Order Cancelled | A client cancels an order, staff reject an order, or staff cancel orders with Cancel Selected on the Orders list. The message gives the reason, for example Cancelled by customer or Rejected by admin. |
| Tickets | New Ticket | A ticket is opened from the client area, the public ticket form, a live chat or an imported email. The message shows the department, client, priority and subject. |
| Tickets | Ticket Reply | A client or guest replies to a ticket, in the client area, on the public ticket page or by email. Replies and internal notes from your staff do not send a message. |
| Tickets | Ticket Closed | A client closes their ticket from the client area. |
| Tickets | Live Chat Reply | A visitor sends a message in a live chat. Only while live chat is switched on (see Live chat). The message includes the first 500 characters of what the visitor wrote. |
| Payments | Payment Completed | A payment is received for an invoice or proforma. The message shows the document, amount and payment gateway. |
| Payments | Payment Failed | A payment gateway reports a failed payment, or an automatic charge of a saved payment method fails. |
| Payments | Payment Refunded | A refund is made on a payment or a proforma, including a refund to the client's credit balance. |
| Invoices | Invoice Created | An invoice is issued. The message shows the number, total and due date. |
| Invoices | Invoice Paid | An invoice is paid, including when staff mark it paid by hand. |
| Invoices | Invoice Overdue | Once per document, when the first payment reminder after the due date goes out. Overdue reminders must be set up for this event to fire. |
| Users | New User | A client signs up for an account, including through a social sign-in. Accounts that staff create do not send a message. |
| Users | User Verified | A client confirms their email address. |
| Services | Service Provisioning | A service starts being set up after payment. |
| Services | Service Activated | A service becomes active. |
| Services | Deployment Failed | Setting up a service fails. The message shows the stage and the error. |
| Services | Service Suspended | A service is suspended, by staff or by the billing automation. |
| Services | Service Unsuspended | A suspended service is reactivated. |
| Services | Service Terminated | A service is terminated. |
| Services | Service Renewed | A renewal is paid and the service's next due date moves on. |
| Services | Upgrade Requested | A client asks for a plan change and it is waiting to be paid. The message shows the old and new plan and the amount due now (see Upgrades and downgrades). |
| Services | Upgrade Completed | A plan change has been applied to the service. |
| Services | Upgrade Failed | A paid plan change could not be applied. |
Monitoring alerts are not part of this list. They are sent through FluxBilling's own alerting.
Message templates
A template is the text of the message, with placeholders in double curly braces that FluxBilling fills in when the event happens. The default New Order template, for example, is:
[#{{data.orderNumber}}]({{helpers.adminUrl}}/orders/{{data.orderId}}) — *New Order*

A new order has been placed.

Total: {{helpers.formatCurrency(data.total, data.currency)}}
In Telegram this arrives as a link with the order number that opens the order in your admin panel, followed by New Order in bold and the total with its currency.
{{data.…}}inserts a field of the event, such as{{data.orderNumber}},{{data.clientName}}or{{data.formattedAmount}}. Under most templates, small buttons insert common fields of that event and adminUrl. Not every event has buttons, and you can type any{{data.…}}field yourself.{{helpers.adminUrl}}is the address of your admin panel. The default templates use it to link to the order, invoice, proforma, ticket, client or service.- Helpers format values:
formatCurrency(amount, currency),formatDate(date),truncate(text, length),capitalize,uppercaseandlowercase. - Simple logic works inside the braces: fallbacks such as
{{data.reason || 'Not specified'}}, conditions such as{{data.isStaffReply ? 'staff' : 'a customer'}}, and joining text with+. - Line breaks in the box are kept.
Messages are sent with Telegram's Markdown formatting: *bold*, _italic_, [text](https://example.com) for links and `code` for fixed-width text. Telegram rejects a message whose formatting does not close, for example a single * or _. Event data can contain these characters too: an email address or hostname with an underscore, or a ticket subject with an asterisk. If an event's messages fail with a formatting error (see Troubleshooting), put that field between backticks, as the default Deployment Failed template does with the error text. Telegram does not interpret formatting inside backticks.
Step 6: Send a test message
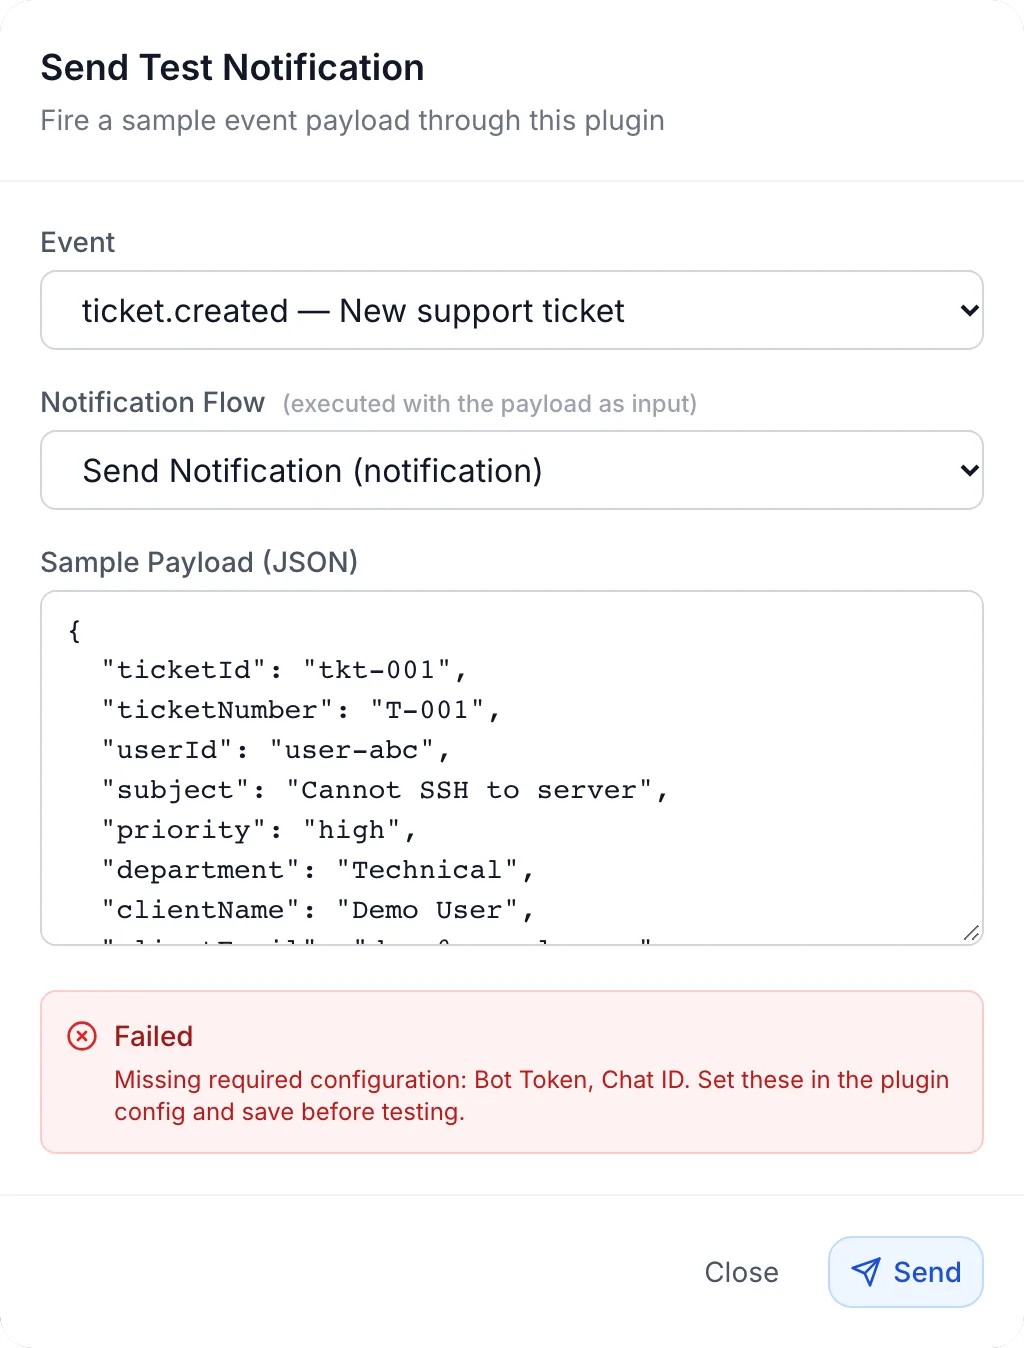
- Save your settings first. The test uses the saved bot token, Chat ID and templates.
- In the Configure dialog, click Send Test Notification.
- Choose an Event. The Sample Payload (JSON) box fills with example data for that event. Leave Notification Flow on Send Notification.
- Click Send.
The message goes to your chat at once, using that event's template, even if the event is switched off. The dialog shows Test notification sent with Telegram's answer, or Failed with the reason. The example data uses made-up numbers, so links in a test message do not open real records, and fields the example does not contain are not filled in. You can edit the sample payload before you send it.
What your customers see
Nothing. The plugin adds no payment method, order form option, service page button or customer email. Clients are not told that a message was sent, and their messages in Telegram do not reach FluxBilling. Only the people in your Telegram chat see the notifications.
What happens when an event fires
- FluxBilling checks whether the event is switched on in the plugin and whether the plugin is Active.
- It fills in the event's template and sends the message to Telegram as your bot. This happens in the background: a slow or failed message never holds up the order, payment or ticket that caused it.
- The attempt is written to the Delivery Log.
Each event type sends at most 60 messages a minute. Further messages of that type within the same minute are skipped and do not appear in the log. Telegram has its own limits: about one message a second in one chat, and 20 messages a minute in a group (Telegram bot FAQ). A burst larger than that, such as many invoices issued at once to a group, can be refused by Telegram and is then retried as described below.
Delivery Log
The Delivery Log at the bottom of the Configure dialog lists the recent messages for this plugin. Its columns include Flow, Status, Attempt, Last Attempt, Next Retry and Error. Filter it by All, Pending, Sent, Failed or Retrying, and click Refresh to update it. Click a row to open it: it shows the Event Payload, Telegram's answer under Response (HTTP …) and, for a failed message, the Error. Test messages are not logged.
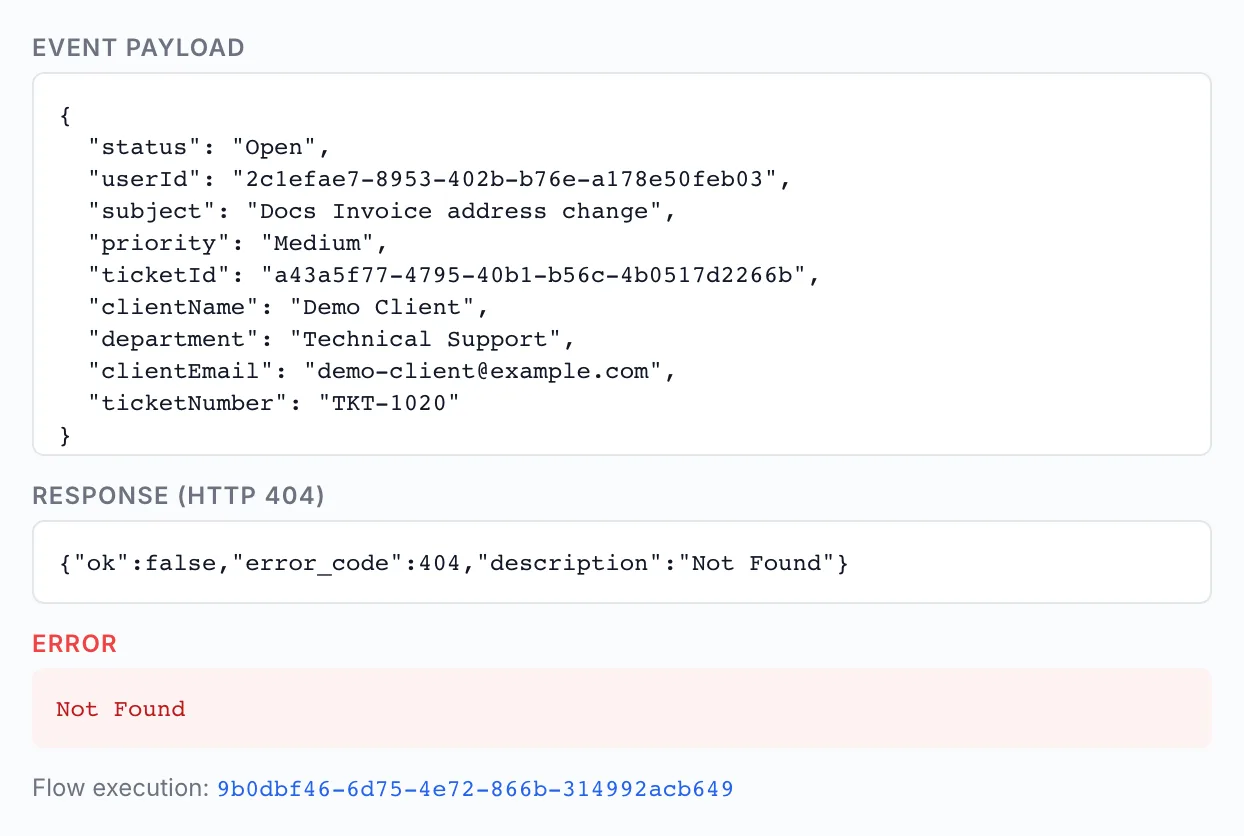
A message that fails is tried again, up to three attempts in all: the first, another about five minutes later, and a last one about fifteen minutes after that. Retries only run while the plugin is Active. A message that still fails stays Failed; open the row to see Telegram's answer.
Stopping or pausing notifications
- One event: switch it off in the Configure dialog and save.
- Everything: on the Telegram Bot card, open the ⋮ menu and choose Disable. Your settings are kept; choose Enable to resume. Events that happen while the plugin is disabled are not sent later.
- Different chat: enter the new Chat ID and save. Messages already sent stay in the old chat.
See Managing plugins for the plugin card and its menu.
Updating the plugin
Open Settings → Integrations → Marketplace, switch to Installed and click Check for Updates. If a newer version exists, click Update to v… on the Telegram Notifications row. Your bot token, Chat ID, switches and edited templates are kept.
Troubleshooting
For a failed test, the dialog shows the reason as a status code followed by Telegram's description, for example 400 Bad Request: chat not found. For a real event, open the Delivery Log, filter by Failed and click the row: the same description is in Telegram's answer under Response. Telegram returns an error code and a description with every failed request (Bot API: making requests).
| Message or symptom | What to check |
|---|---|
| Missing required configuration: Bot Token, Chat ID. Set these in the plugin config and save before testing. | The test was sent before the settings were saved. Enter both fields, click Save Configuration and test again. |
| 401 Unauthorized | Telegram does not accept the bot token. Copy it again from BotFather, without spaces, and save. If you generated a new token, the old one no longer works. |
| 400 Bad Request: chat not found | The Chat ID is wrong, or the bot has never been in that chat. Check the number, including the minus sign and the -100 prefix, and make sure the bot was started or added (step 2). |
| 403 Forbidden with a reason such as the bot being blocked, kicked, or not a member of the chat | Add the bot back to the group, make it an administrator of the channel, or press Start in the private chat again. |
| 400 Bad Request: can't parse entities | The message's formatting did not close. Check the template for a lone *, _, ` or [, and put fields that may contain those characters between backticks (see Message templates). |
| 429 Too Many Requests | Telegram's sending limit was reached. The message is retried automatically. If it happens often in a group, switch off busy events you do not need. |
| The test works, but real events send nothing | Check that the event is switched on and saved, and that the plugin card shows Active. Some events fire only in specific cases: Ticket Reply only for client replies, Ticket Closed only when the client closes the ticket, Live Chat Reply only while live chat is on, Invoice Overdue only with overdue reminders set up. |
| Links in the message do not open your admin panel | The links point to the admin panel address your FluxBilling panel is set up with. Contact FluxBilling support if they point elsewhere. |
Limits
- One chat. All events go to the one Chat ID. You cannot send different events to different chats. In a group with topics, the messages go to the group's main topic.
- One-way. The bot only posts. Replies, buttons and commands in Telegram do nothing in FluxBilling.
- Fixed formatting mode. Messages use Telegram's legacy Markdown. HTML and MarkdownV2 cannot be chosen.
- Text only. No attachments, such as invoice PDFs, and no images.
- Message length. Telegram accepts up to 4,096 characters per message (sendMessage). Keep templates short; a longer message is refused.
- The events listed above only. There are no switches for other events, such as a client changing their profile, and no filters by amount, product or client.
- Staff only. The plugin does not send Telegram messages to your clients.
Telegram is a trademark of Telegram Messenger Inc. FluxBilling is not affiliated with Telegram Messenger Inc.