
Plugin styling and assets
Upload CSS, SVG, image and font files to a plugin, use their public URLs, and keep per-panel theme values and custom CSS on the Styling tab.
Every plugin you build has two tabs for files and looks: Assets, where you upload the CSS, SVG, image and font files that ship with the plugin, and Styling, where you keep a set of colour, spacing, type and border values and custom CSS rules with the plugin. Both are saved inside the plugin, so they travel with it when you export it, import it or update it from a package.
This guide is for admins who build or maintain their own plugins. If you only install ready-made plugins, you do not need either tab. Start at Plugins introduction if you are new to the plugin editor.
Where to find it
- Open Settings and choose Plugins under Integrations.
- Click a plugin card, or open the card menu and choose Edit.
- In the plugin editor, open the Styling or Assets tab.
Plugins are part of every panel. No feature toggle is needed. Every plugin type has both tabs except analytics plugins, which show only Overview and Configuration.
Assets: files that ship with your plugin
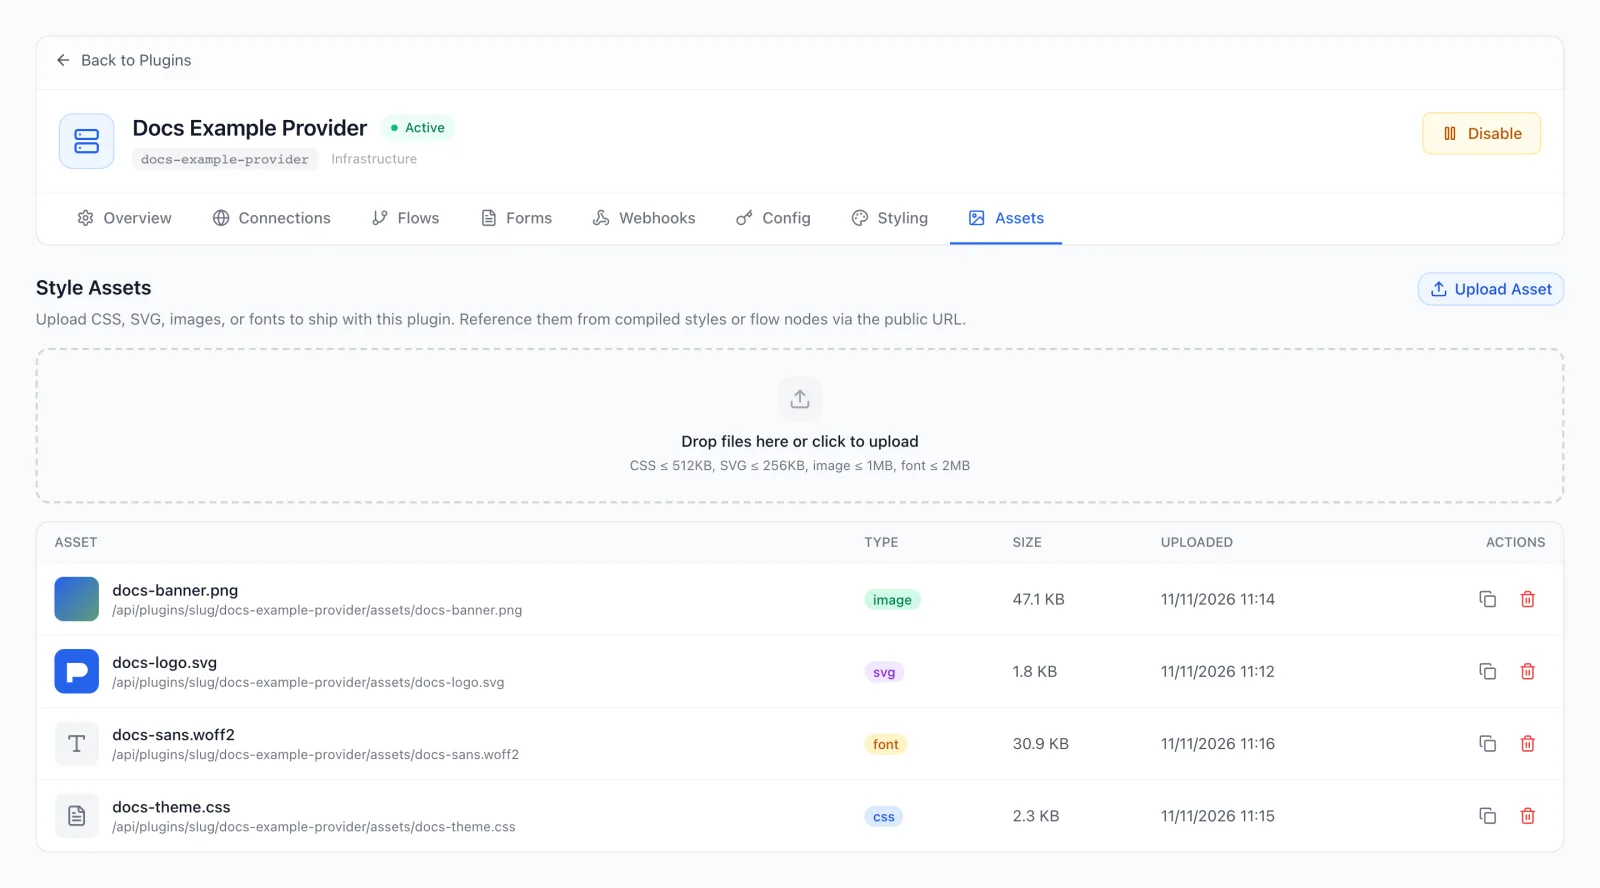
The Style Assets page holds the files your plugin needs, such as a logo, an icon set, a stylesheet or a web font. Each file gets a public URL, so you can point to it from your plugin's screens, from a Code Snippet setting, or from your own website.
Upload files
- Click Upload Asset, or drop files on the box that says Drop files here or click to upload. You can upload several files at once.
- Each file shows a progress bar while it uploads. When it reaches 100%, the file appears in the list.
The file keeps its original file name, and that name is how you refer to it. If you upload a file with the same name as an existing asset, the new file replaces the old one and keeps the same URL.
File types and size limits
The file type is taken from the file extension. The limits are printed under the drop zone.
| Type | Files | Largest file |
|---|---|---|
| css | .css stylesheets | 512 KB |
| svg | .svg vector images | 256 KB |
| image | PNG, JPEG, GIF and WebP images | 1 MB |
| font | .woff, .woff2, .ttf and .otf fonts | 2 MB |
Any file that is not CSS, SVG or a font is treated as an image. Other image formats, such as BMP or AVIF, are refused, and so are scripts. You cannot upload JavaScript from this tab.
The asset list
Each row shows:
- Asset: a thumbnail for images and SVGs (an icon for CSS and fonts), the file name, and the file's public URL underneath.
- Type: css, svg, image or font. Files that came with an installed package can show other types, for example a script for a website widget.
- Size and Uploaded (date and time).
- Actions: Copy public URL and Delete asset.
Use an asset's public URL
Click Copy public URL to copy the address of a file. The message Public URL copied confirms it. Keep these points in mind:
- The copied URL has no domain. It starts with a slash, so it works as it is inside your own panels. To use the file on another website, put your panel's address in front of it.
- Anyone can open it. The URL needs no login, so upload only files you are happy to make public.
- It works only while the plugin is Active. For a plugin in Draft or Disabled status, the URL answers Not Found, and the thumbnails in the list stay blank. Enable the plugin to serve its files.
- Browsers keep a copy for up to 5 minutes. After you replace a file, visitors can see the old version for a few minutes.
Common uses:
- Images in a service panel. A Custom HTML panel on the Forms tab can show an uploaded image with an
<img>tag that uses the copied URL. See Plugin forms and panels. - Embed code for admins. A Code Snippet setting on the Config tab can insert a file's full address with the placeholder
{{asset:<name>}}, for example{{asset:logo.svg}}. Unlike the copied URL, the placeholder includes your panel's address. The admin who sets up the plugin copies the finished code from the plugin's settings. See Configuration settings.
Delete an asset
Click the bin icon in the row and confirm the deletion. After you confirm, the file is gone and its URL answers Not Found. Anything that still points to it, such as a panel image or an embed code on your website, stops showing the file.
Styling: theme values and custom CSS
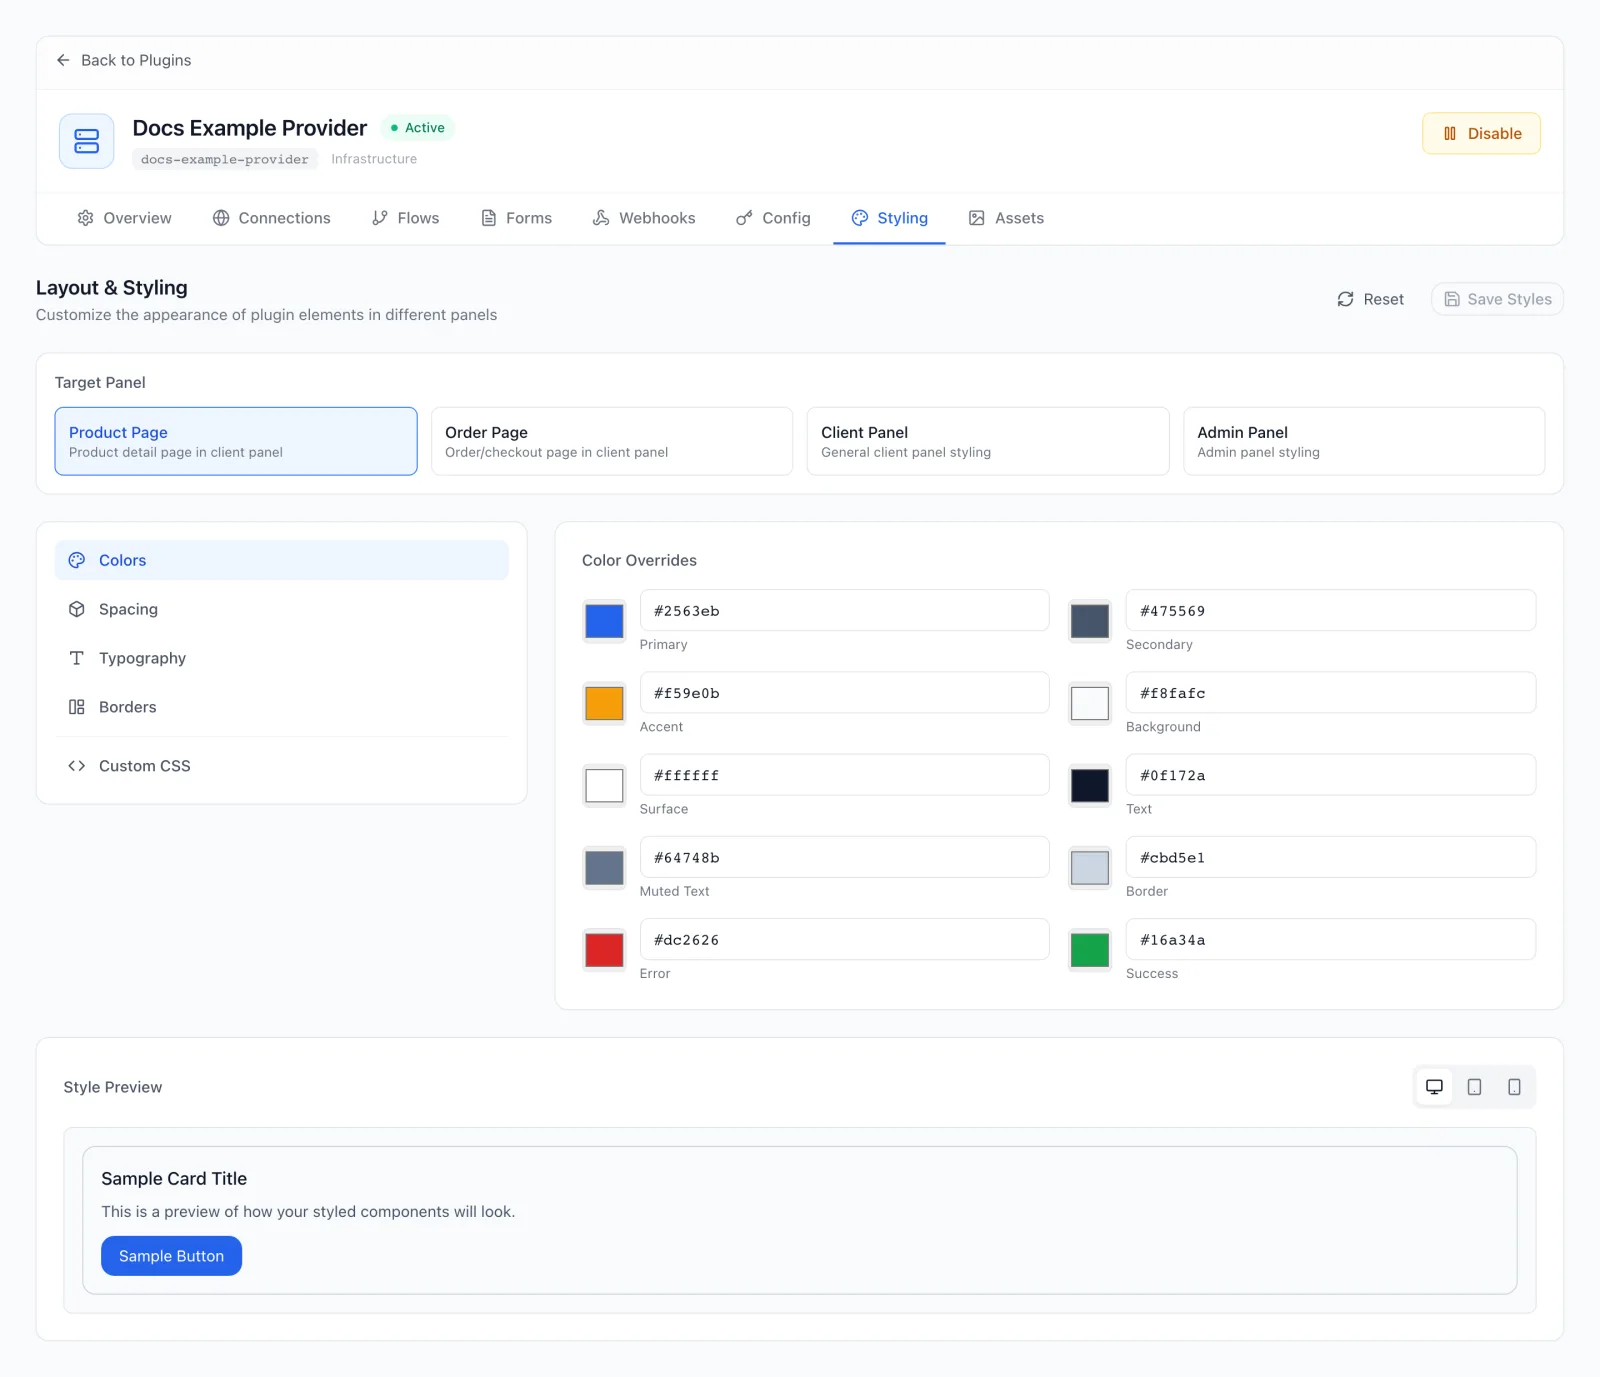
The Layout & Styling page keeps a set of theme values and custom CSS rules with your plugin. You can check the colours, borders and corners on a sample card before you save, and everything you save here travels with the plugin in its package.
Choose a target panel
Under Target Panel, pick one of Product Page, Order Page, Client Panel or Admin Panel. Each target keeps its own set of values and is saved on its own.
Save before you switch targets. When you pick another target, the page loads that target's saved values. Changes you have not saved for the previous target are discarded without a warning.
Edit the values
The menu on the left has four sections and a CSS editor. Apart from Font Weight, which is a list, every field is free text, so you can enter any CSS value, such as #2563eb, 12px or 0.5rem.
| Section | Fields |
|---|---|
| Colors (Color Overrides) | Primary, Secondary, Accent, Background, Surface, Text, Muted Text, Border, Error, Success. Each has a colour picker and a text box for the hex code. |
| Spacing (Spacing Values) | Small, Medium, Large |
| Typography | Font Family, Base Font Size, and Font Weight (Default, Light (300), Normal (400), Medium (500), Semi-bold (600), Bold (700)) |
| Borders | Border Radius, Border Width |
| Custom CSS | A code box for your own CSS rules. Click Custom CSS to open it, and click it again to go back to the sections. |
An empty colour field shows black in its colour picker. That is only the picker's display: the field stays empty until you pick a colour or type one.
To change the look of your client panel, use Settings → Appearance → Custom Code. See Custom code.
Style Preview
The Style Preview at the bottom shows a sample card with your values while you edit. It uses Background and Border for the card, Text for the title, Secondary for the text, Primary for the button and Border Radius for the corners. The other fields do not change the sample. The three icons switch the preview between desktop, tablet and mobile widths.
Save or reset
- Save Styles becomes available once you change something. It saves the values for the selected target, and the message Style saved confirms it.
- Reset asks Reset all styling to defaults? and then clears every field and the custom CSS for the selected target. Nothing is saved until you click Save Styles. If you change your mind, switch to another target and back: the page reloads the saved values.
Styling and assets in packages
When you export a plugin, its saved styles for every target and all of its assets go into the package. When you import that package into another panel, they come with it.
When you update a plugin from a newer package, the package's styles and assets are written over the ones in your panel. A target or an asset with the same name as one in the package is replaced. Targets and assets that the package does not contain are kept. Plugins installed from the marketplace cannot be exported. See Packaging, importing and updating.
Troubleshooting
| Message | What it means |
|---|---|
| "<file>" is too large (CSS ≤ 512KB). (or the limit for SVG, image or font) | The file is over the limit for its type. Compress or resize it and upload again. |
| Mimetype "<type>" not allowed for file_type "image". | The file is not a PNG, JPEG, GIF or WebP image, and not CSS, SVG or a font either. Convert it to one of the supported formats. |
| Failed to upload "<file>" or Upload failed | The upload did not finish. Check your connection and try again. The row of a failed upload is marked Failed with the reason underneath. |
| Copy failed — select the URL manually | The browser blocked the clipboard. Select the URL under the file name and copy it yourself. |
| The public URL shows Not Found | The plugin is not Active, the asset was deleted, or the file name in the URL does not match exactly. Enable the plugin and compare the name with the list. |
| Thumbnails in the asset list are blank | The plugin is in Draft or Disabled status, so its files are not served yet. They appear once you enable the plugin. |
| Asset not found when deleting | The asset was already deleted, for example in another browser tab. Reload the page to see the current list. |
| Failed to delete asset | The asset could not be removed. Reload the page and try again. |
| Failed to save style | The styles were not saved. Your changes are still in the form, so try Save Styles again. |