
Kanban task board
Plan staff work on the Dashboard: boards, lists and cards with labels, members, due dates, checklists and comments, shared or private.
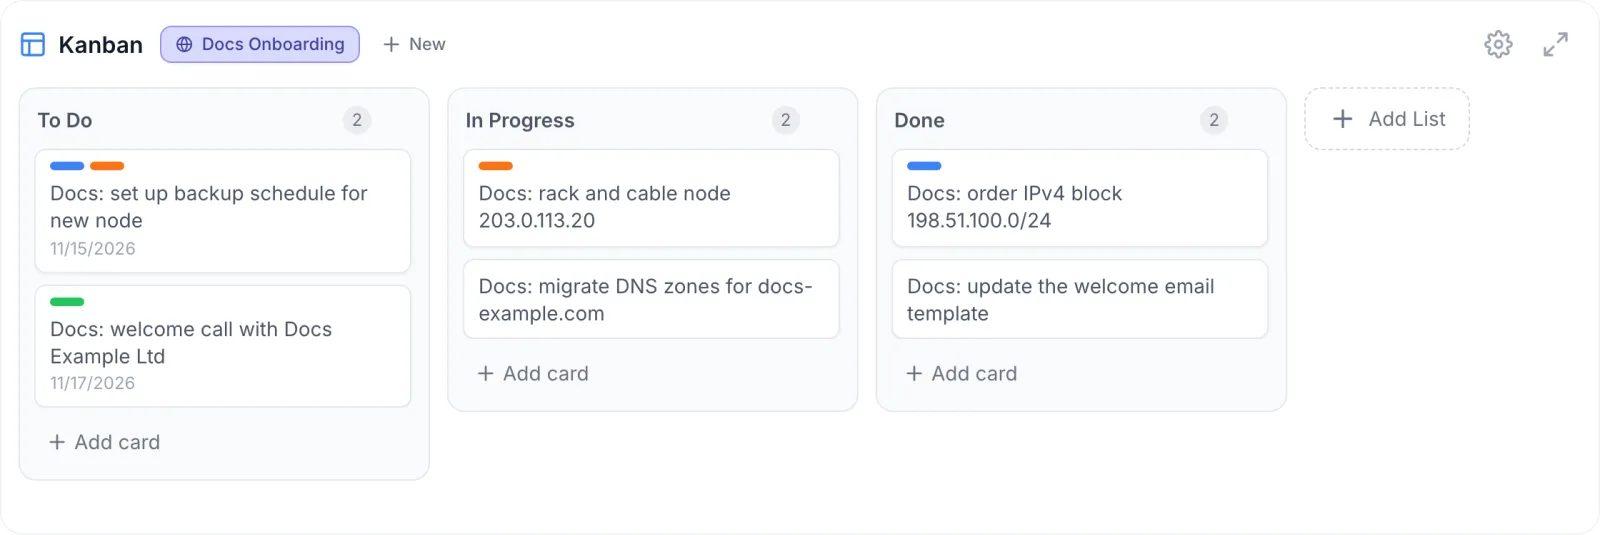
The Kanban board is a task board for your staff, built into the admin Dashboard. Use it for internal work that does not belong in a ticket: onboarding a new node, follow-ups with a client, a certificate to renew, a checklist before a launch. Each board has lists (columns), and each list holds cards you drag from one list to the next as the work moves on.
The board is for staff only. Customers never see it, and nothing on it appears in the client panel.
Where to find it
The board sits on the Dashboard, below the row of counters (pending orders, cancellations, tickets, clients). The section is headed Kanban. See Dashboard for the rest of the page.
- Feature toggle. The section only appears when the Kanban module is on, under Settings → General → Feature Toggles. Turning it off hides the board from the Dashboard. Your boards and cards are kept and come back when you switch the module on again. See Modules & Feature Toggles.
- Who can use it. Every staff account that can sign in to the admin panel can use the board. There is no separate staff permission for it in Staff & Permissions; what each person sees depends on board visibility (below).
Boards
The strip next to the Kanban heading shows one tab per board you can see. A globe icon marks a board shared with all admins; a lock marks a private board. Click a tab to load that board. When the Dashboard opens, the first board in the strip is loaded.
Create a board
- If you have no boards yet, the section reads No boards yet. Click Create Board. Otherwise click New at the end of the board strip.
- In Create New Board, type a name in Board name... and click Create.
Every new board starts with:
- three lists: To Do, In Progress and Done;
- four labels: Bug (red), Feature (green), Enhancement (blue) and Urgent (orange);
- Private visibility, so only you see it. To share it with your team, open the board settings and choose All Admins.
Board settings
Click the gear icon (Board settings) at the top right of the section to open Edit Board.
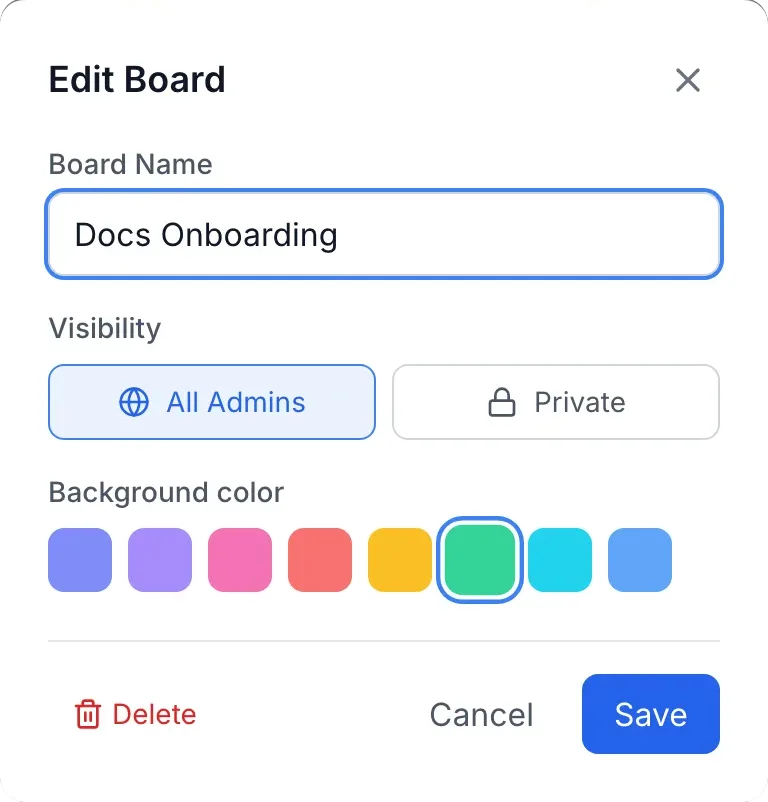
| Field | What it does |
|---|---|
| Board Name | The name on the board tab. A board must have a name; Save does nothing while it is empty. |
| Visibility | All Admins: every staff account sees the board and can work on it. Private: only you, the admin who created the board, see it. |
| Background color | One of eight colours for the board's tab in the strip. |
Click Save to apply the changes.
Delete a board
In Edit Board, click Delete. The dialog asks Delete this board?; click Yes, Delete. The board, its lists, cards, checklists and comments are removed for everyone. Only the admin who created a board can delete it.
Expand and collapse
The arrows icon next to the gear (Expand) gives the board most of the screen height, which helps when lists hold many cards. Click it again (Collapse) to return to the compact view. In the compact view, a list with many cards scrolls inside its column.
Lists
- Add a list. Click Add List after the last column, type a name in Enter list name... and press Enter or click Add List. New lists are added at the right end.
- Rename a list. Click the list name, type the new name, then press Enter or click anywhere else.
- Delete a list. Hover over the list header and click the × (Delete list). Confirm Delete this list and all its cards?. Every card in the list is deleted with it, so move the cards you want to keep first.
The number next to each list name is the number of cards in that list.
Cards
Add a card
- Click Add card at the bottom of a list.
- Type the title in Enter card title....
- Press Enter or click Add card. Shift+Enter starts a new line in the title. The card is added at the bottom of the list.
Move a card
Drag the card. Drop it on another card to put it in that place, in the same list or another one, or drop it on the empty part of a list to put it at the bottom. The target list is highlighted while you drag. A short click, without dragging, opens the card instead.
On the board, a card shows up to four label colours, its title and its due date. Everything else is inside the card.
Card details
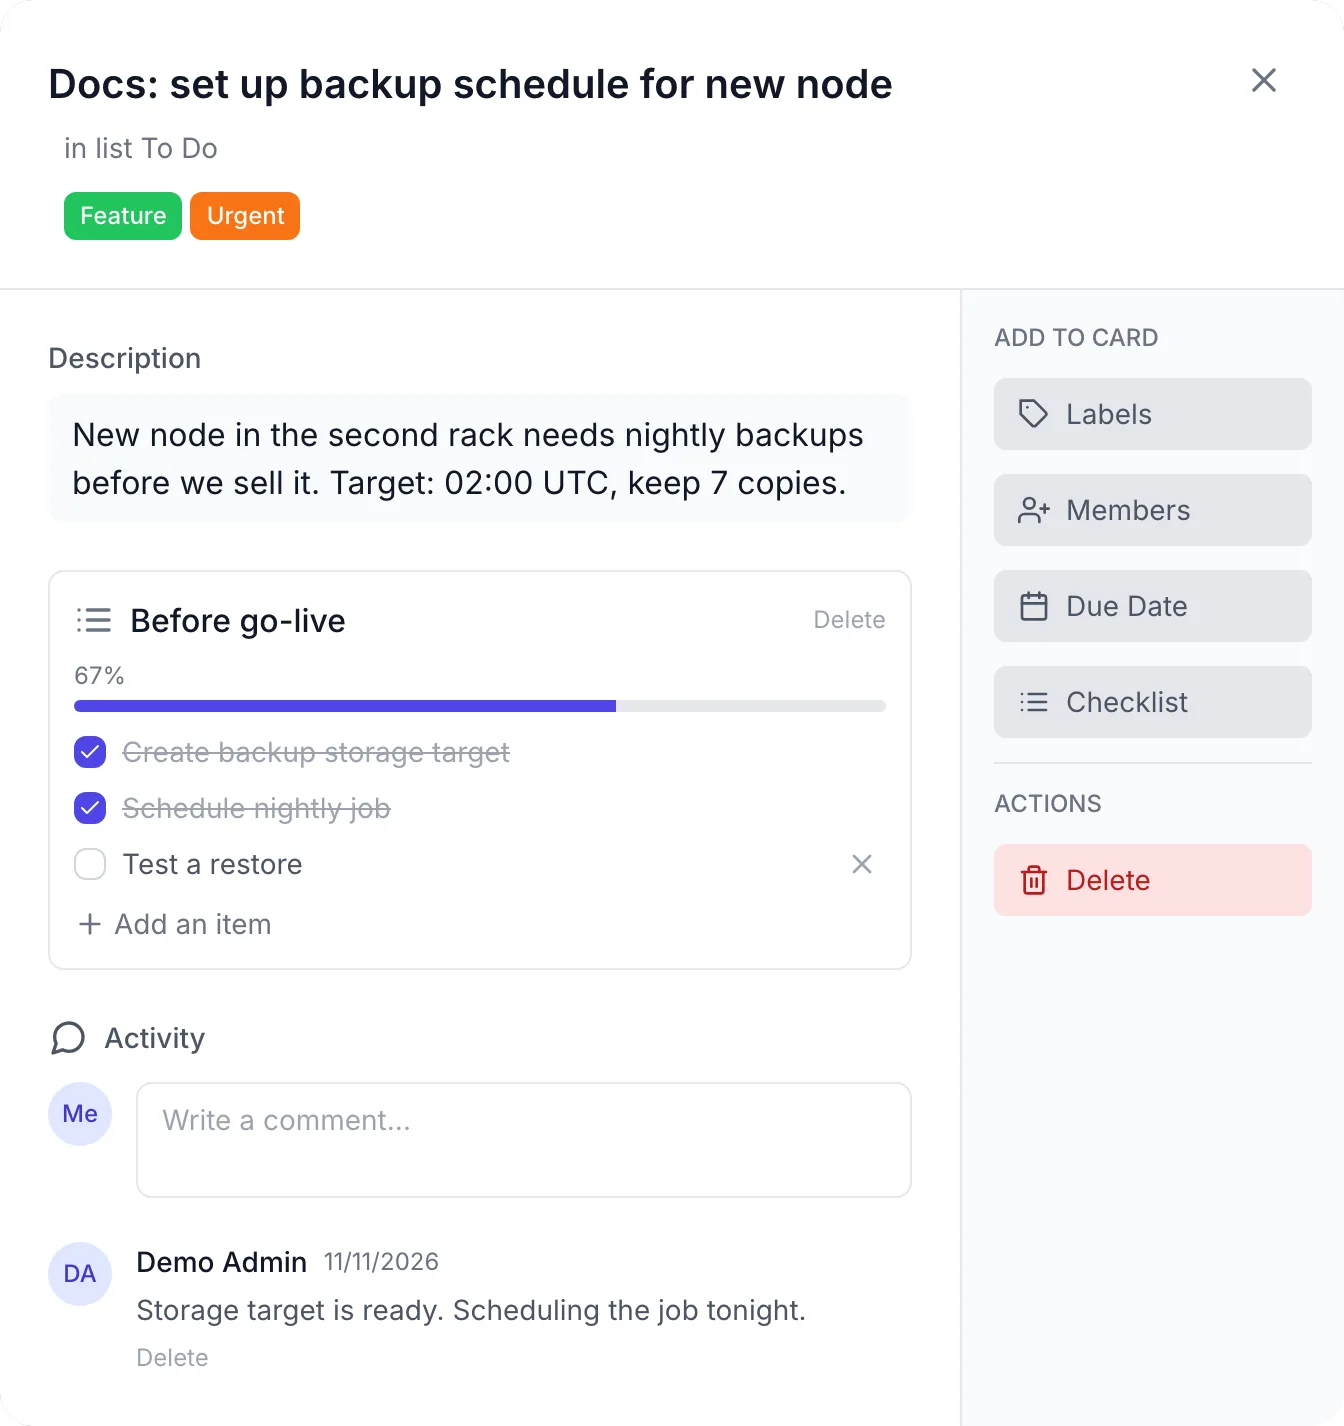
Click a card to open it. Under the title you see which list the card is in (for example in list To Do) and its labels.
Title and description
- Title. Click the title to edit it. Press Enter (or click elsewhere) to save, or Escape to cancel. An empty title is not saved.
- Description. Click the box under Description (it reads Add a more detailed description... while empty), type, and click Save. Cancel discards your edit.
Add to card
The Add to card column on the right holds four buttons. Label and member changes are saved as soon as you click them; a due date is saved when you click Save, and a new checklist when you click Add.
| Button | What it does |
|---|---|
| Labels | Opens the board's labels. Click a label to put it on the card; click it again to take it off. A check mark shows the labels the card has. Labels belong to the board, so every card on the board uses the same set. |
| Members | Lists the active admin accounts. Click a name to assign that person to the card; click again to unassign. A check mark shows who is assigned. Assigning someone does not send them a notification, so tell them yourself. |
| Due Date | Opens a date picker. Choose a date and click Save. The date then shows on the card on the board. It is a date only, with no time. |
| Checklist | Adds a checklist to the card (see below). |
Checklists
- Click Checklist, type a name in Checklist title... (for example "Before go-live") and click Add.
- In the new checklist, click Add an item, type in Add an item... and press Enter or click Add. Press Escape to stop adding.
- Tick the box in front of an item when it is done. Done items are struck through, and the bar above the items shows the share of done items as a percentage.
Hover over an item and click its × to remove it. Delete at the top right of a checklist removes the whole checklist and its items at once, without asking. A card can have more than one checklist.
Comments
The Activity section holds the card's comments, newest first, each with the author's name and date.
- Type in Write a comment... and press Enter, or click Save. Shift+Enter starts a new line.
Delete a card
Under Actions, click Delete and confirm Delete this card? This cannot be undone.. The message Card deleted confirms it. The card's checklists and comments are deleted with it.
Who sees what
| Action | All Admins board | Private board |
|---|---|---|
| See the board | Every staff account | Only the admin who created it |
| Add, edit, move and delete lists and cards | Every staff account | Only the admin who created it |
| Change name, visibility and colour | Every staff account | Only the admin who created it |
| Delete the board | Only the admin who created it | Only the admin who created it |
Making a shared board private. On an All Admins board, anyone can switch Visibility to Private. The board then disappears for everyone except the admin who created it, even if someone else made the change.
Troubleshooting
| You see | What it means |
|---|---|
| No Kanban section on the Dashboard | The Kanban module is off. Switch it on under Settings → General → Feature Toggles. |
| No boards yet | You have no boards of your own, and nobody has shared a board with all admins. Create one, or ask a colleague to set theirs to All Admins. |
| A colleague's board is missing from your strip | The board is Private. Only its creator can see it until it is set to All Admins. |
| Failed to load board | The boards could not be loaded. Reload the Dashboard. If it persists, check that you are still signed in. |
| Failed to load card details | The card could not be opened, for example because a colleague deleted it a moment ago. Reload the Dashboard. |
| Failed to update title, Failed to update description, Failed to update label, Failed to update assignee, Failed to set due date | The change was not saved. Reload the Dashboard and try again; the board may have been deleted or made private in the meantime. |
| Failed to add checklist, Failed to add item, Failed to toggle item, Failed to delete item, Failed to delete checklist | The checklist change was not saved. Reload and try again. |
| Failed to add comment, Failed to delete comment | The comment was not saved or removed. You can delete only comments you wrote. |
| Failed to delete card | The card was not deleted. Reload and try again. |
| A card jumps back after you drop it | The move could not be saved, so the board reloaded its last saved state. Try the move again. |