
Stripe: card payments, wallets and saved cards
Set up the free Stripe plugin: API keys, Connect Stripe and the webhook, hosted or on-site checkout with Apple Pay, saved cards, auto-payment and refunds.
The Stripe plugin lets your customers pay invoices, proformas and orders by card through your own Stripe account. FluxBilling sends the customer to Stripe, or shows Stripe's payment form on your own checkout page, and marks the document paid when Stripe confirms the payment. Customers can save a card for later, so renewal invoices can be charged automatically, and you can refund a payment in full or in part from the invoice. The plugin is free and is listed in the plugin marketplace of every FluxBilling panel.
This guide covers plugin version 3.8. It walks through the setup in the order you do it, then explains what your customers see, what happens to payments over their life, and what to check when something does not work.
Who supports this integration. The plugin is built and maintained by FluxBilling. If something does not work, contact FluxBilling support at contact@fluxbilling.app or through fluxbilling.app/contact. Questions about your Stripe account, payouts, fees or a blocked payment go to Stripe support.
What the plugin does
- One-time payments. By default the customer is sent to a payment page hosted by Stripe (Stripe Checkout) and comes back to your panel when they are done. You can instead show the payment form on your own checkout page, with Apple Pay, Google Pay and Link buttons above a card form (see On-site checkout).
- Saved cards. Customers can save their card while paying, or add one later from their profile. FluxBilling can then charge it for renewal invoices with Auto-Payment.
- Refunds. Full and partial refunds from the invoice page in the admin panel go back to the customer's card through Stripe.
- Status updates from Stripe. Stripe tells FluxBilling about completed, failed and expired payments, refunds, disputes and removed cards through a webhook, so documents stay in step with Stripe.
What you need before you start
- A Stripe account. To try the plugin first, use a Stripe sandbox and its test keys. No real money moves in a sandbox.
- Your Stripe API keys: the Publishable key (starts with
pk_test_orpk_live_) and the Secret key (starts withsk_test_orsk_live_). Both are on the API keys page of the Stripe Dashboard. Stripe explains the key types and how to reveal or create a secret key in API keys. - A public HTTPS address for your panel. Stripe only delivers webhooks to publicly reachable HTTPS addresses (Stripe webhooks). Without webhooks, payments made on Stripe are not reported back reliably.
- The payment methods you want to offer, switched on in the Stripe Dashboard under Settings → Payment methods. That page decides which methods appear on Stripe's payment page and which wallet buttons appear on your own checkout page.
The plugin uses the secret key for these Stripe objects. If you use a restricted key instead of the standard secret key, it must have access to all of them.
| Stripe object | Used for |
|---|---|
| Account, Balance (read) | Checking the key and showing which Stripe account it belongs to |
| Webhook endpoints (write) | Registering the webhook for your panel when you click Connect Stripe |
| Checkout Sessions (write) | Stripe's hosted payment page, and the page where customers add a card |
| PaymentIntents (write) | On-site payments, charging saved cards, checking a payment's status |
| Customers, PaymentMethods, SetupIntents | Saving cards, reading the brand, last four digits and expiry, removing a saved card |
| Refunds (write) | Refunds you make from FluxBilling |
| Payment method domains (write) | Registering your panel's domain for Apple Pay on your own checkout page |
Step 1: Install the plugin
- In the FluxBilling admin panel, open Settings (the gear icon in the top bar).
- Under Integrations, open Marketplace. Stay on the Browse tab.
- Search for Stripe, open its card and click Get for Free.
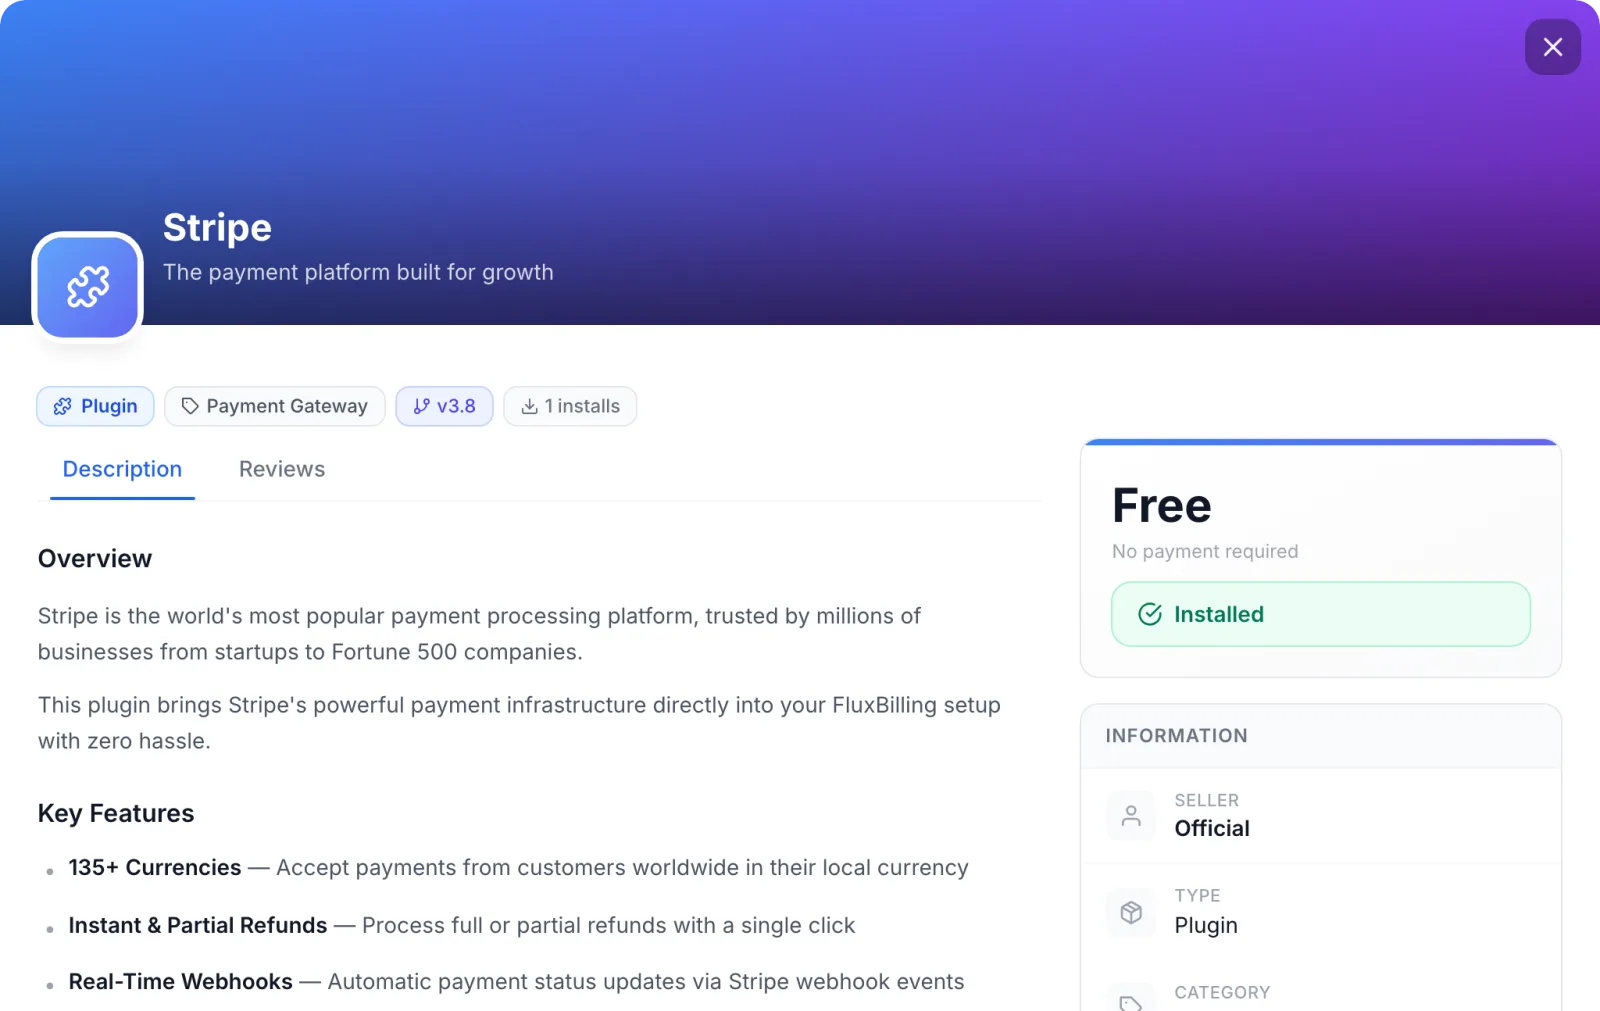
FluxBilling confirms with Plugin "Stripe" installed and ready to use. The plugin is switched on straight away and appears under Settings → Integrations → Plugins, marked Active. Customers do not see Stripe at checkout yet: it appears there only once its keys are saved in the next step.
Step 2: Enter your keys and connect
- Open Settings → Integrations → Plugins.
- On the Stripe card, click Configure. The dialog opens on the Settings tab.
- Make sure Enabled is ticked.
- Paste your Secret Key and Publishable Key. Tick Test Mode if they are test keys.
- Click Connect Stripe. FluxBilling saves what you typed, checks the key with Stripe and registers the webhook (see below).
- Click Save Configuration.
The Setup checklist at the top of the tab repeats these steps, and Open Stripe Dashboard opens Stripe's API keys page in a new tab.
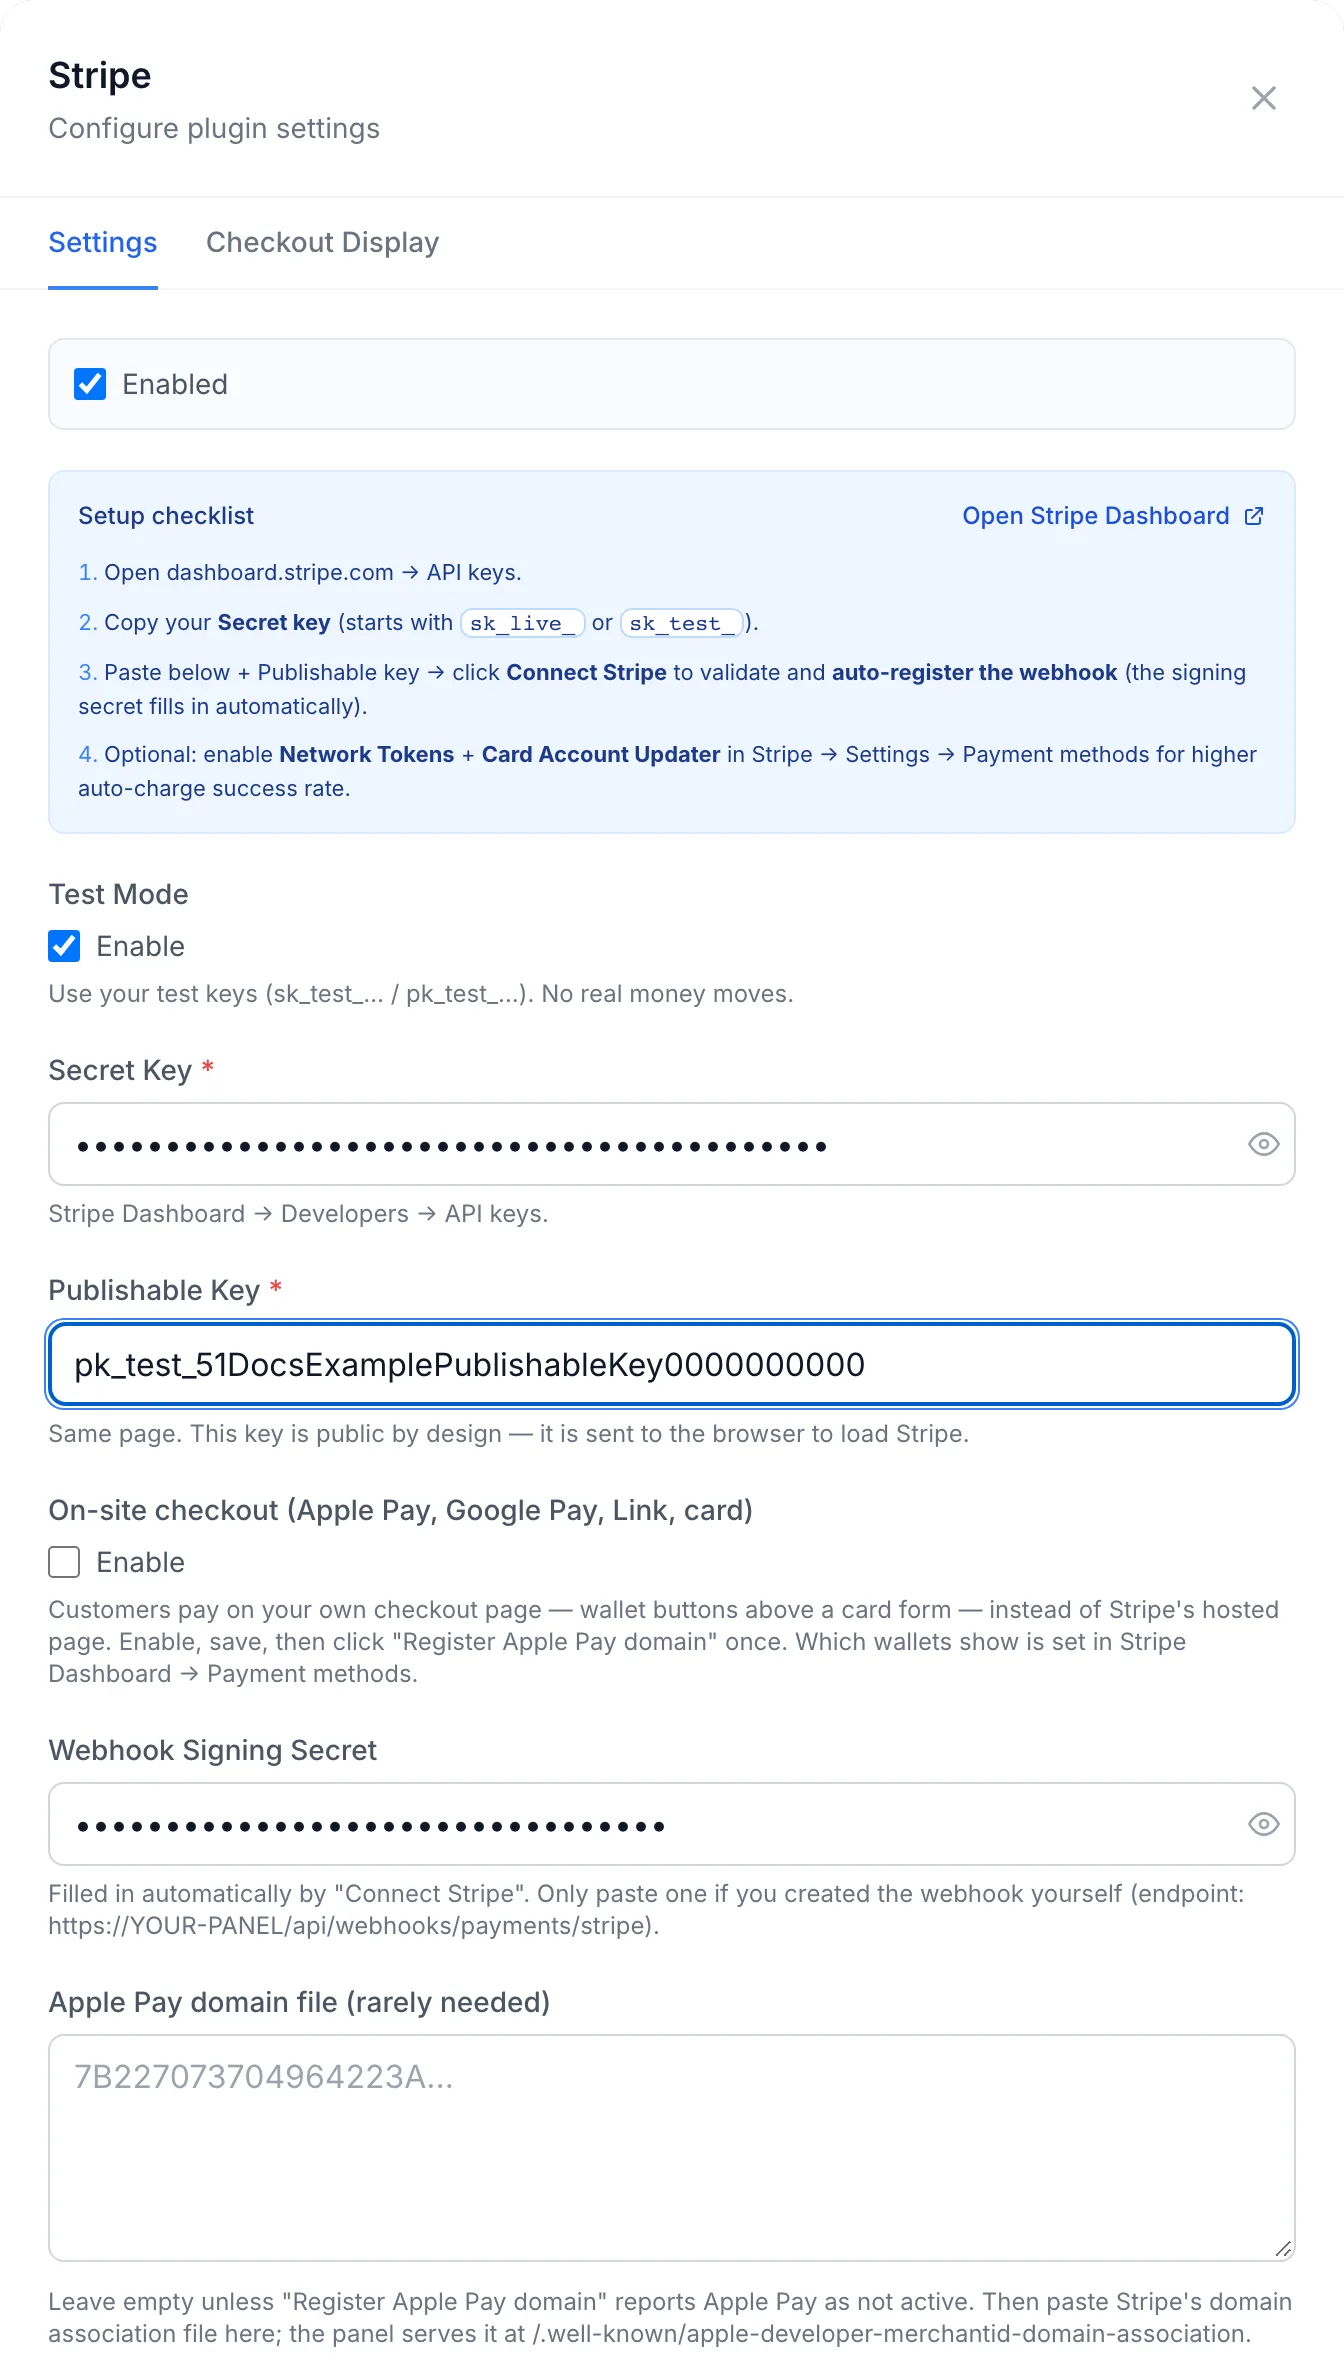
| Field | What it does |
|---|---|
| Enabled | Offers Stripe to customers. It is the same switch as the toggle on Settings → Financial → Payment Gateways. |
| Test Mode (optional) | Tick it while you use test keys, and untick it when you switch to live keys. It marks Stripe with a Test badge in the preview on the Checkout Display tab. Whether a payment is real or a test is decided by the keys themselves: test keys always create test payments, live keys real ones. |
| Secret Key (required) | Your Stripe secret key, sk_test_… or sk_live_…. It is stored encrypted and shown masked; the eye button reveals it. |
| Publishable Key (required) | Your Stripe publishable key from the same page, pk_test_… or pk_live_…. It is public by design: the customer's browser uses it to load Stripe's payment form on your own checkout page. Use the key from the same mode as the secret key. |
| On-site checkout (Apple Pay, Google Pay, Link, card) (optional) | Off: customers pay on Stripe's hosted page. On: they pay on your own checkout page. See On-site checkout. |
| Webhook Signing Secret (optional) | The whsec_… secret FluxBilling uses to check that webhooks really come from Stripe. Connect Stripe fills it in. Paste one yourself only if you create the webhook in Stripe by hand. |
| Apple Pay domain file (rarely needed) (optional) | Leave it empty unless Register Apple Pay domain reports that Apple Pay is not active. See On-site checkout. |
When the keys are saved, FluxBilling shows Configuration saved successfully. If the Secret Key or Publishable Key is missing, it saves the form but tells you the plugin is not configured until you fill in the field it names, and Stripe stays hidden at checkout.
What Connect Stripe does
- It checks the secret key against your Stripe account. On success the dialog shows Connected as the account's email address, with a TEST or LIVE badge. The badge follows the key: a key containing
_live_is live, any other key is test. - It registers a webhook endpoint in your Stripe account that points at your panel, and saves the endpoint's signing secret in Webhook Signing Secret. The line under the account reads Webhook … active with the time it was last verified.
- Once connected, the button reads Reconnect Stripe. Click it after you change keys. When an endpoint and its signing secret are already saved, Reconnect only checks the key and refreshes the endpoint's event list in Stripe; it does not create a second endpoint.
The Webhook configuration required box shows the exact webhook address of your panel with a Copy URL button, and what FluxBilling knows about it: Registered with provider after Connect, Receiving deliveries once Stripe has sent events, or Deliveries failing when they are rejected.
Creating the webhook yourself (optional)
You only need this if you do not want Connect Stripe to register the webhook.
- In the Stripe Dashboard, open Workbench → Webhooks and create an event destination for Your account, with the Snapshot payload. Stripe describes the screens in Receive Stripe events in your webhook endpoint.
- Select the events in the table below.
- As Endpoint URL, paste the address from the Webhook configuration required box.
- Reveal the endpoint's signing secret (
whsec_…), paste it into Webhook Signing Secret and click Save Configuration.
| Event | What FluxBilling does |
|---|---|
checkout.session.completed | Marks the payment completed when Stripe reports it paid, saves the card if the customer asked for that, and finishes adding a card from the profile. |
checkout.session.expired | Marks the payment attempt expired. The document stays unpaid. |
payment_intent.succeeded | Marks the payment completed (on-site checkout and saved-card charges). |
payment_intent.payment_failed | Marks the payment attempt failed, with the decline reason Stripe gives. |
payment_intent.canceled | Marks the payment attempt cancelled. |
charge.refunded | A full refund marks the invoice refunded. A partial refund leaves the invoice as it is. |
charge.dispute.created, charge.dispute.closed | Puts the document on hold when a dispute opens, and settles it when Stripe reports the outcome (see Disputes). |
setup_intent.succeeded | Confirms a card added from the profile. |
payment_method.detached | Switches off the matching saved card in FluxBilling, so it is no longer charged. |
When Connect Stripe registers the endpoint, it subscribes every event in the table except payment_intent.canceled, plus a few further events that FluxBilling receives and ignores. If you create the endpoint yourself, you can add payment_intent.canceled as well.
Step 3: Set how Stripe appears at checkout
Switch to the Checkout Display tab of the same dialog. These settings only change what customers see; they do not affect how payments are processed.
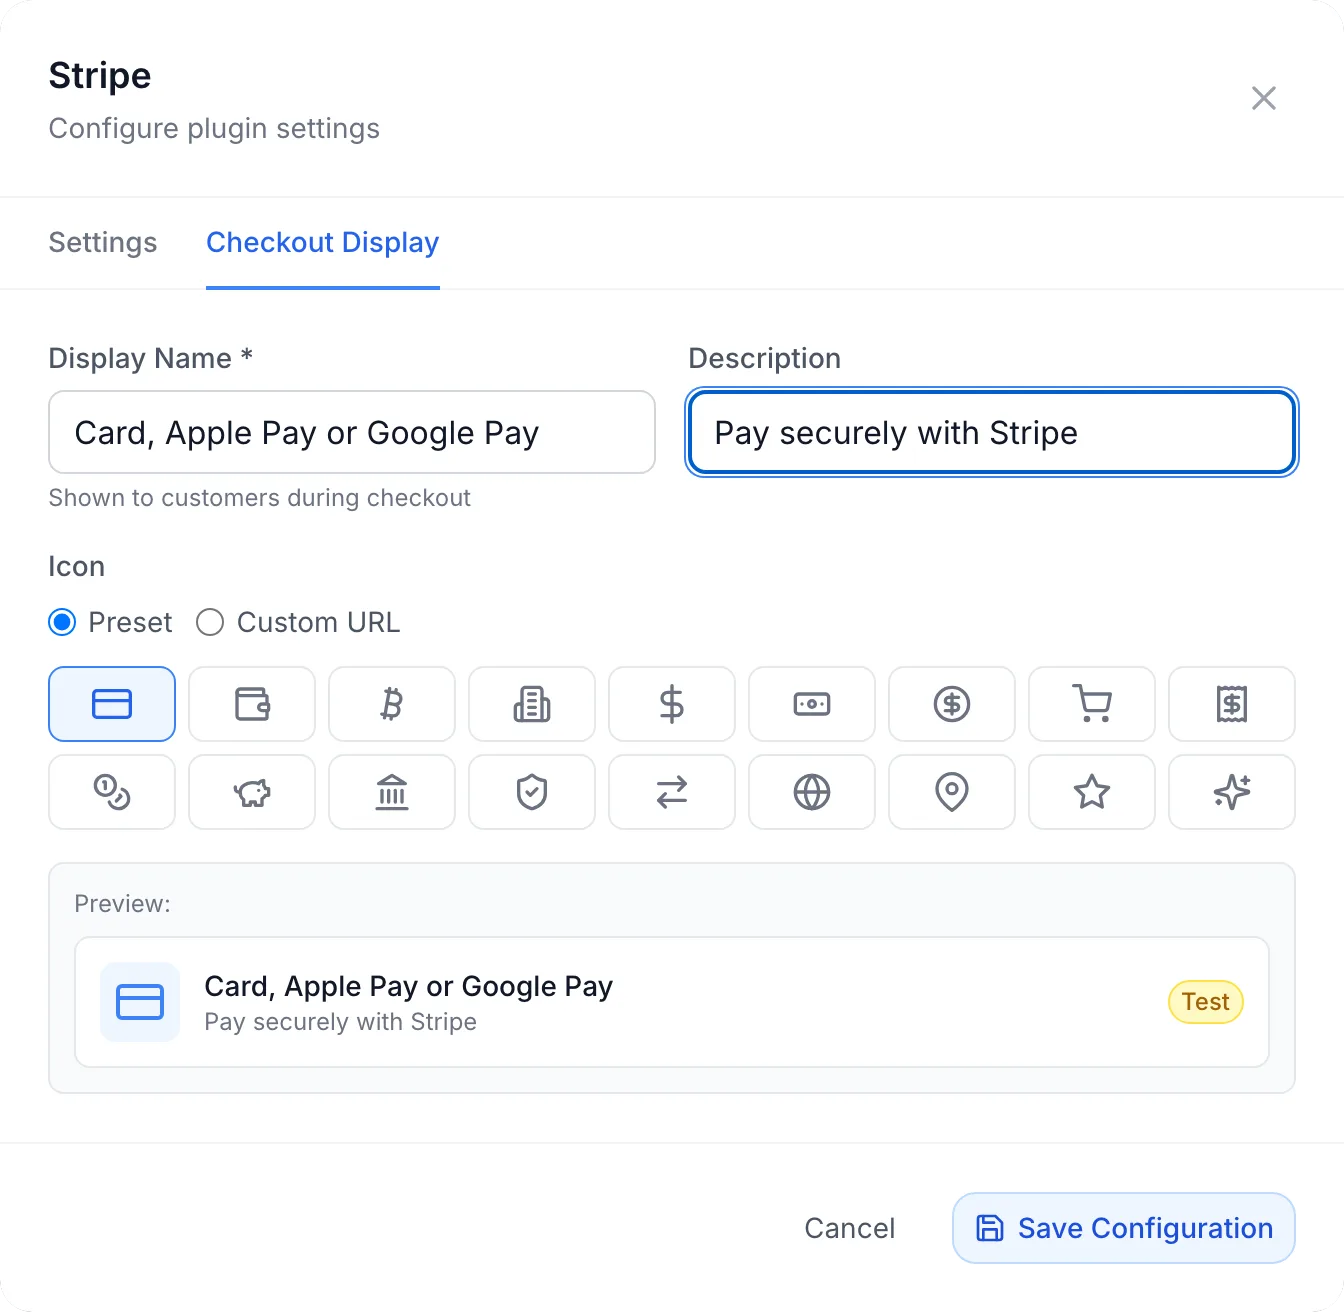
- Display Name (required): the name of the payment method at checkout, for example Card, Apple Pay or Google Pay. Save Configuration stays disabled while it is empty. The card on the Payment Gateways tab shows this name too.
- Description: one short line under the name at checkout. After installation it holds the plugin's own technical description, so replace it with a line written for your customers, for example Pay securely with Stripe.
- Icon: a Preset icon, or a Custom URL to your own image (PNG, SVG or JPG, 64×64 px recommended).
Click Save Configuration.
Step 4: Check that Stripe is switched on
Open Settings → Financial → Payment Gateways. Stripe has a card there under its display name, with an Enabled badge and a toggle. The toggle switches the Stripe plugin on or off straight away; while it is off, customers cannot choose Stripe.

Stripe appears at checkout while it is enabled and its Secret Key and Publishable Key are saved. Place a test payment from a test client account before you switch to live keys. Stripe lists card numbers for sandbox payments in Testing.
Switching to live payments
- In Stripe, switch the API keys page to live mode and copy the live keys.
- In the Configure dialog, replace both keys, untick Test Mode and clear Webhook Signing Secret. Webhook endpoints and their signing secrets are separate in test and live mode, so the test secret must go.
- Click Save Configuration, then click Reconnect Stripe. The badge should now read LIVE. With the secret field empty, Reconnect registers a live webhook endpoint and saves its secret. If a signing secret is still saved, Reconnect keeps the endpoint it already knows (the test one) instead, so clear the field and reconnect again.
On-site checkout, Apple Pay and Google Pay
With On-site checkout (Apple Pay, Google Pay, Link, card) ticked, customers stay on your checkout page. When they choose Stripe, FluxBilling shows Stripe's payment form in place: wallet buttons at the top, then or pay by card and a card form. The page's own pay button submits the card form.
- Stripe shows only the wallets the visitor can actually use, for example Apple Pay in Safari on an Apple device with a card in Wallet, or Google Pay in Chrome. When none is available, only the card form shows.
- Which wallets can appear is set in the Stripe Dashboard under Settings → Payment methods.
- Cards that need 3D Secure authentication take the customer to their bank's check and back to your panel.
For Apple Pay, Stripe must know your panel's domain:
- Tick On-site checkout and click Save Configuration.
- Click Register Apple Pay domain. FluxBilling registers your panel's domain with Stripe as a payment method domain, or asks Stripe to check it again if it is already registered.
- The result reads, for example, Domain billing.example.com registered with Stripe. Apple Pay: active, Google Pay: active. If Apple Pay is active, you are done.
- If Apple Pay is not active, Apple could not read the domain association file from your panel. Download the file from Stripe (Stripe explains where in Register domains for payment methods), paste its contents into Apple Pay domain file (rarely needed), save, and click Register Apple Pay domain again. FluxBilling then serves the file at the address Apple checks on your domain.
The hosted Stripe Checkout page needs none of this, and Google Pay needs no domain file.
What your customers see
Paying an invoice or an order
On the checkout page, Stripe is listed under Payment Method with your display name, description and icon.
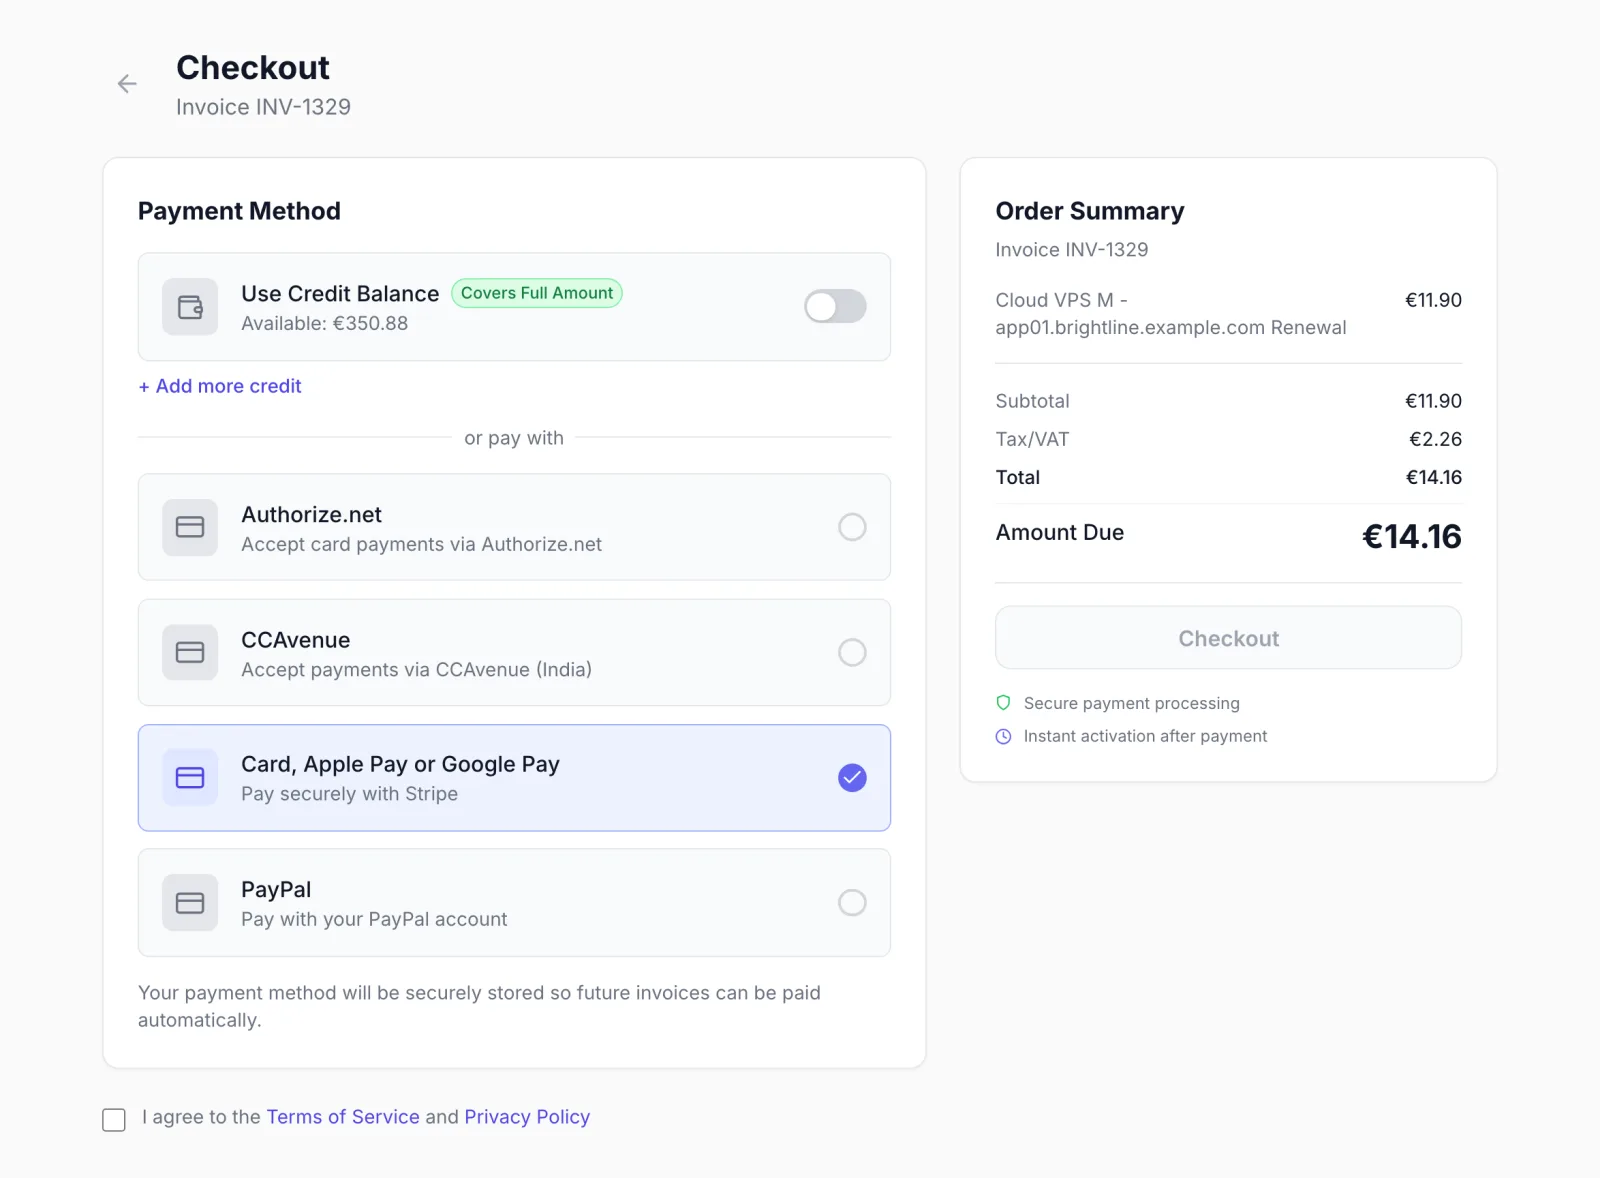
- Under the methods, the tick-box Save this payment method for future purchases lets the customer save the card while paying. If you switch on Require saving the payment method under Settings → Financial → Billing, customers see the notice Your payment method will be securely stored so future invoices can be paid automatically. instead of the tick-box.
- Customers with saved cards see them under Saved Payment Methods at the top, with the card brand, last four digits and expiry, and can pay with one click. or use a different method leads to the full list.
- With the hosted page, the customer is sent to Stripe Checkout to pay and is brought back to your panel afterwards. The methods on Stripe's page follow your Stripe payment method settings.
- The document is marked paid when Stripe confirms the payment. The usual payment emails and service provisioning follow, as for any gateway.
The same Stripe options are offered when a customer adds account credit, if you allow that.
Managing saved cards
In the client area, Profile → Payment Methods lists the customer's Saved Payment Methods. There they can:
- Click Add payment method. If more than one gateway can save a payment method, a dialog lists them and the customer picks Stripe (under the display name you set). They are sent to a Stripe page to enter a card and are brought straight back; FluxBilling then confirms Payment method saved — future invoices can now be paid automatically. Cards are the only method offered on this page.
- Choose Set Default for the card Auto-Payment should use.
- Delete a card. FluxBilling also removes it from the customer in Stripe.
Expired cards are marked Expired.
Payments over time
Automatic payment of renewals
Saved Stripe cards are charged by FluxBilling's Auto-Payment, which you set up under Settings → Financial → Billing, in the Auto-Payment for Renewals card:
- Enable Auto-Payment switches it on. Days Before Due sets when the charge is attempted, Max Retries and Retry Interval how often a declined charge is tried again. Retries happen during the once-a-day billing run.
- Auto-enroll customers when they save a card turns on automatic payment for a customer as soon as they save a card. Leave it off to let customers opt in.
Stripe charges the saved card without the customer present. Each charge attempt carries a unique key, so a repeated request for the same attempt is not charged twice. If a charge fails, with the default email templates the customer receives Action required: payment failed for invoice … with a Pay invoice now button, and the email says whether another attempt will follow. This includes a charge the customer's bank refuses because it wants the customer to authenticate: the customer pays the invoice themselves, and that failure never counts toward switching the card off. After repeated declines the card is switched off and the customer is told by email that their saved payment method was disabled.
If you move from WHMCS, cards your customers saved with WHMCS's Stripe modules come across with the WHMCS Migration and can be charged without customers entering them again.
Refunds
- Open the paid invoice in the admin panel and click Refund.
- Under Refund Method, choose Via Gateway (Process through original payment gateway).
- Enter an Amount, or leave it empty for a full refund. If the invoice was paid more than once, choose the Payment to refund.
- Add a Reason if you like and confirm.
FluxBilling asks Stripe to refund that payment to the customer's card and confirms Refund processed via gateway. Partial refunds keep the invoice paid. Stripe records the refund with the reason "requested by customer". If the refund does not go through, FluxBilling shows the reason, or Failed to process refund.
A full refund you make in the Stripe Dashboard also reaches FluxBilling through the webhook and marks the invoice refunded. Make partial refunds from FluxBilling: a partial refund made in the Stripe Dashboard does not change the invoice.
Disputes
- When a customer disputes a payment, the invoice or proforma it paid is put On hold. If the payment was a credit top-up, the credit it added is taken back from the customer's balance.
- When Stripe reports that you won, the hold is lifted, the document returns to paid and any credit taken back is restored.
- When you lose, an invoice covered in full by the disputed amount is marked refunded, and a proforma covered in full is cancelled. A document covered only in part stays on hold with a note, for you to close.
- Each outcome is recorded in the document's notes. Documents in a closed month keep their status.
Troubleshooting
| Message or symptom | Cause and fix |
|---|---|
| Stripe does not appear at checkout | The plugin is not enabled, or the Secret Key or Publishable Key is not saved. Check Enabled, fill in both keys and save. |
| Last connection attempt failed with Invalid API Key provided: … or Stripe API authentication failed. Verify your Secret Key on dashboard.stripe.com. | The secret key is wrong, expired or rotated. Copy it again from the Stripe API keys page, then click Reconnect Stripe. |
| Connected as … followed by — webhook step needs attention | The key works but Stripe did not register the webhook, for example because your panel's address is not public HTTPS, or a restricted key lacks access to webhook endpoints. Stripe also stops sending events to an endpoint after repeated failed deliveries; check in Workbench → Webhooks that the endpoint is enabled. Fix the cause and reconnect, or create the webhook yourself. |
| The webhook box shows Deliveries failing, or payments stay pending after the customer paid | Stripe's events are rejected, usually because the saved signing secret is missing or belongs to another endpoint (for example a test endpoint after switching to live keys). Clear Webhook Signing Secret, save and click Reconnect Stripe, or paste the secret of the endpoint you created yourself. |
| Minimum payment amount is 0.5 … | The amount left to pay is below the gateway's minimum. Customers can pay the rest with credit or another method. |
| Failed to initiate payment, or an error from Stripe when the customer clicks pay | Stripe refused to create the payment. The customer sees Stripe's own message where Stripe gives one. Check the key, and that the currency and payment methods are available in your Stripe account. |
| Could not register the domain with Stripe. Check the Secret Key and that this panel is reachable over HTTPS. | Registering the Apple Pay domain failed. Check the key and that your panel's address is public HTTPS, then try again. |
| Apple Pay reported as not active after Register Apple Pay domain | Paste Stripe's domain association file into Apple Pay domain file (rarely needed), save, and register again. |
| Setup cancelled — no payment method was saved. | The customer left Stripe's add-card page before finishing. They can start again from Add payment method. |
| The card setup was not completed. Please try again. | The customer came back before Stripe's card setup page was finished, for example while it was still open or after it expired. They can try again from Add payment method. |
| This card setup was started from a different account. | The add-card link was opened while signed in to another client account. The customer signs in to the right account and adds the card again. |
| The card could not be set up for future payments. Please try again or use another card., or Stripe's own reason | Stripe did not approve the card for later payments. The customer tries again or uses another card. |
| An error saying the saved Stripe method has no customer or payment method reference and asking the customer to re-save their card | A saved card, typically an imported one, has no Stripe reference FluxBilling can charge. Ask the customer to add the card again from Profile → Payment Methods. |
| Failed to charge saved payment method, or Stripe's decline message | Stripe declined the saved card. The customer pays the invoice another way or adds a new card. |
Limits
- Documents in US dollars and euros, and documents in your base currency, are charged in their own currency. A document in any other currency is converted and charged in your base currency.
- The smallest amount Stripe is asked to charge is 0.50.
- The plugin does not use Stripe subscriptions or Stripe invoices. Billing cycles, invoices and renewals stay in FluxBilling, which charges saved cards itself.
- Refunds go back to the original card. Refunding to the customer's account credit instead is a separate choice in the Refund dialog that does not involve Stripe.
- Each FluxBilling panel connects to one Stripe account.
Related
Payment Gateways · Settings: Billing · Invoices · Credit balance · WHMCS Migration
Stripe is a trademark of Stripe, Inc. FluxBilling is not affiliated with Stripe, Inc.