
PayPal: payments and saved PayPal accounts
Set up the PayPal plugin: API credentials, Connect PayPal and its webhook, checkout display, saved PayPal accounts for renewals, refunds and troubleshooting.
The PayPal plugin lets your customers pay FluxBilling invoices, orders and credit top-ups with PayPal, and lets FluxBilling charge a saved PayPal account automatically for renewals. The customer picks PayPal at checkout, approves the payment on PayPal's site and comes straight back; FluxBilling captures the payment and marks the invoice paid. Refunds, full or partial, are issued from the invoice in the admin panel. The plugin is free and is listed in the plugin marketplace of every FluxBilling panel.
This guide covers plugin version 3.2. It follows the setup in the order you do it, then explains what your customers see, what happens to payments over time and what to check when something does not work.
Who supports this integration. The plugin is built and maintained by FluxBilling. If something does not work, contact FluxBilling support at contact@fluxbilling.app or through fluxbilling.app/contact. Questions about your PayPal account, its limits, fees or disputes go to PayPal.
What you need before you start
- A PayPal Business account. PayPal requires one to take live payments. See Get started with PayPal REST APIs.
- A REST API app in the PayPal Developer Dashboard, with its Client ID and Secret. Sandbox and live apps have different credentials.
- The Vault feature on that app, if customers should be able to save their PayPal account for automatic renewals (see step 1).
- A public HTTPS address for your FluxBilling panel. PayPal sends its payment events (webhooks) there, and it can only reach a public address.
Step 1: Create a REST API app in PayPal
- Log in to the PayPal Developer Dashboard with your PayPal account.
- Open Apps & Credentials and choose Sandbox to test or Live to take real payments.
- Open an app under REST API apps, or click Create App to make one for FluxBilling.
- Copy the Client ID and the Secret from the app's page.
- To let customers save their PayPal account: on the app's page, under App Feature Options, keep Accept payments checked, expand Advanced options and make sure Vault is selected. PayPal describes this in Save PayPal with the Payment Method Tokens API.
You do not need to add a webhook in PayPal yourself: the Connect PayPal button in step 3 registers it for you. To test without real money, create test buyer and seller accounts as described in PayPal's sandbox testing guide.
Step 2: Install the plugin
- In the FluxBilling admin panel, open Settings (the gear icon in the top bar).
- Under Integrations, open Marketplace. Stay on the Browse tab.
- Open the PayPal card and click Get for Free.
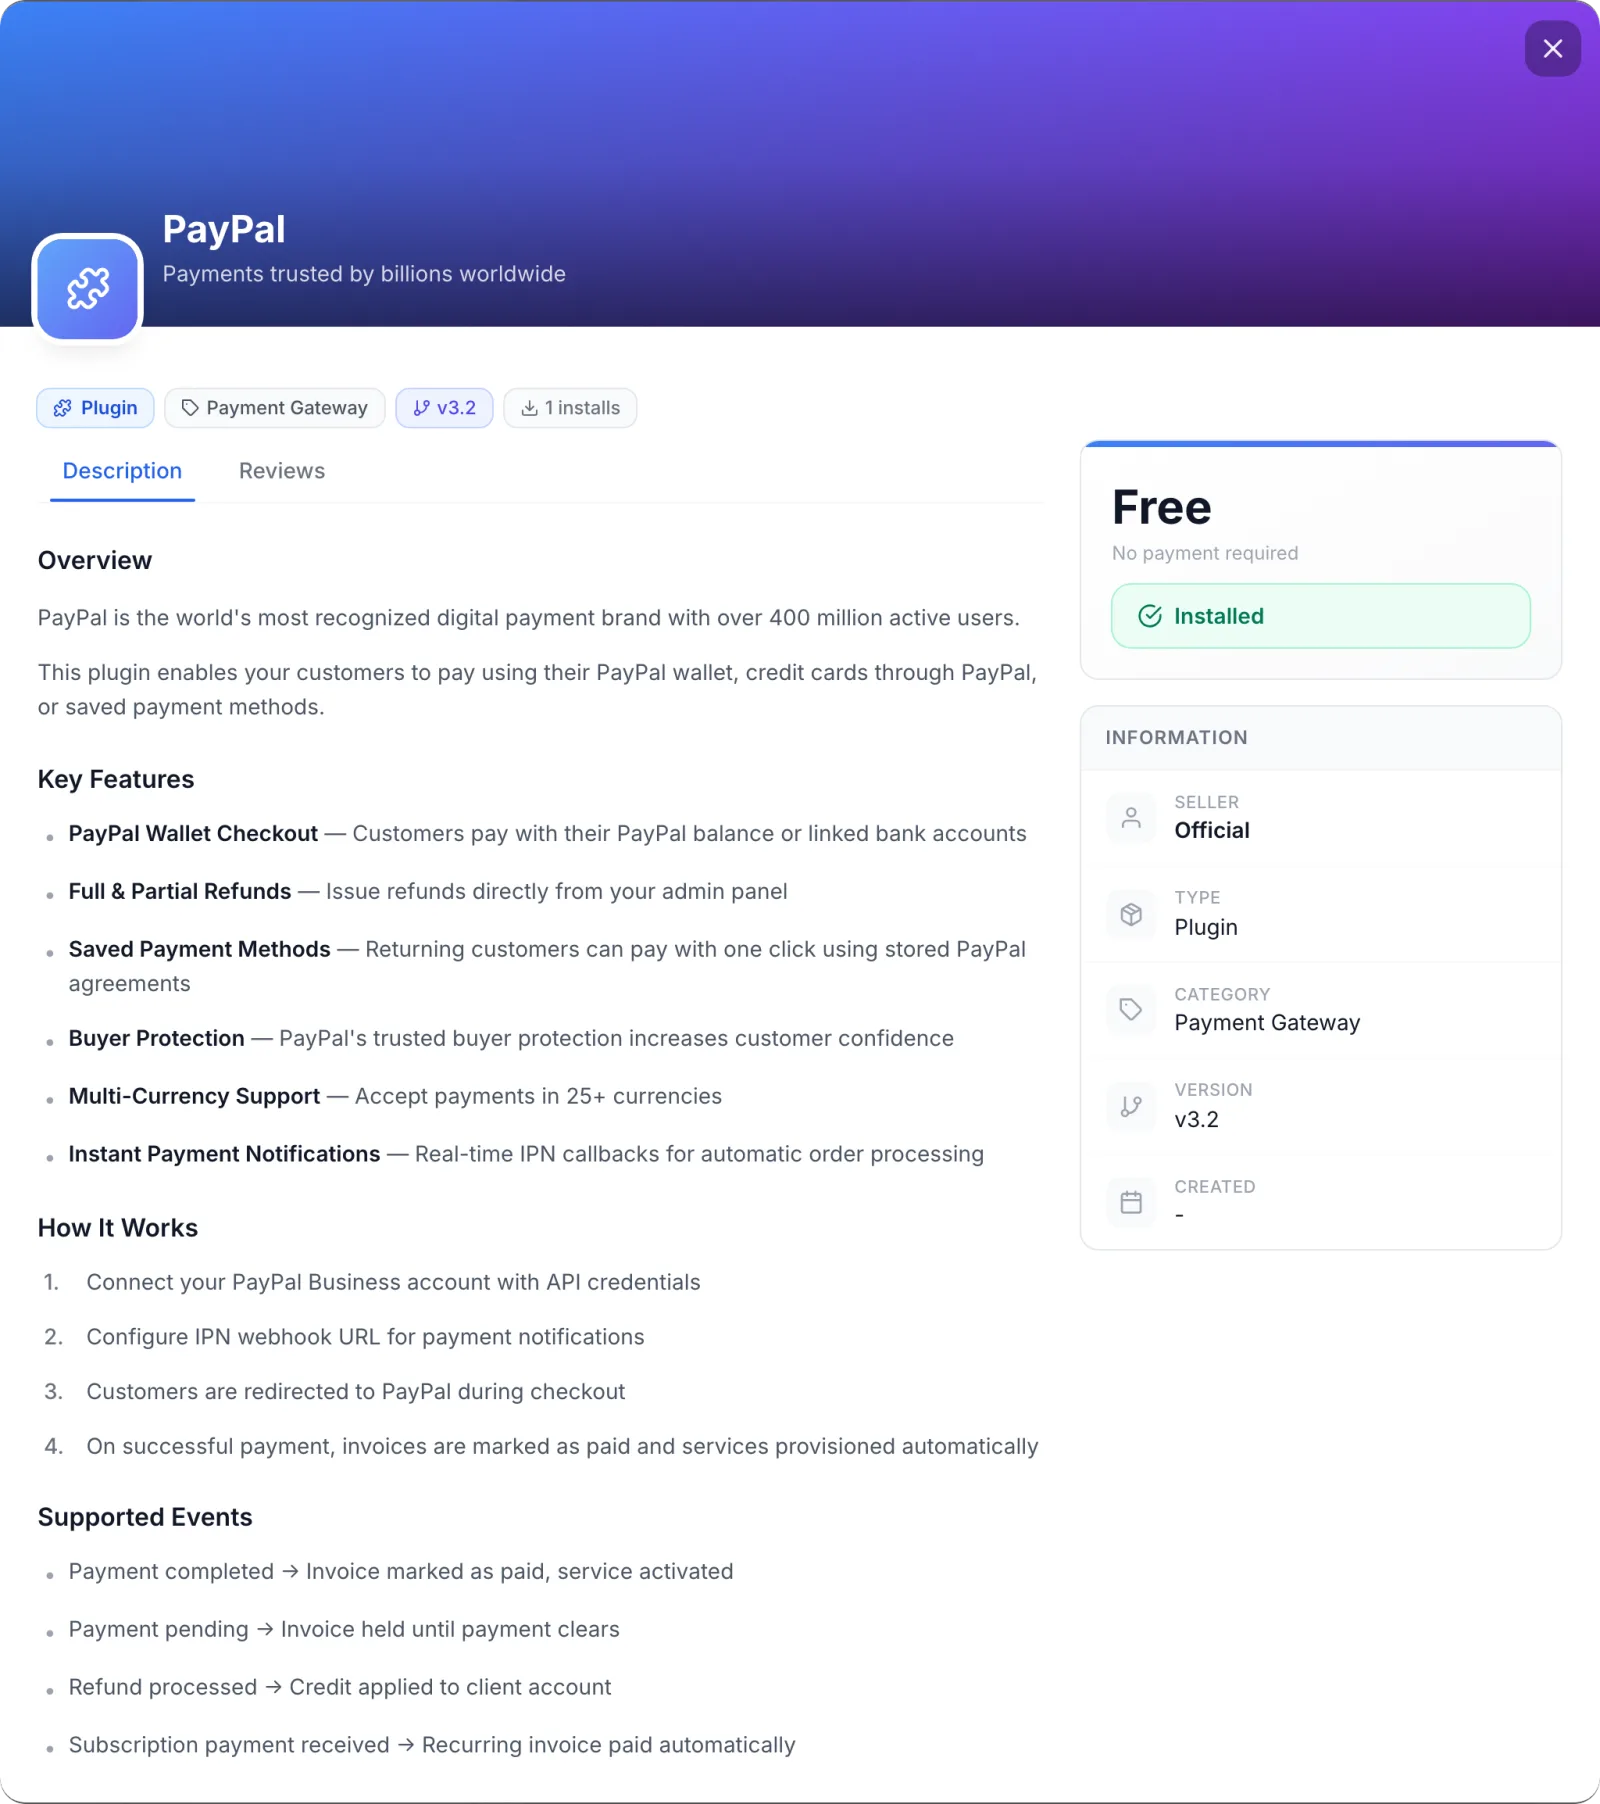
FluxBilling confirms with Plugin "PayPal" installed and ready to use. The plugin is switched on straight away and appears under Settings → Integrations → Plugins as PayPal, marked Active. Customers do not see PayPal at checkout until you have entered its credentials in the next step.
Step 3: Enter your credentials and connect
- Open Settings → Integrations → Plugins.
- On the PayPal card, click Configure. The dialog opens on the Settings tab.
- Leave Enabled checked.
- Set Sandbox Mode to match the credentials you copied: checked for sandbox credentials, unchecked for live ones.
- Paste the PayPal Client ID and PayPal Client Secret.
- Click Connect PayPal.
- Click Save Configuration.
The Settings tab also shows a Setup checklist with the same three PayPal steps and an Open PayPal Developer Dashboard link. The link opens the sandbox or the live dashboard, following the Sandbox Mode checkbox.
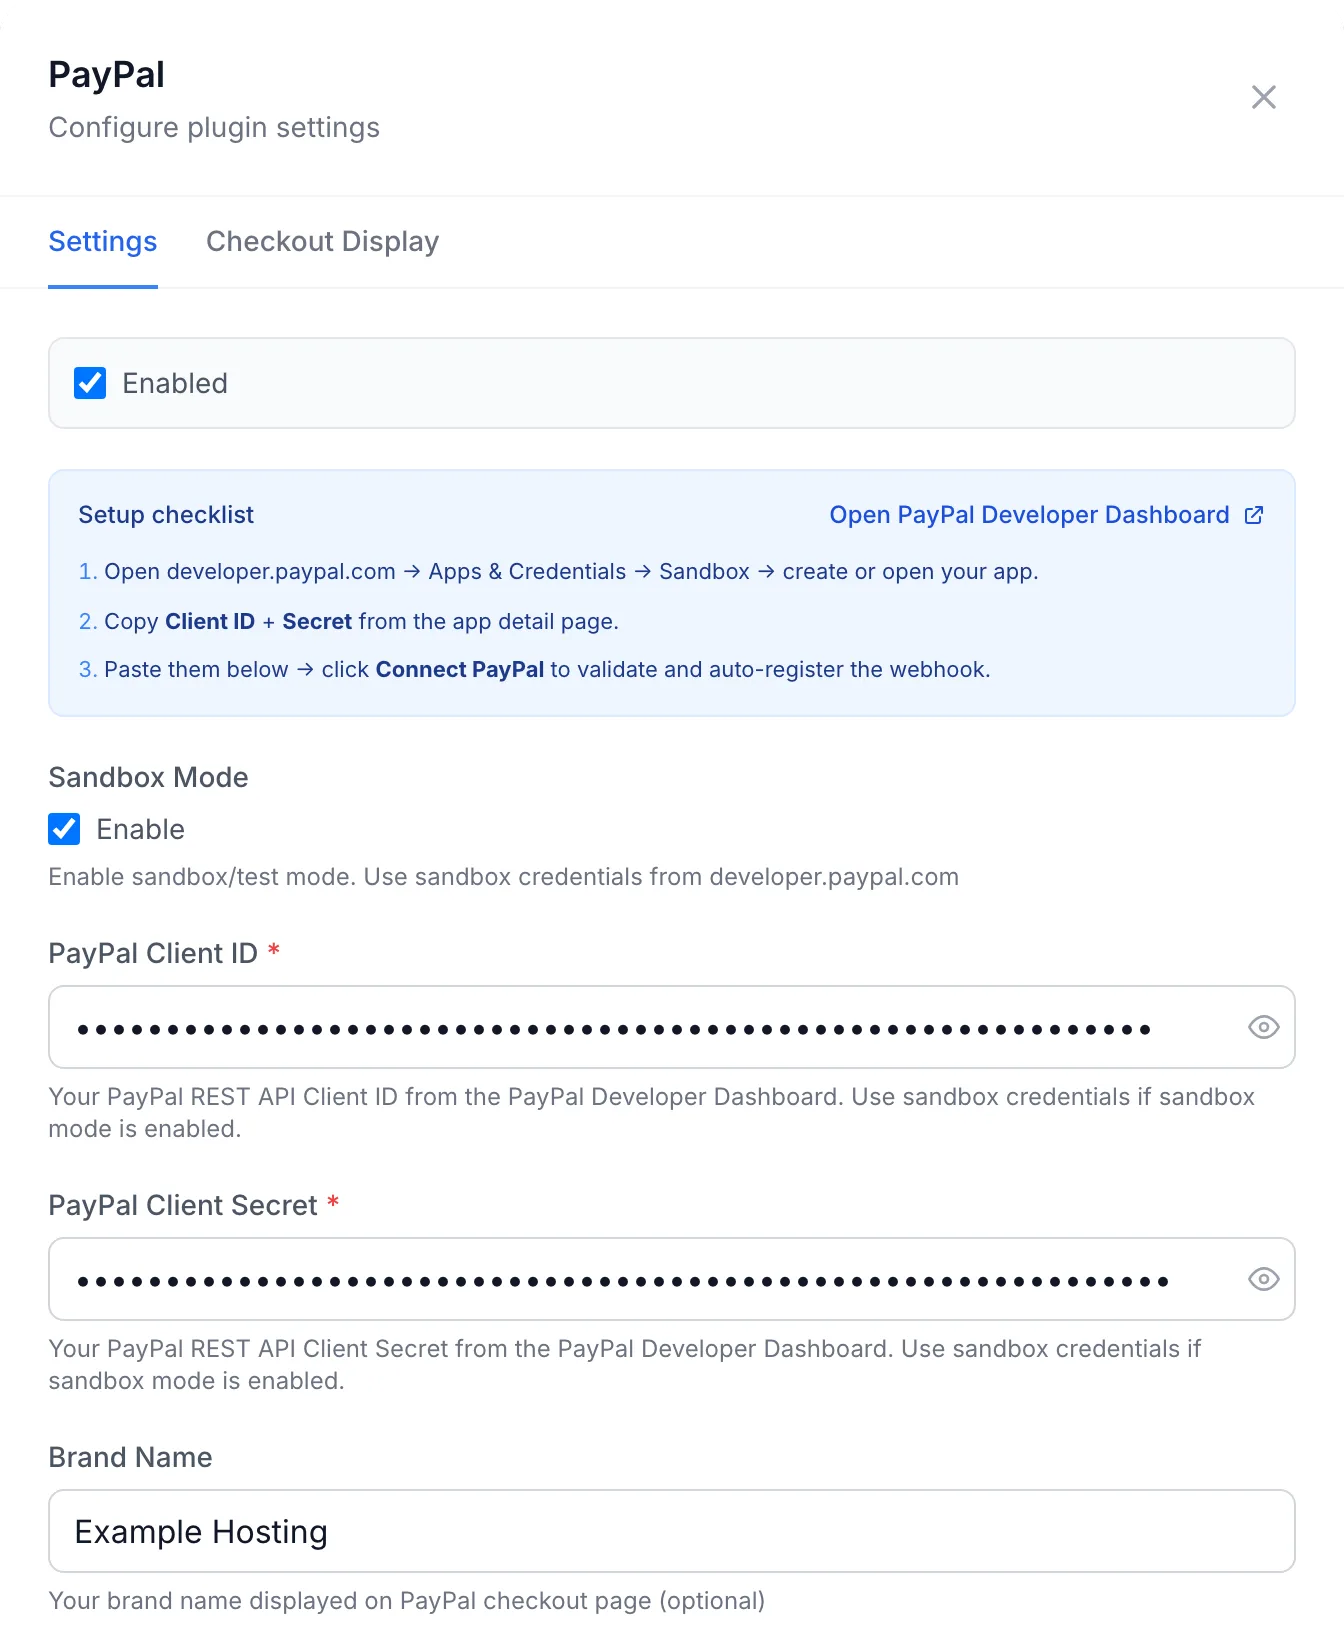
| Field | Required | What it does |
|---|---|---|
| Enabled | No | Offers PayPal to customers. It is the same switch as the PayPal toggle under Settings → Financial → Payment Gateways. |
| Sandbox Mode | No | Checked: every payment, refund and saved account goes to PayPal's sandbox, and no real money moves. Unchecked: PayPal's live environment. Use sandbox credentials with it checked and live credentials with it unchecked. |
| PayPal Client ID | Yes | The Client ID of your PayPal REST API app. |
| PayPal Client Secret | Yes | The Secret of the same app. It is stored encrypted; the eye button shows or hides it while you type. |
| Brand Name | No | The name PayPal shows to the customer on its checkout page. Leave it empty to use the company name from your general settings. |
Connect PayPal first saves what you typed. It then checks the Client ID and Secret with PayPal and registers a webhook for your panel's address in the PayPal app, subscribed to the payment, refund, saved-account and dispute events the plugin uses. When it works, the box under the button shows Connected with a SANDBOX or LIVE badge, Webhook … active and the time of the last check. The button then reads Reconnect PayPal; use it again whenever you change the credentials.
If the credentials belong to the other environment, for example sandbox credentials with Sandbox Mode unchecked, FluxBilling tries the other environment once. When that works, it switches Sandbox Mode for you and says so in the result, for example Sandbox Mode auto-set to ON based on detected environment.
The dialog also shows a Webhook configuration required box with your panel's webhook address and a Copy URL button. Connect PayPal registers this address for you. If you prefer to add the webhook by hand in your PayPal app instead, paste this address there. Until the first event arrives, its status badge reads No deliveries received yet or Registered with provider; once PayPal delivers, it reads Receiving deliveries.
Step 4: Choose how PayPal looks at checkout
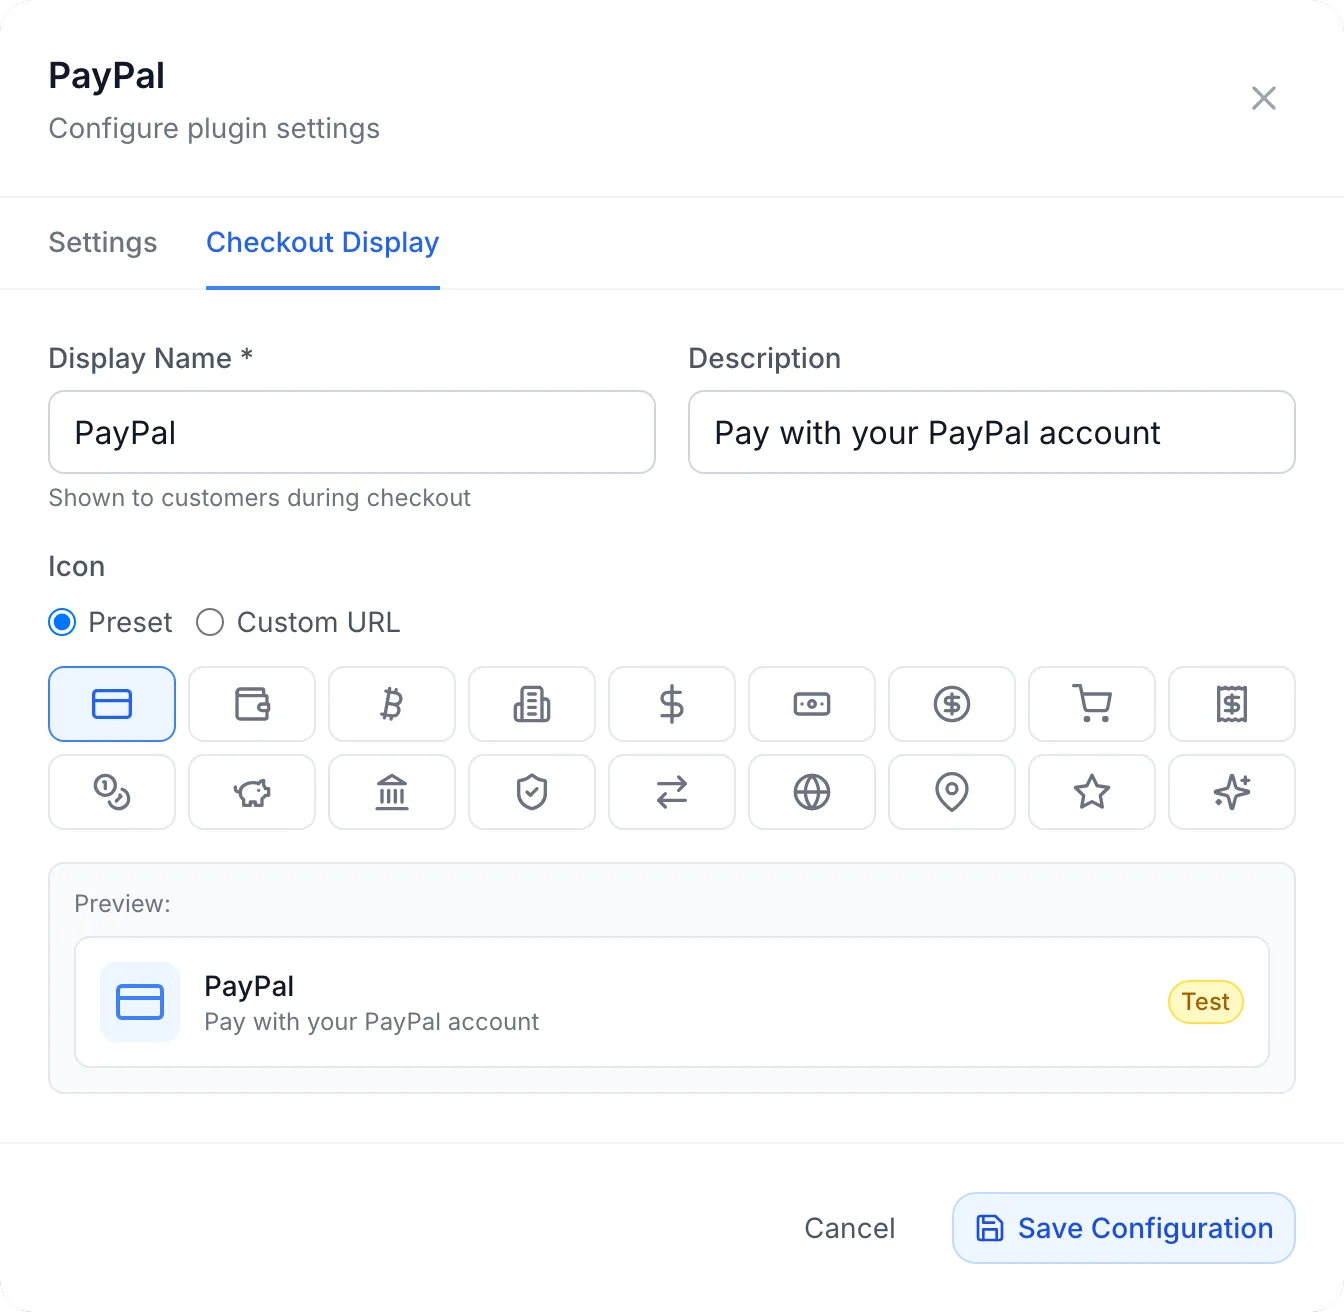
Switch to the Checkout Display tab of the same dialog:
- Display Name (required): the name customers see, for example PayPal.
- Description: an optional line under the name.
- Icon: a Preset icon or a Custom URL to your own image (PNG, SVG or JPG, about 64×64 px).
The Preview shows the result, with a yellow Test badge while Sandbox Mode is on. Click Save Configuration.
PayPal now appears under Settings → Financial → Payment Gateways with an Enabled badge. Use the toggle there to take PayPal off checkout without touching its settings. PayPal applies to every product: there is nothing to attach to products or categories.

Step 5: Test a payment in the sandbox
- With Sandbox Mode on, log in to the client area as a test customer and open an unpaid invoice.
- Choose PayPal and pay. PayPal's sandbox site opens; log in with a sandbox personal test account and approve.
- Back in FluxBilling, the invoice shows as paid. In the admin panel the payment appears on the invoice with PayPal as the gateway.
- Open the PayPal configuration again: the webhook box should now say Receiving deliveries.
When the test works, create a live app (step 1), paste its credentials, uncheck Sandbox Mode, click Reconnect PayPal and save.
What your customers see
PayPal is listed with your display name, description and icon wherever the customer pays: when paying an invoice, at the end of a new order, and when adding credit to their balance. A PayPal payment must be at least 1 in the currency it is charged in: the invoice currency, or your base currency when FluxBilling converts the amount (see Limits). Below that the customer sees Minimum payment amount is 1 followed by the currency.
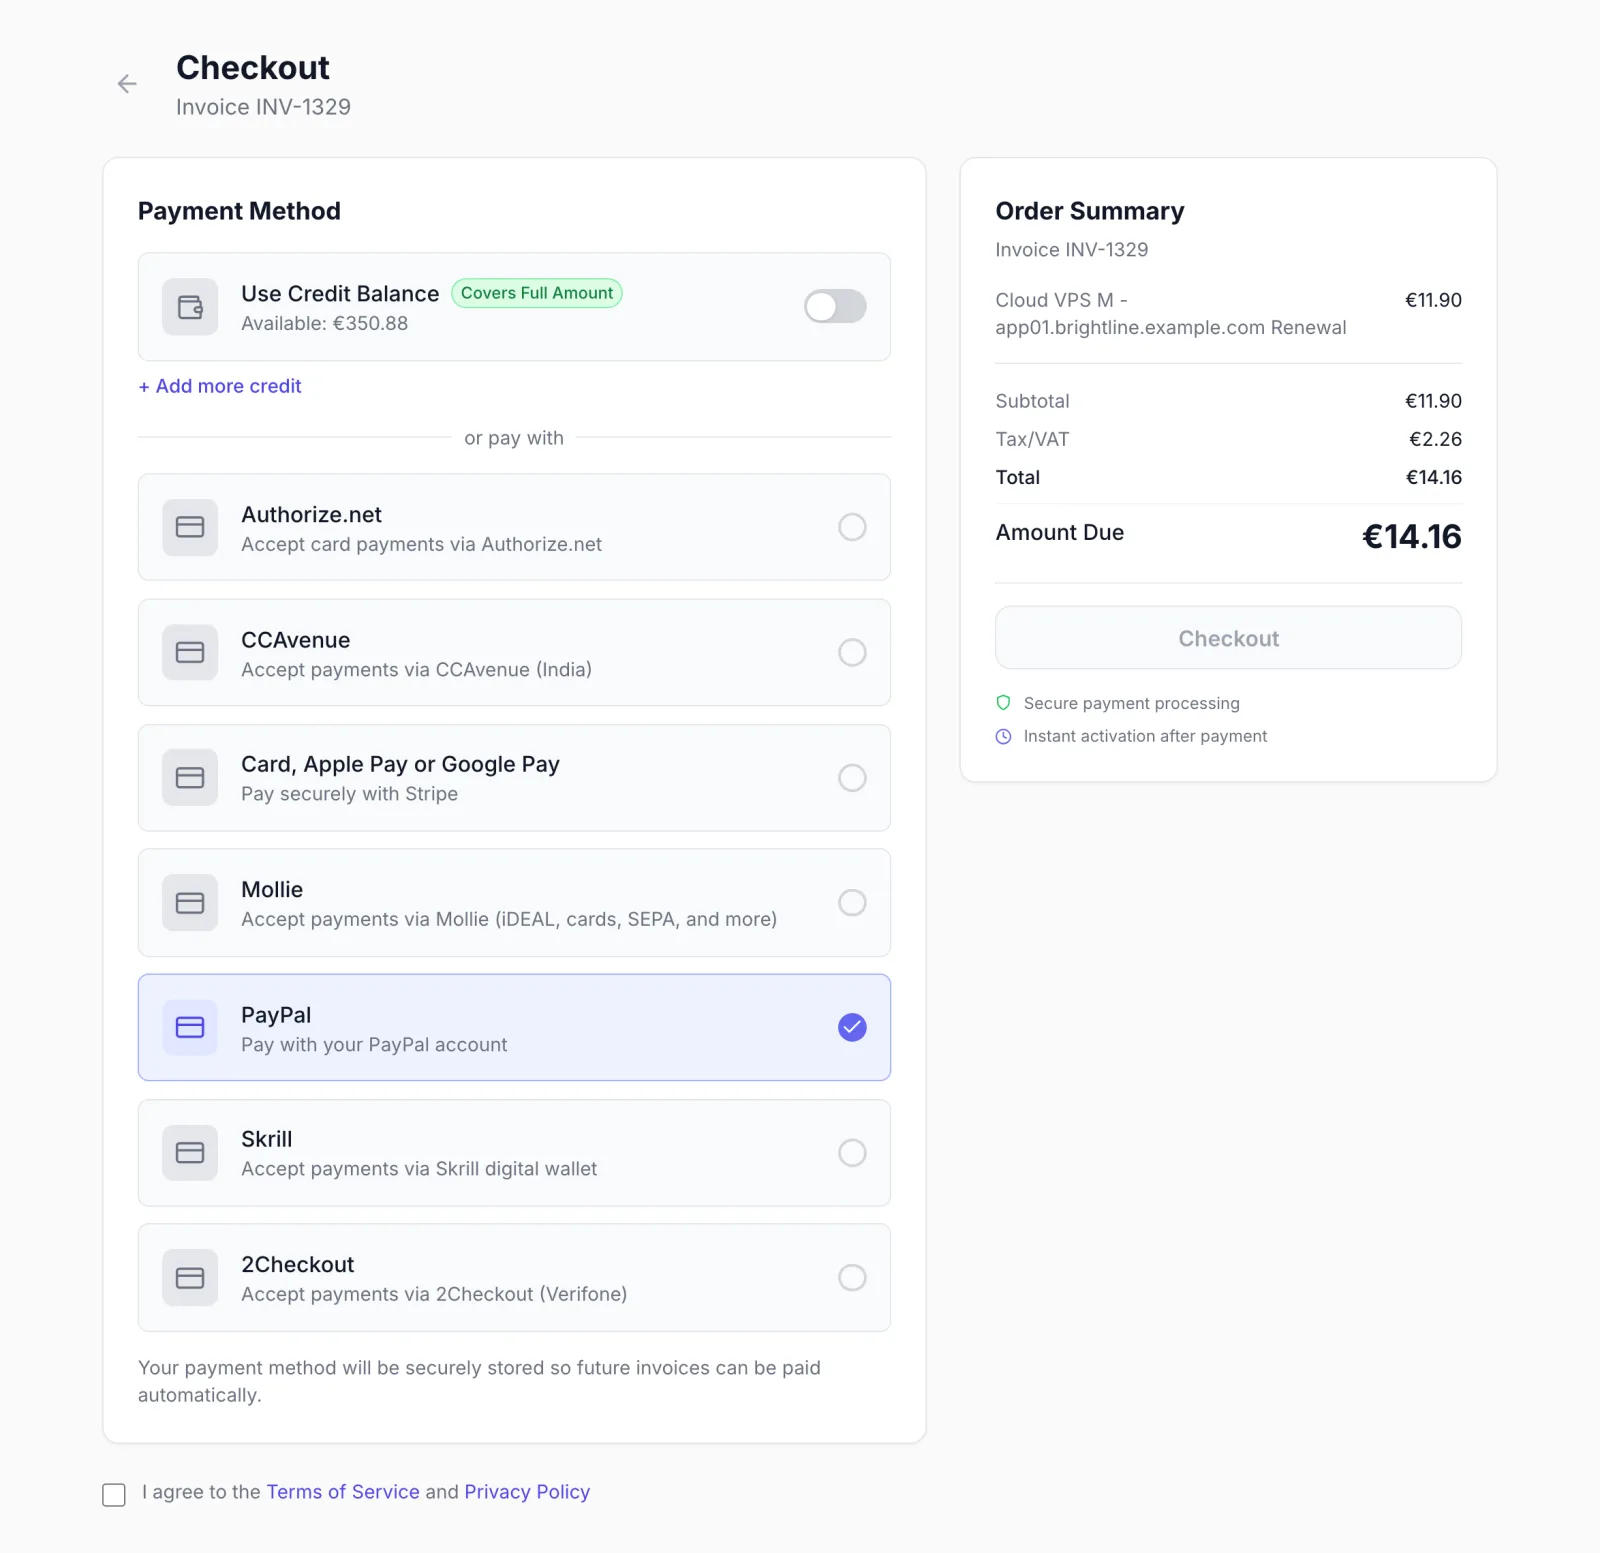
- The customer selects PayPal and clicks to pay. They are sent to PayPal, where your Brand Name is shown.
- They log in to PayPal and approve the payment.
- PayPal sends them back to the client area. FluxBilling captures the payment, the invoice is marked paid and anything waiting on it, such as a new service, goes ahead. The customer gets the same payment emails as with any other gateway.
If the customer closes the browser after approving and never comes back, the payment is still captured: PayPal's webhook tells FluxBilling the payment was approved, and FluxBilling captures it. FluxBilling also checks pending PayPal payments with PayPal on its own, so a missed webhook does not leave an invoice open. A customer who cancels on PayPal returns to the client area without paying.
Saving a PayPal account
Below the payment methods the customer sees Save this payment method for future purchases (on a new order: Save this payment method so renewals are paid automatically). When they tick it, PayPal asks them to approve FluxBilling charging their PayPal account later. When Require saving the payment method is on under Settings → Billing → Automation, the tick-box is replaced by a notice that the payment method will be stored.
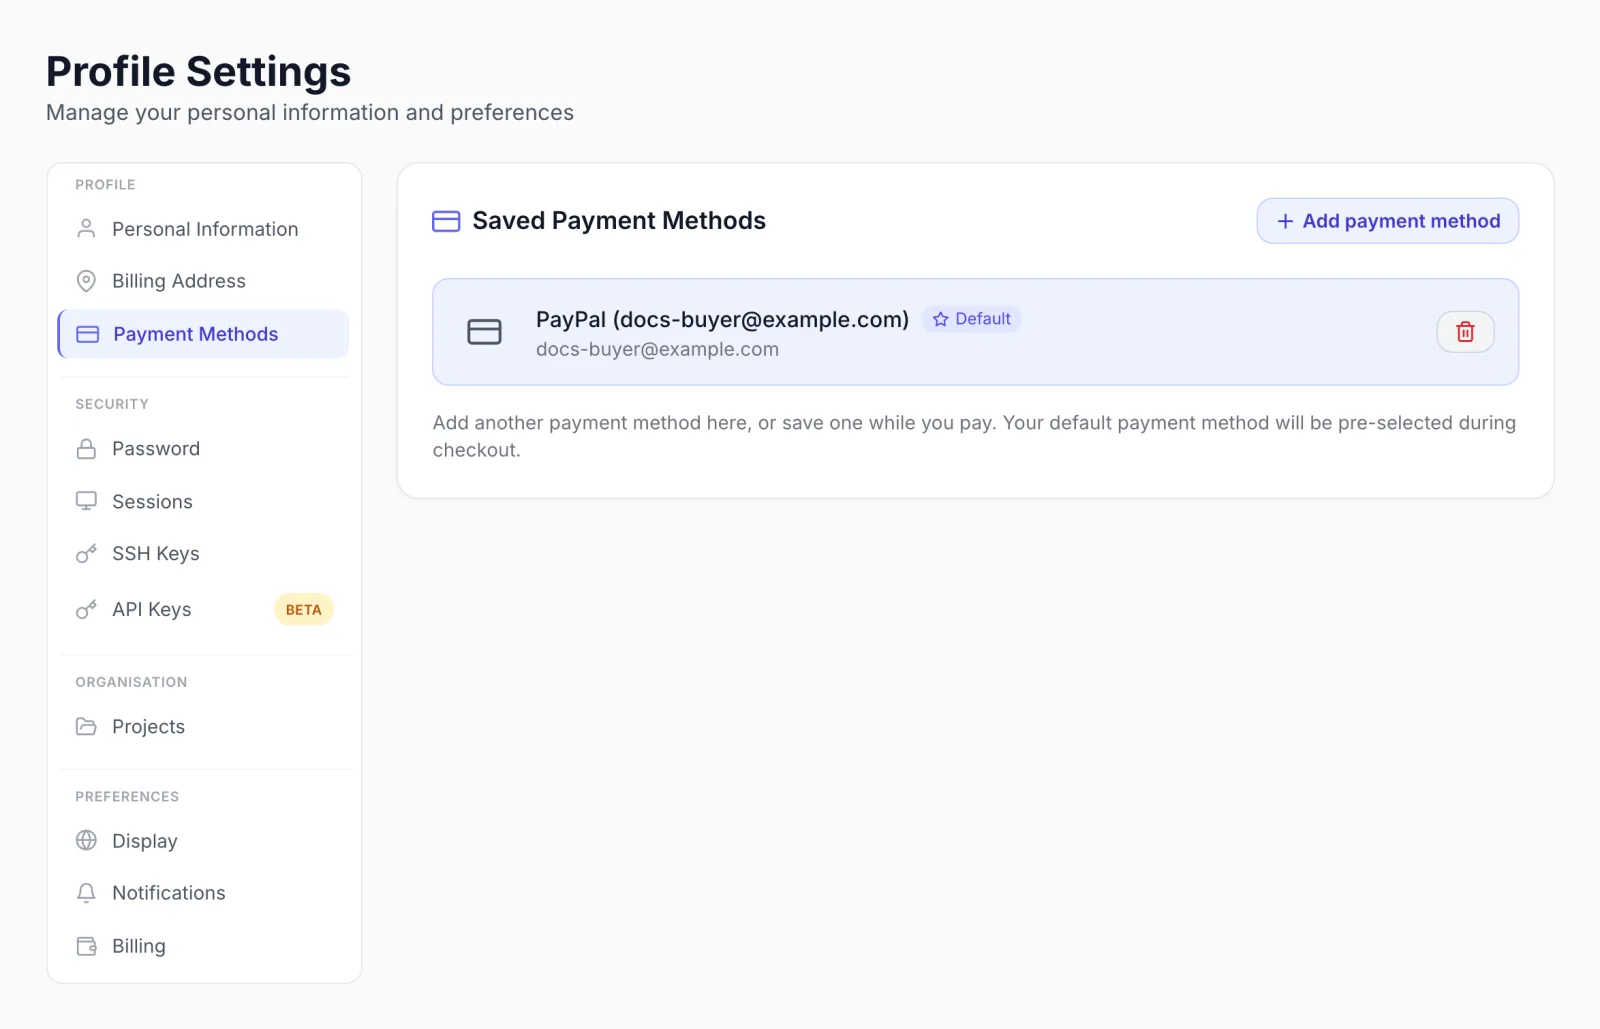
Customers can also add PayPal without paying anything: in the client area under Profile → Payment Methods, Add payment method sends them to PayPal to approve, then back. The saved account is listed as PayPal (their PayPal email). From that list they can make another method the default with Set Default, or delete a method so FluxBilling no longer charges it.
Payments over time
Automatic renewals
With Enable Auto-Payment switched on under Settings → Billing → Automation, in the Auto-Payment for Renewals card, FluxBilling charges the customer's saved PayPal account for renewal invoices without the customer being present. A successful charge marks the invoice paid. A failed charge is retried as set in that card. When the saved PayPal account no longer exists at PayPal, FluxBilling stops charging it and switches it off. When PayPal refuses the payment or the customer's PayPal account is restricted, FluxBilling keeps retrying on the schedule set in that card, but after several refusals in a row it switches the saved account off, which also ends its retries. The note under Max Retries in that card shows how many refusals that takes. See Billing Automation.
Customers whose PayPal billing agreement came over from WHMCS through the WHMCS migration keep being charged automatically. They do not need to link PayPal again.
Refunds
- Open the paid invoice in the admin panel and click Refund.
- Under Refund Method, choose Via Gateway. The dialog shows that it is refunding via PayPal.
- Enter an Amount for a partial refund, or leave it empty for a full refund, add a Reason and click Confirm Refund.
The money goes back to the customer's PayPal account and the reason is passed to PayPal as a note to the payer. FluxBilling confirms with Refund processed via gateway. A refund you start in PayPal itself is also picked up through the webhook. See Invoice details.
Disputes and chargebacks
When a customer opens a dispute in PayPal, the payment is marked Disputed in FluxBilling while the case is open. If PayPal decides for the buyer, it is handled as a lost chargeback. If PayPal decides for you, or the buyer withdraws the case, the hold is lifted. You answer the dispute itself in your PayPal account.
Saved accounts removed in PayPal
If a customer removes FluxBilling from the saved payments in their PayPal account, PayPal tells FluxBilling through the webhook and the saved account is no longer used for automatic charges.
Updating the plugin
Open Settings → Integrations → Marketplace, switch to Installed and click Check for Updates. When a new version is available, click Update to v…. Your settings are kept.
Troubleshooting
Errors from Connect PayPal appear under the button as Last connection attempt failed with the reason. Errors during a payment are shown to the customer. In most cases the text is PayPal's own message.
| Message or symptom | What to check |
|---|---|
| Client Authentication failed, or Invalid PayPal credentials for sandbox mode. Double-check the Client ID and Secret on developer.paypal.com. (or live mode) | The Client ID or Secret is wrong, has extra spaces, or belongs to a deleted app. Copy both again from the app page. For Client Authentication failed, FluxBilling has already tried the other environment for you. The Invalid PayPal credentials text usually means your panel got no answer from PayPal at all, so also check outgoing HTTPS from your server. |
| PayPal is not offered at checkout | Check that the Client ID and Secret are both filled in and saved, that PayPal is Enabled under Settings → Financial → Payment Gateways. Checkout only lists PayPal once both credentials are saved. |
| The connection works but the webhook box does not say Webhook … active | PayPal did not accept the webhook. PayPal only delivers to a public HTTPS address on port 443. Check that your panel is reachable from the internet, then click Reconnect PayPal, or add the address from the Webhook configuration required box to your PayPal app by hand. |
| Invoices stay unpaid after the customer approved on PayPal | The customer did not return and no webhook arrived. Check the webhook box status. FluxBilling also asks PayPal about pending payments by itself, so wait a little before paying it by hand. |
| Failed to create Vault setup token. If your PayPal app does not have the Vault feature enabled, open developer.paypal.com → your app → Features and enable Vault. | A customer tried to save PayPal, but Vault is off for your PayPal app. Turn it on as in step 1. |
| Failed to exchange setup token. The setup token may have expired (3 day TTL) or the customer did not complete the PayPal approval. | The customer did not finish the approval on PayPal, or came back more than three days later. Ask them to add PayPal again. |
| PAYER_ACTION_REQUIRED on an automatic charge | PayPal wants the customer to approve again. Ask them to pay the invoice themselves; they can save PayPal again at the same time. |
| An error saying a legacy billing agreement could not be charged and asking the customer to re-link PayPal | A billing agreement imported from WHMCS no longer works. Ask the customer to add PayPal again under Profile → Payment Methods. |
| Failed to create PayPal order, Capture failed, Refund failed | PayPal gave no reason. Check that the Sandbox Mode setting matches the credentials, and look the payment up in your PayPal account. |
Limits
- One PayPal account per FluxBilling panel. All payments go to the PayPal app whose credentials you entered.
- Customers pay through PayPal's own site. There is no PayPal button or card form embedded in the client area.
- PayPal's own subscriptions are not used: FluxBilling decides when to charge a saved PayPal account, from its own invoices.
- Payments are captured right away. Authorising first and capturing later is not offered.
- PayPal charges an invoice in its own currency when that is your base currency or a currency PayPal is set up for (USD and EUR when PayPal is first installed). An invoice in any other currency is converted and charged in your base currency.
- For currencies without decimals in PayPal (JPY, HUF, TWD), amounts are rounded to whole units.
- Disputes are answered in PayPal, not in FluxBilling.
PayPal is a trademark of PayPal, Inc. FluxBilling is not affiliated with PayPal.