
Building a Plugin with an AI Assistant
Copy the authoring instructions into any AI assistant, paste its JSON back, and let FluxBilling check, explain and import the plugin package.
You can have an AI assistant write a FluxBilling plugin for you. A plugin is a single JSON document, called a package. The Import Plugin dialog gives you everything the assistant needs: one click copies the full authoring instructions, you describe the provider's API in your own chat, and you paste the answer back. FluxBilling checks the package before it imports anything, lists every problem with its exact location, and copies those problems back for the assistant to fix.
This is the quickest way to connect a provider that has no ready-made plugin in the marketplace: a VPS or hosting API, a payment provider, a notification service, a CRM. You need the provider's API documentation and an AI chat assistant of your choice. You do not need to write code.
Where to find it
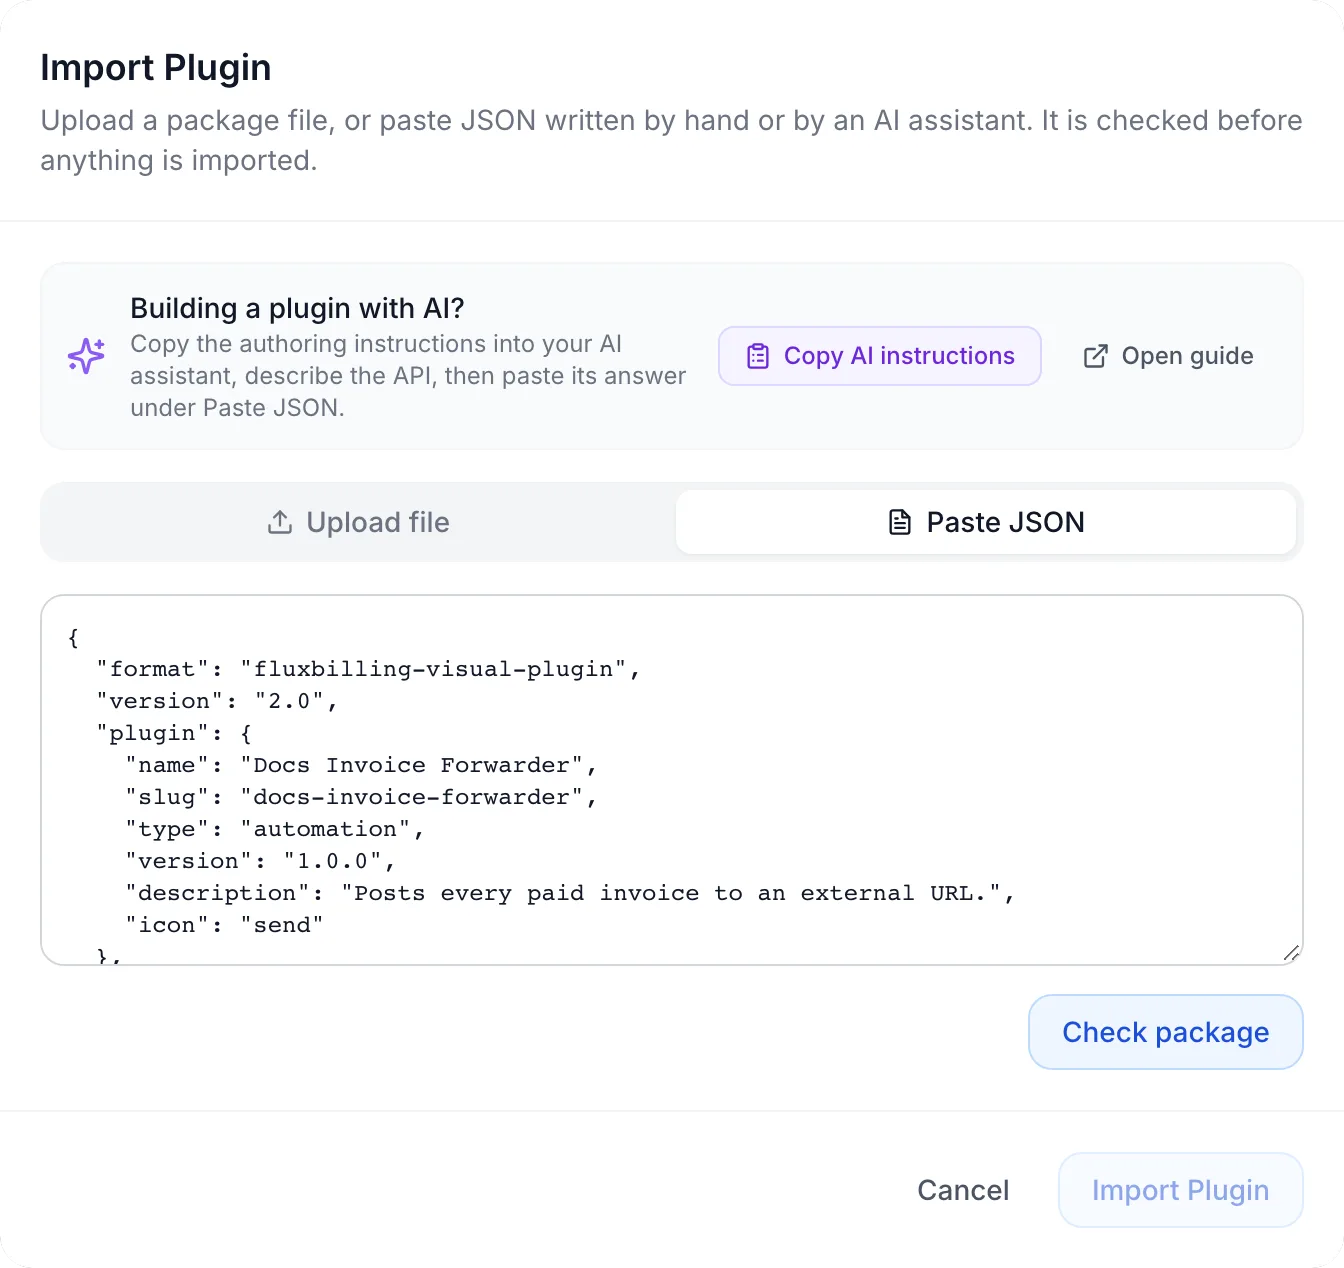
Open Settings → Integrations → Plugins and click Import at the top right, next to New Plugin. The dialog opens with a Building a plugin with AI? panel at the top.
Plugins need no feature toggle: the Plugins tab is always in Settings. You need an admin panel account. Exporting an existing plugin, which you need to have the assistant change it, is limited to super admins.
Before you start
- The provider's API facts: the base URL, how it authenticates (API key, bearer token, username and password…), and the endpoints you need. For a server provider that is usually create, suspend, unsuspend, delete and status. For a payment provider it is creating a payment, the webhook format and refunds. If the provider publishes API documentation, keep it at hand to paste into the chat.
- A test account at the provider, if it offers one, so you can try the plugin without touching real services or real money.
- An AI chat assistant that accepts long messages. The instructions are a complete reference, so they are long.
Keep secrets out of the chat. The assistant never needs your real API keys or passwords. The instructions tell it to declare every key, password and token as a secret setting, which you fill in inside FluxBilling after the import. A package never carries a secret value.
Step 1: Copy the AI instructions
- In the Import Plugin dialog, click Copy AI instructions. The message Instructions copied — paste them into your AI assistant confirms it.
- Paste the text into a new conversation with your assistant.
The copied text starts with a short brief for the assistant: it is writing a FluxBilling plugin package, it must follow the rules in the guide, it should first ask you for any API details it is missing, and it must answer with only the complete JSON package. The full FluxBilling plugin authoring guide follows. Among its rules, the assistant must:
- return exactly one JSON object, with no comments and no surrounding text;
- put every API key, password and token in a secret setting, never in the package itself;
- use only node types, flow types and field names that the guide documents, and only API endpoints that you gave it or that it is sure exist;
- wire every success and error branch, and end every path with a clear success or failure result;
- after you report problems, fix each one by its location and send the whole corrected package, not a fragment.
Open guide opens the same guide in a new browser tab, so you can read it yourself. The guide is public and always matches the version of FluxBilling your panel runs. If your assistant can read web pages, you can also give it the address of the published guide, https://fluxbilling.app/api/docs/plugin-authoring/guide.md, instead of pasting the text. The guide ends with a list of complete example packages for the main plugin types (server provider, payment gateway, notifications, automation, AI provider, two-factor), which make good starting points.
If the browser does not allow the copy, the dialog shows the text in a box below the panel with the message The browser blocked the clipboard. The text is selected below — press Ctrl+C (⌘C on a Mac) to copy it. Copy it from there. Cancel on that box hides it again.
Step 2: Describe the API to the assistant
Under the instructions, tell the assistant what to build. Name the plugin type, how the API authenticates and which endpoints to call, and paste the provider's API documentation if you have it. For example:
Using the FluxBilling plugin authoring guide above, write a complete plugin
package for the Example Cloud API. Type: infrastructure-provider, service
type vps. Authentication: bearer token. Endpoints: POST /servers to create,
POST /servers/{id}/suspend, POST /servers/{id}/unsuspend,
DELETE /servers/{id}, GET /servers/{id} for status. Return only the JSON.
The guide explains each plugin type and the flows FluxBilling expects from it, for example what a server provider must do when a service is created or suspended, or what a payment gateway returns when a customer pays. If the assistant asks questions about the API, answer them: a guessed endpoint is the most common reason a plugin imports cleanly but then fails when it runs.
Step 3: Paste the answer and check it
- Copy the assistant's JSON answer. Copy only the JSON: if the assistant wrapped it in a code block, leave out the opening and closing fence lines.
- In the Import Plugin dialog, choose the Paste JSON tab and paste it into the box (Paste the plugin package JSON here).
- Click Check package. Nothing is saved at this stage.
The check shows:
- A summary: the plugin name, its type, installs as followed by the plugin slug it will get, and how many flows, forms, connections and webhooks it contains.
- No problems found. when the package is clean.
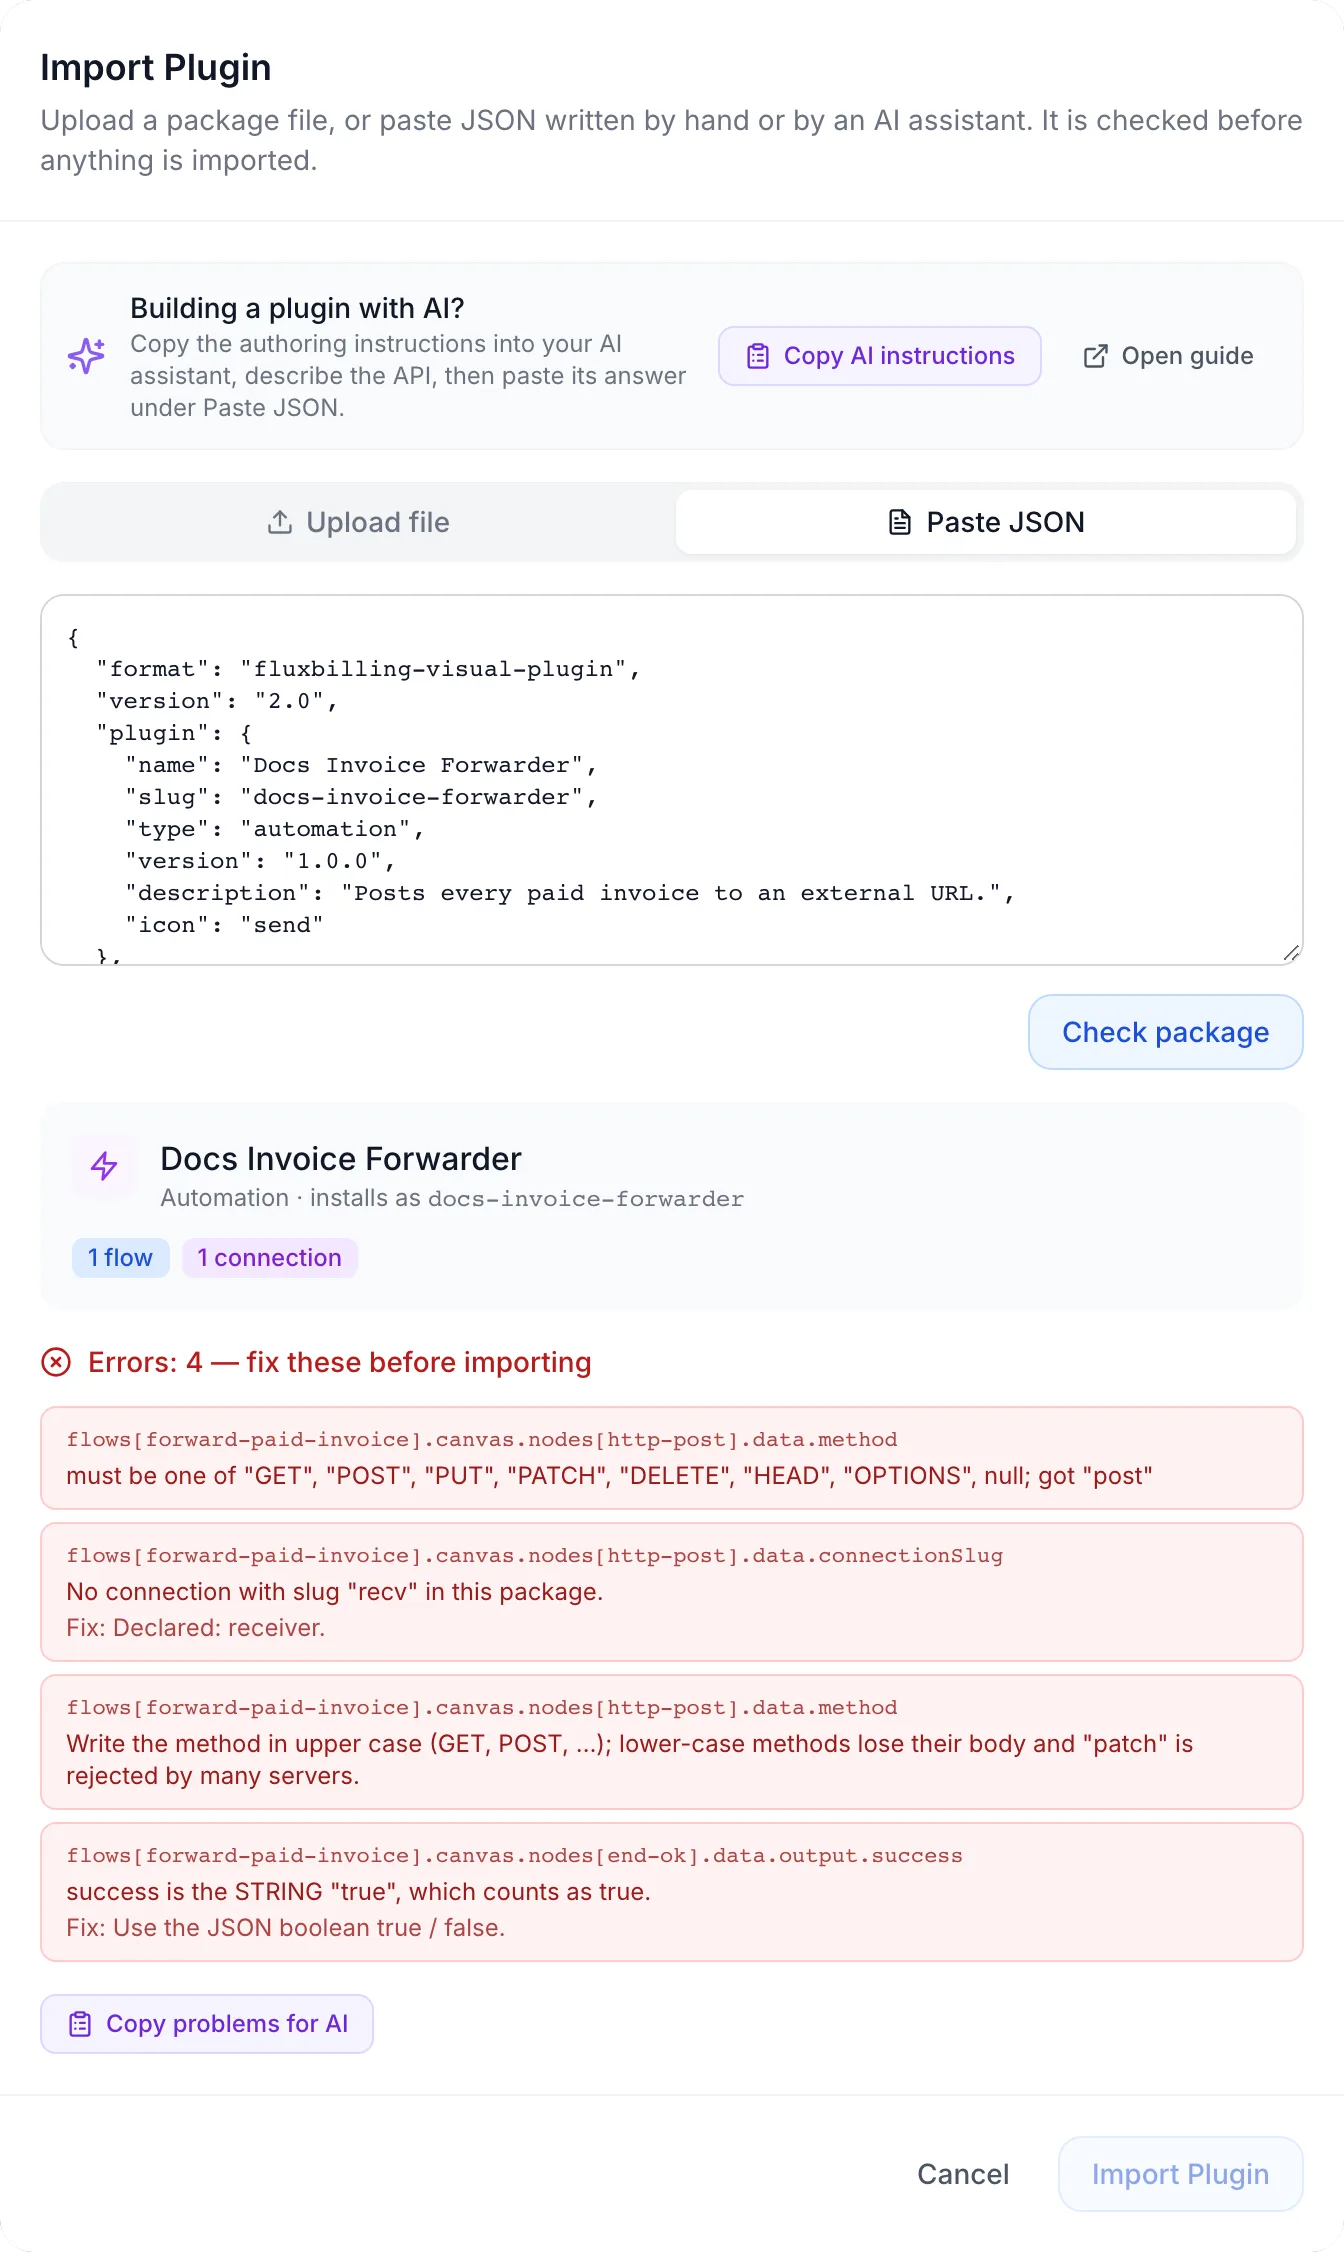
- Errors: N — fix these before importing, in red. While any error is listed, Import Plugin stays disabled.
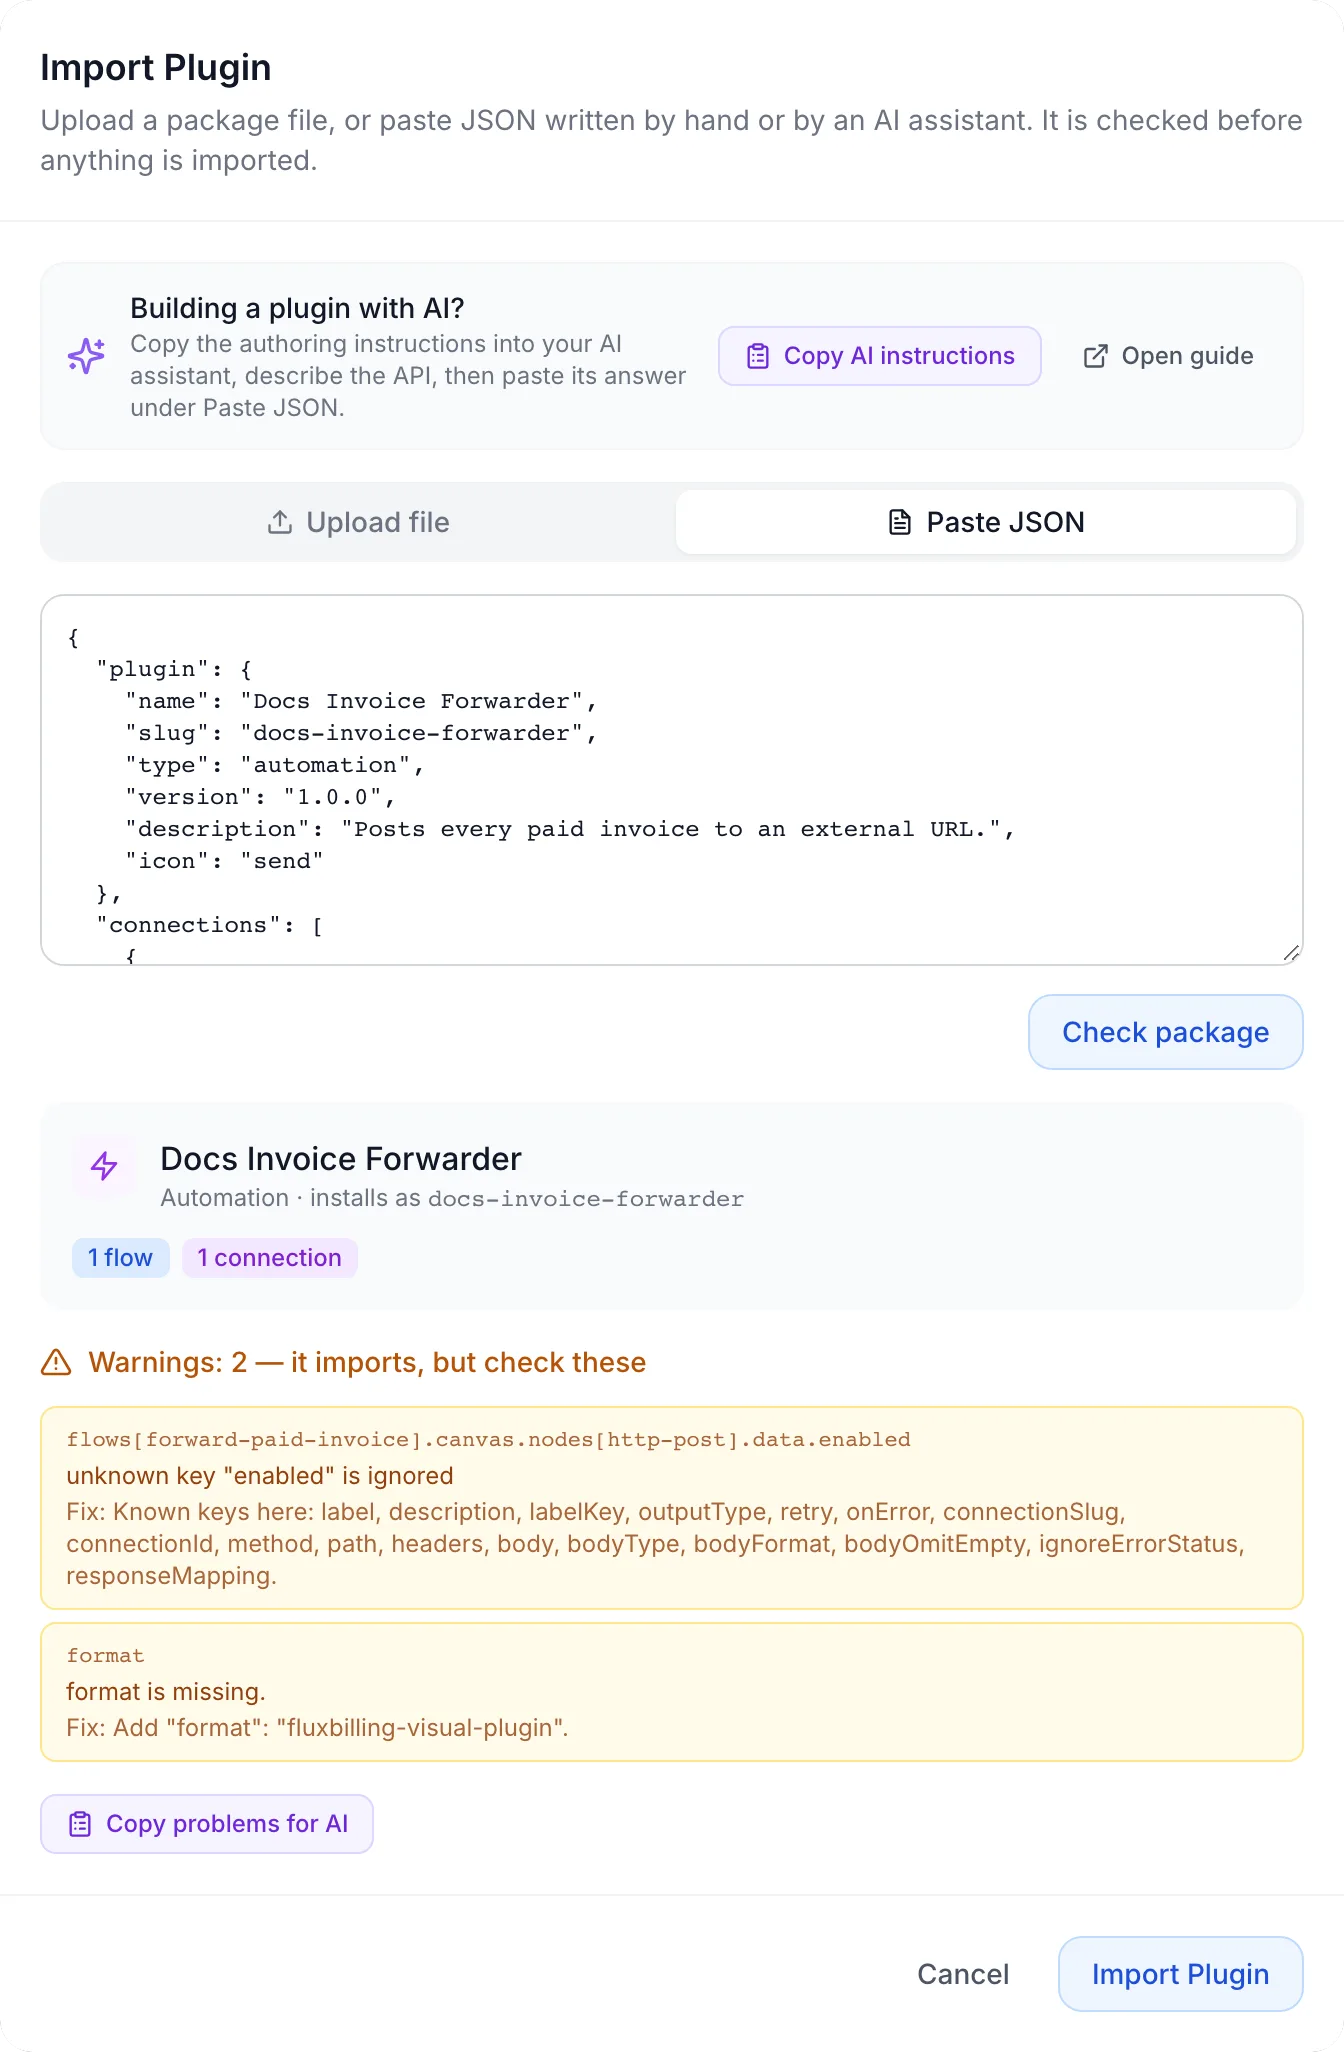
- Warnings: N — it imports, but check these, in amber. The first five are shown, and Show all (N) lists the rest. Warnings do not block the import, but most of them are real mistakes, such as a field name the platform does not know or a flow that nothing will ever run.
Each problem shows where it is in the package, for example flows[forward-paid-invoice].canvas.nodes[http-post].data.method (the http-post step of the forward-paid-invoice flow), then what is wrong, and often a line starting with Fix: that says how to correct it.
You can also use the Upload file tab if you saved the answer as a .json file. Uploading a file runs the same check straight away.
Step 4: Send the problems back to the assistant
When the check lists errors or warnings, a Copy problems for AI button appears below them.
- Click Copy problems for AI. The message Problems copied — paste them into your AI chat confirms it.
- Paste the text into the same conversation and send it.
- Paste the corrected package into Paste JSON, replacing the old one, and click Check package again.
The copied text asks the assistant to fix every error, and every warning that is a real mistake, and to reply with the complete corrected package. It then lists each problem on one line with its code, location, message and fix (shortened here):
ERRORS (4) — the package cannot be imported until these are fixed:
…
- [http.unknownConnection] flows[forward-paid-invoice].canvas.nodes[http-post].data.connectionSlug: No connection with slug "recv" in this package. Fix: Declared: receiver.
…
- [end.stringSuccess] flows[forward-paid-invoice].canvas.nodes[end-ok].data.output.success: success is the STRING "true", which counts as true. Fix: Use the JSON boolean true / false.
Repeat until there are no errors. Read any warnings that remain and decide whether they matter for your plugin.
Step 5: Import, configure, test and enable
- Click Import Plugin. The message Plugin imported appears and the new plugin opens in the plugin editor. The same check runs once more as part of the import.
- The plugin arrives as a Draft. It does nothing until you enable it.
- Open the Config tab and fill in the plugin's settings, including the API keys and other secrets. See Configuration Settings.
- Open the Connections tab and check each connection. See Connections & Authentication.
- If the plugin receives webhooks, open the Webhooks tab, enter any signing secret, and give the provider the webhook address shown there.
- Open each flow on the Flows tab and run it from the Test panel with sample input. See Building Flows. If a step fails, describe the result to the assistant, or fix the step directly in the visual builder.
- When the tests pass, Enable the plugin.
An imported plugin is an ordinary plugin from then on: you can keep editing it in the visual builder, export it, or duplicate it. See Managing Plugins.
Changing an existing plugin with AI
To have the assistant change a plugin you already have, give it the plugin's current package and say what to change. Then import the answer over the installed plugin.
- On the Plugins tab, open the plugin card's menu and choose Export JSON. This needs a super admin account. Plugins installed from the marketplace cannot be exported.
- In the assistant chat, paste the AI instructions (Step 1), then the exported package, then the change you want. Ask it to keep every slug the same.
- Paste the answer into Paste JSON and click Check package.
When the package's plugin slug matches a plugin you have, the dialog shows Update available with the installed plugin's name and status, and the button becomes Update Plugin. Clicking it updates the plugin in place, and the message Plugin updated successfully confirms it.
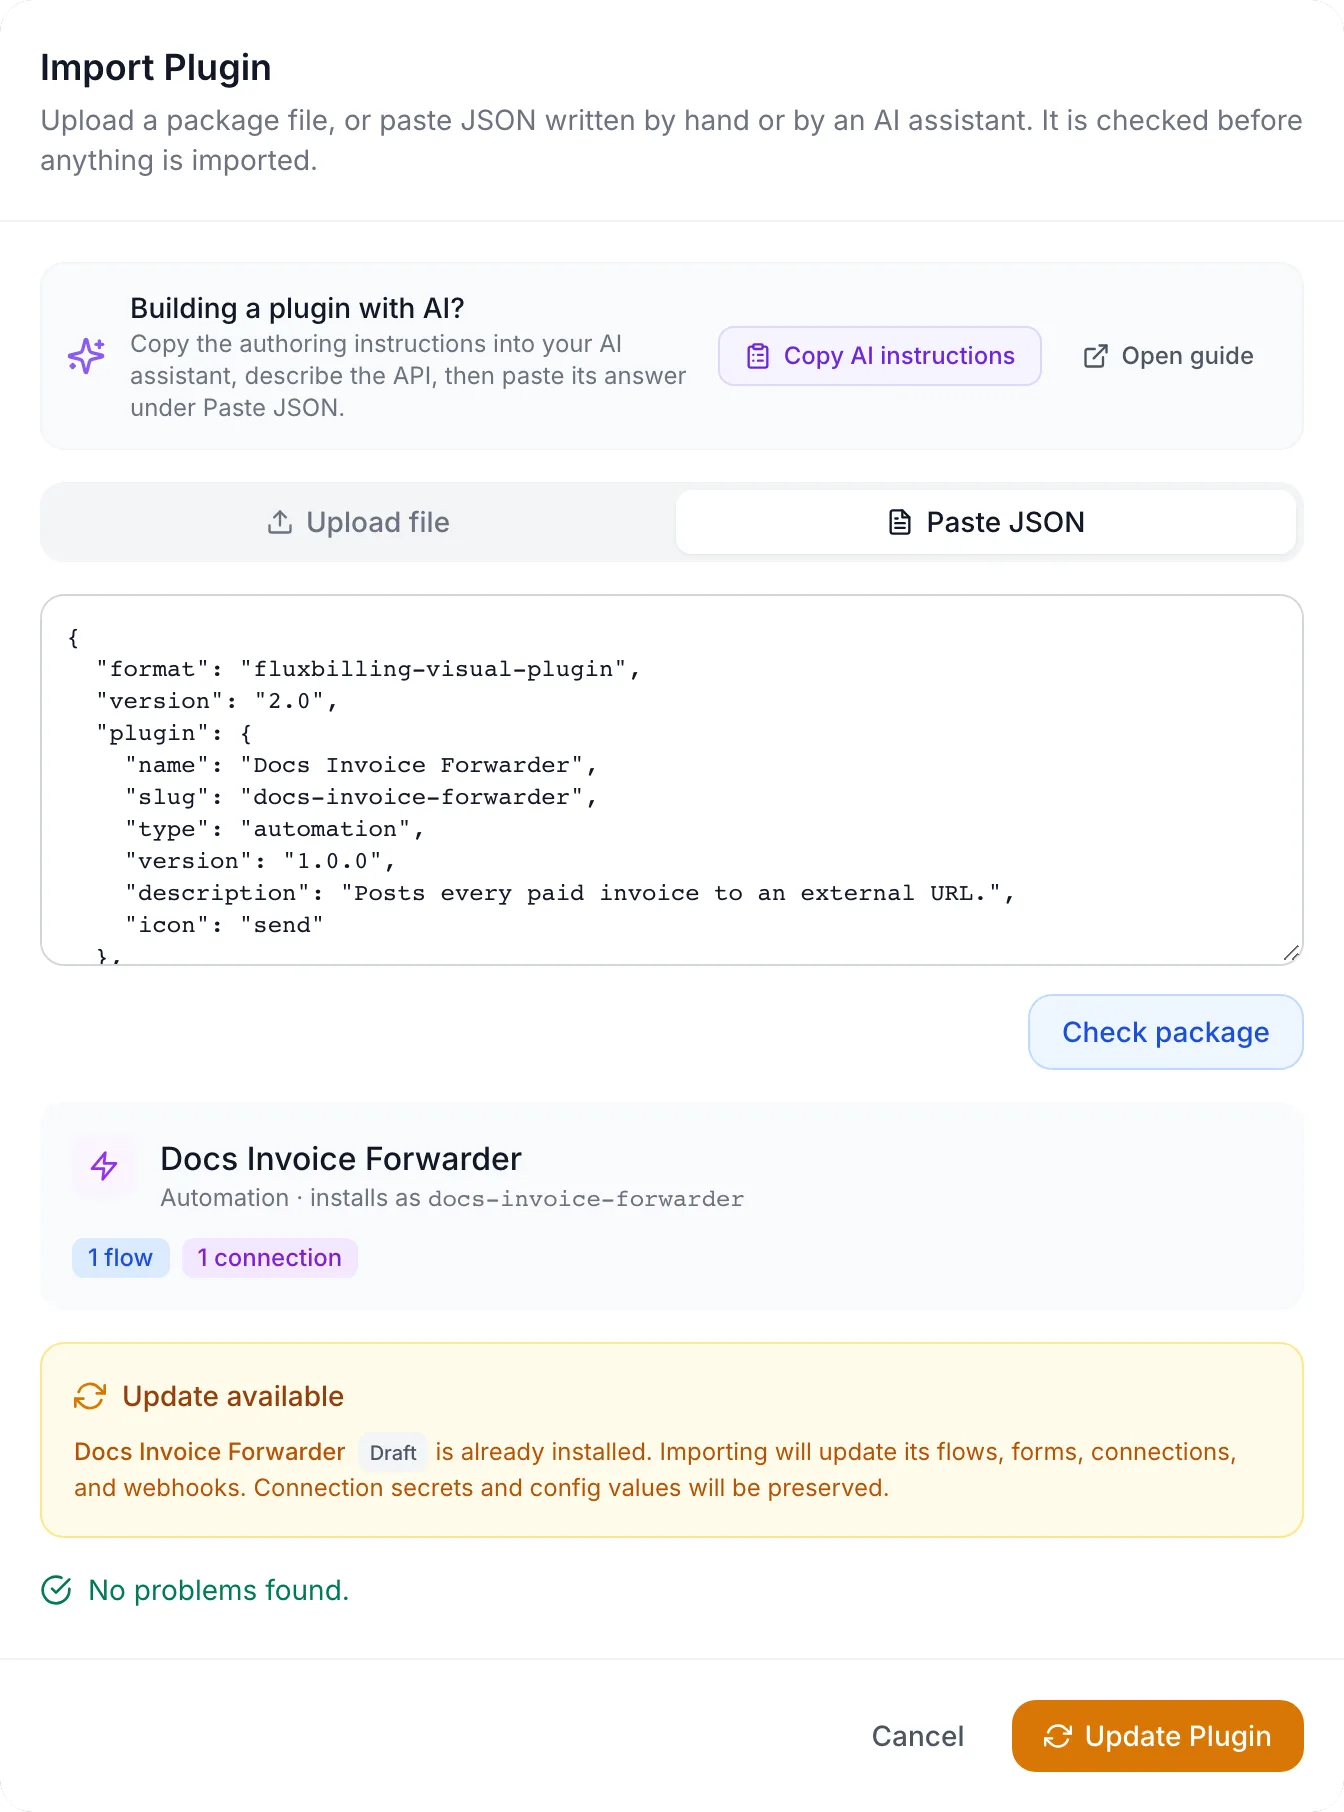
An update keeps the plugin's status, its setting values, its secrets and its connection credentials. It replaces connections, flows, forms and webhooks by slug, and deletes those whose slug is no longer in the package.
Keep slugs stable. If the assistant renames a connection's slug, the update treats it as a new connection and the credentials of the old one are lost. Check the slugs before you click Update Plugin. Packaging and updates are covered in more detail in Packaging, Importing & Updating.
Limits
- Paste JSON accepts JSON text only. Upload file accepts a
.jsonfile or a.xzpluginarchive. - A package can be up to 20 MB.
- An update cannot change the plugin type. To turn a package into a different type of plugin, give it a new plugin slug and import it as a new plugin.
- The check proves that a package is well formed and wired the way FluxBilling expects. It cannot know whether the provider's API really works the way the assistant assumed. Always test the flows before you enable the plugin.
Troubleshooting
| Message | What it means and what to do |
|---|---|
| This is not valid JSON: … | The pasted text is not plain JSON. The usual cause is a code fence (three backticks) or a sentence from the assistant at the start or end. Paste only the JSON object, or ask the assistant to reply with the JSON alone. |
| Not a plugin package: the body is not a JSON object | The JSON is valid but is not a single object, for example a list. Ask the assistant for one complete package object. |
| Errors: N — fix these before importing | Click Copy problems for AI, send the text to the assistant and check the corrected package. |
| The package has N error(s); nothing was imported. | The check that runs during the import found errors. Nothing was saved. Check the package again and fix the listed errors. |
| This package is a "…" plugin; "…" is a "…" plugin. Import it as a new plugin instead. | The package has the same slug as an installed plugin of a different type. Give the package a new plugin slug and import it as a new plugin. |
| A plugin with slug "…" is already installed ("…"). Update that plugin instead, or give this package a different plugin.slug. | Another plugin with that slug was installed after you checked the package. Click Check package again to get the Update Plugin option, or change the slug. |
| The browser blocked the clipboard… | Copy the selected text from the box shown in the dialog. |
| Could not copy to the clipboard | The instructions could not be copied or loaded. Click Open guide and copy the guide from the new tab. |
Related: Creating a Plugin · Packaging, Importing & Updating · Capabilities & Flow Contracts · Building Flows · Plugin Catalogue