
Manual products and delivery (Other category)
Sell products your team fulfils by hand: Other categories, product fields, checkout questions, and delivering a paid service with Activate.
Manual products are the things you sell and deliver yourself: a managed firewall, a software licence pack, an extra IP block, a consulting block. You put them in a product category of type Other. FluxBilling takes the order, sends the invoice and collects the payment, then hands the paid service to your team. Your team fills in the details the customer needs, clicks Activate, and FluxBilling emails those details to the customer and shows them in the client area.
This guide covers the whole flow: creating the category, defining each product's fields and checkout questions, what the customer sees at checkout, delivering a paid service, and what the customer sees afterwards.
How it works
- You create a category of type Other and add products to it.
- On each product you define its Product fields: the details staff hand over (an address, a login link, a password), notes only staff see, and questions the customer answers at checkout.
- The customer orders the product and answers your questions.
- When the order is paid, the service stays Pending. FluxBilling raises a notification for your staff and adds a pending Manual delivery entry to the Automations panel.
- Staff open the service, fill in the details and click Activate & send details. The service becomes Active and the customer gets their details by email and in the client area.
The Other type has no module of its own, so no feature toggle under Settings switches it off. Staff need permission to edit products to set it up and permission to edit services to deliver (see Staff and permissions).
Step 1: Create an Other category
- Open Products in the sidebar and click Add Category.
- On the Basics tab, under Category Type, pick Other. Its card reads Your own products, fulfilled by hand, with fields you define.
- Fill in the name and the rest of the category as usual (see Product categories), then save.
Three things are different on an Other category:
- Provisioning is always manual. An Other category cannot be linked to a plugin or a module. If you try to save one with a provisioning module, the save is refused with An Other category is fulfilled by hand: its provisioning must be Manual (none).
- No hourly billing. The Billing tab hides the hourly cycle and says Other products are never billed hourly: every order waits for your team to deliver it.
- No category-level checkout questions. The Checkout tab explains that Other products ask their own questions: you add them per product as fields set to Both (Step 2). The Welcome Letter Template setting on the same tab still works and replaces the default delivery email for this category.
The customer always gets the built-in order form for an Other category: the products of the category, the billing term, the questions you mark Both, and add-ons.
Changing an existing category to Other. If the category had checkout questions before you switched it to Other, customers are still asked them, and the Checkout tab shows a warning with the list. Add each question to the products as a field set to Both, then delete it from the category.
Step 2: Add the product and its fields
- On the Products page, click Add Product (or edit an existing product) and choose your Other category.
- Set the name, description and prices as for any product (see Products).
- Open the Configuration tab. The Product fields card lists what staff record for each service of this product, and what the customer is asked when ordering.
- Click Add field, fill in the field, and click Done. Repeat for each field.
- Use the arrows to put the fields in the order you want. Customers and staff see them in this order.
- Save the product. Fields are saved with the product, not on their own.
Field settings
| Setting | What it does |
|---|---|
| Label | The name staff and customers see, for example Management URL. Required, up to 200 characters. |
| Key | Generated from the label when you save the product, for example management_url. It never changes after that: stored values are filed under it. |
| Type | Text, Long text, Number, Link (URL), IP address or Secret (password, key). The type decides how the value is checked and shown. |
| Who sees it | One of three access levels, described below. |
| Required at checkout | Only for fields set to Both. The customer cannot place the order without answering. |
| Primary IP | Only for an IP address field set to Client. The value is shown as the service's IP address in service lists and in the client area. One field per product. |
| Placeholder | Example text inside the empty input. Up to 200 characters. |
| Help text | Shown under the input. Up to 1,000 characters. |
Who sees it
| Option | Who fills it in | Who sees it | Typical use |
|---|---|---|---|
| Admin: staff only | Staff | Staff only. Never shown to the customer or emailed. | Internal notes, a switch port, a supplier reference |
| Client: shown to the customer | Staff, after the order | Staff and the customer. A secret stays masked until the customer reveals it. | The address, login link, username and password you hand over |
| Both: asked at checkout | The customer, when ordering | Staff and the customer. Staff can correct the answer. | A domain name, the IP to protect, a preferred username |
Rules the editor enforces
- A product can have at most 30 fields.
- A secret can never be a checkout question. Choosing Secret on a Both field moves it to Client.
- Only one field can be the primary IP. When another field already holds it, the checkbox reads Another field is already the primary IP.
- Removing a field hides it, but values already stored on services are kept. A new field with the same label gets a new key, so old values never come back under it.
Once the product has been sold, a notice at the top of the card says what can still change: keys are fixed, a secret stays a secret, and an existing field can only be re-typed to Text or Long text. If you change a staff-only field to Client or Both, the values staff already entered become visible to customers. The card warns you and you must tick I understand, show these values to customers before the product saves.
Step 3: Add-ons and delivery timing
Only billing-only add-ons can be attached to an Other product. An add-on that grants a resource (extra RAM, an IP allocation and so on) would be billed and never delivered, so it is refused with a message ending this product is fulfilled by hand, so only billing-only add-ons apply to it. See Product options.
The product's Delivery tab has the usual When to deliver choice: After payment or When ordered, before payment. It decides when the service is handed to your team. See Billing terms and delivery before payment.
What the customer sees at checkout
The order page of an Other category shows a Choose a product section with the products of the category and their descriptions, and a Your details section with the questions of the selected product. Only the selected product's questions are shown. Required questions carry a red asterisk.
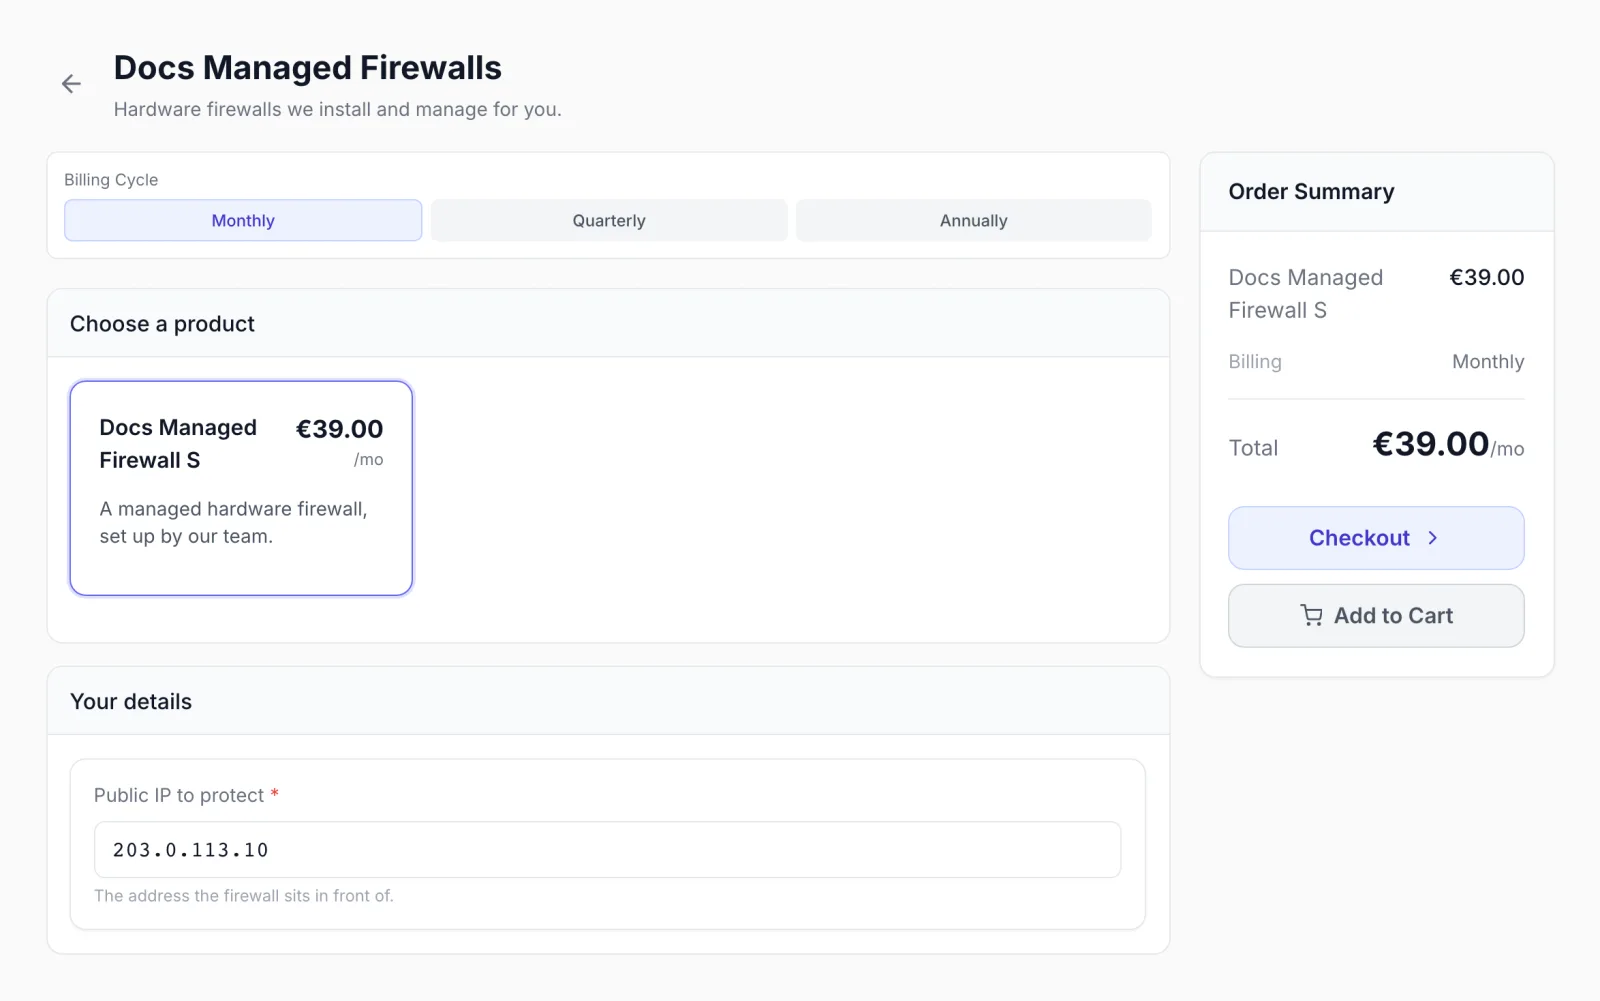
Answers are checked by type before the order goes through:
- Number: <Label> must be a number
- Link (URL): <Label> must start with http:// or https://
- IP address: <Label> must be a valid IPv4 or IPv6 address
- A required question left empty: <Label> is required
The hourly billing term is never offered. Only answers to the product's own Both questions are stored with the order; anything else sent with the order is dropped.
Orders placed by staff or through the API
When staff create an order under Orders → New Order, an Other product shows an Order questions box with the same questions. They are all optional for staff, marked (required for customers) where they apply, so staff can leave one blank and fill it in on the service later (see Creating an order). Orders placed through the reseller API do not enforce required questions either. Orders through the client API must answer required questions, like the order form.
Step 4: Deliver a paid service
When an Other service is paid it stays Pending, and FluxBilling tells your team:
- An admin notification titled Deliver product for client, reading Paid and waiting for you: fill in the service details, then set it Active to send the customer their delivery letter. It links to the service. See Notifications.
- A pending Manual delivery entry in the Automations panel. It closes by itself when the service is activated. See Automations.
To deliver:
- Open the service from the notification, or from Services. A Waiting for delivery banner sits at the top: This service is fulfilled by hand. Fill in the details below, then activate it.
- Do the work for the customer (install the device, issue the licence and so on).
- In the Service details card, click Edit, fill in the fields and click Save details.
- Leave Email the details to the customer ticked if the customer should get the delivery email, or untick it.
- Click Activate & send details (the button reads Activate when the email box is unticked).
The service becomes Active and a toast confirms Service activated. The details email is on its way to the customer. (or Service activated. No email was sent.). Activation also completes the order and, for a service sold through a reseller, tells the reseller it was delivered.
You can also activate by clicking Edit at the top of the page and setting Status to Active. The same Email the details to the customer checkbox appears under the status. Either way, the delivery runs once per service: setting a suspended service active again later does not send the email again. To send it again, use Resend Welcome.
The Service details card
- Each field shows who sees it: Staff only, Shown to customer or Customer answer.
- A customer's checkout answer is marked From checkout. If staff change it, it is marked Override and the card keeps the customer's original answer in view (Customer's answer: …). Use the customer's answer in the editor brings it back.
- A secret is never shown in the card. Click Reveal to read it; it hides itself after a minute, and every reveal is recorded against your account. When editing, leave a secret blank to keep the stored value.
- With the IPAM module on, an IP address field has Assign from IPAM, which books a free address from a subnet and fills the field. A field assigned from IPAM shows an IPAM badge with Change and Release. Staff need the IPAM edit permission for this. See IPAM.
- When a service is cancelled, terminated or marked as fraud, addresses its fields booked from IPAM are released.
What the delivery email contains
The email uses the Service Activated (Details) template, unless the category's Welcome Letter Template names another one. It lists every field the customer can see (Client and Both fields that have a value), including Client secrets such as a password. When it contains a secret, the email adds a Store these details safely note asking the customer to keep the email private and change the password after first use. Staff-only fields are never emailed. Edit the template under Email templates.
What the customer sees in the client area
The service page shows a Service details card in place of the server panels other products have.
- While the service is pending, the card says We're setting this up — details appear here once ready. and lists only the customer's own answers under Your answers.
- Once active, it lists every Client and Both field in your order. An empty field reads Not issued yet (or Not provided for an unanswered question). Values can be copied, and links open in a new tab.
- Secrets appear masked. The customer clicks Reveal to show one; it hides again after one minute. Reveal works while the service is active, suspended or cancelled. After termination the card says Hidden values are no longer available for this service.
- The primary IP field is marked Primary, and its value is the IP address shown for the service in the customer's service list.
Troubleshooting
| Message | Where | What to do |
|---|---|---|
| This product is delivered by hand and cannot be billed hourly. Choose a monthly or longer billing term. | Checkout, New Order, API | Order on a monthly or longer term. |
| <Label> is required | Checkout | The customer must answer the question, or untick Required at checkout on the field. |
| Other categories ask checkout questions per product: add a field marked Both to the product instead | Adding a checkout question to an Other category | Add the question to each product as a field set to Both. |
| Every field needs a label | Product fields editor | Give the field a label before clicking Done. |
| A product can have at most 30 fields | Product fields editor | Remove a field you no longer need, or combine values into a Long text field. |
| <Label>: a secret cannot be asked at checkout … | Saving a product | Set the field to Client (staff fill it in, the customer reveals it) or Admin. |
| <Label>: this field already has values on existing services, so it can only change to Text or Long text … | Saving a sold product | Keep the type, or add a new field instead. |
| Confirm under Configuration, Product fields, that values staff entered as staff-only may become visible to customers. | Saving a sold product | Tick I understand, show these values to customers on the Product fields card, or put the field back to Admin. |
| Could not activate the service: … | Activating | Read the reason after the colon, fix it and click the button again. |
| The customer did not get the delivery email | Client | Check that the email box was ticked when you activated, then check Email logs. Use Resend Welcome on the service to send it again. |
For how other product types are delivered, see Provisioning and delivery.