
OpenStack: sell cloud servers from your OpenStack project
Set up the free OpenStack plugin: application credential, connection settings, products from flavors, the order form, client controls and troubleshooting.
The OpenStack plugin connects FluxBilling to one project of your OpenStack cloud, so you can sell cloud servers as FluxBilling products. FluxBilling takes the order, sends the invoice and collects the payment. When the invoice is paid, the plugin boots the server in the project, and the customer manages it from the FluxBilling client area. The plugin is free and is listed in the plugin marketplace of every FluxBilling panel. Your cloud stays as it is: the plugin uses the cloud's standard identity, compute, network, image and block storage APIs.
This guide covers plugin version 1.1.0. It walks through the setup in the order you do it, then explains what happens to a server over its life and what to check when something does not work.
Who supports this integration. The plugin is built and maintained by FluxBilling. If something does not work, contact FluxBilling support at contact@fluxbilling.app or through fluxbilling.app/contact. Questions about your OpenStack cloud itself, its quotas or its hypervisors go to whoever runs the cloud.
What you need before you start
- FluxBilling 0.0.1572 or newer.
- An OpenStack cloud whose compute API supports microversion 2.67 or newer (OpenStack Stein, 2019, or later). A few actions need more on servers that boot from a volume: reinstall and snapshot restore need 2.93 (Zed), rescue mode needs 2.87 (Ussuri). The compute API microversion history lists which release added which version.
- One project that will own all the servers, with enough quota for the servers, addresses, volumes and snapshots you plan to sell. Every server, floating IP and snapshot the plugin creates lives in this project.
- A login for that project: an application credential (recommended) or a user name and password with the member role. See step 1.
- At least one flavor the project can use. The flavor sets vCPU, RAM and disk.
- OS images in the image service. Linux images need cloud-init, which sets the hostname, the root password, root SSH login and the customer's SSH key on first boot. Windows images need cloudbase-init, which sets the Administrator password.
- A network for the servers. Either a provider network that hands out public addresses directly, or a private network plus an external network for floating IPs.
- Network access from your FluxBilling panel to the identity endpoint and to the compute, network, image and block storage endpoints that the cloud's service catalog lists. Self-signed certificates and private addresses are accepted.
- A console proxy your customers can reach, if you want them to use the web console. The console opens the cloud's own noVNC (or SPICE) link in the customer's browser. See OpenStack's remote console access.
Step 1: Create a login in OpenStack
The plugin logs in to the identity service (Keystone) at the start of every task and reads the other endpoints from the service catalog it gets back. It can log in in two ways.
Application credential (recommended)
An application credential belongs to one project, can be revoked on its own, and never exposes a user's password.
- Sign in to the dashboard (Horizon) and switch to the project that will own the servers.
- Open Identity → Application Credentials and click Create Application Credential.
- Give it a name, for example fluxbilling, and give it the member role. Leave the expiry empty unless you want to rotate it on a date.
- Copy the ID and the secret. The secret is shown only once.
With the command line client the same is openstack application credential create fluxbilling, run while scoped to the project. OpenStack documents it in Application Credentials.
User name and password
Use a user with the member role on the project. You will enter the user name, password, the user's domain and the project (by ID, or by name and domain).
Member or admin role. The member role is enough for everything except the CPU, memory and traffic figures. Those come from the server diagnostics API, which OpenStack allows only to the admin role by default. If your login is a member, leave Read Usage off (step 3).
Step 2: Install the plugin
- In the FluxBilling admin panel, open Settings (the gear icon in the top bar).
- Under Integrations, open Marketplace. Stay on the Browse tab.
- Open the OpenStack Provider card and click Get for Free.
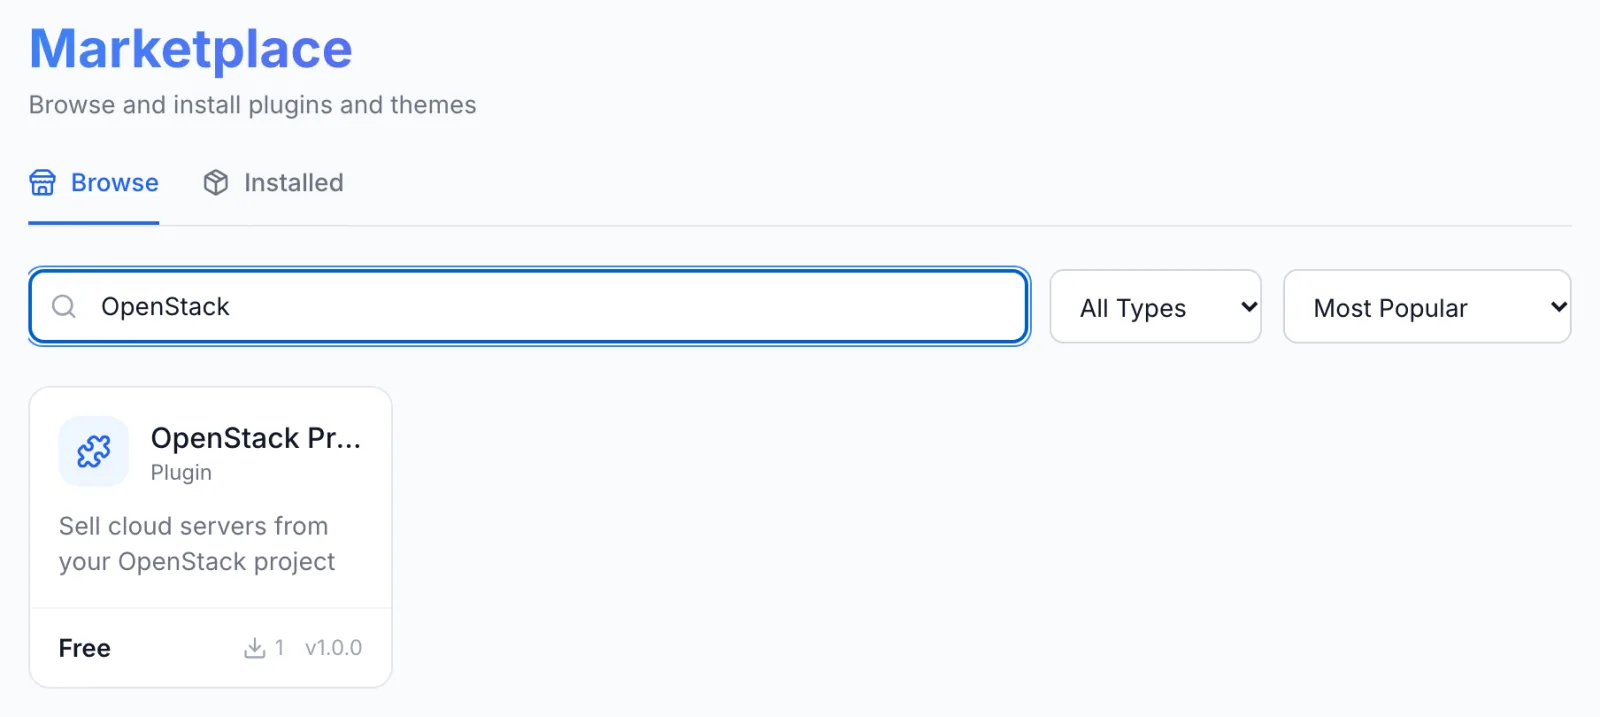
FluxBilling confirms with Plugin "OpenStack Provider" installed and ready to use. The plugin is switched on straight away and appears under Settings → Integrations → Plugins as OpenStack Provider, marked Active.
Step 3: Connect it to your cloud
- Open Settings → Integrations → Plugins.
- On the OpenStack Provider card, click Configure.
- Fill in the fields below and click Save Configuration.
The dialog has three sections: Connection, Endpoint Overrides (optional) and Behaviour.
| Field | What to enter |
|---|---|
| Identity (Keystone) URL (required) | The identity endpoint, with or without /v3, for example https://cloud.example.com:5000/v3. Every other endpoint comes from its service catalog. |
| Login With | Application credential (recommended) or User name and password. |
| Application Credential ID | The ID from step 1. Application credential login only. |
| Application Credential Secret | The secret from step 1. Application credential login only. |
| User Name, Password | Password login only. |
| User Domain | Password login only: the user's domain name, or its 32-character ID. The field is prefilled with Default. |
| Project ID | Password login only: the project that owns the servers. Or leave it empty and fill in Project Name. |
| Project Name, Project Domain | Password login only, when no project ID is given: the project's name and the domain it is in (name or ID). |
| Region | The region to use from the catalog, for example RegionOne. Empty uses the first one listed. |
| Endpoint Interface | Which catalog URLs to call: Public, Internal or Admin. Keep Public unless your FluxBilling panel runs inside the cloud's own network. |
| Field | When to use it |
|---|---|
| Compute Endpoint Override | Only when the catalog URL cannot be reached from FluxBilling, for example https://cloud.example.com:8774/v2.1. |
| Network Endpoint Override | For example https://cloud.example.com:9696. |
| Image Endpoint Override | For example https://cloud.example.com:9292. |
| Block Storage Endpoint Override | For example https://cloud.example.com:8776/v3/ followed by the project ID. |
An override wins over the catalog for that service. Leave all four empty when the catalog URLs work from FluxBilling.
| Field | What it does |
|---|---|
| Suspend Method | What suspending an unpaid service does to its server: Stop (keeps the hypervisor slot), Suspend to disk, or Shelve (frees the hypervisor; slower to resume). Unsuspending undoes whichever it was. The dialog preselects Stop. |
| Snapshots Per Server | How many snapshots a customer may keep. 0 turns snapshots off. Snapshots are stored as images in the project and count against its image storage. The dialog prefills 1. |
| Read Usage | Show CPU, memory and traffic figures. Reads each server's diagnostics on every status refresh. OpenStack allows that only to the admin role, so leave it off for a member login. |
The secret and the password are stored encrypted. FluxBilling shows Configuration saved successfully when the settings are saved.
Test the connection
On Settings → Integrations → Plugins, click the OpenStack Provider card itself (not Configure), switch to the Connections tab and click Test connection on the OpenStack API row. The test logs in with your credential, checks that the compute API supports version 2.67 or newer, and makes one read each from the network and image APIs. It also says whether the catalog lists block storage, which boot volumes need. A working setup answers like Connected — project servers; region RegionOne; compute API up to 2.96; network OK; image OK; block storage listed. Otherwise it names the problem; see Troubleshooting.
Step 4: Create a category for your OpenStack products
In FluxBilling, the category decides how its products are delivered. Every product in the category is built by the plugin you choose here.
- Open Products, switch to the Categories tab and click Add Category.
- When FluxBilling asks What does this category sell?, choose Plugins. Do not choose VPS: that type is FluxBilling's own KVM module, not OpenStack.
- Enter a Name. The URL slug fills in by itself.
- Under How paid orders are fulfilled, click OpenStack Provider.
- Under Availability, choose Live to show the category on the order page, or Unlisted while you test.
- Click Create Category.
Step 5: Create a product for each flavor
- On the Products tab, click Add Product and choose the category from step 4.
- On General, enter the product name and description your customers will see.
- On Configuration, fill in the OpenStack fields described below. The lists are read live from your cloud.
- On Pricing, set the price. Prices, billing cycles, taxes and add-ons all live in FluxBilling.
- Click Create Product.
| Field | What it does |
|---|---|
| Flavor (required) | vCPU, RAM and disk of every server sold with this product. The list shows each flavor's size; a flavor without a disk is marked as needing a boot volume. |
| Availability Zones Offered (required) | The zones the customer can choose at order. The first one is used when they do not choose. Zones the cloud reports as unavailable are not listed. |
| OS Images Offered (required) | The images customers can choose at order. Reinstalls offer the same list. Snapshots are left out of this list. |
| Networks | Networks to attach, in this order. The first one carries the main address. Empty lets the cloud pick, which only works when the project has one usable network or an auto-allocated one. |
| Floating IP Network | For servers on a private network: each server gets a floating IP from this external network as its public address, and one more for each extra IPv4 address ordered. Leave it empty when the networks above give public addresses directly. |
| Security Groups | Firewall groups for the server. With none chosen and Open All Ports off, the server gets the project's default group, which blocks all inbound traffic. |
| Open All Ports | Adds the project's allow-all-inbound security group, so SSH, web and every other port are reachable like on a plain VPS. The plugin creates the group the first time it is needed, with inbound rules for IPv4 and IPv6, and reuses it for every server. A product counts as on unless you switch it off. |
| Boot Volume Size (GB) | Boot from a block storage volume of this size instead of the flavor's own disk. The volume is deleted with the server. Required for flavors without a disk. If the image needs a bigger disk than you set, the image's minimum is used. |
| Boot Volume Type | Storage tier for boot volumes. Empty uses the cloud's default type. |
| Staff SSH Key | Optional. A key pair of the login's user, put on every server (cloud-init images) for staff access. |
| Hostname Template | Optional. When set, FluxBilling generates the hostname and the customer is not asked for one. {{id}} is replaced by the service number, so vps-{{id}}.example.com becomes for example vps-1042.example.com. Leave it empty to let customers enter a hostname. |
The Pricing tab also lists your availability zones under Location Pricing, so you can charge extra for a zone, and shows the add-on the plugin understands (see the next step).
Step 6 (optional): Sell more IPv4 addresses
Each server gets one public IPv4 address. To let customers order more, up to four in total, create one add-on and attach it to your OpenStack products.
- Open Products, switch to the Options tab and click Add Option.
- Enter an Option Name such as IPv4 addresses.
- Under Slug, choose additional_ips — OpenStack Provider. This is the name the plugin reads. A different slug is not seen by the plugin.
- Leave Spec Service on None (billing only).
- Choose a Pricing Type, then switch on Configurable Options.
- Add one choice per address count. The Value is the total number of IPv4 addresses on the server, from 1 to 4 (
ipv4-2style values work too). So1means the main address only and2means one extra address. - Click Create, then open each OpenStack product, go to Pricing and use Attach under Plugin expects these options:.
- Extra addresses are added to the server's network port from the same subnet as the main address. The guest operating system has to configure them itself.
- With a Floating IP Network on the product, each extra address also gets its own floating IP.
- Values above 4 are treated as 4.
The add-on takes effect when the server is built. The plugin does not add or remove addresses on an existing server. If the add-on is changed later, FluxBilling bills the new choice but the addresses have to be added or removed in OpenStack by hand.
Step 7: Place a test order
Place an order for each product before you sell it, for example from a test client account. The order form asks for:
- Location: one of the availability zones the product offers.
- Operating System: one of the OS images the product offers.
- Hostname: only when the product has no hostname template. Letters, numbers, hyphens and dots, with no spaces.
- Root Password: at least 8 characters, with at least three of uppercase letter, lowercase letter, number and symbol.
- SSH Public Key (optional): one OpenSSH public key, the whole line from the
.pubfile. It is added to root's authorized keys on Linux images.
What happens when the invoice is paid
With Auto Provisioning switched on (see Billing lifecycle), FluxBilling starts the build as soon as the invoice is paid:
- Checks. The plugin logs in, reads the product's flavor and the chosen OS image, and stops with a clear message if either cannot be used. A choice the product does not offer is replaced by the first one it does offer.
- Reuse or boot. Every server is tagged with its FluxBilling service. If an earlier attempt for this service already created a server, the plugin takes that one over instead of booting a second. Otherwise it boots the server in the chosen zone, on the product's networks and security groups, from the image or from a new boot volume.
- Guest setup. Linux images get the hostname, the root password, root SSH login with a password, and the customer's SSH key through cloud-init. Windows images get the Administrator password through cloudbase-init. An image can name its own admin user (image property
os_admin_user); otherwise the login isroot, orAdministratorfor Windows. - Wait. The plugin waits about three minutes for the server to become active. A server that goes into an error state is deleted, and the cloud's reason is shown. A server that is still building when the wait ends is handed over anyway; its addresses are filled in by FluxBilling's hourly refresh.
- Addresses. It adds the extra IPv4 addresses ordered and, with a floating IP network, attaches the floating IPs.
- Hand-over. FluxBilling saves the server, its main IP address and the login on the service and marks it Active. With the default email templates, the customer gets an email that the server is ready, with its IP address and password.
What your customers can do
In the client area, the customer opens the service. The server buttons sit at the top of the page: Stop, Restart and Console on a running server, the rest under More. Each button shows only in the server states where it works.
| Control | What it does |
|---|---|
| Start | Starts the server from stopped, suspended, paused or shelved. |
| Stop, Restart | Clean shutdown and soft reboot, with a confirmation. |
| Force Restart | Power-cycles the server like pressing reset. Also available when the server is in an error state or stuck starting or stopping. |
| Console | Opens the cloud's noVNC console in a new browser tab, or SPICE when the cloud has no VNC. Available while the server runs or is in rescue mode. |
| Reinstall | Erases the server and installs the chosen operating system with a new root password. Only the OS images the product offered at order are listed. |
| Reset Password | Sets a new root password on the running server. Works only with images that have the guest agent (see below). |
| Rescue Mode / Leave Rescue Mode | Restarts the server into the cloud's rescue system with its own disk attached as a second drive, for repairs from the console. An optional rescue password is passed to the cloud. |
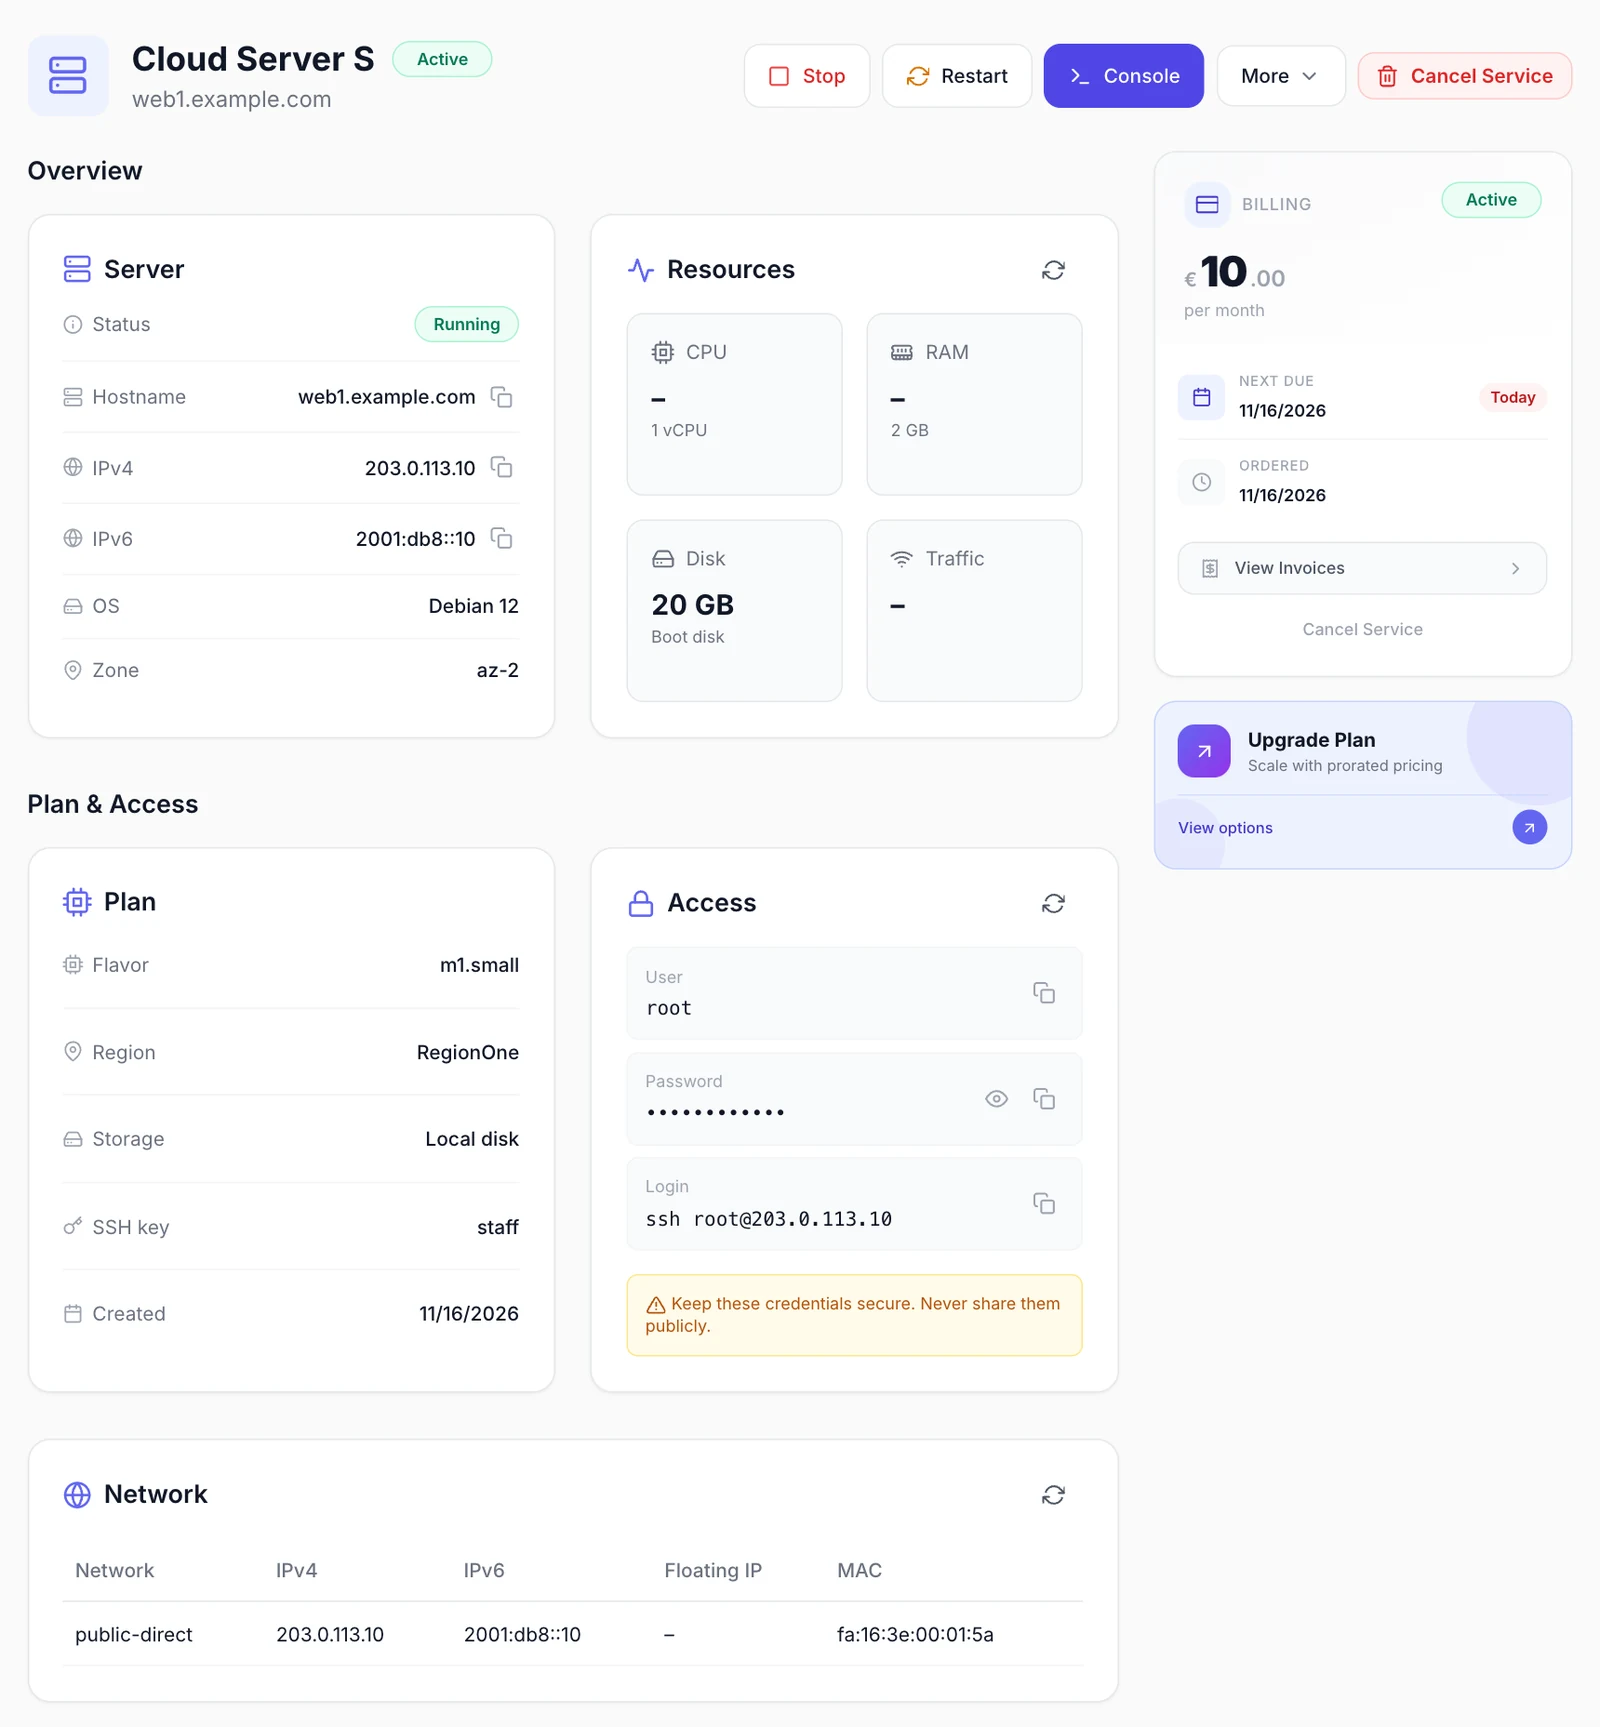
Below the buttons, the page shows these cards:
| Card | What it shows |
|---|---|
| Server | Status, Hostname, IPv4, IPv6 when the server has one, OS and Zone (the availability zone). |
| Resources | CPU with the vCPU count, RAM with its size, Disk (the boot disk size) and Traffic, refreshed every 30 seconds. CPU use, memory use and traffic show only with Read Usage on and an admin-role login; otherwise they show a dash. |
| Plan | Flavor, Region, Storage (Local disk, or Volume for a server that boots from a volume), SSH key (the key pair the server was built with, or None) and Created. |
| Access | User, Password and Login, the command to connect with (ssh root@…, or mstsc /v:… for Windows), each with a copy button. The password stays masked until the customer clicks Show, and is hidden again after one minute. |
| Network | One row per network interface: Network, IPv4, IPv6, Floating IP and MAC. Extra IPv4 addresses appear here too. |
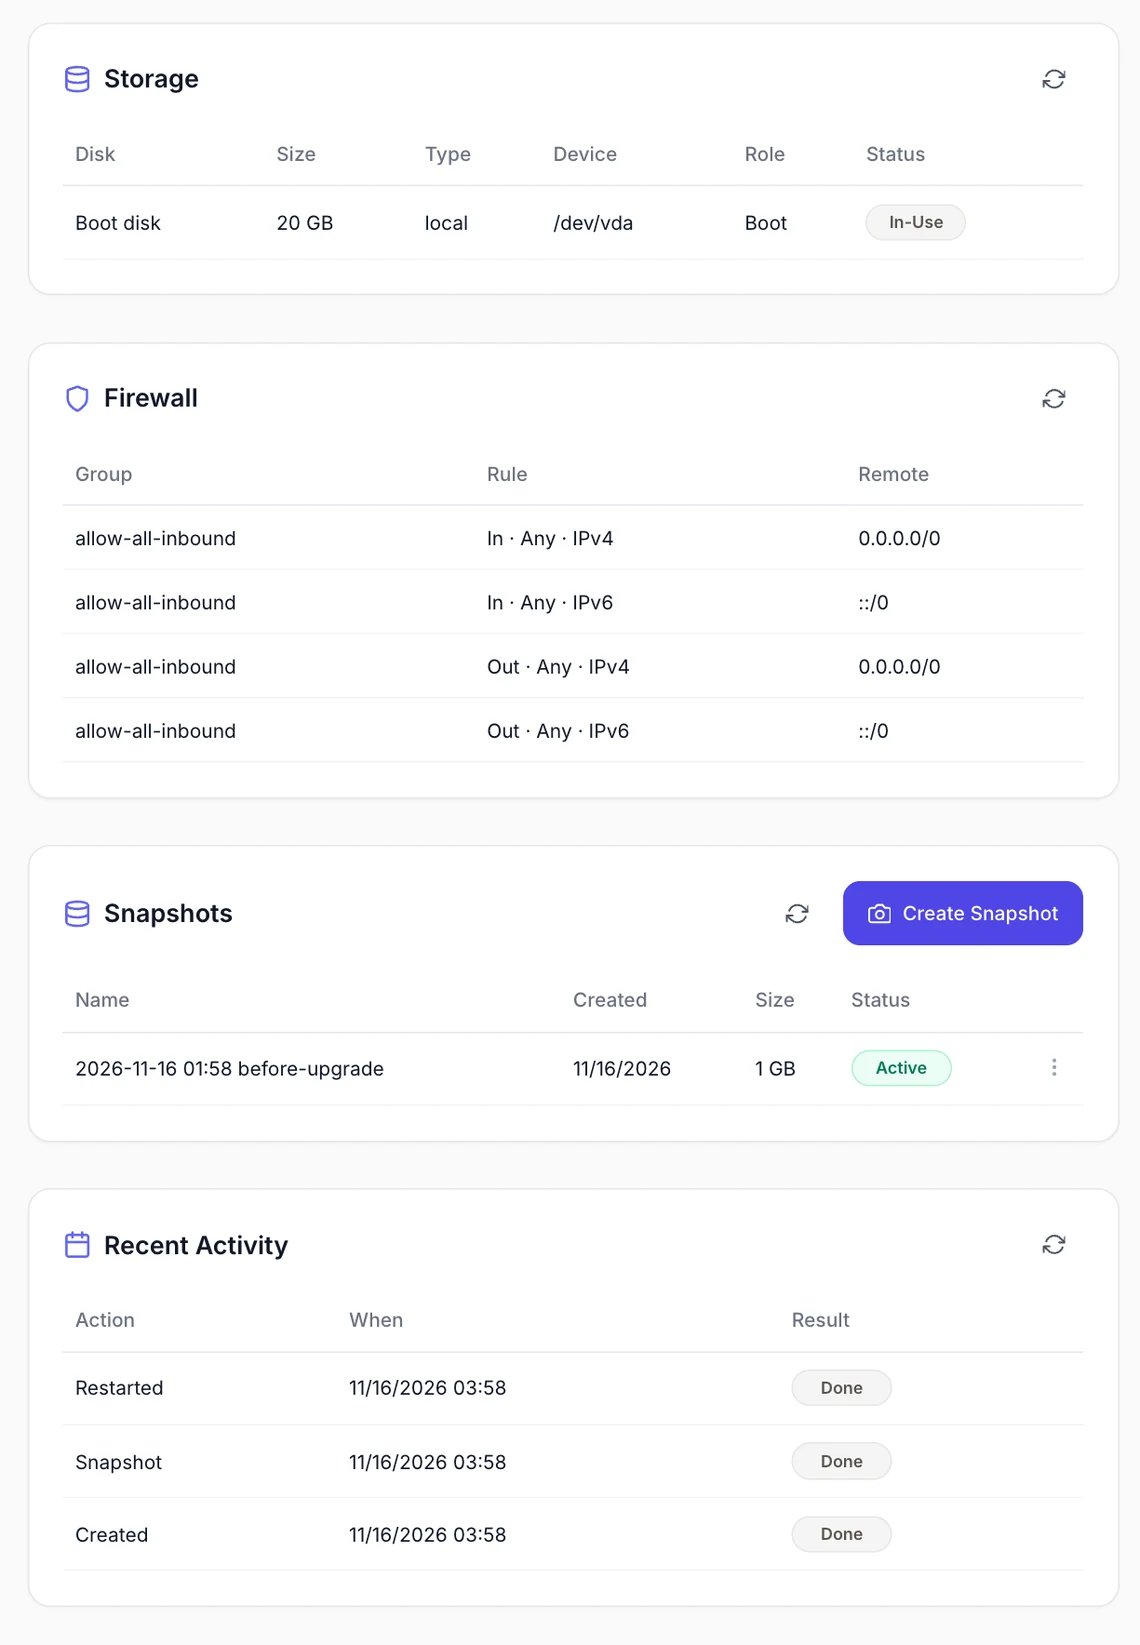
| Storage | The boot disk and every attached volume: Disk, Size, Type, Device, Role (boot or data) and Status. |
| Firewall | The rules of the security groups on the server's ports, inbound first: Group, Rule (for example In · TCP 22 · IPv4) and Remote. The customer can read them but not change them. |
| Snapshots | Name, Created, Size and Status of the server's snapshots, with Create Snapshot (with an optional label) and per snapshot Restore and Delete. Restoring rebuilds the server from the snapshot; everything written since is lost. Customers can keep as many snapshots as Snapshots Per Server allows. |
| Recent Activity | The 10 most recent actions the cloud recorded for the server, such as Created, Restarted or Snapshot, with When and Result. |
Show reveals the stored password, only while the service is active and the customer's account is not suspended; team members also need the Manage Services permission. Every reveal is recorded in the activity log. After a reinstall or a password reset, it shows the new password.
While a service is suspended, the buttons and cards are hidden, and the customer sees a Service Suspended notice with the reason.
Password reset needs the guest agent. OpenStack can change a running server's password only through the QEMU guest agent: the image needs the property
hw_qemu_guest_agent=yes(see useful image properties) and the agent installed and running in the guest. Without it the customer sees a message telling them to reinstall to set a new password.
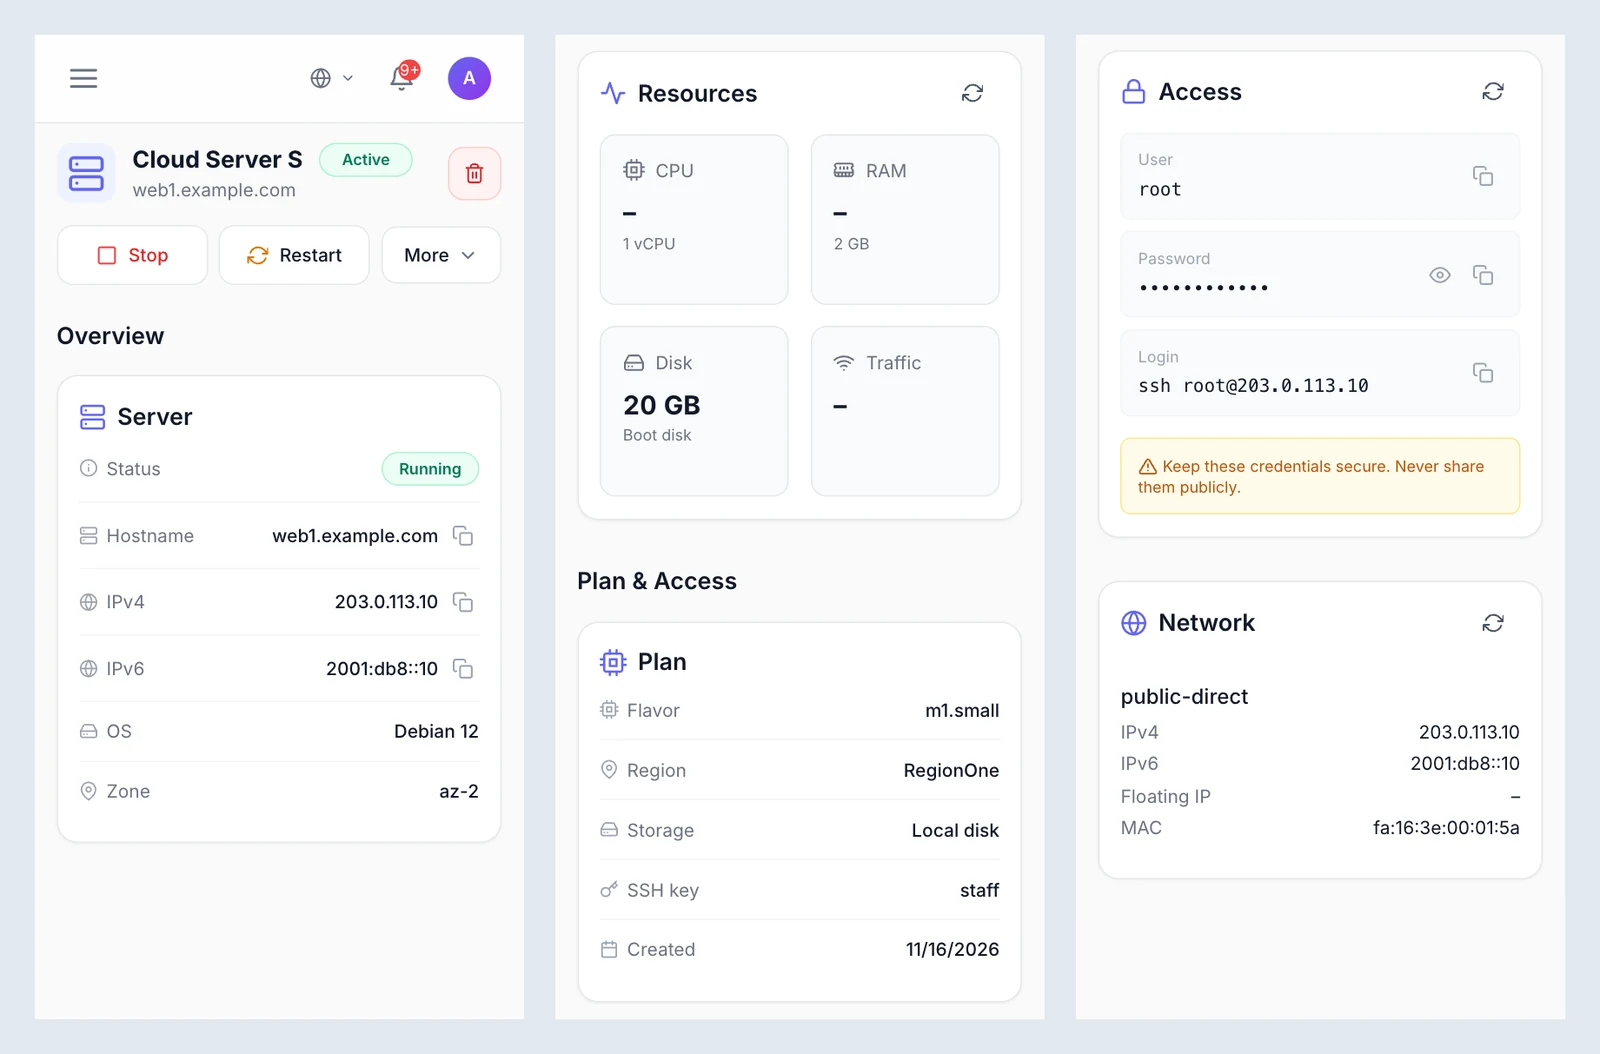
What your staff see
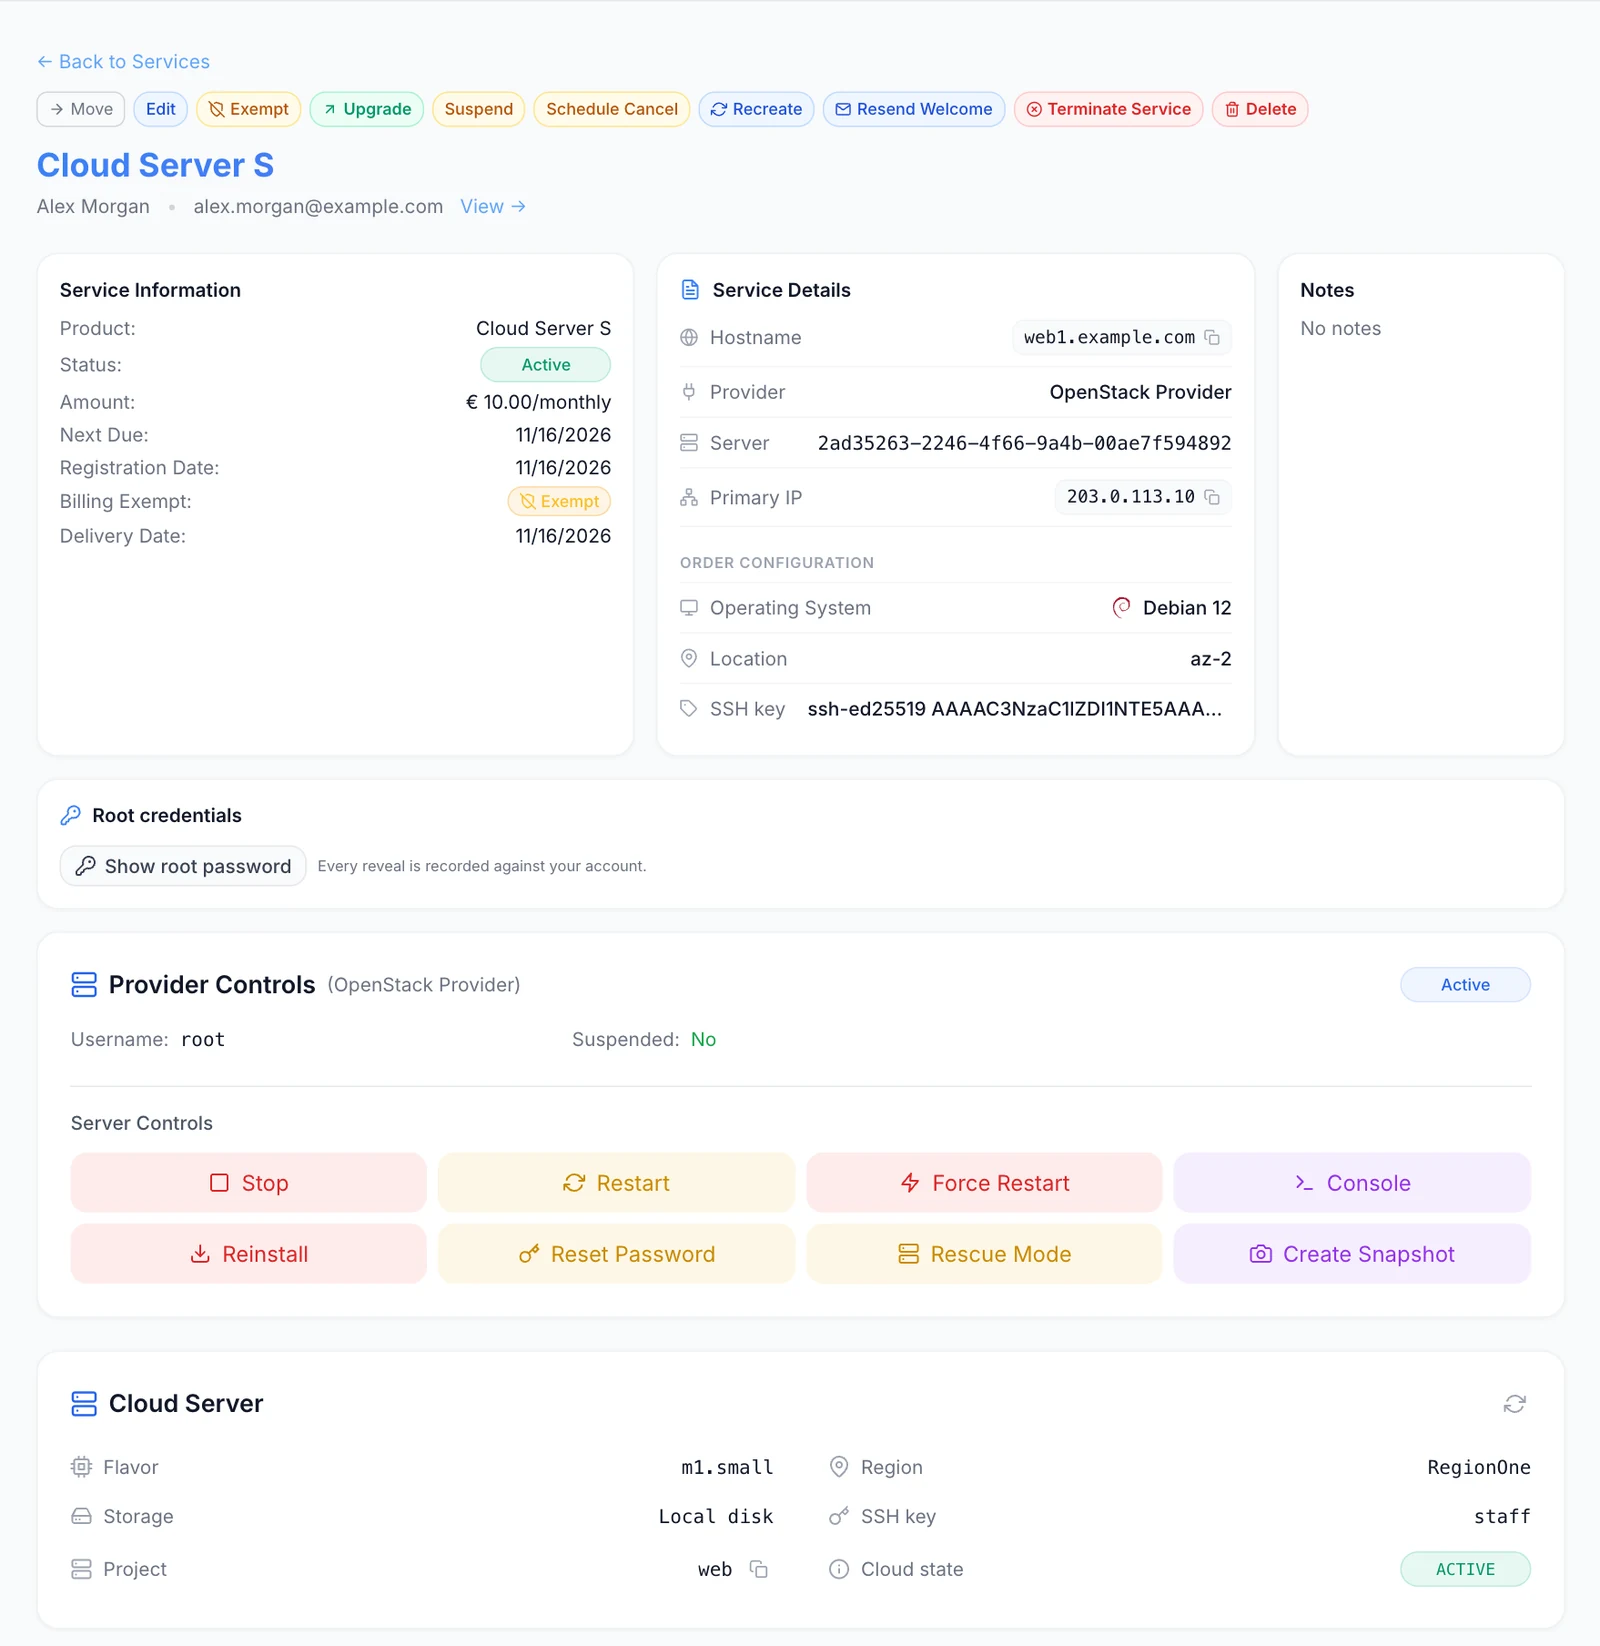
In the admin panel, the service page shows these cards for an OpenStack server:
- Root credentials: Show root password shows the stored user and the masked password with a copy button, and hides itself after a minute. Every reveal is recorded against your account.
- Provider Controls: the server's state, Username, Suspended, and under Server Controls the same actions as the customer's buttons plus Create Snapshot.
- Cloud Server: Flavor, Region, Storage, SSH key, Project, Cloud state (the server's state in OpenStack, with any task in progress) and Last fault (the cloud's last error for the server, shown only when there is one).
- The customer's Resources, Network, Storage, Firewall, Snapshots and Recent Activity cards, where staff can restore or delete snapshots for the customer.
Billing lifecycle
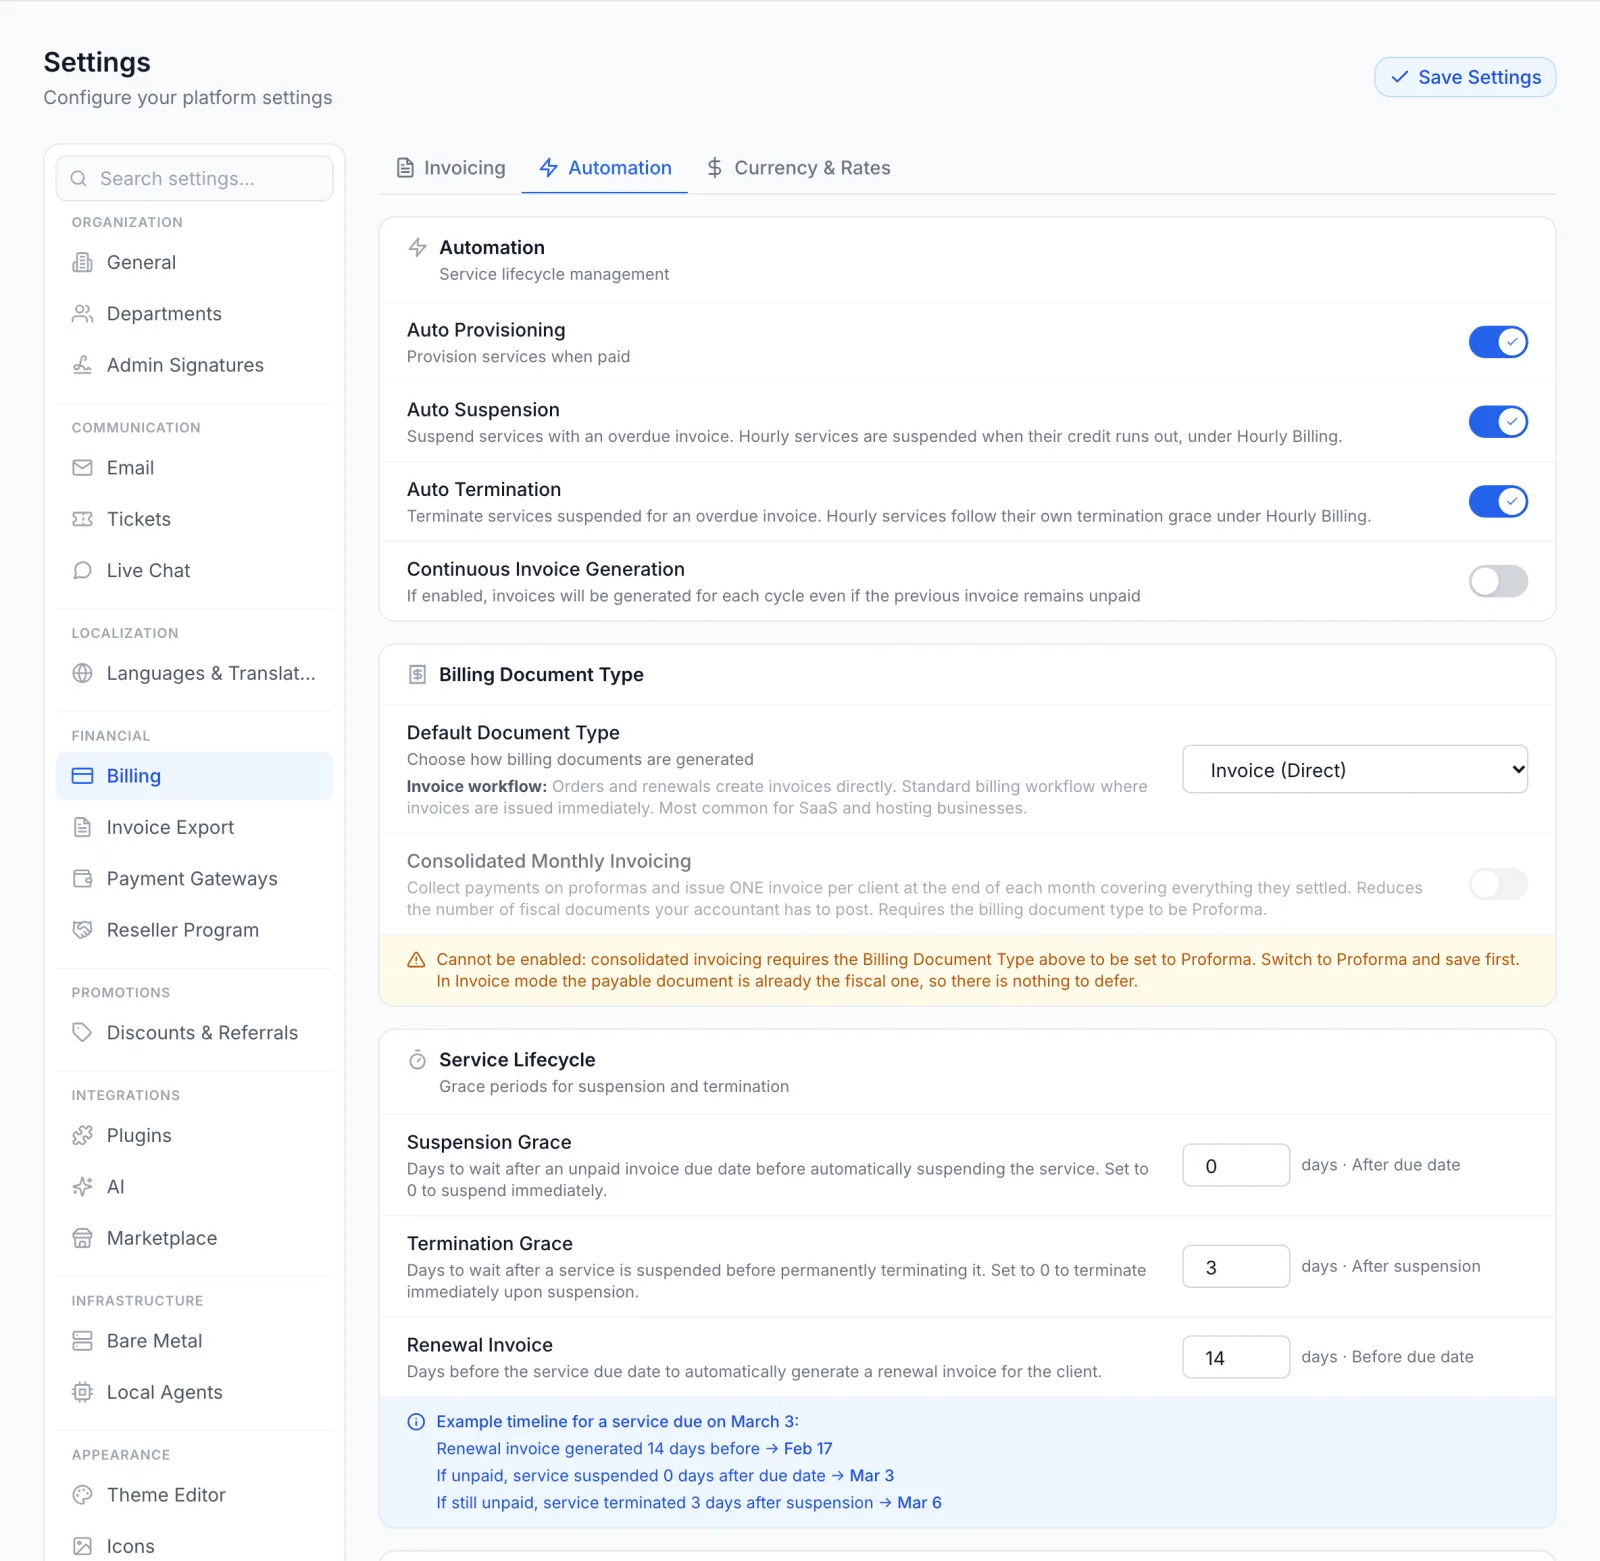
The invoice drives the server. The rules are set under Settings → Billing → Automation:
- Auto Provisioning: builds the server when the first invoice is paid. When it is off, the paid service waits as Pending until staff provision it.
- Auto Suspension with Suspension Grace: an invoice still unpaid that many days after its due date suspends the service. The server is stopped, suspended to disk or shelved, as set in Suspend Method. If the cloud refuses a suspend or shelve, the plugin stops the server instead. Disks are kept.
- Paying the overdue invoice unsuspends the service: the server is started, resumed, unpaused or unshelved, whichever brings it back.
- Auto Termination with Termination Grace: a service still suspended for non-payment that many days later is terminated.
Terminating a service deletes the server. The plugin releases its floating IPs, deletes the server together with its boot volume, waits until it is gone (forcing the delete when the cloud only soft-deletes), and deletes the snapshots taken through FluxBilling. This happens when auto termination runs, when a customer's cancellation takes effect, or when staff terminate the service. It cannot be undone.
Plan changes
Customers can only move between products you link on the product's Upgrade Paths tab. When an upgrade or downgrade between two OpenStack products is paid, the plugin resizes the server to the new product's flavor and confirms the resize. If the new product sets a larger Boot Volume Size (GB), the boot volume is grown while the server runs; the filesystem inside the guest may need to be grown too if the operating system does not do it by itself. OpenStack does not shrink disks, so a move to a flavor with a smaller disk is refused by the cloud, and the upgrade is marked as failed. Try a plan change on a test server before you offer upgrades to customers.
Updating the plugin
Open Settings → Integrations → Marketplace, switch to Installed and click Check for Updates. When a new version is available, click Update to v…. Your connection settings and products are kept.
Troubleshooting
When a build fails, the service stays Pending. The error appears in the Automations menu in the top bar of the admin panel, as Provision via Openstack Provider with the reason and a retry button. FluxBilling tries a failed build again by itself, up to two more times over the next minutes. After that, open the service and click Retry Provisioning. Because the server is tagged with its service, a retry never boots a second server; it finishes the one already there. A build started this way does not email the customer, so use Resend Welcome on the service page once it has worked.
Most messages include OpenStack's own error text after the colon. That text tells you what the cloud objected to.
| Message or symptom | What to check |
|---|---|
| The Flavor or other lists in the product editor stay empty | FluxBilling cannot log in or reach an endpoint. Check the identity URL, the credential, the region and interface, and firewalls. |
| The cloud supports compute API up to …; this plugin needs 2.67 (OpenStack Stein) or newer. (connection test) | The cloud is older than the plugin supports. See What you need before you start. |
| The network API failed: … or The image API failed: … (connection test) | The login works, but that service did not answer. Check that FluxBilling can reach its catalog address, or set the matching endpoint override. |
| Could not reach the identity endpoint … | FluxBilling cannot connect to the identity URL. Check the address and port, and that your FluxBilling panel can reach it. |
| The cloud refused the login (HTTP 401): … Check the user, password or application credential, and the project. | Wrong ID or secret, an expired or deleted application credential, a wrong user domain, or a project the user has no role on. |
| The service catalog has no public compute endpoint in region … (regions: …) | The Region or Endpoint Interface does not match the catalog. The message lists the regions the catalog has. |
| Could not reach … followed by an endpoint address | The catalog lists an address FluxBilling cannot reach, often an internal one. Set the matching endpoint override. |
| The cloud has no block storage endpoint in its catalog for this region and interface | Boot volumes need the block storage service. Remove the boot volume size from the product, or set the Block Storage Endpoint Override. |
| Flavor … has no root disk (0 GB): set "Boot Volume Size" on the product so the server boots from a volume | Set Boot Volume Size (GB) on the product, or choose a flavor with a disk. |
| OS image … was not found or the project cannot use it: … or Flavor … was not found or the project cannot use it: … | The image or flavor was deleted, or is private to another project. Pick a current one on the product. |
| OS image … is not ready (…) | The image is not active in the image service yet. |
| The cloud refused the server: … | OpenStack rejected the build, most often because the project quota for instances, cores, RAM or volumes is used up. Raise the quota, then retry. |
| The cloud reports an error: No valid host was found … (after the server was created) | The server went into an error state and was deleted. The cloud had no hypervisor with room for the flavor in that zone. |
| The server is running, but its address setup failed: … (retrying the provision finishes it) | The server exists but its public floating IP could not be attached, for example because the floating IP pool is empty. Fix the cause, then use Retry Provisioning. |
| The cloud did not finish in time (…) | OpenStack was still working when the plugin stopped waiting. Check the server in OpenStack and try again. |
| The server could not change its password in place (…). This needs the guest agent in the OS image — reinstall the server to set a new password. | The image has no QEMU guest agent. See the note under What your customers can do. |
| Reinstalling a server that boots from a volume needs a newer cloud (compute API 2.93 or later), and the same for restoring snapshots; Rescue mode for a server that boots from a volume needs a newer cloud (compute API 2.87 or later) | Your cloud is older than these features need. Products without a boot volume size are not affected. |
| This server already has 1 snapshot, the most allowed — delete one first | The customer has reached Snapshots Per Server. Snapshots are not included with this service means the limit is 0. |
| The server is in rescue mode — leave rescue mode first | Click Leave Rescue Mode before starting the server normally. |
| Could not open the console: … | The cloud has neither a noVNC nor a SPICE console for the server. If the console opens but stays blank, the customer's browser cannot reach the cloud's console proxy. |
Limits
- All servers live in one OpenStack project, the one the login is for. Customers do not get their own OpenStack logins.
- CPU, memory and traffic figures need an admin-role login and Read Usage; with a member login the client area shows vCPU, RAM and disk size only.
- The IPv4 add-on is applied only when the server is built. Changing it later changes the price; you add or remove the addresses in OpenStack yourself. Extra addresses must be configured inside the guest.
- Addresses come from the cloud's networks. FluxBilling's own IP address management is not involved, and the plugin does not set reverse DNS.
- No backups or custom ISOs through the plugin. Snapshots are images in the project and use its image storage.
- Customers see their server's firewall rules but cannot change them. Change the security groups in OpenStack.
- The
allow-all-inboundsecurity group stays in the project when servers are terminated, so the next server can use it. - FluxBilling does not rely on callbacks from OpenStack: each action waits for the cloud's answer. Nothing has to be set up in OpenStack for callbacks.
OpenStack is a trademark of the OpenInfra Foundation. FluxBilling is not affiliated with the OpenInfra Foundation.