
Blade chassis and blade bays
Add blade chassis to your inventory, read and edit the chassis view, put blades into bays, take them out, and how blades are sold to customers.
A blade chassis is an enclosure that sits in your rack and holds several blade servers in numbered bays. FluxBilling records the chassis as its own device, shows its bays as a grid, and treats every blade in a bay as a server you can sell, power and install like a dedicated server. A blade has no rack position of its own: it is wherever its chassis is.
This article covers adding a chassis, reading and editing the chassis view, putting blades into bays, taking them out again, and how blades are sold. For the Inventory page as a whole, see Inventory. For the rack itself, see Rack management.
Before you start
- Feature toggles. Chassis and blades live on the Inventory page. It needs the Locations and Inventory toggles in Settings → General → Feature Toggles. Inventory cannot be switched on without Locations.
- Permissions. The staff member's department needs the inventory permissions. Without them the Inventory entry is hidden from the sidebar. See Departments.
- A rack to put it in. A new chassis must be placed in a rack, so build the location, datacenter and rack first. See Locations and Datacenter details.
Where to find chassis
Open Inventory in the sidebar and click the Chassis tab. Each row is one chassis. Next to the Chassis type badge, the table shows how many bays are filled, for example (3/16 blades). Click a row to open the chassis view.
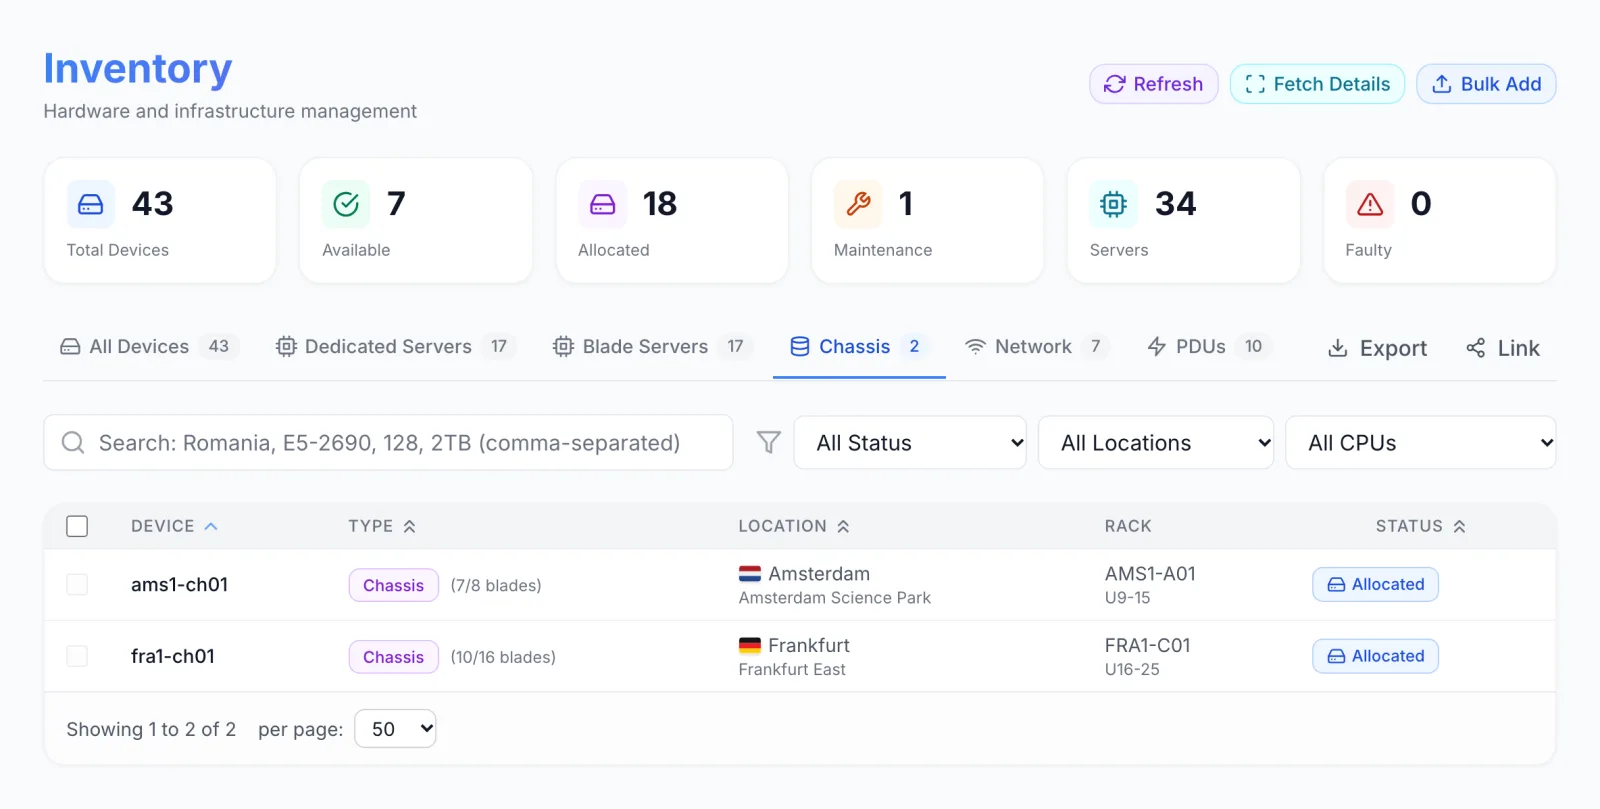
You can also open a chassis from its rack: go to Locations, open the location and the datacenter, open the rack, and click the chassis block in the rack diagram. The same chassis view opens.
The blades themselves are listed on the Blade Servers tab of the Inventory page.
Add a chassis
Chassis are added with the bulk dialog, one or many at a time.
- On the Inventory page, click Bulk Add and choose Chassis. The Bulk Add Devices dialog opens with two tabs, Chassis Setup and Location.
- On Chassis Setup, fill one row per chassis:
- Name (required). Generate Names fills every row from a prefix and a start number; the suggested prefix for chassis is
CHS-, which givesCHS-001,CHS-002and so on. - Model (required). Each option shows the maker, model, height and number of bays, for example Dell PowerEdge M1000e (10U, 16 slots). The model sets the chassis' manufacturer, height and bay count.
- Slots is read-only. It shows the bay count and height taken from the model.
- Status. Pick the chassis' status, normally Available.
- Name (required). Generate Names fills every row from a prefix and a start number; the suggested prefix for chassis is
- On Location, pick the Location, Datacenter and Rack, and enter Start U, the bottom rack unit the chassis sits on. All four are required for a chassis. A 10U chassis with Start U 16 occupies U16 to U25.
- Click Add Devices. Rows without a name are skipped.
Add Row adds another row. The copy icon in a row's Actions makes that row a template for new rows, and the bin icon removes the row.
Migrating from EasyDCIM? Chassis brought in by the EasyDCIM migration keep their bay count, so you do not have to add them again.
Reading the chassis view
The chassis view opens as a large window over the page.
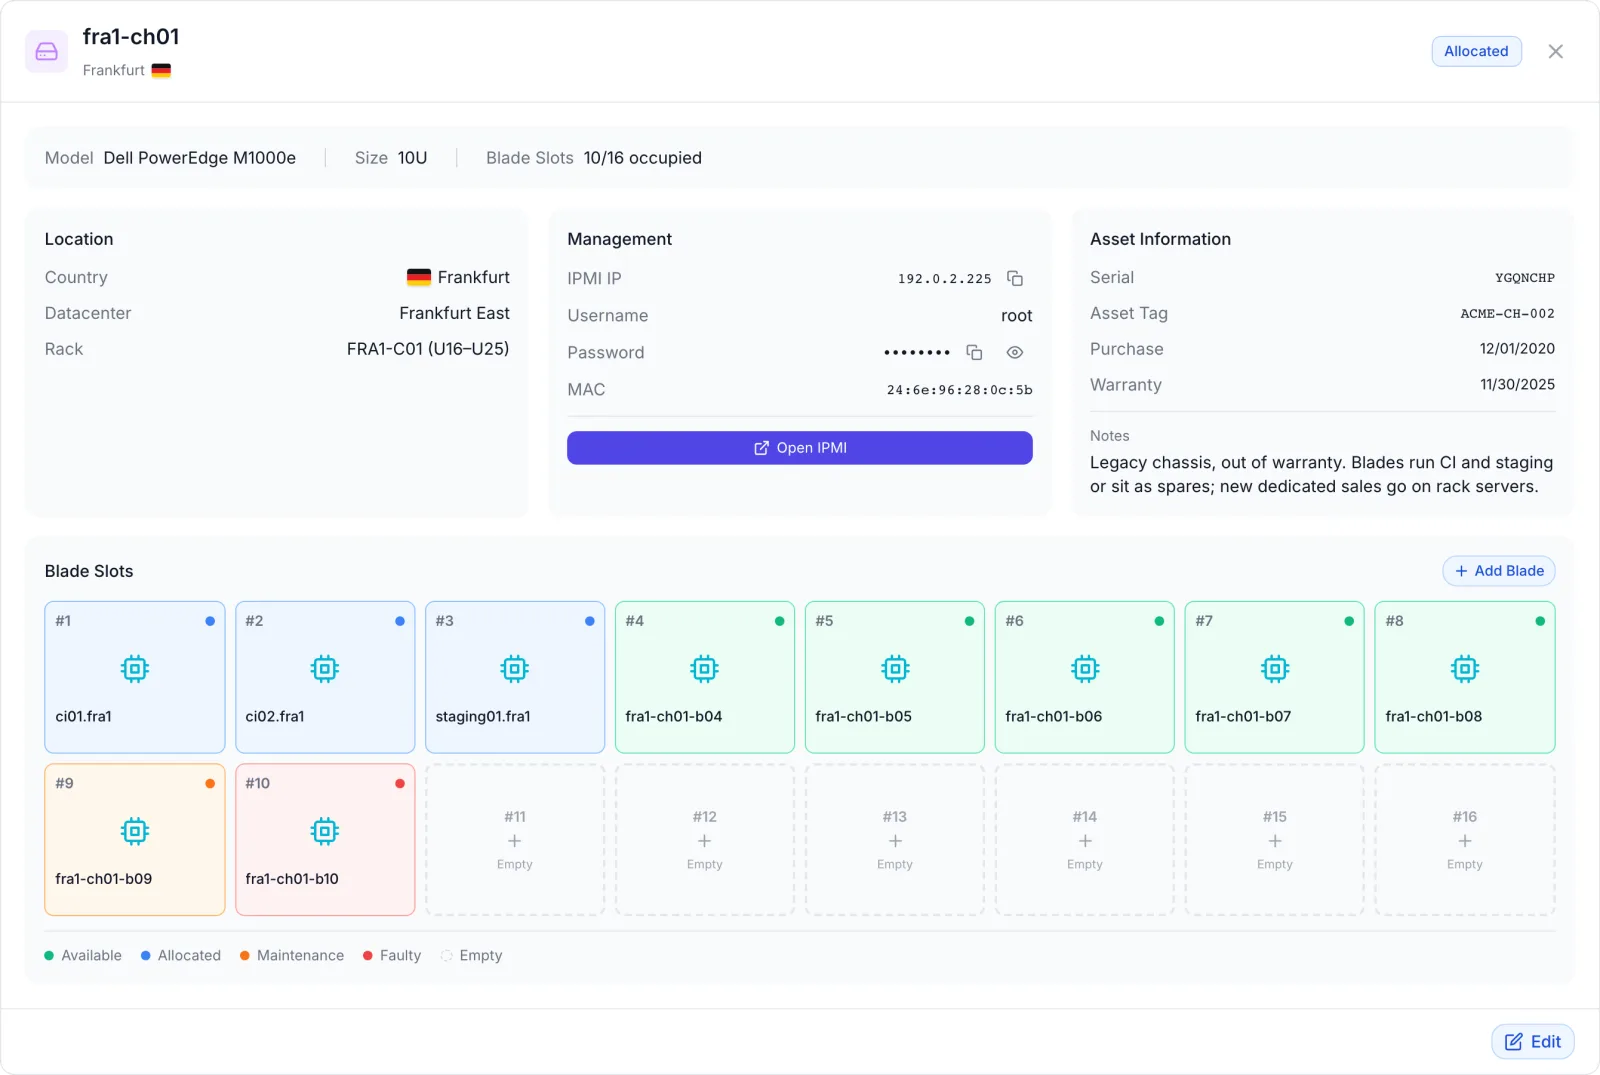
- Header: the chassis name, its location with a country flag (or No location), and a status badge.
- Spec line: Model (manufacturer and model), Size in U, and Blade Slots as filled bays out of total, for example 10/16 occupied.
- Location card: Country, Datacenter and Rack, with the U range the chassis occupies, for example (U16–U25).
- Management card, for the chassis management controller:
- IPMI IP, with a copy button.
- Username.
- Password, shown as dots. The copy button copies it without showing it, and the eye button shows it.
- MAC.
- Open IPMI appears when an IPMI IP is set. It opens
https://followed by that address in a new browser tab.
- Asset Information card: Serial, Asset Tag, Purchase date, Warranty expiry and Notes.
- Blade Slots grid: one tile per bay, numbered from #1. Up to eight bays sit on one row; a chassis with more than eight bays is drawn in two rows, like the front of the enclosure.
Bay tiles
An empty bay is a dashed tile with a plus sign and the word Empty. A filled bay shows the bay number, a coloured status dot, the blade's name and, when the blade is sold, the name of the service in blue. The tile's colour follows the blade's status.
| Tile | Blade status |
|---|---|
| Green | Available |
| Blue | Allocated to a service |
| Purple | Reserved |
| Orange | Maintenance |
| Red | Faulty |
| Grey | Decommissioned |
| Dashed outline | Empty bay |
The legend under the grid always lists Available, Allocated and Empty. Reserved, Maintenance, Faulty and Decommissioned appear in the legend only when a blade in this chassis has that status.
Edit a chassis
- Click Edit at the bottom right of the chassis view. The values turn into fields.
- Change what you need:
- Label: the chassis name. It cannot be empty.
- Model: choosing another model also sets the manufacturer, height and bay count from that model.
- Status: Available, Reserved, Maintenance, Faulty or Decommissioned. The field is locked while the chassis itself is allocated to a service.
- Country, Datacenter, Rack and the U box next to the rack. Each list is filtered by the one before it and unlocks only when that one is set. Changing the country clears the datacenter and rack.
- IPMI IP, Username, Password and MAC. The password field starts empty. Leave it empty to keep the stored password, or type a new one to replace it.
- Serial, Asset Tag, Purchase, Warranty and Notes.
- Click Save. The confirmation reads Chassis updated successfully. Cancel puts back the stored values.
Serial numbers and asset tags must be unique across your devices. A duplicate is refused with, for example, Serial number "CN7792A0" already exists.
Put blades into a chassis
There are two ways to fill a bay: add new blades straight into a chassis, or assign a blade that already exists but is not in any chassis.
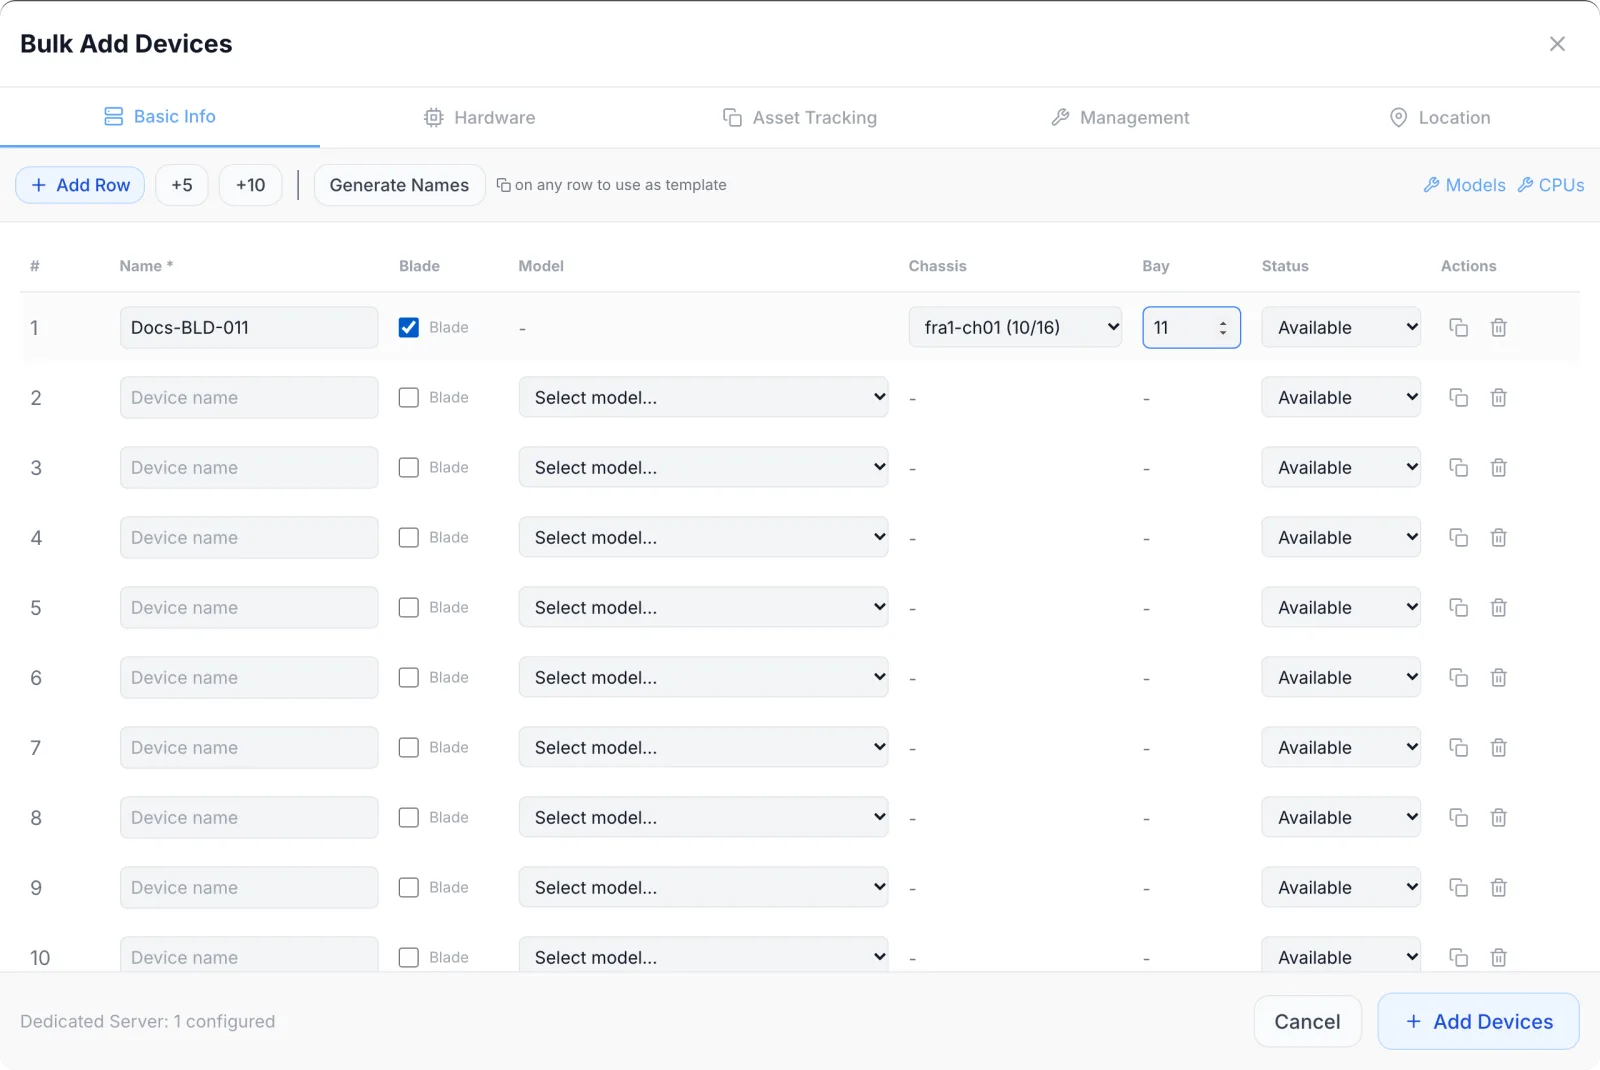
Add new blades in bulk
- On the Inventory page, click Bulk Add and choose Dedicated Servers.
- In each row that is a blade, tick Blade. The Model column then shows a dash and the Chassis and Bay columns open.
- In Chassis, pick the enclosure. Each option shows the chassis name with filled and total bays, for example fra1-ch01 (10/16).
- In Bay, enter the bay number, from 1 to the chassis' bay count.
- Fill the Hardware and Asset Tracking tabs as for a dedicated server (see Inventory). On the Management tab, the Management IP and Boot Method you type are not saved for blades; IPMI User, IPMI Pass and Notes are. After you add it, open the blade and set its IPMI IP there.
- Click Add Devices.
- Leave Blade unticked, or leave Chassis empty, and the row is added as an ordinary dedicated server.
- Each bay holds one blade. If a bay is taken, that row fails with Bay 4 is already occupied and the other rows are still added.
- Whatever you enter on the Location tab for a blade row is not used. A blade always follows its chassis.
- Up to 32 blades can go into one chassis in a single submit.
Assign an existing blade to a bay
A blade can exist without a chassis: for example, a dedicated server you turned into a blade with Convert to blade (see Take a blade out of a chassis). Such a blade is unassigned until you put it in a bay.
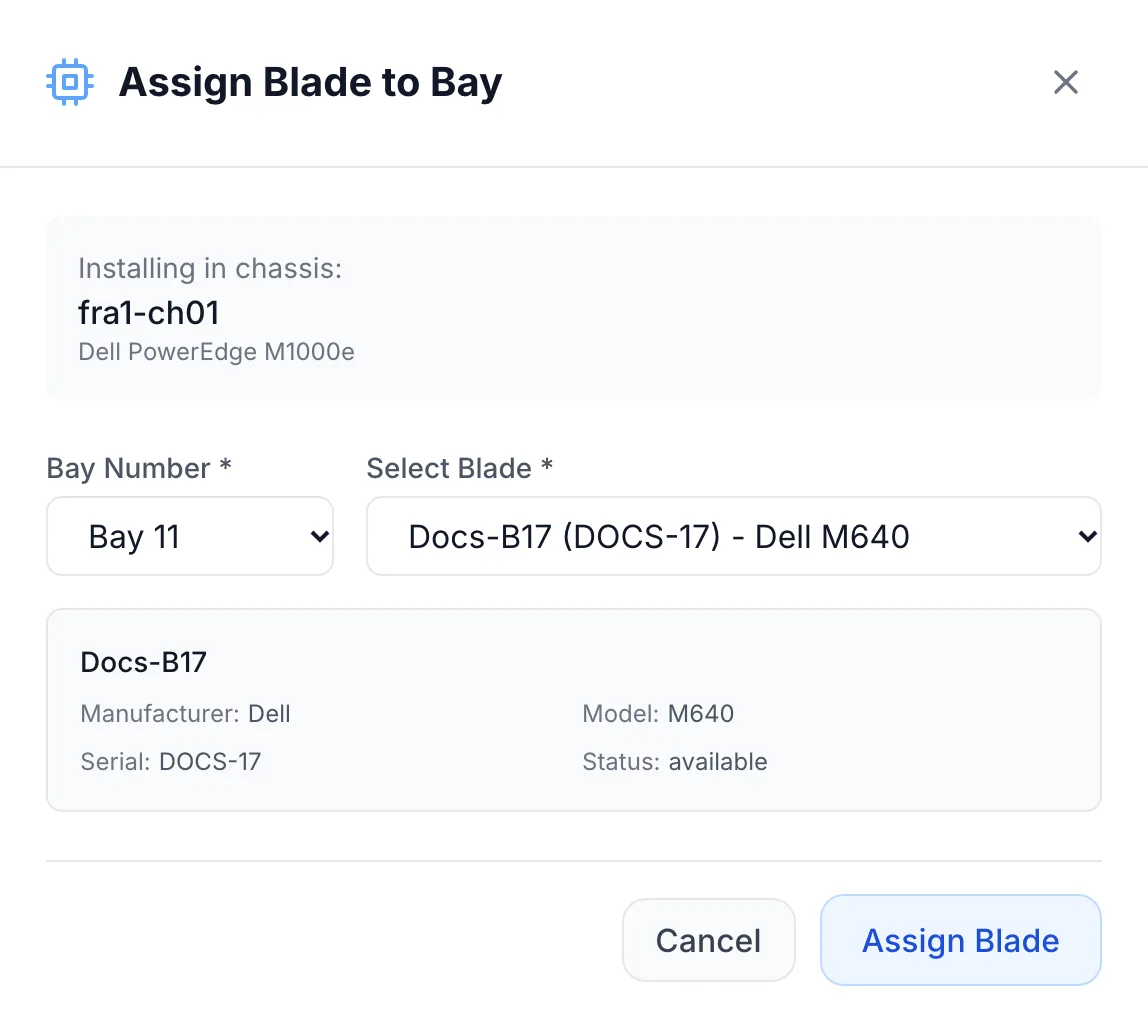
- In the chassis view, click an empty bay tile, or click Add Blade above the grid. Add Blade is greyed out when every bay is full.
- The Assign Blade to Bay dialog opens. It names the chassis under Installing in chassis:.
- Bay Number: the bay you clicked is already selected. If you came from Add Blade, Bay 1 is selected; pick a free bay.
- Select Blade: pick from the blades that are not in any chassis. Each entry shows the name, the serial number in brackets and the make and model. When you pick one, a summary shows its Manufacturer, Model, Serial and Status.
- Click Assign Blade. The confirmation reads Blade assigned, and the bay fills in.
If no blade is free, the dialog says No unallocated blade servers available. and Assign Blade stays greyed out. Assigning does not change the blade's status.
Work with a blade
Click a filled bay to open the blade. It opens in the same full server view as a dedicated server, with specifications, network, credentials, power actions and the OS install action. See Inventory and Bare metal.
For a blade, the Location card is marked (chassis) and adds two rows, Chassis and Bay, for example Bay 4. Country, datacenter and rack come from the chassis and cannot be edited on the blade. To move a blade's location, move its chassis.
Take a blade out of a chassis
Bays cannot be swapped by dragging, and a blade cannot be moved straight to another bay. These are the ways to free a bay, all from the blade's own view, and only while the blade is not allocated to a service:
- Convert to dedicated turns the blade into a dedicated server and frees the bay. It keeps the blade's name, hardware, credentials, status and notes, and the datacenter of the chassis, but it has no rack position yet. Place it in a rack so it shows in the rack diagram. Click Convert to dedicated, then Yes at Convert to dedicated?
- Delete removes the blade record and frees the bay.
To move a blade to another bay or chassis, convert it to a dedicated server, open that server and click Convert to blade, then assign it to the new bay as described above. Convert to blade is offered on dedicated servers that are not allocated.
An allocated blade refuses these actions: Cannot convert an allocated blade. Unallocate it first. or Cannot delete allocated blade. Deallocate from service first.
Delete a chassis
- Empty every bay first. While any blade is in the chassis, Delete is greyed out and its tooltip says Remove all blades first.
- Click Delete at the bottom left of the chassis view.
- At Delete Chassis?, click Yes. The confirmation reads Chassis deleted.
Delete is not shown while the chassis itself is allocated to a service.
Selling blades
Blades are sold through dedicated-server products that reserve a server from inventory. In the product editor's Delivery section, Server type decides whether blades can be picked: Any — standalone or blade, Standalone only or Blade only. See Products and Allocation & Equivalences.
- Only blades with status Available that sit in a chassis are picked. A blade that is not in any chassis is never picked.
- A blade's location is its chassis' location: the location of the chassis' rack, or of the chassis' datacenter. A chassis with no datacenter gives its blades no location, so they never match an order for a specific location.
- The chassis' own status does not decide whether its blades are sold. To keep a blade out of sale, set the blade to Reserved, Maintenance, Faulty or Decommissioned.
- When the service is terminated, the blade is released and can be sold again. See Inventory for what suspension and termination do to the hardware.
Each blade counts toward the dedicated-server limit of your FluxBilling plan, like a rack server. The chassis does not count.
What your customer sees
Customers never see the chassis view. On the customer's invoices, a service that runs on a blade can carry an asset line under the item, with the chassis and bay, for example Asset: Dell PowerEdge M640 · S/N CN7792A0 · Chassis fra1-ch01 Bay 4 · Rack FRA1-R03 / U16-25. The rack and U range are the chassis' own. The line is recorded when the invoice is issued and does not change afterwards.
Troubleshooting
| Message | What it means |
|---|---|
| Please fix validation errors | A chassis row is missing its model, location, datacenter, rack or Start U. The missing fields are outlined in red. |
| Bay number must be between 1 and 16 | The bay number is outside the chassis' bay count (16 in this example). |
| Bay 4 is already occupied or Bay 4 is already occupied by web01 | That bay holds another blade. Pick an empty bay, or free this one first. |
| Blade is already assigned to a chassis | The blade you picked was put in a chassis in the meantime. Reopen the dialog to get a fresh list. |
| Name is required | You saved the chassis with an empty Label. |
| Serial number "…" already exists / Asset tag "…" already exists | Another device already has that serial number or asset tag. |
| Remove all blades first or Cannot delete chassis with blade servers. Remove blades first. | The chassis still has blades. Convert or delete them first. |
| Cannot convert an allocated blade. Unallocate it first. | The blade is sold. Release it from its service before converting it. |
| Failed to load blade servers | The bay grid could not be loaded. Close the chassis view and open it again. |