
Colocation cross-connects
Record the cross-connects of a colocation service: carrier, circuit, cable, both ends and a monthly charge, and what the customer sees.
A cross-connect is the physical cable that joins a colocation customer's equipment to a carrier, another customer or your own network inside the datacenter. FluxBilling keeps a record of every cross-connect on the colocation service it belongs to: the port label, the carrier, the circuit ID, the cable and connector, the speed, both ends of the cable, and an optional monthly charge that is added to the renewal invoices FluxBilling raises for the service. The customer sees their cross-connects on the service page in the client area.
This article covers adding, editing and decommissioning cross-connects, what each field does, how the charge is billed and what the customer sees. For the rest of the colocation service page, see Service Details. For placing colocation space in a rack, see Rack Management.
What you need
- The Colocation module switched on. It is the Colocation switch (Colocation rack space & services) under Settings → General. It depends on Locations: with Locations off, Colocation is off too.
- A colocation service, that is, a service whose product is in your colocation category.
- Rack space linked to the service. The cross-connect list appears only once the service has a colocation block in a rack. Until then the Colocation Details card shows No colocation device linked. and a Locations button. Place the space from the rack diagram as described in Rack Management.
- Staff permissions. Staff need View Services to open the service and see its cross-connects, and Edit Services to add, change or decommission them. See Staff & Permissions.
- Optional, for the device pickers: the Inventory module and View Inventory permission to pick a switch port, and switches whose ports have been read by an SNMP poll (see Network Devices). Patch panels come from your racks and need View Locations (see Patch Panels and Cable Tracing). Without them you can still describe both ends by hand with Custom.
Where to find it
Open Services, click the colocation service, and scroll to the Colocation Details card. Below the location, rack position, power and bandwidth tiles is the Cross-Connects list, with the number of records in brackets and an Add button.
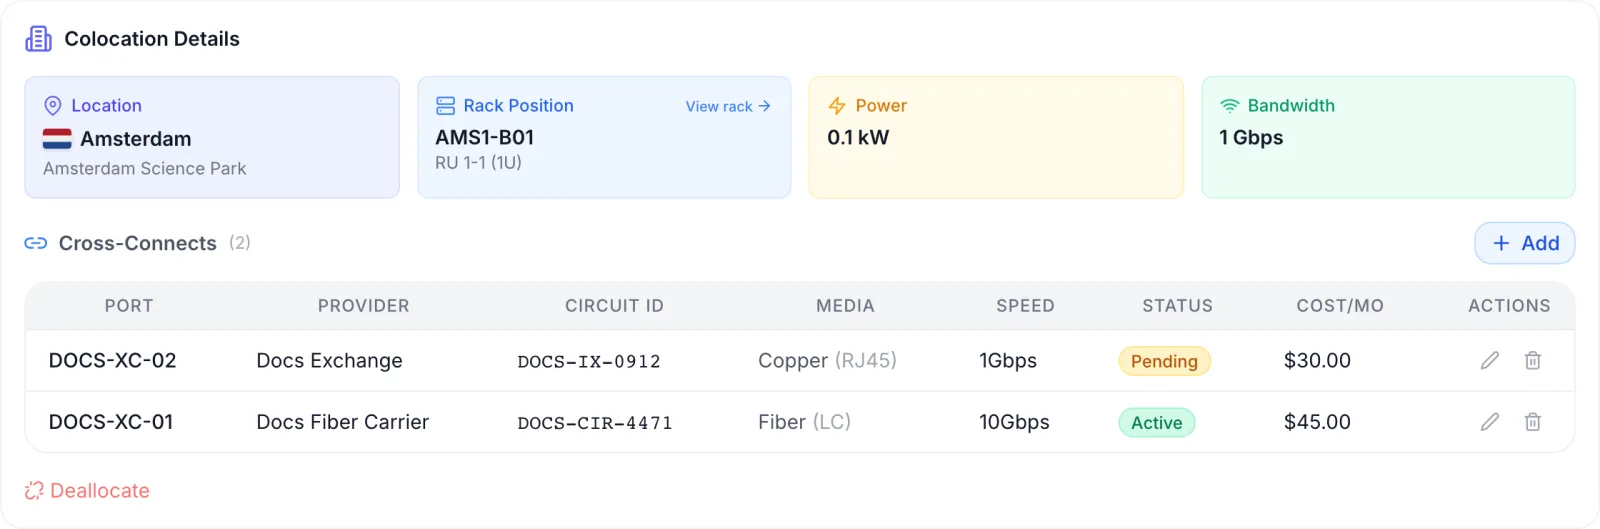
The list is shown while you view the service. It is hidden while the page is in Edit mode, so finish or cancel the edit first.
The table has these columns:
| Column | Shows |
|---|---|
| Port | The Port Label you gave the cross-connect. |
| Provider | The carrier or party on the other end. |
| Circuit ID | The carrier's circuit reference. |
| Media | Fiber, Copper, Coax or Other, with the connector in brackets. |
| Speed | Shown in Mbps, or in Gbps from 1,000 Mbps up. |
| Status | Pending, Active or Decommissioned. |
| Cost/mo | The monthly charge, or a dash when there is none. |
| Actions | Edit (pencil) and Decommission (bin). Decommission is not offered on a cross-connect that is already decommissioned. |
The two ends of the cable, the installed date and the notes are not columns. Open Edit to see them.
Add a cross-connect
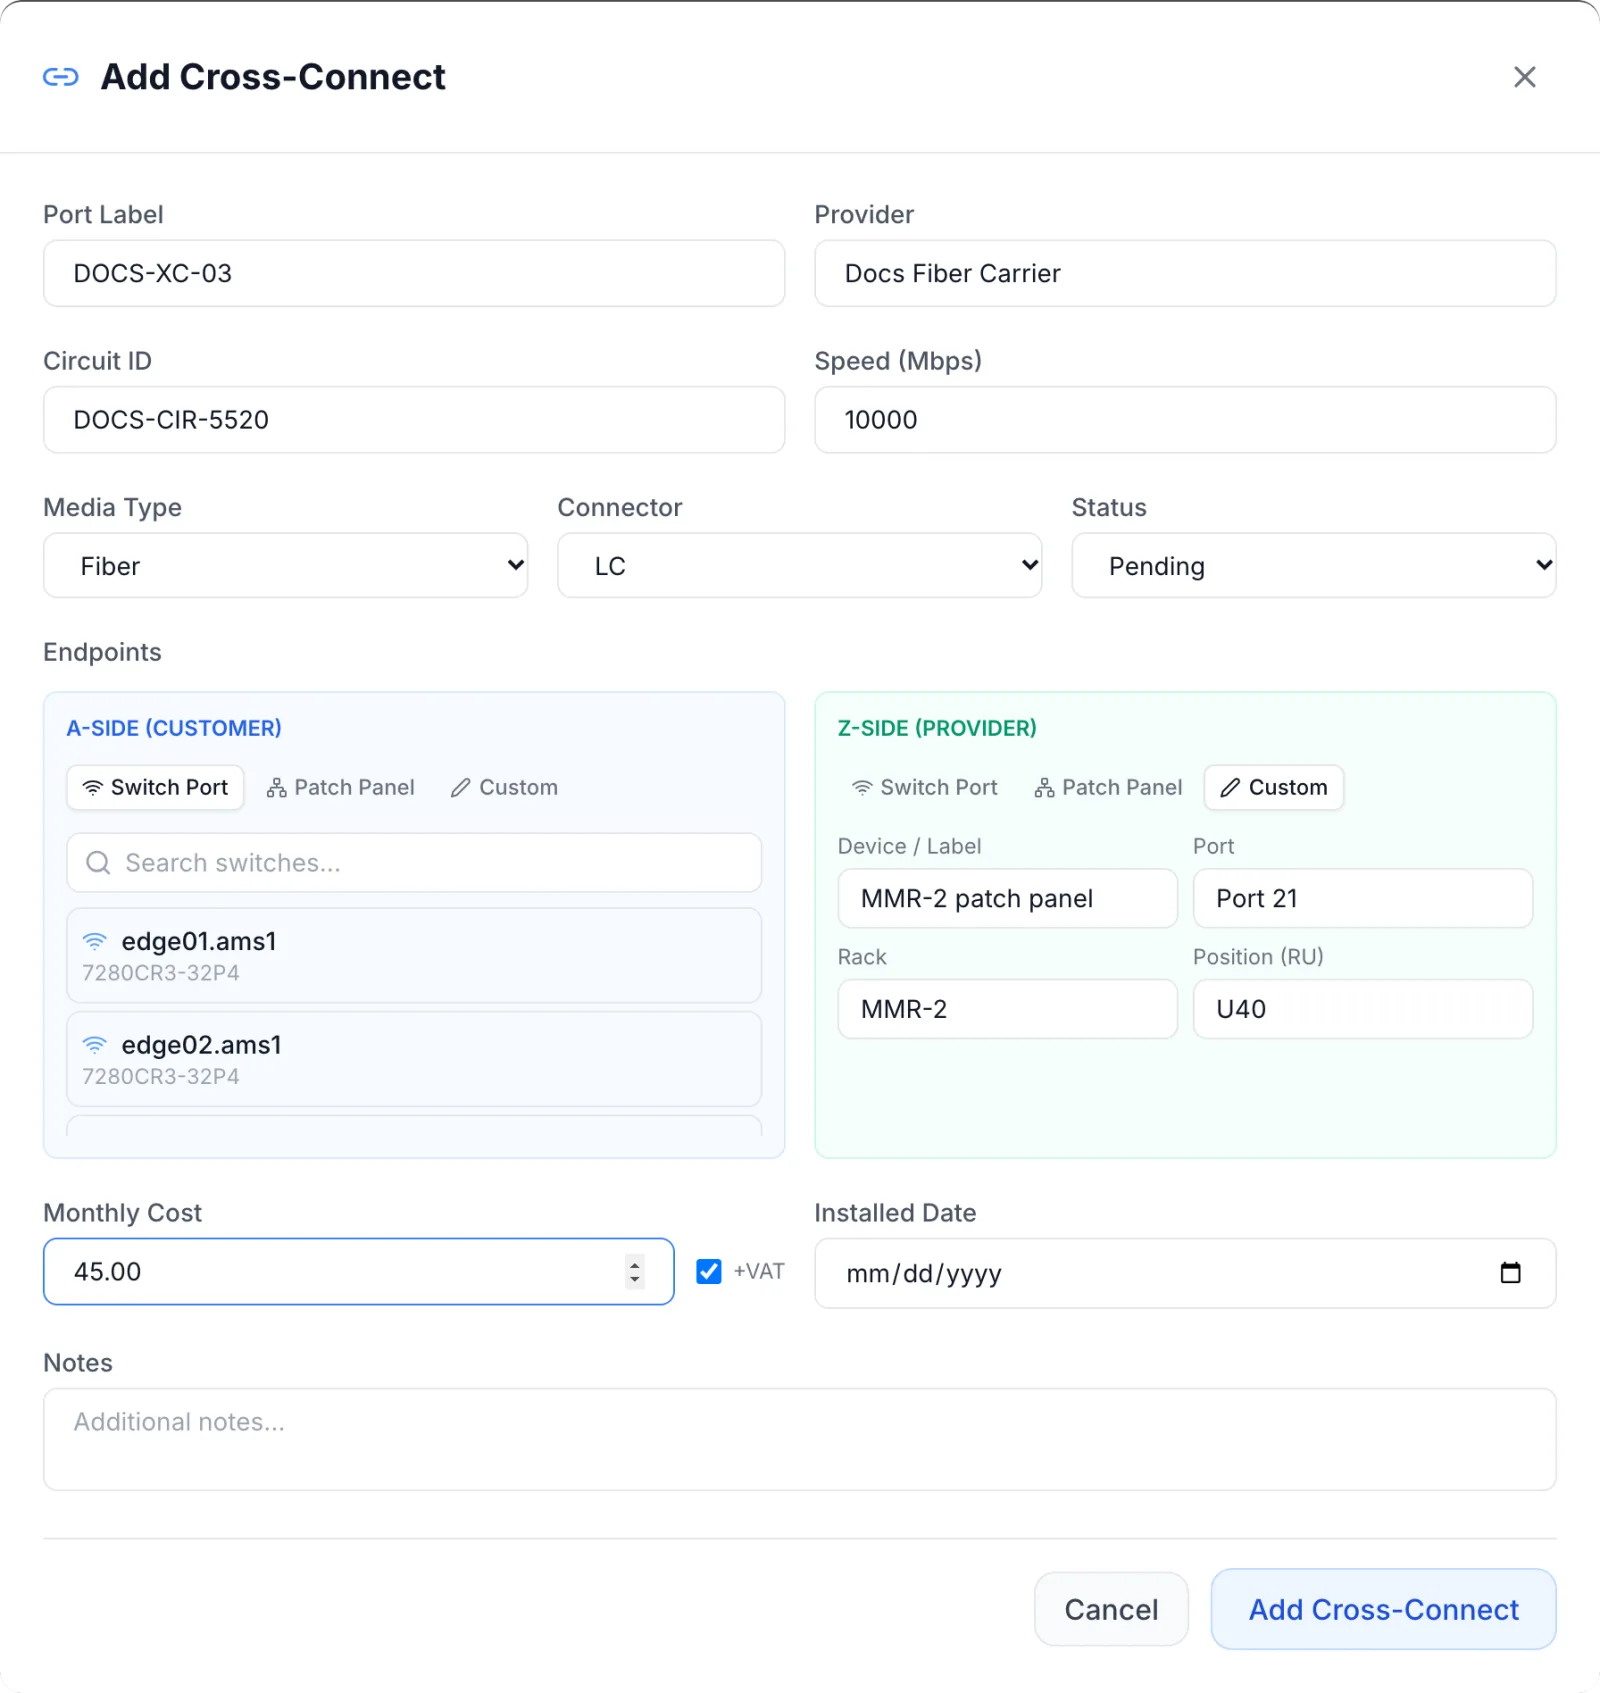
- On the service, click Add in the Cross-Connects list. The Add Cross-Connect dialog opens.
- Fill in the cable details: Port Label, Provider, Circuit ID, Speed (Mbps), Media Type and Connector.
- Choose the Status. New cross-connects start as Pending. Leave it there while the cable is on order, and change it to Active when it is in service.
- Under Endpoints, describe each end of the cable: A-Side (Customer) and Z-Side (Provider). See Endpoints below.
- If you charge for the cross-connect, enter the Monthly Cost and tick or clear +VAT.
- Optionally set the Installed Date and add Notes.
- Click Add Cross-Connect. You see Cross-connect added and the new row appears in the list.
Cable fields
| Field | What it is for |
|---|---|
| Port Label | Your name for the cross-connect, for example XC-001. It is the Port column in both panels and the name on the invoice line. |
| Provider | The carrier, exchange or customer at the far end, for example a carrier's name. |
| Circuit ID | The reference the carrier or datacenter gave the circuit. Quote it when you raise a fault with them. |
| Speed (Mbps) | A whole number in Mbps: 10000 is shown as 10Gbps. |
| Media Type | Fiber, Copper, Coax or Other. |
| Connector | LC, SC, ST, MPO/MTP, RJ45, SFP+, QSFP+ or QSFP28. |
| Status | Pending, Active or Decommissioned. Only Active cross-connects are billed. |
| Monthly Cost | The amount added to the service's renewal invoices, in the service's currency. Leave it empty for a cross-connect that is included in the plan. |
| +VAT | Ticked: VAT is charged on the cross-connect line, at the customer's rate. Cleared: the line is not taxed. Ticked when the dialog opens. |
| Installed Date | The day the cable went live, for your records. |
| Notes | Anything staff should know, such as the order reference or the LOA. Notes are for staff only. |
Endpoints
Each side of the cable has three tabs. The A-Side (Customer) opens on Switch Port and the Z-Side (Provider) opens on Custom; switch either one to whatever fits.
- Switch Port
- Search your switches, routers and firewalls by name or model under Search switches..., click one, then click a port. Ports already connected to a server in the switch's port map are greyed out and marked (in use). The port list comes from the switch's SNMP data: if no poll has run, you see No ports found. Run SNMP poll first. Click Change to pick another device.
- Patch Panel
- Search your patch panels under Search patch panels.... Each panel shows how many ports are free (for example 12 avail). After you pick a panel, choose the Mode: Single Port for one port, or Port Pair for a fibre pair. In Port Pair mode, click the first port (Port 3 selected — click a second port) and then the second (Selected: Port 3 + Port 4). Only ports with nothing patched on the front are listed. If none are free you see No available ports on this panel.
- Custom
- Type the end by hand: Device / Label (for example a meet-me room panel), Port, Rack and Position (RU). Use this for equipment that is not in your inventory, such as the carrier's demarcation panel.
Picking a switch port or a patch-panel port saves the device and port names on the cross-connect. It does not mark that port as connected in the switch's port map or the patch panel's port mapping, so record the patching there as well if you want the port shown as taken.
Rack and Position (RU) are entered on the Custom tab only. For a switch or patch-panel end, the device's own rack placement already says where it is.
Edit a cross-connect
- Click the pencil (Edit) on the row. The Edit Cross-Connect dialog opens with the saved values.
- Change what you need. To bring a cable into service, set Status to Active.
- Click Update Cross-Connect. You see Cross-connect updated.
An end saved from a patch panel reopens on the Patch Panel tab, and an end saved from a switch reopens on Switch Port. To keep an end recorded as a switch port, pick the switch and port again whenever you edit the cross-connect. If you leave that side as it is, the device and port names are kept, but the end reopens on Custom next time.
Decommission a cross-connect
- Click the bin (Decommission) on the row.
- Confirm Decommission this cross-connect?. You see Cross-connect decommissioned.
Decommissioning does not delete the record. The row stays in the list with the status Decommissioned, so you keep the circuit history, and it is no longer billed. If you decommissioned the wrong one, open Edit and set the Status back to Active or Pending. Cross-connects are removed for good only when the whole service is deleted.
How cross-connects are billed
A cross-connect is charged when its Status is Active and it has a Monthly Cost above zero. Each one becomes its own line on the renewal invoices FluxBilling raises automatically for the service, named Cross-Connect: followed by the Port Label (or Cross-Connect: XC when the label is empty), at the Monthly Cost. VAT follows the +VAT box. Any recurring discount on the service applies to the base price only, not to cross-connect lines.
- From the next renewal. The line is added when FluxBilling raises the renewal invoice. Adding or activating a cross-connect does not raise an invoice of its own and is not prorated. If the renewal invoice for the current cycle already exists, the charge starts on the following one.
- Once per renewal invoice. The amount is added once to each automatic renewal invoice, whatever the service's billing cycle. On a service billed quarterly or yearly, enter the amount you want on each renewal.
- Renewals raised by hand carry the service price only. An invoice or proforma raised with Generate Invoice (n) or Generate Proforma (n) on the client's Services tab is built from the service's price and has no cross-connect lines.
- Pending and decommissioned cross-connects are not billed. Use Pending while a cable is on order, so the customer is charged only once it is in service.
When and how renewal invoices are raised is set out in Billing Automation.
Cross-Connects Included
A colocation plan can state how many cross-connects it includes. The number is set on the colocation product (see Products), or per service in the Colocation Details card while the service is in Edit mode. It shows as Cross-Connects Included: above the list. It is a figure for you and the customer: it does not stop you adding more cross-connects, and it does not set any of them free of charge. For a cross-connect that is part of the plan, leave Monthly Cost empty. To sell more cross-connects as an upgrade, see the Resources upgrade in Service Details.
What the customer sees
In the client area, the customer opens the service from Services. Below the Colocation Details card, a Cross-Connects card lists every cross-connect on the service, with the count in brackets, in these columns: Port, Provider, Circuit ID, Media (with the connector), Speed and Status. Decommissioned cross-connects stay in the list with their status.
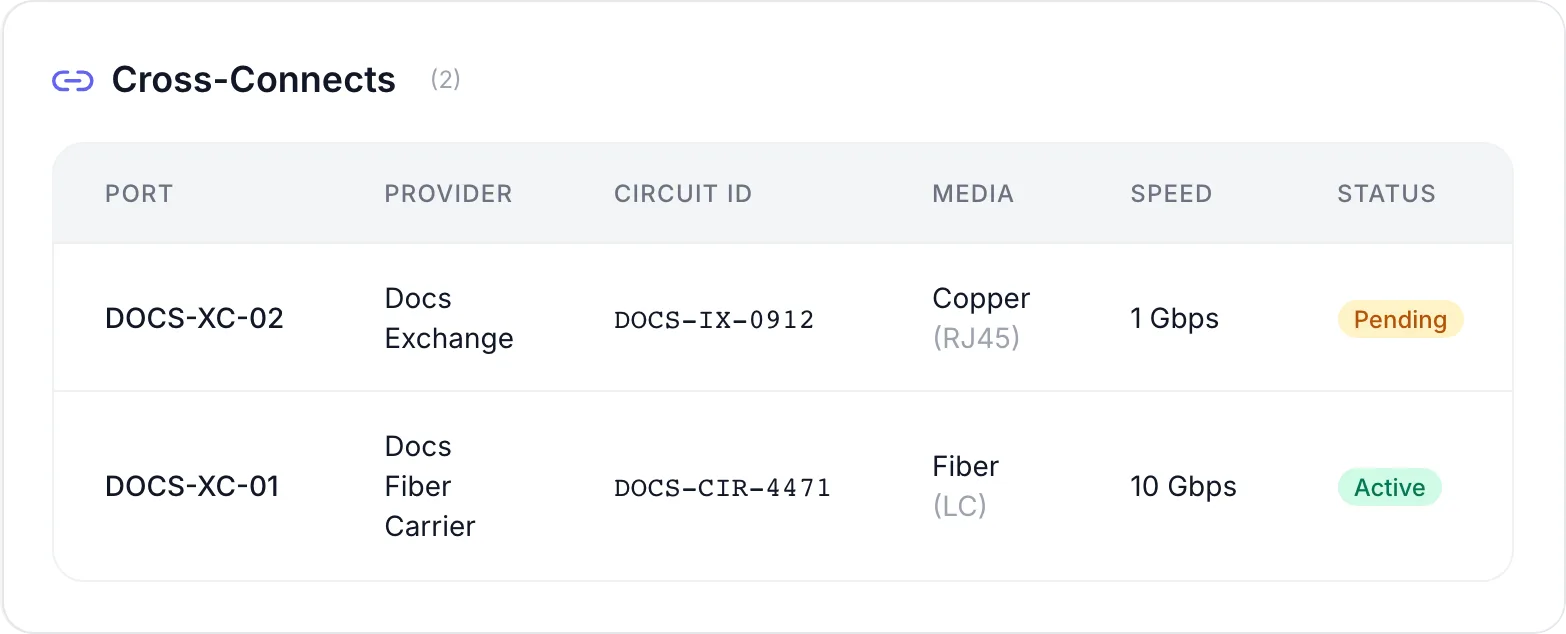
The customer does not see the endpoints, the installed date, the notes or the monthly cost on this card. They see the charge as a line on their renewal invoice. They cannot add or change cross-connects themselves; they ask you, for example through a ticket. The card is shown only when the service has at least one cross-connect and its rack space has been placed; before that, the customer sees Your colocation space is being prepared.
A team member on the customer's account sees the card when their account role lets them view services.
Troubleshooting
- There is no Cross-Connects list on the service
- Check that the page is not in Edit mode, that the product is in your colocation category, and that the card does not say No colocation device linked. In that case place the service's space in a rack first.
- "No network devices found" on the Switch Port tab
- There are no switches, routers or firewalls in your inventory, the Inventory module is off, or your staff role lacks View Inventory. Use Custom instead, or add the device in Inventory.
- "No ports found. Run SNMP poll first."
- FluxBilling has no port list for that switch yet. Set up SNMP on the device and run a poll (see Network Devices), or enter the end as Custom.
- "No patch panels found" or "No available ports on this panel."
- There are no patch panels in your racks, your staff role lacks View Locations, or every front port on the chosen panel is already patched. Free a port in the panel's port mapping, or use Custom.
- "Failed: Service not found" or "Failed: Cross-connect not found"
- The service or the cross-connect was deleted while the page was open. Reload the page.
- The cross-connect is not on the renewal invoice
- Check that its status is Active, that Monthly Cost is above zero, and when the renewal invoice was raised: a charge added after that appears on the next renewal. A renewal raised by hand with Generate Invoice (n) or Generate Proforma (n) does not include cross-connect lines.