
Email Suppressions and Mail Preferences
Block mail to an address, handle bounces, and set a client's email preferences, and find out why a client did not receive an email.
FluxBilling has two separate ways to stop email going to someone: suppressions and notification preferences. A suppression means the platform must not send to an address. It is set by your staff or added automatically when an address bounces. A notification preference means the client has chosen not to receive a type of email. The client sets it in their client area, or your staff set it for them. Every notification and campaign email the platform sends to clients and other recipients is checked against both before it goes out, including invoices, reminders, ticket mail, service mail, campaigns and newsletters.
This article explains both controls, where to find them, what each option blocks and how to work out why a client did not get an email.
Suppressions and preferences compared
| Suppression | Notification preference | |
|---|---|---|
| What it means | Do not send to this address. | This client does not want this type of email. |
| Applies to | An email address, whether or not it belongs to a client account. | A client account. |
| Who sets it | Your staff, or the platform when an address bounces. | The client, or your staff on the client's behalf. |
| How fine-grained | Five mail categories, or Everything. | Groups of emails and individual emails, plus News and offers. |
| Can stop password resets and two-factor codes | Yes, but only when a staff member blocks Account & security or Everything. | No. Those emails are always on. |
| Where you manage it | The Suppressions page, or Mail controls on a client's Emails tab. | Notification preferences on a client's Emails tab. |
| Status in the email log | Suppressed | Opted out |
Where to find them
- For one client: open the client from Clients and go to the Emails tab. Two cards sit above the client's email log: Mail controls (suppressions for the client's email address) and Notification preferences. Each card shows a one-line summary. Click Manage to open it.
- For all addresses: the Suppressions page lists every blocked address, including addresses that do not belong to a client. Open it with the Suppressions button at the top of the Email Logs page.
- For the client: clients manage their own preferences in the client area under Settings → Notifications. See Notification preferences for the client's view.
You do not need to turn on a feature for either control. Each needs a staff permission (see Staff and permissions):
- Mail controls and the Suppressions page need View Settings. That permission covers viewing, blocking and releasing.
- Opening the Notification preferences card needs View Clients or Edit Clients. Changing a switch needs Edit Clients.
Mail categories
A suppression blocks one category of mail for an address, or all of them. The platform works out the category of each email from the type of notification it is.
| Category | Description shown in the panel | What it blocks |
|---|---|---|
| Account & security | Password resets, two-factor codes, email verification, welcome letters. | Account emails. Blocking this category leaves the person no way to reset a password or receive a sign-in code by email. |
| Invoices & payments | Invoices, reminders, overdue notices, payment receipts, licence delivery. | Invoice, payment and licence emails. |
| Services & orders | Activation, suspension, renewal reminders, provisioning and order updates. | Service and order emails, including the activation emails that carry login details. |
| Tickets | Ticket created, replies and closures. | Ticket emails. This category also covers any other email that is not in one of the categories above and is not a campaign or newsletter, such as credit, hourly-billing and team emails. |
| Marketing | Broadcasts and newsletters only. Transactional mail still goes out. | Campaigns and newsletters. |
| Everything | Every category, including account and security mail. | All mail to the address. |
Why an address is suppressed
The Reason column shows how each block was added:
| Reason | How it is added |
|---|---|
| Set by staff | A staff member blocked the address with Block an address or the Mail controls card. |
| Hard bounce | Added automatically when an address turns out not to exist. This happens in two cases. First, your mail server rejects the address while the platform is sending, either with a 5.1.x status code or with a 550–553 reply saying that the user, mailbox or recipient does not exist. Second, a bounce report with a 5.1.x status reaches a mailbox connected to a department. The bounce diagnostic is saved in the Detail column. |
| Spam complaint | The address was reported for marking a message as spam. Only the platform sets this reason, never staff. |
| Unsubscribed | Added, for example, when News and offers is switched off in the client's notification preferences. The detail reads Set from notification preferences. |
An automatic block never touches account mail. A hard bounce or spam complaint block is added as four separate blocks, for Marketing, Tickets, Services & orders and Invoices & payments. Account & security stays open, so if the client fixes their mailbox they can still reset their password. Only a staff member can block Account & security or Everything.
A softer delivery failure, such as a full mailbox or a temporary error, does not add a block. A message that is too large does not add one either.
The Suppressions page
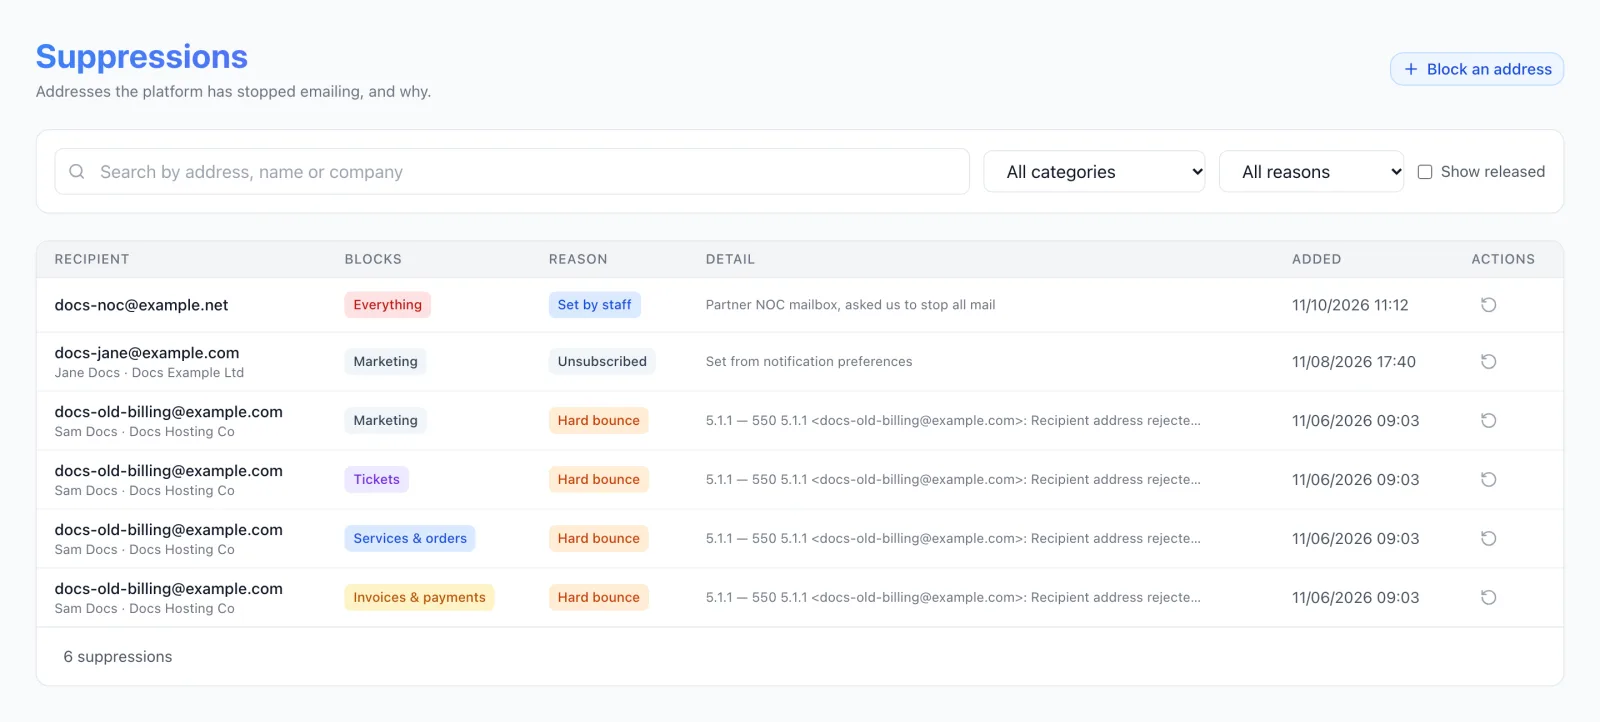
The page heading is Suppressions, with the subtitle Addresses the platform has stopped emailing, and why. It lists active blocks, newest first.
Filters
- Search: matches the email address and the client's first and last name.
- All categories: shows only blocks in one category, such as Marketing or Invoices & payments.
- All reasons: shows only Set by staff, Hard bounce, Spam complaint or Unsubscribed blocks.
- Show released: also shows blocks that have been lifted. They appear faded, with a Released date under the date they were added.
Columns
- Recipient: the address, with the client's name and company underneath when the address belongs to a client account. Addresses with no account, such as a partner's NOC mailbox or an extra notification recipient, show the address only.
- Blocks: the category that is blocked.
- Reason: how the block was added (see above).
- Detail: the note entered by staff, or the bounce diagnostic. Hover over a long detail to read all of it.
- Added: when the block was created.
- Actions: the Allow mail again button (a circular arrow) lifts the block.
The footer counts every matching block, for example 6 suppressions. The table shows the 200 most recent matches. If the count is higher, use the search box or the filters to find an address. When nothing is blocked, the page reads Nothing is suppressed. Every address the platform knows about is receiving mail.
Block an address
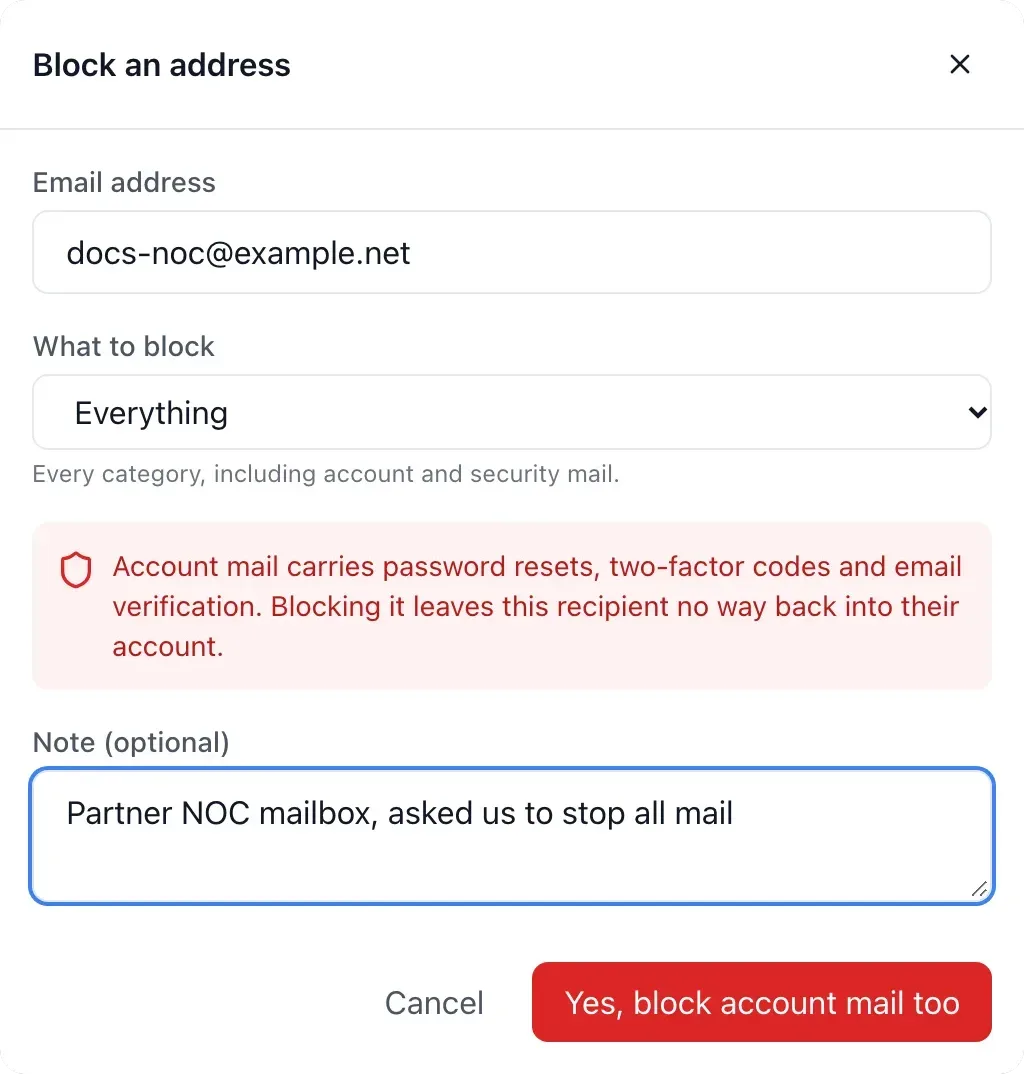
- Click Block an address.
- Enter the Email address. Any address can be blocked, whether or not it belongs to a client.
- Choose What to block. The dialog opens with Marketing selected, and the description of the selected category appears under the list.
- Optionally add a Note (optional) explaining why, such as a ticket number. It appears in the Detail column.
- Click Block.
If you choose Account & security or Everything, the dialog shows a warning: Account mail carries password resets, two-factor codes and email verification. Blocking it leaves this recipient no way back into their account. The button changes to Yes, block account mail too.
Addresses are matched case-insensitively, so Docs@Example.com and docs@example.com are the same address. If the category is already blocked for that address, the existing block is updated instead of a second one being added. Its reason becomes Set by staff and its note is replaced.
Allow mail again
Click the Allow mail again button on a row. The block is lifted straight away, without a confirmation step. It is not deleted: turn on Show released to see it with the date it was released. An address that keeps bouncing will show several released hard-bounce rows, which is a sign that the mailbox really is gone.
Lifting a block only affects future mail. Emails that were blocked earlier are not sent automatically. If the client needs one of them, send it again from where it started, for example by sending the invoice again.
Mail controls on a client
The Mail controls card on a client's Emails tab shows the same suppressions, limited to the client's account email address. The summary reads Nothing blocked, 1 category blocked or 2 categories blocked (and so on), or All mail blocked. Click Manage to open it.
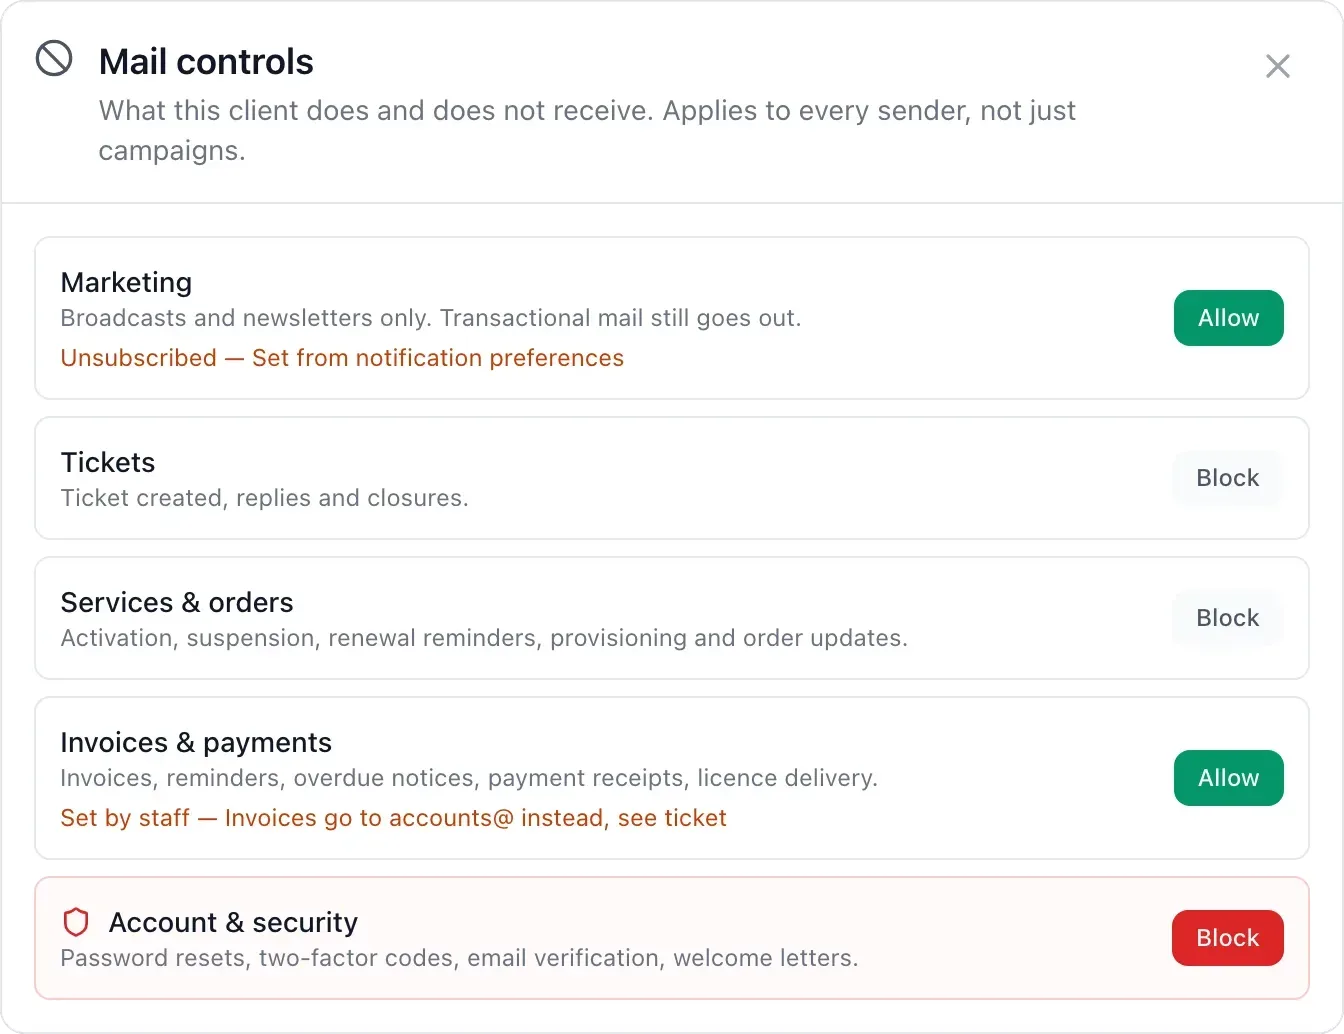
The window lists the categories in this order: Marketing, Tickets, Services & orders, Invoices & payments and Account & security. Each row has one button:
- Block adds a Set by staff block for that category.
- Allow (green) lifts the block, whatever its reason. A blocked row shows its reason and note under the description, for example Hard bounce followed by the bounce diagnostic.
Changes take effect as soon as you click. Account & security is highlighted in red because blocking it stops password resets and two-factor codes. Unlike the Block an address dialog, this window does not ask you to confirm, so click it only when you mean it.
If the address has an Everything block, the window shows All mail to this address is blocked, including account and security messages. Release the blanket block to control categories individually. All the buttons are then greyed out. To lift the blanket block, open the Suppressions page, find the Everything row for the address and click Allow mail again.
Mail controls cover only the client's account email address. Other addresses, such as team members or extra contacts, are managed on the Suppressions page. Blocks follow the address, not the account. If a client changes their email address, blocks on the old address stay where they are, and the new address starts with none.
Notification preferences on a client
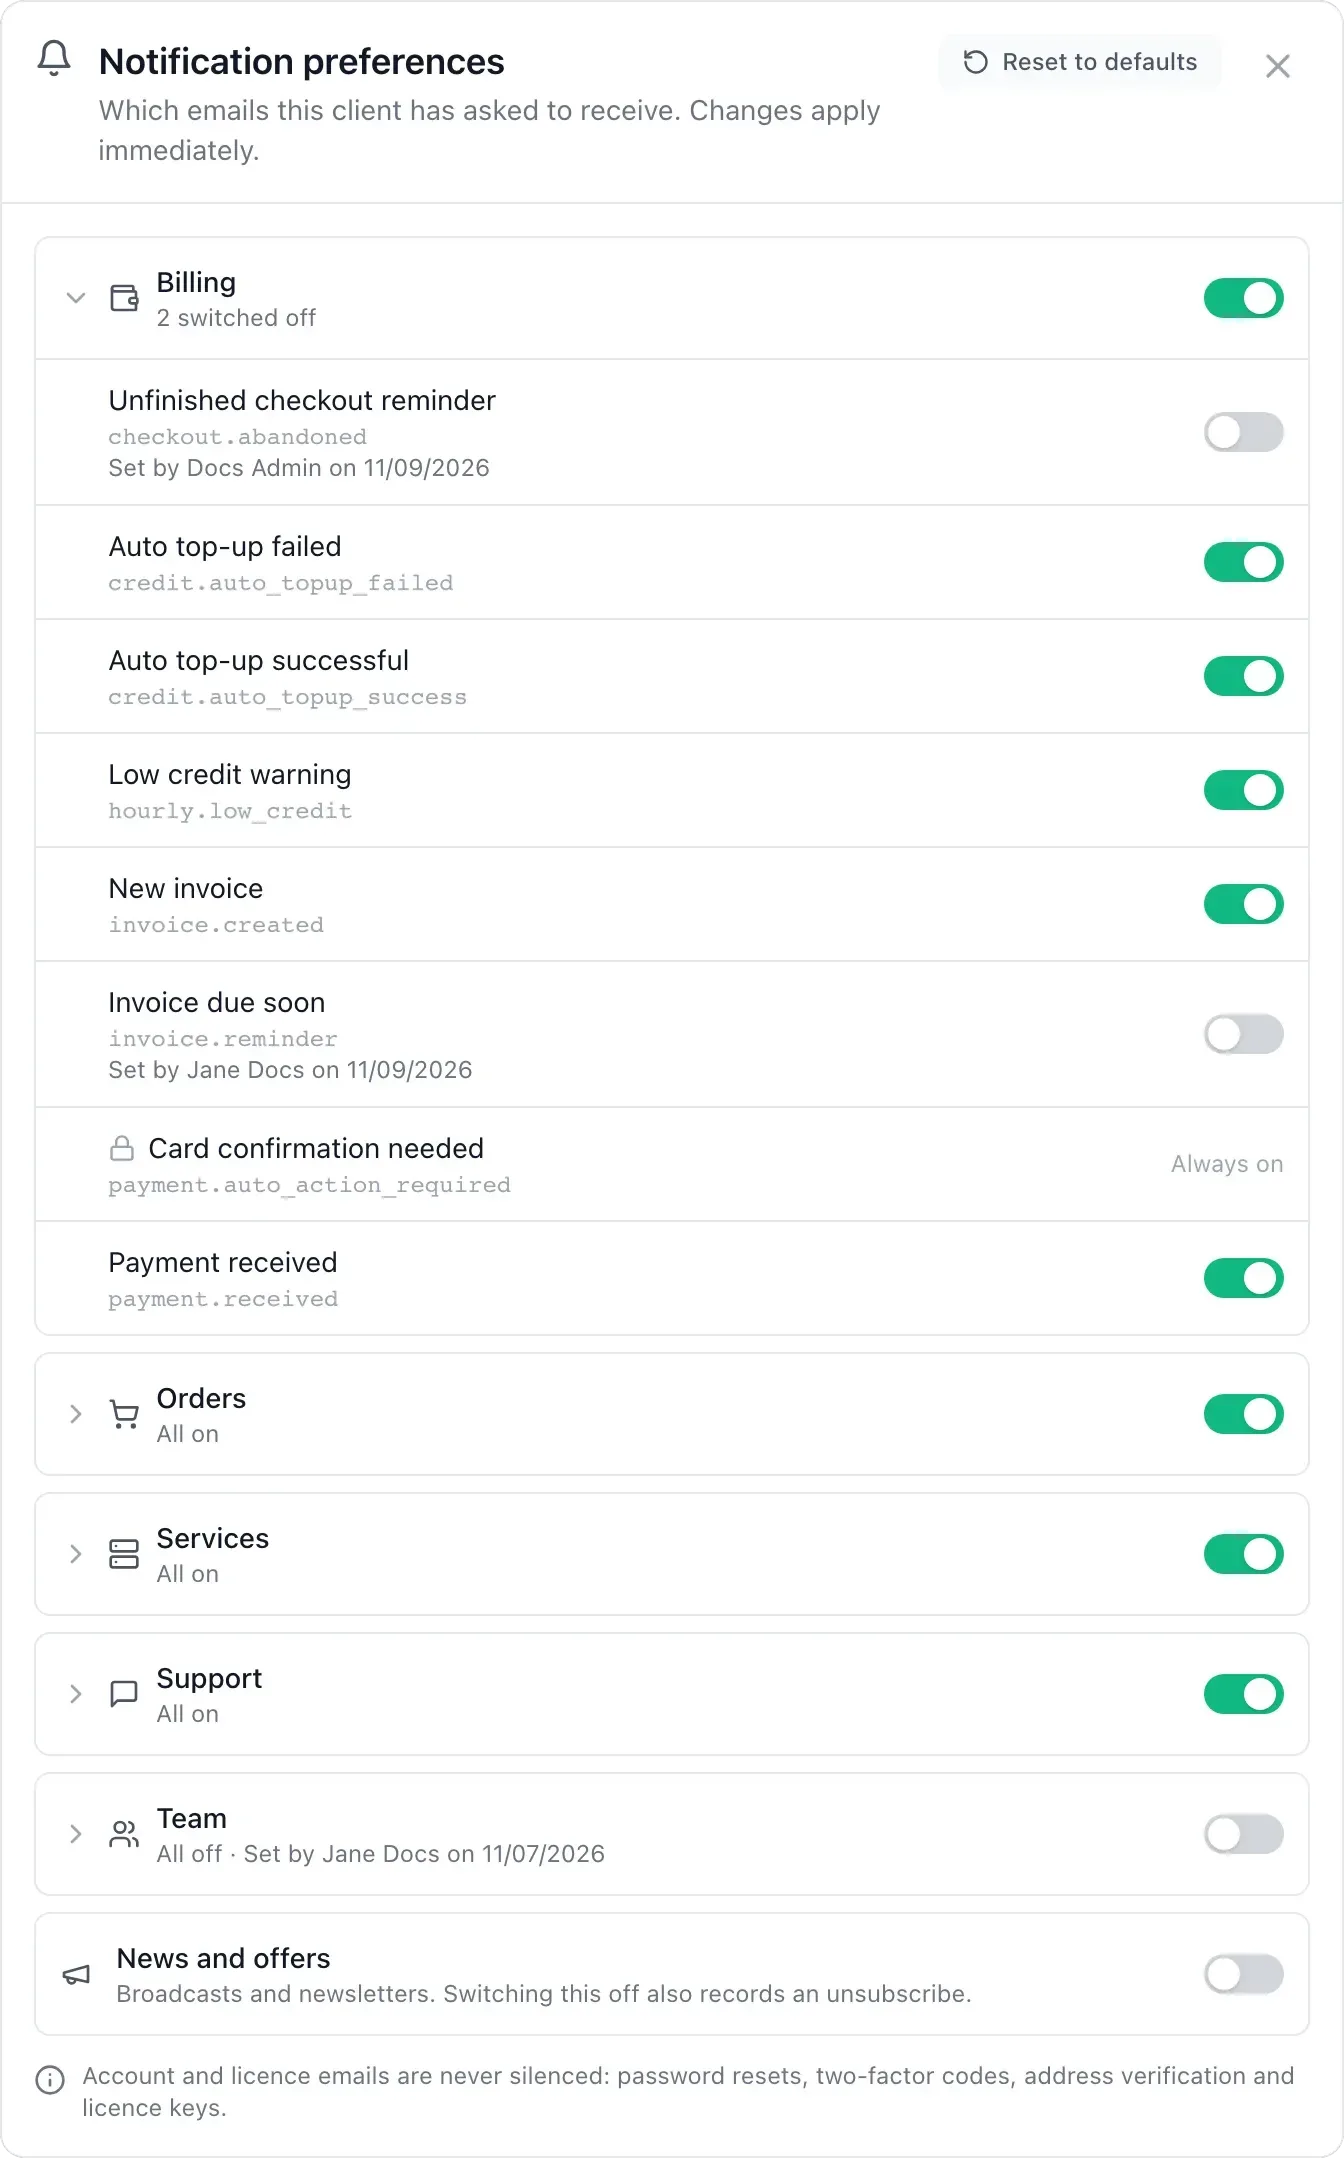
The Notification preferences card shows the email choices for the client's account. These are the same switches the client sees in their own client area. Use it when a client asks in a ticket to stop or restart an email, so you do not have to walk them through the settings. The summary reads All on or, for example, 3 switched off. Click Manage to open it. The subtitle reads Which emails this client has asked to receive. Changes apply immediately.
Groups and switches
Emails are grouped under Billing, Orders, Services, Support and Team. A group only appears if it contains at least one email that your platform can send.
- The switch on a group row turns the whole group on or off. The line under the group name reads All on, All off or, for example, 2 switched off.
- Click the group name to expand it. Each email shows its name, its notification type in small text and its own switch.
- When a group is off, its emails show a dash instead of a switch. The group switch overrides them until it is turned back on, and their own settings are kept for when it is.
- After a change, the group or email shows Set by <name> on <date>. The name is a staff member's or the client's, so you can see who made the change. If that account has since been deleted, it reads a deleted account.
Only emails that are switched on in your email settings and have a template are listed. If you turn an email off for the whole platform, it disappears from this list. The client's choice for it is kept and comes back if you turn the email on again.
Emails that are always on
Two emails in the list cannot be switched off. They show a padlock and the label Always on:
- Card confirmation needed, which asks the client to confirm a card payment with their bank;
- Team invitation, which contains the link a new team member uses to join.
Account emails (such as password resets, two-factor codes and address verification), licence emails and reseller account emails (approved, rejected, suspended, reactivated) cannot be switched off either, and they are not listed at all. The note at the bottom of the window covers them: Account and licence emails are never silenced: password resets, two-factor codes, address verification and licence keys. This applies only to preferences. A staff suppression on Account & security or Everything still blocks these emails.
Emails that carry login details
Service activated (login details) and Server ready (login details) are marked Carries the server login details. These emails are the only place a new server's root password is sent, and the client area does not display it. Switching either one off asks for confirmation first: This email is the only place a new server’s root password is sent, and the client panel does not display it. With it off, any server built from now on reaches this client without login details. Switch it off anyway? Click Switch it off to go ahead.
News and offers
News and offers controls campaigns and newsletters. Its description reads Broadcasts and newsletters. Switching this off also records an unsubscribe.
- Switching it off marks the account as unsubscribed from campaigns and adds a Marketing suppression with the reason Unsubscribed.
- Switching it on clears the unsubscribe and lifts Marketing blocks for the address, including staff blocks. It does not lift Hard bounce or Spam complaint blocks, and it does not lift an Everything block. Lift those on the Suppressions page.
- If the client unsubscribes with the link in a campaign email, News and offers also shows as off.
Reset to defaults
Reset to defaults clears every group and email choice on the account, so the client receives all emails again. It is greyed out when nothing has been changed, and the window then reads Nothing changed — this client receives every email the platform sends. Reset does not change News and offers, because a marketing opt-out is a standing instruction from the client. To change it, use its switch.
What the client sees
Clients never see suppressions. They see their own notification preferences under Settings → Notifications, on a card titled Email notifications. It has the same groups, switches, Always on labels, login-details warning and News and offers switch as the staff window. The note at the bottom reads Password resets, two-factor codes and licence keys are always sent — they are how you get back into your account. Changes you make on the client's behalf appear there straight away, and the client's changes appear on your card with their name. Clients have no reset button. See Notification preferences for the full client-side guide.
What happens to a blocked email
A blocked email is not sent, but it is still logged. It appears in the client's email log on the Emails tab and on the Email Logs page:
- Suppressed (shown as suppressed on the Email Logs page): a suppression stopped the email. The entry records the category and reason of the block. To fix it, lift the block in Mail controls or on the Suppressions page.
- Opted out: the client's notification preferences stopped the email. To fix it, turn the switch back on in Notification preferences if the client wants it.
Suppressions are checked first. An email can still be suppressed even if the client's preferences allow it, and that includes an Always on email. The message body is not stored for a blocked email, and there is nothing to retry. Once the block is lifted, send the email again from where it started.
When a bounce report arrives for an address that was emailed in the last seven days, entries that showed sent to that address are changed to bounced, with the bounce diagnostic.
Troubleshooting
| Problem | What to check |
|---|---|
| A client says they never received an invoice | Open the client's Emails tab and find the invoice email. Suppressed means a block: open Mail controls and allow Invoices & payments. Opted out means the client switched it off: check the Billing group in Notification preferences. |
| Every button in Mail controls is greyed out | The address has an Everything block. Lift it on the Suppressions page with Allow mail again. |
| A block keeps coming back after you lift it | The address still bounces. Each rejected send adds new Hard bounce blocks. Ask the client to fix the mailbox or change their email address. Released rows (turn on Show released) show how often it has happened. |
| A client is not receiving password reset emails | Look for an Account & security or Everything block. Automatic blocks never cover account mail, so a staff member added it. |
| News and offers will not stay on | The address has a Hard bounce or Spam complaint block on Marketing, or an Everything block. Turning the switch on does not lift these. Release them on the Suppressions page. |
| A new server arrived without login details | Check Service activated (login details) and Server ready (login details) under Services in Notification preferences, and check for a Services & orders block in Mail controls. Turning them back on only affects servers built afterwards. |
| Allow mail again shows Suppression not found or already released | Someone else already lifted that block. Reload the page. |
| Block an address rejects the address | The address is not a valid email address. Check it for typos and spaces. |
| Mail controls shows an error message when you open it | Your account lacks View Settings. Ask an administrator to add it to one of your departments. |